题目原地址:https://github.com/gzr2017/ImageProcessing100Wen
我的github地址:https://github.com/LeonG7/image_100question
前言:
这是图像处理100题的题目记录以及我自己写的参考代码,感谢@gzr2017提供中文翻译。
所有代码由jupyter book软件导出,如需可执行源代码,请在我的github下载。
如有任何问题或错误,欢迎在评论区讨论和指正
图像处理11~20题
读取图片:
import cv2
import matplotlib
from matplotlib import pyplot as plt
import numpy as np
%matplotlib inline

#如果没有安装opencv的话,这里可以替换成matplotlib读取图片
img = cv2.imread("imori.jpg")
img_noise = cv2.imread("imori_noise.jpg")
img_dark = cv2.imread("imori_dark.jpg")
#使用matplotlib输出图片,所以要将BGR格式预先转为RBG格式
img = img[:,:,[2,1,0]]
img_noise = img_noise[:,:,[2,1,0]]
img_dark = img_dark[:,:,[2,1,0]]
#灰度化
def gray(img):
    newimg = img[:,:,0]*0.2126 + img[:,:,1]*0.7152 + img[:,:,2]*0.0722
    return newimg
#进行3×3滤波
def getarea(img,padding,method):
    #建立一个新的数组,该数组用于保存计算的高斯滤波值,所以要去掉padding
    #判断是单通道还是多通道(灰度or彩色)
    if len(img.shape)>2:
        result = np.zeros([img.shape[0]-2*padding,
                      img.shape[1]-2*padding,
                      img.shape[2]],dtype="uint8")
    else:
        result = np.zeros([img.shape[0]-2*padding,
                      img.shape[1]-2*padding],dtype="uint8")

    for i in range(int(img.shape[0]-2)):
        for j in range(int(img.shape[1]-2)):
            area = img[i:i+3,j:j+3]
            #均值滤波器
            if method=="average":
                result[i,j] = avgFilter(area)
            #运动滤波器
            if method=="motion":
                result[i,j] = motFilter(area)
            #max-min滤波器
            if method=="maxmin":
                result[i,j] = maxminFilter(area)
            #差分滤波器(纵向)
            if method=="differential_v":
                result[i,j] = diffFilter(area,True)
            #差分滤波器(横向)
            if method=="differential_h":
                result[i,j] = diffFilter(area,False)
            #Sobel滤波器(纵向)
            if method=="sobel_v":
                result[i,j] = sobelFilter(area,True)
            #Sobel滤波器(横向)
            if method=="sobel_h":
                result[i,j] = sobelFilter(area,False)
            #Prewitt录波器(纵向)
            if method=="prewitt_v":
                result[i,j] = prewittFilter(area,True)
            #Prewitt录波器(横向)
            if method=="prewitt_h":
                result[i,j] = prewittFilter(area,False)
            #拉普拉斯滤波器
            if method=="laplacian":
                result[i,j] = laplacianFilter(area)
            #Emboss滤波器
            if method=="emboss":
                result[i,j] = embossFilter(area)
            #高斯滤波器
            if(method=="gaussian"):
                result[i,j] = gaussFilter(area)
            #中值滤波器
            if(method=="median"):
                result[i,j] = medianFilter(area)
    return result
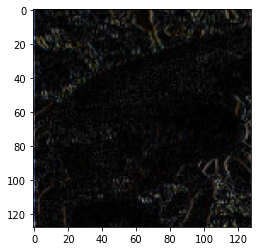
1.均值滤波器
在滤波器中,取范围内的中值数填入中心点
def padding(img,s=1):
    #先加行
    rows = np.zeros((s,img.shape[1],img.shape[2]),dtype="uint8")
    #再加列,这时候列长已经扩充 2*s,也就是(128×128) -> (129×129)
    columns = np.zeros((img.shape[0]+(2*s),s,img.shape[2]),dtype="uint8")
    #拼接
    img = np.vstack((rows,img,rows))
    img = np.hstack((columns,img,columns))
    return img
def avgFilter(area):
    #拉成一条,并且转置为横向
    area = area.reshape(-1,3).T
    #进行排序后取出中间值
    newk = area.mean(axis = 1)
    return newk
imgshow = plt.imshow(img)
plt.show()

img1 = img.copy()
img1 = padding(img1,1)
img1 = getarea(img1,1,"average")
imgshow = plt.imshow(img1)
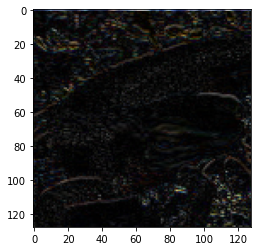
2.运动滤波器(Motion Filter)
使用 的Motion Filter来进行滤波吧。
Motion Filter取对角线方向的像素的平均值,像下式这样定义:
在滤波器中,取范围内的对角线的平均值填入中心点
def motFilter(area):
    #拉成一条,并且转置为横向
    area = area.reshape(-1,3).T
    #取出对角线的值,计算平均数
    area = area[:,[0,4,8]]
    newk = area.mean(axis=1)

    return newk
imgshow = plt.imshow(img)
plt.show()

img2 = img.copy()
img2 = padding(img2,1)
img2 = getarea(img2,1,"motion")
imgshow = plt.imshow(img2)
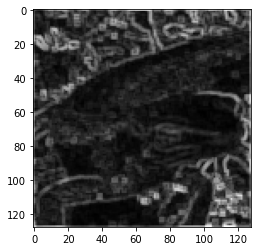
3.MAX-MIN滤波器
使用MAX-MIN滤波器来进行滤波吧。
MAX-MIN滤波器使用网格内像素的最大值和最小值的差值对网格内像素重新赋值。通常用于边缘检测。
边缘检测用于检测图像中的线。像这样提取图像中的信息的操作被称为特征提取。
边缘检测通常在灰度图像上进行。
def maxminFilter(area):
    #拉成一条,并且转置为横向
    area = area.reshape(-1,1).T
    #取出对角线的值,计算平均数
    newk = area.max(axis=1)-area.min(axis=1)
    return newk
imgshow = plt.imshow(img)
plt.show()

img3 = img.copy()
img3 = padding(img3,1)
#灰度化
img3 = gray(img3)
img3 = getarea(img3,1,"maxmin")
imgshow = plt.imshow(img3,cmap='gray')
4.差分滤波器(Differential Filter)
使用 的差分滤波器来进行滤波吧。
差分滤波器对图像亮度急剧变化的边缘有提取效果,可以获得邻接像素的差值。
纵向:
横向:
纵向:在滤波器中,取范围内中心点的值和上方的值,两者之差填入中心点
横向:在滤波器中,取范围内中心点的值和左方的值,两者之差填入中心点
注意:有可能用较大值减去较小值
比如:180-181 = -1,由于数据类型是uint8,自动变成255
所以要取相减之后的绝对值
def diffFilter(area,isDirection):
    #isDirection为真是纵向,否则为横向
    #拉成一条,并且转置为横向
    area = area.reshape(-1,3).T
    #取出对角线的值,计算平均数
    x = area[:,4].astype(np.int)
    if isDirection:
        y = area[:,1].astype(np.int)
    else:
        y = area[:,3].astype(np.int)
    newk = np.abs(x-y).astype(np.uint8)
    return newk
imgshow = plt.imshow(img)
plt.show()

img4 = img.copy()
img4 = padding(img4,1)

img4_1 = getarea(img4,1,"differential_v")
imgshow = plt.imshow(img4_1)
plt.show()
img4_2 = getarea(img4,1,"differential_h")
imgshow = plt.imshow(img4_2)
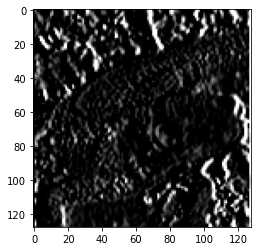
5.Sobel滤波器
使用 的Sobel滤波器来进行滤波吧。
Sobel滤波器可以提取特定方向(纵向或横向)的边缘,滤波器按下式定义:
纵向:
横向:
def sobelFilter(area,isDirection):
    #isDirection为真是纵向,否则为横向
    #拉成一条,并且转置为横向
    area = area.reshape(-1).T
    if isDirection:
        c = np.array([1,2,1,0,0,0,-1,-2,-1]).reshape(-1,1)
    else:
        c = np.array([1,0,-1,2,0,-2,1,0,-1]).reshape(-1,1)
    #计算滤波
    newk = np.dot(area,c)
     #将小于0的置0,大于255的置255
    newk = np.clip(newk, 0, 255)
    #转回uint8类型
    newk = newk.astype(np.uint8)
    return newk
imgshow = plt.imshow(img)
plt.show()

img5 = img.copy()
img5 = padding(img5,1)
img5 = gray(img5)
img5_1 = getarea(img5,1,"sobel_v")
imgshow = plt.imshow(img5_1,cmap="gray")
plt.show()
img5_2 = getarea(img5,1,"sobel_h")
imgshow = plt.imshow(img5_2,cmap="gray")
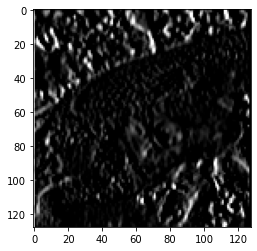
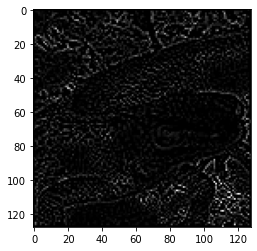
6.Prewitt滤波器
使用 的Prewitt滤波器来进行滤波吧。
Prewitt滤波器是用于边缘检测的一种滤波器,使用下式定义:
纵向:
横向:
def prewittFilter(area,isDirection):
    #isDirection为真是纵向,否则为横向
    #拉成一条,并且转置为横向
    area = area.reshape(-1).T
    if isDirection:
        c = np.array([-1,-1,-1,0,0,0,1,1,1]).reshape(-1,1)
    else:
        c = np.array([-1,0,1,-1,0,1,-1,0,1]).reshape(-1,1)
    #计算滤波
    newk = np.dot(area,c)
     #将小于0的置0,大于255的置255
    newk = np.clip(newk, 0, 255)
    #转回uint8类型
    newk = newk.astype(np.uint8)
    return newk
imgshow = plt.imshow(img)
plt.show()

img6 = img.copy()
img6 = padding(img6,1)
img6 = gray(img6)
img6_1 = getarea(img6,1,"prewitt_v")
imgshow = plt.imshow(img6_1,cmap="gray")
plt.show()
img6_2 = getarea(img6,1,"prewitt_h")
imgshow = plt.imshow(img6_2,cmap="gray")
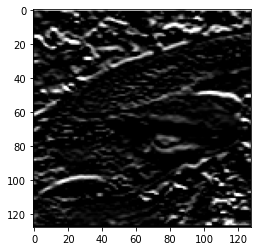
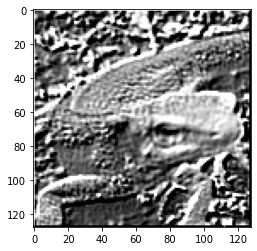
7.拉普拉斯滤波器(Laplacian Filter)
对图像进行二次微分,微分方法为离散型
最后得出的式子为:
KaTeX parse error: No such environment: align* at position 8: \begin{̲a̲l̲i̲g̲n̲*̲}̲&\nabla^2\ I(x,…
得出的滤波器形状如下:
def laplacianFilter(area):
    #isDirection为真是纵向,否则为横向
    #拉成一条,并且转置为横向
    area = area.reshape(-1).T

    c = np.array([0,1,0,1,-4,1,0,1,0]).reshape(-1,1)

    #计算滤波
    newk = np.dot(area,c)
    #将小于0的置0,大于255的置255
    newk = np.clip(newk, 0, 255)
    #转回uint8类型
    newk = newk.astype(np.uint8)
    return newk
imgshow = plt.imshow(img)
plt.show()

img7 = img.copy()
img7 = padding(img7,1)
img7 = gray(img7)
img7 = getarea(img7,1,"laplacian")
imgshow = plt.imshow(img7,cmap="gray")
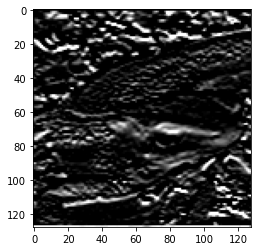
8.Emboss滤波器
使用Emboss滤波器来进行滤波吧。
Emboss滤波器可以使物体轮廓更加清晰,按照以下式子定义:
def embossFilter(area):
    #isDirection为真是纵向,否则为横向
    #拉成一条,并且转置为横向
    area = area.reshape(-1).T

    c = np.array([-2,-1,0,-1,1,1,0,1,2]).reshape(-1,1)

    #计算滤波
    newk = np.dot(area,c)
    #将小于0的置0,大于255的置255
    newk = np.clip(newk, 0, 255)
    #转回uint8类型
    newk = newk.astype(np.uint8)
    return newk
imgshow = plt.imshow(img)
plt.show()

img8 = img.copy()

img8 = padding(img8,1)
img8 = gray(img8)
img8 = getarea(img8,1,"emboss")
imgshow = plt.imshow(img8,cmap="gray")
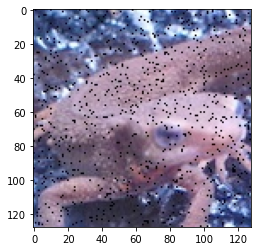
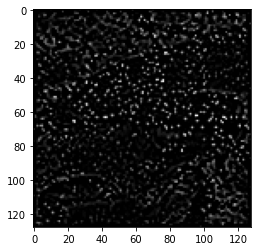
9.LoG滤波器
使用LoG 滤波器,来对imori_noise.jpg检测边缘吧!
LoG即高斯-拉普拉斯(Laplacian of Gaussian)的缩写,使用高斯滤波器使图像平滑化之后再使用拉普拉斯滤波器使图像的轮廓更加清晰。
为了防止拉普拉斯滤波器计算二次微分会使得图像噪声更加明显,所以我们首先使用高斯滤波器来抑制噪声。
LoG 滤波器使用以下式子定义:
就图像结果而言,感觉用中值滤波器更好
LoG即高斯-拉普拉斯滤波器,使用高斯平滑之后在使用拉普拉斯滤波器
这个题目我的理解可能有错,仅供参考
def gaussFilter(area):
    #拉成一条,用矩阵的乘法完成滤波计算,参考卷积核计算方法
    area = area.reshape(-1,3)

    kernel = np.array([1,2,1,2,4,2,1,2,1])*(1/16)

    newk = np.dot(kernel,area)
    newk = newk.astype(np.uint8)
    return newk
def medianFilter(area):
    #拉成一条,并且转置为横向
    area = area.reshape(-1,3).T
    #进行排序后取出中间值
    newk = np.sort(area,axis=1)[:,4]
    return newk
imgshow = plt.imshow(img_noise)
plt.show()

img9 = img_noise.copy()
img9 = padding(img9,1)
img9 = getarea(img9,1,"gaussian")
#img9 = getarea(img9,1,"median")
img9 = padding(img9,1)
img9 = gray(img9)
img9 = getarea(img9,1,"laplacian")
imgshow = plt.imshow(img9,cmap="gray")
标准答案:
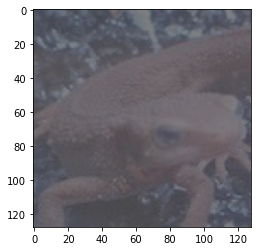
10.直方图
使用Matplotlib来绘制imori_dark.jpg的直方图吧!
直方图显示了不同数值的像素出现的次数。在Matplotlib中有hist()函数提供绘制直方图的接口。
imgshow = plt.imshow(img_dark)
plt.show()

img10 = img_dark.copy()
#img10 = img10.astype(np.float)
img10 = img10.reshape(-1)
hist = plt.hist(img10,bins=255,rwidth=0.85,range=(0,255))
原创首发,欢迎来我的博客留言讨论,我的博客主页:LeonG是什么意思?我的知乎专栏:LeonG与机器学习
版权声明:本文为博主原创文章,遵循 CC 4.0 BY-SA 版权协议,转载请附上原文出处链接和本声明。
