文章目录
1.在Ubuntu16.04系统上安装OpenCV和imutils
(1)opencv安装在我之前的博文上介绍过可以翻阅;
(2)安装imutils:
pip install imutils
如果是使用虚拟环境的话,记得进入虚拟环境后再安装imutils
简单介绍一下imutils:它是在opencv的基础上对一些方法进行了封装,使得一些图像处理方法更方便易用
2.查看我们opencv项目结构
假设我们将下载到的源码存放在“下载”文件夹下,执行以下命令:
cd 下载
unzip opencv-tutorial.zip
cd opencv-tutorial
tree
opencv项目结构.png
第一个脚本opencv_tutorial_01.py将使用电影《侏罗纪公园》中的图像(jp.png)进行基本的图像处理操作。
第二个脚本opencv_tutorial_02.py将介绍如何使用这些图像处理模块来创建OpenCV应用程序,以计算Tetris图像(tetris_blocks.png )中的对象数量。
3.加载并显示图像
首先在文本编辑器或IDE中打开opencv_tutorial_01.py:
#导入必要的软件包
import imutils
import cv2

#加载并显示图像尺寸
#将图像表示为包含h、w、d的多维numpy数组即变量"image"
#形状参数包括行(height) x 列 (width) x 通道 (depth)
image = cv2.imread("jp.png")
(h, w, d) = image.shape
print("width={}, height={}, depth={}".format(w, h, d))
#在屏幕上显示图像,鼠标要点击到图像窗口
#按任意键继续执行程序
cv2.imshow("Image", image)
cv2.waitKey(0)
深度是通道数——在我们的例子中是3,因为我们正在使用3个颜色通道:蓝色,绿色和红色(RGB)。
print输出宽、高、深度:
width=600, height=322, depth=3
cv2.waitKey(0):等待按键,这一点很重要,否则我们的图像显示和消失的速度将比我们看到图像还要快
4.访问单个像素
所有图像都由像素组成,640 x 480图像具有640列(宽度)和480行(高度),有640×480 = 307200个像素点
灰度图像中的每个像素都有一个代表灰度的值,在OpenCV中,有256种灰度(从0到255)。因此,灰度图像将具有与每个像素关联的灰度值。
彩色图像中的像素具有其他信息,在学习图像处理时很快就会熟悉几种色彩空间。为简单起见,我们仅考虑RGB颜色空间。
在OpenCV彩色图像中,RGB(红色,绿色,蓝色)颜色空间中的每个像素都有一个3元组(B, G, R) ,注意,顺序是BGR而不是RGB。
BGR 3元组中的每个值的范围为[0, 255] 。OpenCV中RGB图像中的每个像素有多少种颜色可能性?这很简单:256×256×256 = 16777216
图像坐标系规定是左上角为(0,0)
#访问位于x = 50(w),y = 100(h)的RGB像素
#OpenCV以BGR而不是RGB的顺序存储图像
(B, G, R) = image[100, 50]
print("R={}, G={}, B={}".format(R, G, B))
前面已知图片尺寸为width=600, height=322, depth=3 。我们可以通过指定坐标来访问数组中的各个像素值,只要它们在最大宽度和高度之内即可,图像指定像素点的格式为:image[Y,X]。
在终端打印出该像素的RGB值:
R=41, G=49, B=37
5.提取感兴趣区域(ROI)
提取“感兴趣区域”(ROI)是图像处理的一项重要技能。
举例来说,您正在识别电影中的人脸。首先,您将运行人脸检测算法以查找正在使用的所有帧中人脸的坐标。然后,您需要提取面部ROI,然后保存它们或对其进行处理。
手动提取ROI通过数组切片来实现:
#从输入图像提取一个100*100的感兴趣区,
#从x=320,y=60到x=420,y=160,并显示图像
roi = image[60:160, 320:420]
cv2.imshow("ROI", roi)
cv2.waitKey(0)
数组切片的格式为:image[startY:endY, startX:endX],注意前闭后开
6.调整图像大小
调整图像大小很重要,原因有很多。首先,我们可能需要调整大图像的大小以适合屏幕。在较小的图像上,图像处理也更快,因为要处理的像素更少。在深度学习的情况下,我们经常忽略宽高比来调整图像的大小,以使体积适合网络,这要求图像是正方形且具有一定尺寸。
#忽略宽高比,将原始图像调整为200 x 200像素:
resized = cv2.resize(image, (200, 200))
cv2.imshow("Fixed Resizing", resized)
cv2.waitKey(0)
由于忽略了宽高比,得到的图像已经失真。

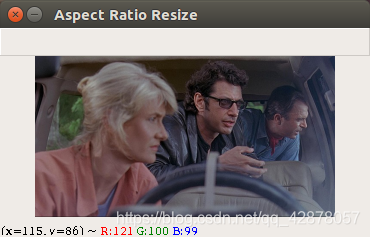
假设要将600像素宽的图像调整为300像素宽,同时保持宽高比。
#固定大小调整扭曲了宽高比,所以让我们将宽度调整为300px,
#但根据宽高比得到height
r = 300.0 / w
dim = (300, int(h * r))
resized = cv2.resize(image, dim)
cv2.imshow("Aspect Ratio Resize", resized)
cv2.waitKey(0)
我们计算新宽度与旧宽度的比率(恰好是0.5)。
在此,我们指定新图像的尺寸dim 。我们知道,我们希望有一个300像素宽的图像,但我们必须乘以该比例计算新高度h。
将dim(图像的尺寸)输入到cv2.resize函数中,我们现在获得了一个名为resized的新图像,该图像没有失真。
但是,我们是否可以使调整大小时保持宽高比的过程变得更加容易?
使用imutils中的函数:imutils.resize
#手动计算宽高比可能很麻烦,
#所以让我们使用#imutils库来代替
resized = imutils.resize(image, width=300)
cv2.imshow("Imutils Resize", resized)
cv2.waitKey(0)
这样保留了宽高比并调整图像的大小只需要需要提供图像的width或height作为参数

7.旋转图像
# 首先计算图像中心,"//"表示向下取整除
# 构造旋转矩阵
# 最后应用warpAffine函数旋转图像
center = (w // 2, h // 2)
M = cv2.getRotationMatrix2D(center, -45, 1.0)
rotated = cv2.warpAffine(image, M, (w, h))
cv2.imshow("OpenCV Rotation", rotated)
cv2.waitKey(0)
-45表示将图像顺时针旋转45度。回忆一下中学关于单位圆的信息,正角是逆时针方向,负角是顺时针方向。

# 使用imutils执行相同的操作
rotated = imutils.rotate(image, -45)
cv2.imshow("Imutils Rotation", rotated)
cv2.waitKey(0)
但是以上的操作都使图像被裁剪,运用imutils.rotate_bound函数使整个图像保持可见。 :
rotated = imutils.rotate_bound(image, 45)
cv2.imshow("Imutils Bound Rotation", rotated)
cv2.waitKey(0)

8.平滑图像
在许多图像处理场合中,我们必须对图像进行模糊处理以减少高频噪声,从而使我们的算法更容易检测和理解图像的实际内容,在OpenCV中,对图像进行模糊处理非常容易,并且有多种方法可以完成图像处理。
# 将具有11x11内核的高斯模糊应用于图像以使其平滑,减少高频噪声
blurred = cv2.GaussianBlur(image, (11, 11), 0)
cv2.imshow("Blurred", blurred)
cv2.waitKey(0)
较大的内核将产生更模糊的图像,较小的内核将创建较少的模糊图像。

9.在图像上绘图
我们将在输入图像上绘制矩形,圆形和直线,我们还将在图像上覆盖文本。
在继续使用OpenCV在图像上绘图之前,请注意,在图像上进行绘图操作是直接执行的。因此,在每个代码块的开头,我们制作原始图像的副本,并将副本存储为output 。然后,我们继续绘制output的图像,以免破坏原始图像。
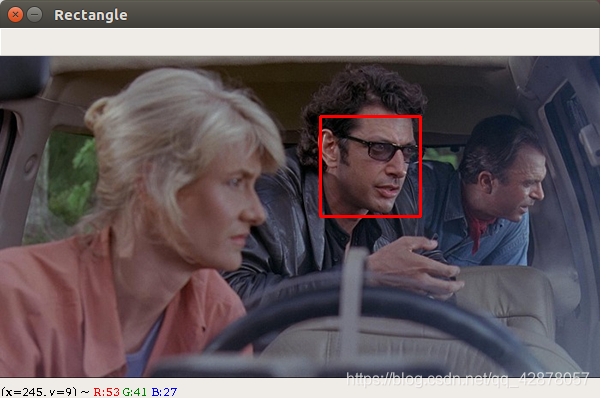
(1)在伊恩·马尔科姆(Ian Malcolm)的脸上绘制一个矩形:
# 在男主脸上画个矩形,线粗为2
output = image.copy()
cv2.rectangle(output, (320, 60), (420, 160), (0, 0, 255), 2)
cv2.imshow("Rectangle", output)
cv2.waitKey(0)
在OpenCV中绘制矩形比较简单,使用预先计算的坐标,向cv2.rectangle函数提供了以下参数:
- img :要绘制的目标图像output
- pt1 :起始像素坐标,在我们的例子中位于左上角,(320, 60)
- pt2 :结束像素坐标,右下角的像素位于(420, 160)
- color :BGR元组,红色(0 , 0, 255)
- thickness :线粗(负值将形成一个实心矩形),,这里为2
由于我们使用的是OpenCV的函数而不是NumPy的操作,因此我们可以按(x,y)的顺序而不是(y,x)的顺序提供坐标,因为我们没有直接操作或访问NumPy数组为我们处理这些事情。
(2)在Ellie Sattler博士的脸前放置一个蓝色实心圆:
# 画一个实心蓝色圆在x=300,y=150
output = image.copy()
cv2.circle(output, (300, 150), 20, (255, 0, 0), -1)
cv2.imshow("Circle", output)
cv2.waitKey(0)

要绘制圆,需要向cv2.circle提供以下参数 :
- img :图像名称
- center :圆的中心坐标,这里是(300, 150)
- radius :圆半径(以像素为单位),设置为20个像素值
- color :圆圈颜色,蓝色(255, 0, 0)
- thickness :线的粗细,使用负值(-1),因此圆圈是实心的
(3)画一条红线,这条线穿过Ellie的头,经过她的眼睛,一直到Ian的手:
# 画一条线宽为5的红线从x=60,y=20到x=400,y=200
output = image.copy()
cv2.line(output, (60, 20), (400, 200), (0, 0, 255), 5)
cv2.imshow("Line", output)
cv2.waitKey(0)
就像在矩形中一样,需要两个参数,颜色和线宽。

(4)在图像上覆盖文本:
如果进行人脸识别,则可能需要在该人的脸上方绘制该人的名字
或者如果在计算机视觉事业中取得进步,则可以构建图像分类器或对象检测器,需要绘制包含类名和概率的文本。
# 在图像上绘制文本
output = image.copy()
cv2.putText(output, "OpenCV + Jurassic Park!!!", (10, 25),
    cv2.FONT_HERSHEY_SIMPLEX, 0.7, (0, 255, 0), 2)
cv2.imshow("Text", output)
cv2.waitKey(0)
putText函数的功能负责在图像上绘制文本,需要的参数:
- img :图像名称
- text :要在图像上写/画的文本字符串
- pt :文本的起点
- font :经常用cv2.FONT_HERSHEY_SIMPLEX字体,可以官网查阅
- scale :字体大小
- color :文字颜色
- thickness :笔划的粗细(以像素为单位)

10.运行脚本
我使用的是vscode,右键-在终端中运行即可
最后贴上源代码:
# USAGE
# python opencv_tutorial_01.py

# import the necessary packages
import imutils
import cv2

# load the input image and show its dimensions, keeping in mind that
# images are represented as a multi-dimensional NumPy array with
# shape no. rows (height) x no. columns (width) x no. channels (depth)
image = cv2.imread("jp.png")
(h, w, d) = image.shape
print("width={}, height={}, depth={}".format(w, h, d))

# display the image to our screen -- we will need to click the window
# open by OpenCV and press a key on our keyboard to continue execution
cv2.imshow("Image", image)
cv2.waitKey(0)

# access the RGB pixel located at x=50, y=100, keepind in mind that
# OpenCV stores images in BGR order rather than RGB
(B, G, R) = image[100, 50]
print("R={}, G={}, B={}".format(R, G, B))

# extract a 100x100 pixel square ROI (Region of Interest) from the
# input image starting at x=320,y=60 at ending at x=420,y=160
roi = image[60:160, 320:420]
cv2.imshow("ROI", roi)
cv2.waitKey(0)

# resize the image to 200x200px, ignoring aspect ratio
resized = cv2.resize(image, (200, 200))
cv2.imshow("Fixed Resizing", resized)
cv2.waitKey(0)

# fixed resizing and distort aspect ratio so let's resize the width
# to be 300px but compute the new height based on the aspect ratio
r = 300.0 / w
dim = (300, int(h * r))
resized = cv2.resize(image, dim)
cv2.imshow("Aspect Ratio Resize", resized)
cv2.waitKey(0)

# manually computing the aspect ratio can be a pain so let's use the
# imutils library instead
resized = imutils.resize(image, width=300)
cv2.imshow("Imutils Resize", resized)
cv2.waitKey(0)

# let's rotate an image 45 degrees clockwise using OpenCV by first
# computing the image center, then constructing the rotation matrix,
# and then finally applying the affine warp
center = (w // 2, h // 2)
M = cv2.getRotationMatrix2D(center, -45, 1.0)
rotated = cv2.warpAffine(image, M, (w, h))
cv2.imshow("OpenCV Rotation", rotated)
cv2.waitKey(0)

# rotation can also be easily accomplished via imutils with less code
rotated = imutils.rotate(image, -45)
cv2.imshow("Imutils Rotation", rotated)
cv2.waitKey(0)

# OpenCV doesn't "care" if our rotated image is clipped after rotation
# so we can instead use another imutils convenience function to help
# us out
rotated = imutils.rotate_bound(image, 45)
cv2.imshow("Imutils Bound Rotation", rotated)
cv2.waitKey(0)

# apply a Gaussian blur with a 11x11 kernel to the image to smooth it,
# useful when reducing high frequency noise
blurred = cv2.GaussianBlur(image, (11, 11), 0)
cv2.imshow("Blurred", blurred)
cv2.waitKey(0)

# draw a 2px thick red rectangle surrounding the face
output = image.copy()
cv2.rectangle(output, (320, 60), (420, 160), (0, 0, 255), 2)
cv2.imshow("Rectangle", output)
cv2.waitKey(0)

# draw a blue 20px (filled in) circle on the image centered at
# x=300,y=150
output = image.copy()
cv2.circle(output, (300, 150), 20, (255, 0, 0), -1)
cv2.imshow("Circle", output)
cv2.waitKey(0)

# draw a 5px thick red line from x=60,y=20 to x=400,y=200
output = image.copy()
cv2.line(output, (60, 20), (400, 200), (0, 0, 255), 5)
cv2.imshow("Line", output)
cv2.waitKey(0)

# draw green text on the image
output = image.copy()
cv2.putText(output, "OpenCV + Jurassic Park!!!", (10, 25),
    cv2.FONT_HERSHEY_SIMPLEX, 0.7, (0, 255, 0), 2)
cv2.imshow("Text", output)
cv2.waitKey(0)
