首先需要导入必要的库、解析参数
#导入必要的软件包,包括Python附带的命令行参数解析包argparse
import argparse
import imutils
import cv2

#构造参数解析器并解析参数
ap = argparse.ArgumentParser()
ap.add_argument("-i", "--image", required=True,
    help="path to input image")
args = vars(ap.parse_args())
1.将彩色图像转换为灰度图像
# 加载图像 (路径包含在命令行参数中)并且显示
image = cv2.imread(args["image"])
cv2.imshow("Image", image)
cv2.waitKey(0)

# 转换图像为灰度图像,需要image和cv2.COLOR_BGR2GRAY标志
gray = cv2.cvtColor(image, cv2.COLOR_BGR2GRAY)
cv2.imshow("Gray", gray)
cv2.waitKey(0)

2.边缘检测
边缘检测对于查找图像中对象的边界很有用,多用于图像分割。
   # 应用边缘检测找到图像中目标物体的轮廓
    edged = cv2.Canny(gray, 30, 150)
    cv2.imshow("Edged", edged)
    cv2.waitKey(0)
使用流行的Canny算法(由John F. Canny在1986年开发),我们可以找到图像中的边缘。
cv2.Canny函数需要三个参数:
- img :灰度图像
- 最小值 :本例中的最低阈值30
- 最大值 :本例中最大阈值是150
- aperture_size :Sobel内核大小,默认情况下,此值为3,因此未在代码中显示
不同的最小阈值和最大阈值将返回不同的边缘图

3.灰度图像求阈值
在灰度图像中,每个像素有一个灰度值0到255,其中0表示“黑”,255表示“白”。0到255之间的值是不同深浅的灰色,接近0的值更暗,接近255的值比较轻。
图像阈值化是图像处理的重要中间步骤,阈值处理可以帮助我们去除较亮或较暗的图像区域和轮廓。
通过反复试验(以及经验)对以下代码进行了调整,使其适用于本示例:
# 所有灰度值<225的像素点设置为255(白色)-俄罗斯方块
# 灰度值>=225且<=255的像素点设置为0(黑色)——背景
thresh = cv2.threshold(gray, 225, 255, cv2.THRESH_BINARY_INV)[1]
cv2.imshow("Thresh", thresh)
cv2.waitKey(0)
有关cv2.threshold函数的更多信息请参考opencv官方文档。
使用二值化图像从背景中分割前景对于找到轮廓至关重要。

4.检测、计数和绘制轮廓
  # 在图像中找到前景物体的轮廓
    cnts = cv2.findContours(thresh.copy(), cv2.RETR_EXTERNAL,
        cv2.CHAIN_APPROX_SIMPLE)
    cnts = imutils.grab_contours(cnts)
    output = image.copy()

    # 循环绘制轮廓
    for c in cnts:
        # 以紫色线条绘制轮廓
        # 一次显示一个物体的轮廓
        cv2.drawContours(output, [c], -1, (240, 0, 159), 3)
        cv2.imshow("Contours", output)
        cv2.waitKey(0)
使用cv2.findContours以检测图像中的轮廓,图像使用的是二值化图像,注意函数的参数但是问题简单化就是找到前景(白色)像素点。
使用之前文章中的知识,在图像上覆盖一些文本:
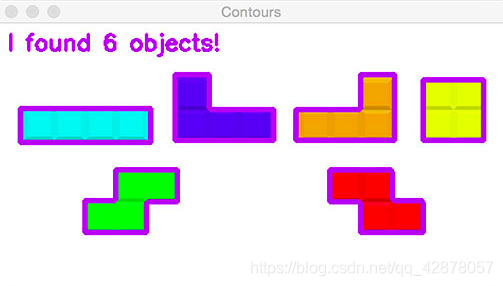
# 注明紫色轮廓的个数
text = "I found {} objects!".format(len(cnts))
cv2.putText(output, text, (10, 25),  cv2.FONT_HERSHEY_SIMPLEX, 0.7,
    (240, 0, 159), 2)
cv2.imshow("Contours", output)
cv2.waitKey(0)
变量text是包含形状轮廓数量的字符串,计算此图像中的对象总数就是检查轮廓列表的长度len(cnts)
5.腐蚀和膨胀
侵蚀和膨胀通常用于减少二进制图像中的噪声(阈值的副作用)。
(1)为了减少前景对象的尺寸,我们可以通过多次迭代来腐蚀掉像素:
 #通过腐蚀减小前景物体的尺寸,利用cv2.erode将轮廓尺寸减小5
    mask = thresh.copy()
    mask = cv2.erode(mask, None, iterations=5)
    cv2.imshow("Eroded", mask)
    cv2.waitKey(0)

使用OpenCV腐蚀轮廓,有效地缩小轮廓或使它们在经过足够的迭代后完全消失,这对于去除二值化图像中的噪声点通常很有用。
(2)要扩大前景对象的尺寸,只需使用cv2.dilate:
 # 膨胀可以扩大前景对象的尺寸
    mask = thresh.copy()
    mask = cv2.dilate(mask, None, iterations=5)
    cv2.imshow("Dilated", mask)
    cv2.waitKey(0)

在图像处理中,如果需要连接附近的轮廓,则可以对图像进行放大。图中显示的是通过五次迭代对轮廓进行扩张的结果,但并未使两个轮廓变为一个。
6.遮罩图像
称为遮罩是因为它们将隐藏我们不关心的图像区域,比如使用二值化图像将原始图像覆盖,将得到以下结果:

背景现在是黑色,前景由彩色像素组成——一些像素点被二值化,突出俄罗斯方块区域
#我们可能要应用的典型操作是遮盖图像某部分
#对输入图像按位与
# regions
mask = thresh.copy()
output = cv2.bitwise_and(image, image, mask=mask)
cv2.imshow("Output", output)
cv2.waitKey(0)
7.运行脚本
终端输入:
python opencv_tutorial_02.py --image tetris_blocks.png
参数标志是–image,并且image参数是tetris_blocks.png——目录中相关文件的路径。
最后贴上源代码:
# USAGE
# python opencv_tutorial_02.py --image tetris_blocks.png

# import the necessary packages
import argparse
import imutils
import cv2

# construct the argument parser and parse the arguments
ap = argparse.ArgumentParser()
ap.add_argument("-i", "--image", required=True,
    help="path to input image")
args = vars(ap.parse_args())

# load the input image (whose path was supplied via command line
# argument) and display the image to our screen
image = cv2.imread(args["image"])
cv2.imshow("Image", image)
cv2.waitKey(0)

# convert the image to grayscale
gray = cv2.cvtColor(image, cv2.COLOR_BGR2GRAY)
cv2.imshow("Gray", gray)
cv2.waitKey(0)

# applying edge detection we can find the outlines of objects in
# images
edged = cv2.Canny(gray, 30, 150)
cv2.imshow("Edged", edged)
cv2.waitKey(0)

# threshold the image by setting all pixel values less than 225
# to 255 (white; foreground) and all pixel values >= 225 to 255
# (black; background), thereby segmenting the image
thresh = cv2.threshold(gray, 225, 255, cv2.THRESH_BINARY_INV)[1]
cv2.imshow("Thresh", thresh)
cv2.waitKey(0)

# find contours (i.e., outlines) of the foreground objects in the
# thresholded image
cnts = cv2.findContours(thresh.copy(), cv2.RETR_EXTERNAL,
    cv2.CHAIN_APPROX_SIMPLE)
cnts = imutils.grab_contours(cnts)
output = image.copy()

# loop over the contours
for c in cnts:
    # draw each contour on the output image with a 3px thick purple
    # outline, then display the output contours one at a time
    cv2.drawContours(output, [c], -1, (240, 0, 159), 3)
    cv2.imshow("Contours", output)
    cv2.waitKey(0)

# draw the total number of contours found in purple
text = "I found {} objects!".format(len(cnts))
cv2.putText(output, text, (10, 25),  cv2.FONT_HERSHEY_SIMPLEX, 0.7,
    (240, 0, 159), 2)
cv2.imshow("Contours", output)
cv2.waitKey(0)

# we apply erosions to reduce the size of foreground objects
mask = thresh.copy()
mask = cv2.erode(mask, None, iterations=5)
cv2.imshow("Eroded", mask)
cv2.waitKey(0)

# similarly, dilations can increase the size of the ground objects
mask = thresh.copy()
mask = cv2.dilate(mask, None, iterations=5)
cv2.imshow("Dilated", mask)
cv2.waitKey(0)

# a typical operation we may want to apply is to take our mask and
# apply a bitwise AND to our input image, keeping only the masked
# regions
mask = thresh.copy()
output = cv2.bitwise_and(image, image, mask=mask)
cv2.imshow("Output", output)
cv2.waitKey(0)
