主启动类Application.class
 1 package com.vegeta.spring_boot;
 2
 3 import org.springframework.boot.SpringApplication;
 4 import org.springframework.boot.autoconfigure.SpringBootApplication;
 5
 6 @SpringBootApplication
 7 public class Application {
 8
 9     public static void main(String[] args) {
10         SpringApplication.run(Application.class, args);
11     }
12
13 }
进入注解@SpringBootApplication之中
 1 @Target({ElementType.TYPE})
 2 @Retention(RetentionPolicy.RUNTIME)
 3 @Documented
 4 @Inherited
 5 @SpringBootConfiguration
 6 @EnableAutoConfiguration
 7 @ComponentScan(
 8     excludeFilters = {@Filter(
 9     type = FilterType.CUSTOM,
10     classes = {TypeExcludeFilter.class}
11 ), @Filter(
12     type = FilterType.CUSTOM,
13     classes = {AutoConfigurationExcludeFilter.class}
14 )}
15 )
16 @ConfigurationPropertiesScan
17 public @interface SpringBootApplication {
18     .........
19 }
可以看到SpringBootApplication上有个注解@EnableAutoConfiguration开启自动配置,进入该注解
 1 @Target({ElementType.TYPE})
 2 @Retention(RetentionPolicy.RUNTIME)
 3 @Documented
 4 @Inherited
 5 @AutoConfigurationPackage
 6 @Import({AutoConfigurationImportSelector.class})
 7 public @interface EnableAutoConfiguration {
 8     String ENABLED_OVERRIDE_PROPERTY = "spring.boot.enableautoconfiguration";
 9
10     Class<?>[] exclude() default {};
11
12     String[] excludeName() default {};
13 }
可以看到该注解上有@Import({AutoConfigurationImportSelector.class}),进入AutoConfigurationImportSelect.class,主要步骤看下面注解的代码
public class AutoConfigurationImportSelector
implements DeferredImportSelector, BeanClassLoaderAware, ResourceLoaderAware, BeanFactoryAware, EnvironmentAware, Ordered {
    private static final AutoConfigurationImportSelector.AutoConfigurationEntry EMPTY_ENTRY =
    new AutoConfigurationImportSelector.AutoConfigurationEntry();
    private static final String[] NO_IMPORTS = new String[0];
    private static final Log logger = LogFactory.getLog(AutoConfigurationImportSelector.class);
    private static final String PROPERTY_NAME_AUTOCONFIGURE_EXCLUDE = "spring.autoconfigure.exclude";
    private ConfigurableListableBeanFactory beanFactory;
    private Environment environment;
    private ClassLoader beanClassLoader;
    private ResourceLoader resourceLoader;

    public String[] selectImports(AnnotationMetadata annotationMetadata) {
        if (!this.isEnabled(annotationMetadata)) {
            return NO_IMPORTS;
        } else {
            AutoConfigurationMetadata autoConfigurationMetadata = AutoConfigurationMetadataLoader.loadMetadata(this.beanClassLoader);
       // 获取自动配置
            AutoConfigurationImportSelector.AutoConfigurationEntry autoConfigurationEntry = this.getAutoConfigurationEntry(autoConfigurationMetadata, annotationMetadata);
            return StringUtils.toStringArray(autoConfigurationEntry.getConfigurations());
        }
    }

    protected AutoConfigurationImportSelector.AutoConfigurationEntry getAutoConfigurationEntry(AutoConfigurationMetadata autoConfigurationMetadata, AnnotationMetadata annotationMetadata) {
        if (!this.isEnabled(annotationMetadata)) {
            return EMPTY_ENTRY;
        } else {
            AnnotationAttributes attributes = this.getAttributes(annotationMetadata);
       // 自动配置的候选的配置
            List<String> configurations = this.getCandidateConfigurations(annotationMetadata, attributes);
            configurations = this.removeDuplicates(configurations);
            Set<String> exclusions = this.getExclusions(annotationMetadata, attributes);
            this.checkExcludedClasses(configurations, exclusions);
            configurations.removeAll(exclusions);
            configurations = this.filter(configurations, autoConfigurationMetadata);
            this.fireAutoConfigurationImportEvents(configurations, exclusions);
            return new AutoConfigurationImportSelector.AutoConfigurationEntry(configurations, exclusions);
        }
    }

    protected List<String> getCandidateConfigurations(AnnotationMetadata metadata, AnnotationAttributes attributes) {
     // 配置信息是从spring工厂加载器中加载获得
        List<String> configurations = SpringFactoriesLoader.loadFactoryNames(this.getSpringFactoriesLoaderFactoryClass(), this.getBeanClassLoader());
        Assert.notEmpty(configurations, "No auto configuration classes found in META-INF/spring.factories. If you are using a custom packaging, make sure that file is correct.");
        return configurations;
    }
}
进入SpringFactoriesLoader.loadFactoryNames的方法中,具体细节继续看注解的代码
public final class SpringFactoriesLoader {
    public static final String FACTORIES_RESOURCE_LOCATION = "META-INF/spring.factories";
    private static final Log logger = LogFactory.getLog(SpringFactoriesLoader.class);
    private static final Map<ClassLoader, MultiValueMap<String, String>> cache = new ConcurrentReferenceHashMap();

  // 获取加载集合,调用了下面的方法
   public static List<String> loadFactoryNames(Class<?> factoryType, @Nullable ClassLoader classLoader) {
        String factoryTypeName = factoryType.getName();
     //内部调用了loadSpringFactories方法
        return (List)loadSpringFactories(classLoader).getOrDefault(factoryTypeName, Collections.emptyList());
    }

  // 这个到了真正能看懂的方法
  private static Map<String, List<String>> loadSpringFactories(@Nullable ClassLoader classLoader) {
        MultiValueMap<String, String> result = (MultiValueMap)cache.get(classLoader);
        if (result != null) {
            return result;
        } else {
            try {
          // 获取META-INF/spring.factories的资源文件,并映射到urls这个中
                Enumeration<URL> urls = classLoader != null ? classLoader.getResources("META-INF/spring.factories") : ClassLoader.getSystemResources("META-INF/spring.factories");
                LinkedMultiValueMap result = new LinkedMultiValueMap();
          // 遍历urls并将值封装到result中,并返回,那么核心就是这个META-INF/spring.factories文件
                while(urls.hasMoreElements()) {
                    URL url = (URL)urls.nextElement();
                    UrlResource resource = new UrlResource(url);
                    Properties properties = PropertiesLoaderUtils.loadProperties(resource);
                    Iterator var6 = properties.entrySet().iterator();

                    while(var6.hasNext()) {
                        Entry<?, ?> entry = (Entry)var6.next();
                        String factoryTypeName = ((String)entry.getKey()).trim();
                        String[] var9 = StringUtils.commaDelimitedListToStringArray((String)entry.getValue());
                        int var10 = var9.length;

                        for(int var11 = 0; var11 < var10; ++var11) {
                            String factoryImplementationName = var9[var11];
                            result.add(factoryTypeName, factoryImplementationName.trim());
                        }
                    }
                }

                cache.put(classLoader, result);
                return result;
            } catch (IOException var13) {
                throw new IllegalArgumentException("Unable to load factories from location [META-INF/spring.factories]", var13);
            }
        }
    }
}
这个META-INF/spring.factories文件在哪里呢?就在你maven引入的org.springframework.boot:spring-boot-autoconfigure的jar包中
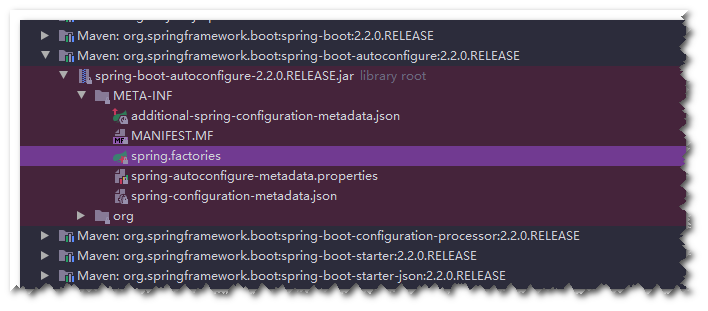
打开这个spring.factories文件如下(只是一部分,全部很多),全是xxxAutoConfiguration自动配置类
 1 org.springframework.boot.autoconfigure.validation.ValidationAutoConfiguration,\
 2 org.springframework.boot.autoconfigure.web.client.RestTemplateAutoConfiguration,\
 3 org.springframework.boot.autoconfigure.web.embedded.EmbeddedWebServerFactoryCustomizerAutoConfiguration,\
 4 org.springframework.boot.autoconfigure.web.reactive.HttpHandlerAutoConfiguration,\
 5 org.springframework.boot.autoconfigure.web.reactive.ReactiveWebServerFactoryAutoConfiguration,\
 6 org.springframework.boot.autoconfigure.web.reactive.WebFluxAutoConfiguration,\
 7 org.springframework.boot.autoconfigure.web.reactive.error.ErrorWebFluxAutoConfiguration,\
 8 org.springframework.boot.autoconfigure.web.reactive.function.client.ClientHttpConnectorAutoConfiguration,\
 9 org.springframework.boot.autoconfigure.web.reactive.function.client.WebClientAutoConfiguration,\
10 org.springframework.boot.autoconfigure.web.servlet.DispatcherServletAutoConfiguration,\
11 org.springframework.boot.autoconfigure.web.servlet.ServletWebServerFactoryAutoConfiguration,\
12 org.springframework.boot.autoconfigure.web.servlet.error.ErrorMvcAutoConfiguration,\
13 org.springframework.boot.autoconfigure.web.servlet.HttpEncodingAutoConfiguration,\
14 org.springframework.boot.autoconfigure.web.servlet.MultipartAutoConfiguration,\
15 org.springframework.boot.autoconfigure.web.servlet.WebMvcAutoConfiguration,\
16 org.springframework.boot.autoconfigure.websocket.reactive.WebSocketReactiveAutoConfiguration,\
17 org.springframework.boot.autoconfigure.websocket.servlet.WebSocketServletAutoConfiguration,\
18 org.springframework.boot.autoconfigure.websocket.servlet.WebSocketMessagingAutoConfiguration,\
19 org.springframework.boot.autoconfigure.webservices.WebServicesAutoConfiguration,\
20 org.springframework.boot.autoconfigure.webservices.client.WebServiceTemplateAutoConfiguration
为了演示方便,我们打开一个简单的HttpEncodingAutoConfiguration
@Configuration(
    proxyBeanMethods = false
)
@EnableConfigurationProperties({HttpProperties.class})
@ConditionalOnWebApplication(
    type = Type.SERVLET
)
@ConditionalOnClass({CharacterEncodingFilter.class})
@ConditionalOnProperty(
    prefix = "spring.http.encoding",
    value = {"enabled"},
    matchIfMissing = true
)
public class HttpEncodingAutoConfiguration {
......
}
其中最关键的注解为@EnableConfigurationProperties({HttpProperties.class}),我们进入HttpProperties类
// 这里可以到配置该设置的前缀为spring.http
@ConfigurationProperties(
    prefix = "spring.http"
)
public class HttpProperties {
    private boolean logRequestDetails;
  // 其中属性名称为encoding,这是一个对象
    private final HttpProperties.Encoding encoding = new HttpProperties.Encoding();

    public HttpProperties() {
    }

    public boolean isLogRequestDetails() {
        return this.logRequestDetails;
    }

    public void setLogRequestDetails(boolean logRequestDetails) {
        this.logRequestDetails = logRequestDetails;
    }

    public HttpProperties.Encoding getEncoding() {
        return this.encoding;
    }

    public static class Encoding {
     // 这个对象一共有过5个属性
        public static final Charset DEFAULT_CHARSET;
        private Charset charset;
        private Boolean force;
        private Boolean forceRequest;
        private Boolean forceResponse;
        private Map<Locale, Charset> mapping;

        public Encoding() {
            this.charset = DEFAULT_CHARSET;
        }

        public Charset getCharset() {
            return this.charset;
        }

        public void setCharset(Charset charset) {
            this.charset = charset;
        }

        public boolean isForce() {
            return Boolean.TRUE.equals(this.force);
        }

        public void setForce(boolean force) {
            this.force = force;
        }

        public boolean isForceRequest() {
            return Boolean.TRUE.equals(this.forceRequest);
        }

        public void setForceRequest(boolean forceRequest) {
            this.forceRequest = forceRequest;
        }

        public boolean isForceResponse() {
            return Boolean.TRUE.equals(this.forceResponse);
        }

        public void setForceResponse(boolean forceResponse) {
            this.forceResponse = forceResponse;
        }

        public Map<Locale, Charset> getMapping() {
            return this.mapping;
        }

        public void setMapping(Map<Locale, Charset> mapping) {
            this.mapping = mapping;
        }

        public boolean shouldForce(HttpProperties.Encoding.Type type) {
            Boolean force = type != HttpProperties.Encoding.Type.REQUEST ? this.forceResponse : this.forceRequest;
            if (force == null) {
                force = this.force;
            }

            if (force == null) {
                force = type == HttpProperties.Encoding.Type.REQUEST;
            }

            return force;
        }

        static {
            DEFAULT_CHARSET = StandardCharsets.UTF_8;
        }

        public static enum Type {
            REQUEST,
            RESPONSE;

            private Type() {
            }
        }
    }
}
这里可以到配置该设置的前缀为spring.http;其中属性名称为encoding,这是一个对象;这个对象一共有过5个属性charset, force, forceRequest, forceResponse, mapping;
所以application.properties中可以指定这个配置
spring.http.encoding.charset=utf-8
spring.http.encoding.force=true
spring.http.encoding.force-request=true
spring.http.encoding.force-response=true
spring.http.encoding.mapping.zh_CN=GBK
spring.http.encoding.mapping.en_US-=UTF-8
当然这是我们指定配置的,如果我们没有配置,那么springboot一样会根据这一套流程加载配置,只不过是默认配置
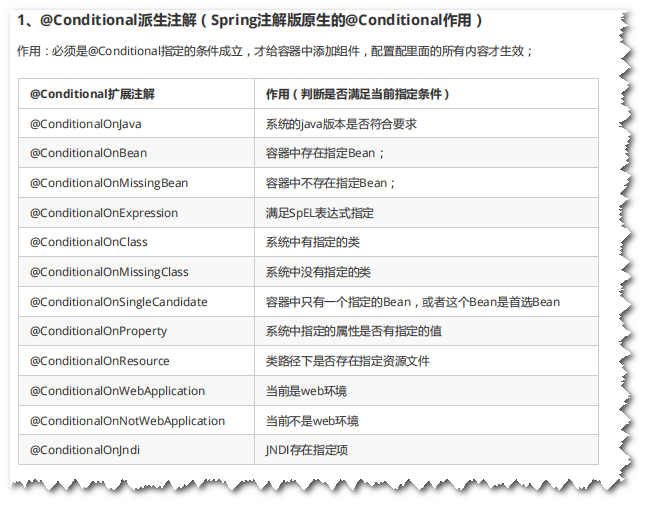
自动配置过程中涉及的一些注解
我们怎么知道哪些自动配置类生效;我们可以通过在配置文件中启用 debug=true属性;来让控制台打印自动配置报告