本章介绍SpringBoot的缓存机制及使用
Spring缓存介绍
Spring从3.1开始定义了org.springframework.cache.Cache 和org.springframework.cache.CacheManager接口来统一不同的缓存技术; 并支持使用JCache(JSR-107)注解简化我们开发;
• Cache接口为缓存的组件规范定义,包含缓存的各种操作集合;
• Cache接口下Spring提供了各种xxxCache的实现;如RedisCache,EhCacheCache,ConcurrentMapCache等;
• 每次调用需要缓存功能的方法时,Spring会检查检查指定参数的指定的目标方法是否 已经被调用过;如果有就直接从缓存中获取方法调用后的结果,如果没有就调用方法 并缓存结果后返回给用户。下次调用直接从缓存中获取。
• 使用Spring缓存抽象时我们需要关注以下两点;
1、确定方法需要被缓存以及他们的缓存策略
2、从缓存中读取之前缓存存储的数据
几个重要概念&缓存注解
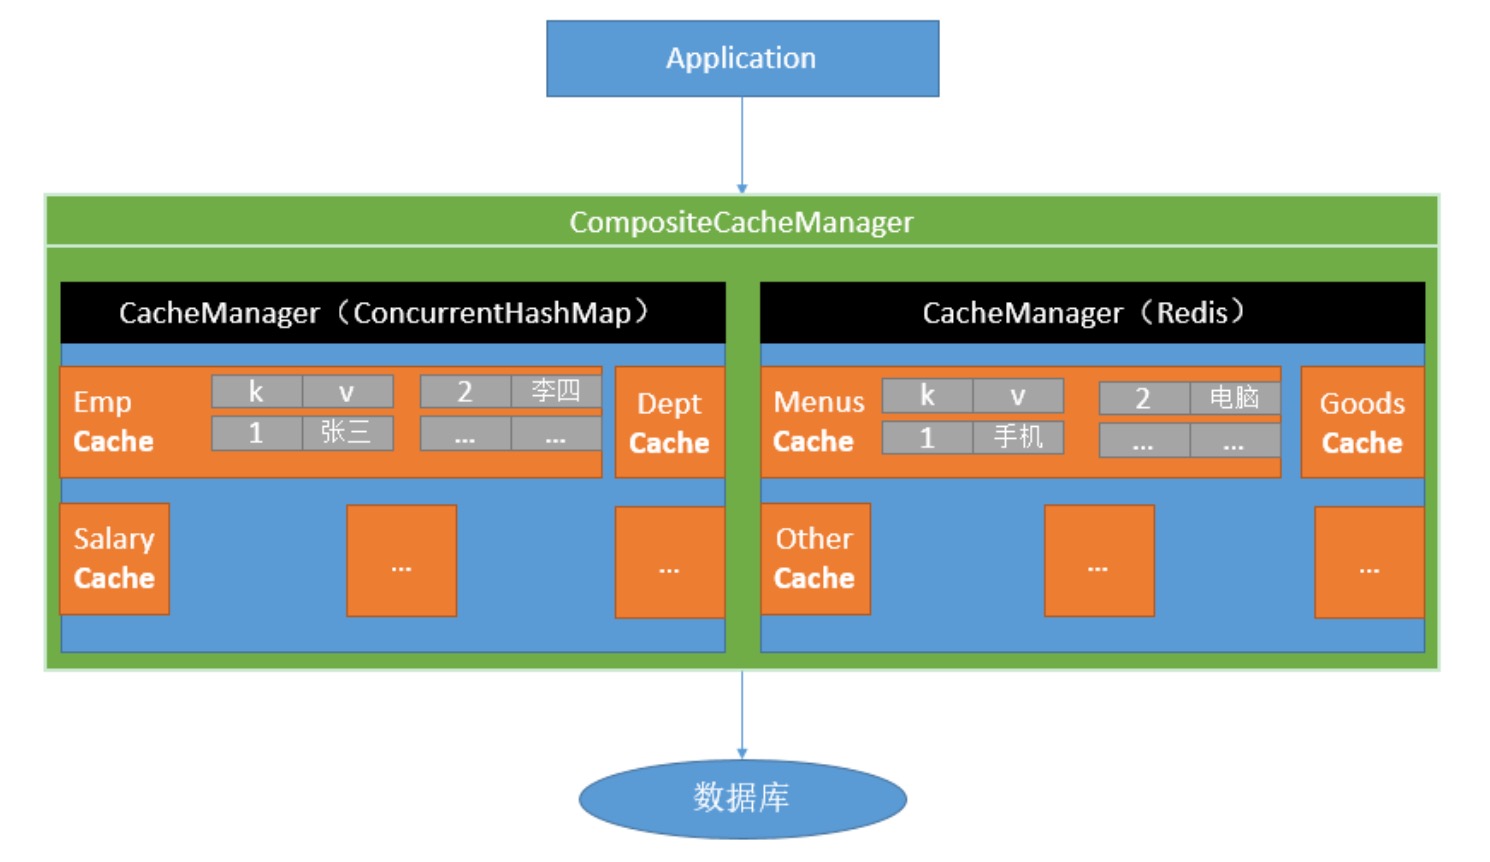
缓存组件关系图
|
Cache |
缓存接口,定义缓存操作。实现有:RedisCache、EhCacheCache、ConcurrentMapCache等 |
|
CacheManager |
缓存管理器,管理各种缓存(Cache)组件 |
|
@Cacheable |
主要针对方法配置,能够根据方法的请求参数对其结果进行缓存 |
|
@CacheEvict |
清空缓存 |
|
@CachePut |
保证方法被调用,又希望结果被缓存。 |
|
@EnableCaching |
开启基于注解的缓存 |
|
keyGenerator |
缓存数据时key生成策略 |
|
serialize |
缓存数据时value序列化策略 |
缓存注解的主要参数
|
@Cacheable/@CachePut/@CacheEvict 主要的参数 |
||
|
value |
缓存的名称,在 spring 配置文件中定义,必须指定 至少一个 |
例如: @Cacheable(value=”mycache”) 或者 @Cacheable(value={”cache1”,”cache2”} |
|
key |
缓存的 key,可以为空,如果指定要按照 SpEL 表达 式编写,如果不指定,则缺省按照方法的所有参数 进行组合 |
例如: @Cacheable(value=”testcache”,key=”#userName”) |
|
condition |
缓存的条件,可以为空,使用 SpEL 编写,返回 true 或者 false,只有为 true 才进行缓存/清除缓存,在 调用方法之前之后都能判断 |
例如: @Cacheable(value=”testcache”,condition=”#userNam e.length()>2”) |
|
allEntries (@CacheEvict ) |
是否清空所有缓存内容,缺省为 false,如果指定为 true,则方法调用后将立即清空所有缓存 |
例如: @CachEvict(value=”testcache”,allEntries=true) |
|
beforeInvocation (@CacheEvict) |
是否在方法执行前就清空,缺省为 false,如果指定 为 true,则在方法还没有执行的时候就清空缓存, 缺省情况下,如果方法执行抛出异常,则不会清空 缓存 |
例如: @CachEvict(value=”testcache”, beforeInvocation=true) |
|
unless (@CachePut) (@Cacheable) |
用于否决缓存的,不像condition,该表达式只在方 法执行之后判断,此时可以拿到返回值result进行判 断。条件为true不会缓存,fasle才缓存 |
例如: @Cacheable(value=”testcache”,unless=”#result == null”) |
缓存使用
项目搭建
1、新建一个Spring Web工程,整合了mybatis,pom.xml文件如下:


 1 <?xml version="1.0" encoding="UTF-8"?>
 2 <project xmlns="http://maven.apache.org/POM/4.0.0"
 3          xmlns:xsi="http://www.w3.org/2001/XMLSchema-instance"
 4          xsi:schemaLocation="http://maven.apache.org/POM/4.0.0 http://maven.apache.org/xsd/maven-4.0.0.xsd">
 5     <modelVersion>4.0.0</modelVersion>
 6
 7     <groupId>com.test</groupId>
 8     <artifactId>test-springboot-cache</artifactId>
 9     <version>1.0-SNAPSHOT</version>
10
11     <parent>
12         <groupId>org.springframework.boot</groupId>
13         <artifactId>spring-boot-starter-parent</artifactId>
14         <version>2.1.8.RELEASE</version>
15     </parent>
16
17     <properties>
18
19         <project.build.sourceEncoding>UTF-8</project.build.sourceEncoding>
20         <project.reporting.outputEncoding>UTF-8</project.reporting.outputEncoding>
21         <java.version>1.8</java.version>
22     </properties>
23
24     <dependencies>
25
26         <dependency>
27             <groupId>org.springframework.boot</groupId>
28             <artifactId>spring-boot-starter-web</artifactId>
29         </dependency>
30
31         <dependency>
32             <groupId>org.mybatis.spring.boot</groupId>
33             <artifactId>mybatis-spring-boot-starter</artifactId>
34             <version>2.0.1</version>
35         </dependency>
36
37         <!-- mysql -->
38         <dependency>
39             <groupId>mysql</groupId>
40             <artifactId>mysql-connector-java</artifactId>
41             <version>8.0.12</version>
42         </dependency>
43
44         <dependency>
45             <groupId>org.springframework.boot</groupId>
46             <artifactId>spring-boot-starter-test</artifactId>
47             <scope>test</scope>
48         </dependency>
49
50     </dependencies>
51
52
53     <!-- SpringBoot打包插件,可以将代码打包成一个可执行的jar包 -->
54     <build>
55         <plugins>
56             <plugin>
57                 <groupId>org.springframework.boot</groupId>
58                 <artifactId>spring-boot-maven-plugin</artifactId>
59             </plugin>
60         </plugins>
61     </build>
62
63 </project>
application.yml文件如下:
spring:
  datasource:
    username: admin
    password: 123456
    url: jdbc:mysql://127.0.0.1:3306/test_mybatis
    driver-class-name: com.mysql.jdbc.Driver


mybatis:
  configuration:
    # 下划线转大写映射
    mapUnderscoreToCamelCase: true

logging:
  level:
    com:
      test:
        springboot:
          cache:
            mapper: debug

debug: true
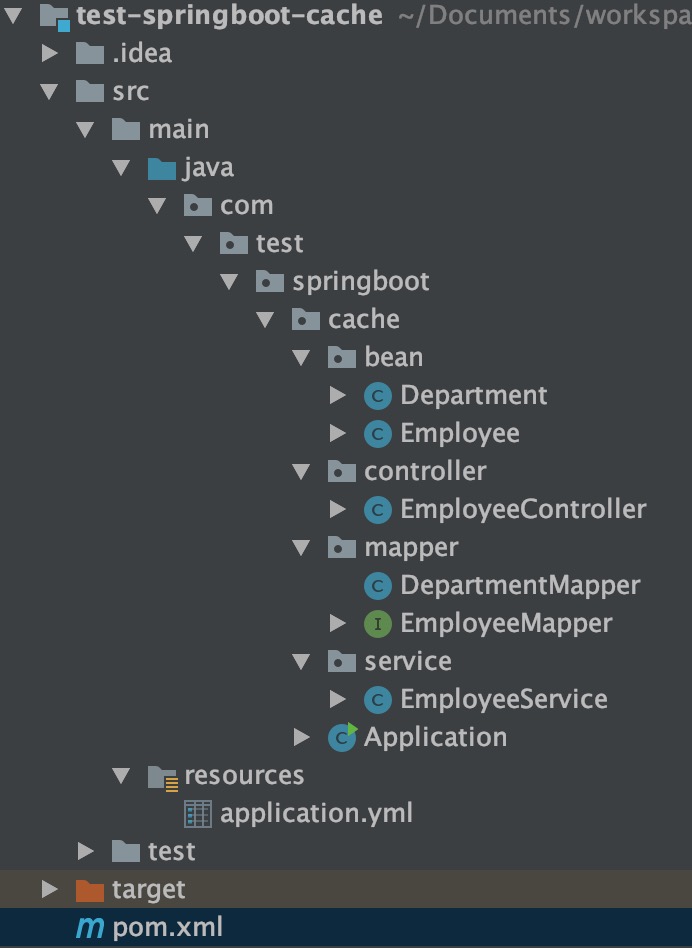
目录结构
2、编写实体类Employee.java和Department.java
 1 package com.test.springboot.cache.bean;
 2
 3 import java.io.Serializable;
 4
 5 public class Employee implements Serializable {
 6
 7     private Integer id;
 8     private String lastName;
 9     private String gender;
10     private String email;
11     private Integer deptId;
12
13     public Integer getDeptId() {
14         return deptId;
15     }
16
17     public void setDeptId(Integer deptId) {
18         this.deptId = deptId;
19     }
20
21     public Integer getId() {
22         return id;
23     }
24
25     public void setId(Integer id) {
26         this.id = id;
27     }
28
29     public String getLastName() {
30         return lastName;
31     }
32
33     public void setLastName(String lastName) {
34         this.lastName = lastName;
35     }
36
37     public String getGender() {
38         return gender;
39     }
40
41     public void setGender(String gender) {
42         this.gender = gender;
43     }
44
45     public String getEmail() {
46         return email;
47     }
48
49     public void setEmail(String email) {
50         this.email = email;
51     }
52
53     @Override
54     public String toString() {
55         return "Employee{" +
56                 "id=" + id +
57                 ", lastName='" + lastName + '\'' +
58                 ", gender='" + gender + '\'' +
59                 ", email='" + email + '\'' +
60                 ", deptId=" + deptId +
61                 '}';
62     }
63 }
 1 package com.test.springboot.cache.bean;
 2
 3 import java.io.Serializable;
 4
 5 public class Department implements Serializable {
 6
 7     private Integer id;
 8     private String depName;
 9
10     public Integer getId() {
11         return id;
12     }
13
14     public void setId(Integer id) {
15         this.id = id;
16     }
17
18     public String getDepName() {
19         return depName;
20     }
21
22     public void setDepName(String depName) {
23         this.depName = depName;
24     }
25 }
3、编写EmployeeMapper.java
 1 package com.test.springboot.cache.mapper;
 2
 3 import com.test.springboot.cache.bean.Employee;
 4 import org.apache.ibatis.annotations.*;
 5
 6 @Mapper
 7 public interface EmployeeMapper {
 8
 9     @Select("SELECT * FROM employee WHERE id = #{id}")
10     public Employee getEmpById(Integer id);
11
12     @Update("UPDATE employee SET last_name = #{lastName}, email=#{email},gender=#{gender},dept_id=#{deptId} WHERE id = #{id}")
13     public void updateEmp(Employee employee);
14
15     @Delete("DELETE FROM employee WHERE id = #{id}")
16     public void deleteEmpById(Integer id);
17
18     @Insert("INSERT INTO employee(last_name, email, gender, dept_id) VALUES(#{lastName},#{email},#{gender},#{deptId})")
19     public void insertEmp(Employee emp);
20 }
4、编写EmployeeService.java
 1 package com.test.springboot.cache.service;
 2
 3 import com.test.springboot.cache.bean.Employee;
 4 import com.test.springboot.cache.mapper.EmployeeMapper;
 5 import org.springframework.beans.factory.annotation.Autowired;
 6 import org.springframework.stereotype.Service;
 7
 8 @Service
 9 public class EmployeeService {
10
11     @Autowired
12     EmployeeMapper employeeMapper;
13
14     public Employee getEmp(Integer id){
15         System.out.println("===查询" + id + "号员工");
16         return employeeMapper.getEmpById(id);
17     }
18 }
5、编写EmployeeController.java
 1 package com.test.springboot.cache.controller;
 2
 3 import com.test.springboot.cache.bean.Employee;
 4 import com.test.springboot.cache.service.EmployeeService;
 5 import org.springframework.beans.factory.annotation.Autowired;
 6 import org.springframework.web.bind.annotation.GetMapping;
 7 import org.springframework.web.bind.annotation.PathVariable;
 8 import org.springframework.web.bind.annotation.RestController;
 9
10 @RestController
11 public class EmployeeController {
12
13     @Autowired
14     EmployeeService employeeService;
15
16     @GetMapping("emp/{id}")
17     public Employee getEmployee(@PathVariable("id") Integer id) {
18
19         return employeeService.getEmp(id);
20     }
21 }
7、编写启动类Application.java
 1 package com.test.springboot.cache;
 2
 3
 4 import org.mybatis.spring.annotation.MapperScan;
 5 import org.springframework.boot.SpringApplication;
 6 import org.springframework.boot.autoconfigure.SpringBootApplication;
 7
 8 /**
 9  * 一、搭建基本环境
10  * 1、创建数据库,创建department和employee表
11  * 2、创建JavaBean封装数据
12  * 3、整合MyBatis操作数据库
13  *      a、配置数据源信息
14  *      b、使用注解版的MyBatis:
15  *          1)、@MapperScan指定需要扫描的mapper接口所在的包
16  * 二、快速体验缓存
17  *  步骤:
18  *      1、开启基于注解的缓存 @EnableCaching
19  *      2、标注缓存注解即可 @Cacheable、@CacheEvict、@CachePut
20  */
21
22 @MapperScan("com.test.springboot.cache.mapper")
23 @SpringBootApplication
24 public class Application {
25
26     public static void main(String[] args) {
27         SpringApplication.run(Application.class, args);
28     }
29
30 }
8、启动项目,浏览器访问地址:http://localhost:8080/emp/1,测试能否正常获取数据
使用缓存
1、开启基于注解的缓存 @EnableCaching
 1 @EnableCaching
 2 @MapperScan("com.test.springboot.cache.mapper")
 3 @SpringBootApplication
 4 public class Application {
 5
 6     public static void main(String[] args) {
 7         SpringApplication.run(Application.class, args);
 8     }
 9
10 }
2、标注缓存注解即可 @Cacheable、@CacheEvict、@CachePut,在EmployeeService的getEmp方法上注解
1 @Cacheable(cacheNames="emp")
2 public Employee getEmp(Integer id){
3     System.out.println("===查询" + id + "号员工");
4     return employeeMapper.getEmpById(id);
5 }
3、启动项目,浏览器访问地址:http://localhost:8080/emp/1,连续2个请求,看第二次是否有查数据库(通过日志可以体现)
缓存原理
缓存自动配置原理
1、分析自动配置类:CacheAutoConfiguration
2、在CacheAutoConfiguration类中,自动导入了类CacheConfigurationImportSelector.class
1 @Import(CacheConfigurationImportSelector.class)
2 public class CacheAutoConfiguration {
CacheConfigurationImportSelector.class
 1 static class CacheConfigurationImportSelector implements ImportSelector {
 2
 3     @Override
 4     public String[] selectImports(AnnotationMetadata importingClassMetadata) {
 5         CacheType[] types = CacheType.values();
 6         String[] imports = new String[types.length];
 7         for (int i = 0; i < types.length; i++) {
 8             imports[i] = CacheConfigurations.getConfigurationClass(types[i]);
 9         }
10         return imports;
11     }
12
13
而CacheConfigurationImportSelector会根据条件自动导入以下缓存的配置类,以下配置类不完全生效,要在一定条件下配置类才会生效
GenericCacheConfiguration.class
EhCacheCacheConfiguration.class
HazelcastCacheConfiguration.class
InfinispanCacheConfiguration.class
JCacheCacheConfiguration.class
CouchbaseCacheConfiguration.class
RedisCacheConfiguration.class
CaffeineCacheConfiguration.class
SimpleCacheConfiguration.class
NoOpCacheConfiguration.class
3、测试项目,在项目配置文件中配置(debug: true),配置调试模式,然后启动项目通过在控制查看输出日志,可以看到SimpleCacheConfiguration配置上了

而SimpleCacheConfiguration,的内容如下;它在容器中注入了一个ConcurrentMapCacheManager,用来管理缓存
 1 @Configuration
 2 @ConditionalOnMissingBean(CacheManager.class)
 3 @Conditional(CacheCondition.class)
 4 class SimpleCacheConfiguration {
 5
 6     private final CacheProperties cacheProperties;
 7
 8     private final CacheManagerCustomizers customizerInvoker;
 9
10     SimpleCacheConfiguration(CacheProperties cacheProperties, CacheManagerCustomizers customizerInvoker) {
11         this.cacheProperties = cacheProperties;
12         this.customizerInvoker = customizerInvoker;
13     }
14
15     @Bean
16     public ConcurrentMapCacheManager cacheManager() {
17         ConcurrentMapCacheManager cacheManager = new ConcurrentMapCacheManager();
18         List<String> cacheNames = this.cacheProperties.getCacheNames();
19         if (!cacheNames.isEmpty()) {
20             cacheManager.setCacheNames(cacheNames);
21         }
22         return this.customizerInvoker.customize(cacheManager);
23     }
24
25 }
4、分析ConcurrentMapCacheManager类,它是实现了CacheManager接口
 1 public class ConcurrentMapCacheManager implements CacheManager, BeanClassLoaderAware {
 2
 3     private final ConcurrentMap<String, Cache> cacheMap = new ConcurrentHashMap<>(16);
 4
 5     private boolean dynamic = true;
 6
 7     private boolean allowNullValues = true;
 8
 9     private boolean storeByValue = false;
10
11     ...
12
13     // 根据名字获取一个Cache
14     @Override
15     @Nullable
16     public Cache getCache(String name) {
17         Cache cache = this.cacheMap.get(name);
18         if (cache == null && this.dynamic) {
19             synchronized (this.cacheMap) {
20                 cache = this.cacheMap.get(name);
21                 if (cache == null) {
22                     // cache为空时,创建一个Cache
23                     cache = createConcurrentMapCache(name);
24                     this.cacheMap.put(name, cache);
25                 }
26             }
27         }
28         return cache;
29     }
30
31
32     // 根据名字创建一个Cache,实际上是ConcurrentMapCache
33     protected Cache createConcurrentMapCache(String name) {
34         SerializationDelegate actualSerialization = (isStoreByValue() ? this.serialization : null);
35         return new ConcurrentMapCache(name, new ConcurrentHashMap<>(256),
36                 isAllowNullValues(), actualSerialization);
37
38     }
39
40 }
在ConcurrentMapCacheManager类中的getCache上打断点,然后页面做请求访问,可以看到调用被@Cacheable注解的方法时;会在方法调用前,调用getCache方法,而第一次调用getCache方法时,会去创建一个ConcurrentMapCache,而ConcurrentMapCache它的构造方法中,有ConcurrentHashMap参数,所以缓存键值对实际是放在ConcurrentHashMap中。
缓存运行步骤
@Cacheable注解的方法运行步骤
1、方法运行之前,先去查询Cache(缓存组件),按照cacheNames指定的名字获取(CacheManager先获取相应的缓存),第一次获取缓存如果没有Cache组件会自动创建
2、去Cache中查找缓存的内容,使用一个key,默认就是方法的参数,key是按照某种策略生成的,默认使用SimpleKeyGenerator生成key
通过调试运行方法,可以看到会调用抽象类CacheAspectSupport的findCachedItem方法,其中通过generateKey方法生成key的

而generateKey方法如下:其中keyGenerator就是SimpleKeyGenerator
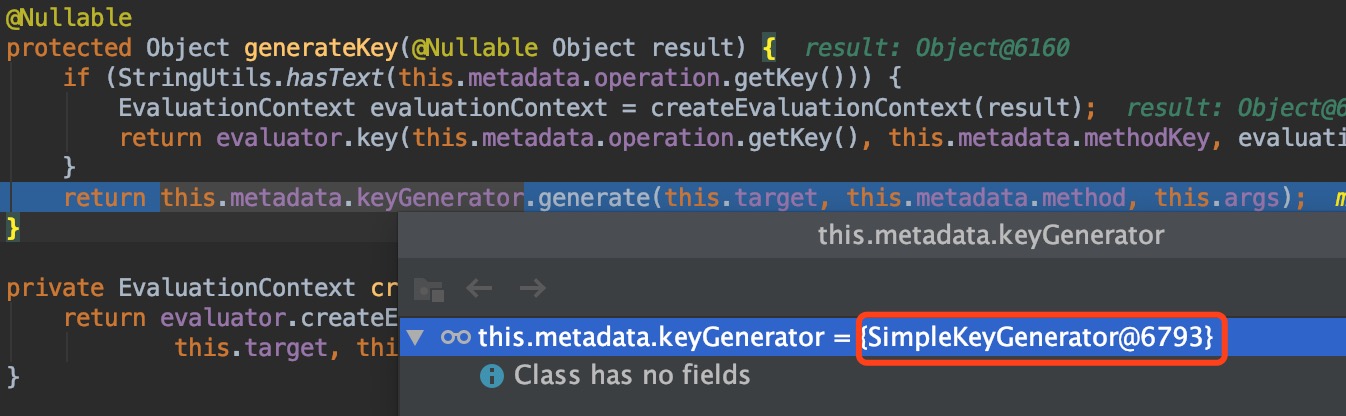
查看SimpleKeyGenerator类,可以知道其中key的生成策略
 1 public class SimpleKeyGenerator implements KeyGenerator {
 2
 3     @Override
 4     public Object generate(Object target, Method method, Object... params) {
 5         return generateKey(params);
 6     }
 7
 8     /**
 9      * Generate a key based on the specified parameters.
10      */
11     public static Object generateKey(Object... params) {
12         if (params.length == 0) {
13             return SimpleKey.EMPTY;
14         }
15         if (params.length == 1) {
16             Object param = params[0];
17             if (param != null && !param.getClass().isArray()) {
18                 return param;
19             }
20         }
21         return new SimpleKey(params);
22     }
23
24 }
分析SimpleKeyGenerator生成key的默认策略:
-
-
- 如果没有参数:key= new SimpleKey();
- 如果有一个参数:key=参数的值
- 如果有多个参数:key=new SimpleKey(params);
-
3、没有查到缓存就调用目标方法
4、将目标方法返回的结果,放入缓存中