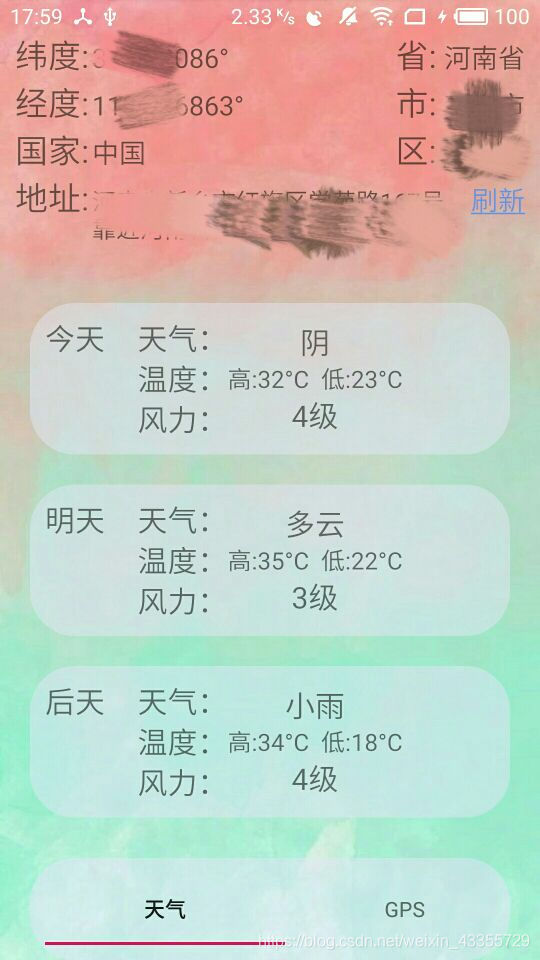
先看图
这个是定位和天气显示的界面
这个是运动轨迹的界面
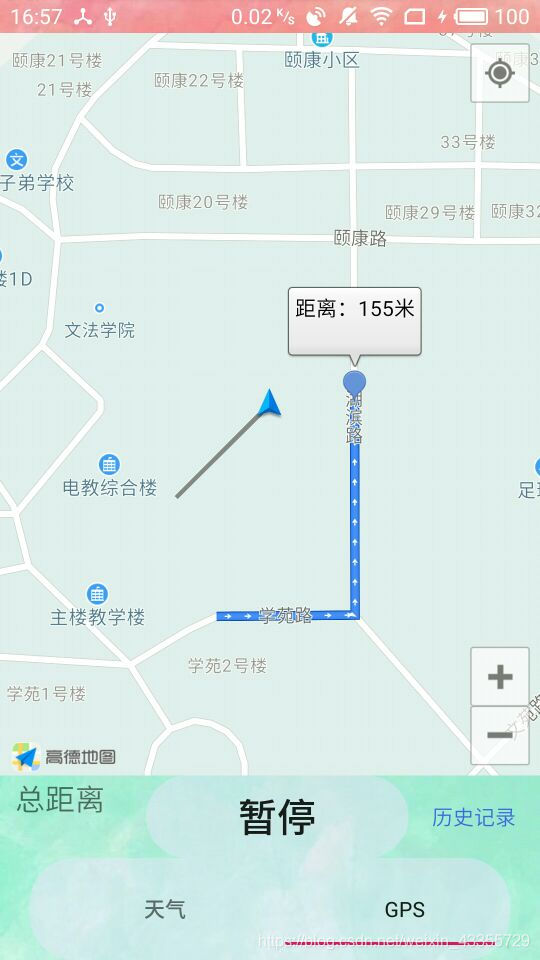
看图就知道大概功能是什么了
定位还有轨迹我用的是高德的SDK 我这就不说怎么配置环境了,高德那还是很不错的有教程有Demo 看看Demo啥都会了。
天气我用的是心知天气 网址是 https://www.seniverse.com
可以看看官方的帮助文档会发现数据用json返回的 我们只需要把返回的json数据转化一下就能得到了
可以看一下这个网址 https://docs.seniverse.com/api/weather/daily.html
明明白白 只需要把json数据解析一下就ok了
下边是获取网络json信息的代码 很简单一看就能看懂
 //开线程获取网络json信息
    public void StartThread() {
        new Thread() {
            @Override
            public void run() {
                super.run();
                try {
                    //城市需要用拼音
                    String city = "xinxiang";
                    String path = "https://api.seniverse.com/v3/weather/daily" +
                            ".json?key=你的key &location=" + city +
                            "&language=zh-Hans&unit=c" +
                            "&start=0&days=5";
                    URL url = new URL(path);
                    HttpURLConnection conn = (HttpURLConnection) url.openConnection();
                    conn.setReadTimeout(5000);
                    conn.setRequestMethod("GET");
                    if (conn.getResponseCode() == 200) {
                        //如果请求成功 获取网络上的数据
                        InputStream in = conn.getInputStream();
                        String str = "";
                        int len = -1;
                        byte[] buffer = new byte[1024];
                        while ((len = in.read(buffer)) > 0) {
                            //从buffer第0位取len的长度后拼接成字符串
                            str += new String(buffer, 0, len);
                        }
                        //解析json
                        arrayList = MyJsonParser.getWeather(str);
                        getActivity().runOnUiThread(new Runnable() {
                            @Override
                            public void run() {
                                //Log.d("测试", arrayList.get(0).getTime());
                                listViewAdapter = new ListViewAdapter(getContext(), arrayList);
                                listView.setAdapter(listViewAdapter);
                            }
                        });
                    } else {
                        Log.d("测试", "非200");
                    }
                } catch (Exception e) {
                    e.printStackTrace();
                    Log.d("测试", "错误" + e);
                }
            }
        }.start();
    }
下边是解析json数据的类的源码 也很简单会json解析就行
public class MyJsonParser {

    public static ArrayList<WeatherDate> getWeather(String str) throws Exception {
        ArrayList<WeatherDate> arrayList = new ArrayList<>();
        //获取json对象
        JSONObject json = new JSONObject(str);
        JSONArray results = json.getJSONArray("results");
        //获取城市
        JSONObject location = (JSONObject) results.get(0);
        String city = location.getJSONObject("location").getString("name");
        //获取daily 数组
        JSONArray daily = location.getJSONArray("daily");
        for (int i = 0; i < daily.length(); i++) {
            //初始化WeatherDate对象
            WeatherDate weatherDate = new WeatherDate();
            //添加城市
            weatherDate.setCity(city);
            JSONObject day = (JSONObject) daily.get(i);
            //获取最高温度
            String high = day.getString("high");
            weatherDate.setHigh(high);
            //获取最低温度
            String low = day.getString("low");
            weatherDate.setLow(low);
            //获取文字描述(白天)
            String text_day = day.getString("text_day");
            weatherDate.setWeather(text_day);
            //获取风力
            String wind_scale = day.getString("wind_scale");
            weatherDate.setFeng(wind_scale);
            //获取 天气的时间
            String date = day.getString("date");
            weatherDate.setTime(date);
            arrayList.add(weatherDate);
        }
        return arrayList;
    }
}
这样就能获取到需要的数据了 请根据自己的需要去json数据里获取
我是跟着另一个博客学的 非常感谢这位大佬
博客网址:https://blog.csdn.net/qq_42254413/article/details/84572474
定位的话其实看看高德地图的开发文档就行了
/**
     * 单次客户端的定位监听
     */
    AMapLocationListener locationSingleListener = new AMapLocationListener() {
        @Override
        public void onLocationChanged(AMapLocation location) {
            if (getLocationStr(location)) {
                Toast.makeText(getContext(), "定位成功", Toast.LENGTH_SHORT).show();
            } else {
                Toast.makeText(getContext(), "定位失败", Toast.LENGTH_SHORT).show();
            }
        }
    };

    /**
     * 启动单次客户端定位
     */
    void startSingleLocation() {
        if (null == locationClientSingle) {
            locationClientSingle = new AMapLocationClient(getContext().getApplicationContext());
        }

        AMapLocationClientOption locationClientOption = new AMapLocationClientOption();
        //使用单次定位
        locationClientOption.setOnceLocation(true);
        // 地址信息
        locationClientOption.setNeedAddress(true);
        locationClientOption.setLocationCacheEnable(false);
        locationClientSingle.setLocationOption(locationClientOption);
        locationClientSingle.setLocationListener(locationSingleListener);
        locationClientSingle.startLocation();
    }

    public boolean getLocationStr(AMapLocation location) {
        if (null == location) {
            return false;
        }
        //errCode等于0代表定位成功,其他的为定位失败,具体的可以参照官网定位错误码说明
        if (location.getErrorCode() == 0) {
            tv_longitude.setText(location.getLongitude() + "°");
            tv_latitude.setText(location.getLatitude() + "°");
            tv_country.setText(location.getCountry());
            tv_address.setText(location.getAddress());
            tv_province.setText(location.getProvince());
            tv_city.setText(location.getCity());
            tv_district.setText(location.getDistrict());
            return true;

        } else {
            return false;
        }
    }
第一个界面大概就这样
定位轨迹的话我就是根据官方的demo一点一点测试 测试出来的 我感觉轨迹不是特别的准确 大家去看官方的文档吧
这俩功能主要就是学会使用和理解官方的sdk 利用别人的sdk完成自己需要的功能
如果有要源码的小伙伴就留言吧
