目录
一、Apache的作用
- 在web被访问时通常使用 http:// 的方式
http:// 			##超文本传输协议
超文本传输协议提供软件:
Apache				##百度使用
nginx				##网易
stgw				##阿里
jfe					##jd使用
Tengine				##腾讯使用
注意:
- 可以用 curl -I 命令来查看

二、Apache的安装
dnf install httpd.x86_64 -y ##安装

三、Apache的启用
systemctl enable --now httpd ##开启服务并设定服务为开机启动

firewall-cmd --list-all ##查看火墙信息

firewall-cmd --permanent --add-service=http 	##在火墙中永久开启http访问
firewall-cmd --permanent --add-service=https 	##在火墙中永久开启https访问
firewall-cmd --reload 							##刷新火墙使设定生效

四、Apache的基本信息
- 服务名称: httpd
- 配置文件:
/etc/httpd/conf/httpd.conf 		##主配置文件
/etc/httpd/conf.d/*.conf 		##子配置文件
-
默认发布目录:/var/www/html
-
默认发布文件: index.html
-
默认端口:
http:80
https:443 -
用户: apache
-
日志: /etc/httpd/logs
五、Apache的基本配置
1、Apache端口修改
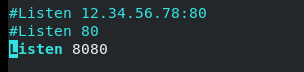
(1)8080端口试验:
vim /etc/httpd/conf/httpd.conf				##打开主配置文件
Listen 8080									##写入,把端口改为8080
在 firefox 连接,显示:(未写入内容,显示测试页面)

(2)6666端口试验
vim /etc/httpd/conf/httpd.conf					##打开主配置文件
Listen 6666										##写入,把端口改为6666
**注意:**按以上步骤修改后,http服务重启失败。
原因:

firewall-cmd --permanent --add-port=6666/tcp	##在火墙中添加端口
firewall-cmd --reload							##reload
semanage port -l | grep http					##查看http相关端口
semanage port -a -t http_port_t -p tcp 6666		##在selinux中添加端口
systemctl restart httpd							##重启httpd服务

2、默认发布文件修改
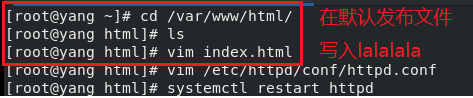
(1)在默认发布文件写入lalalala,然后:
vim /etc/httpd/conf/httpd.conf			##打开主配置文件
DirectoryIndex index.html				##写入
systemctl restart httpd
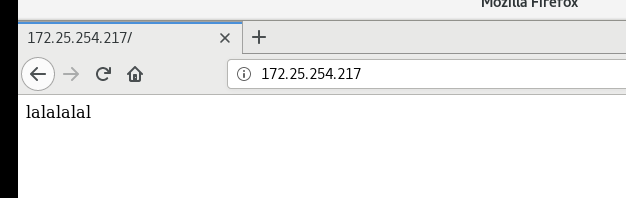
访问显示:
(2)修改默认发布文件:
vim /etc/httpd/conf/httpd.conf				##打开主配置文件
DirectoryIndex yang.html index.html			##写入
systemctl restart httpd
修改:
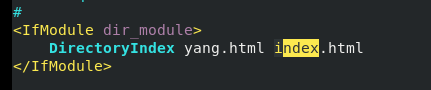
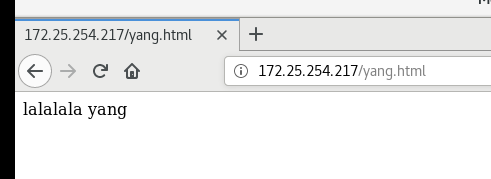
注意: 先显示yang.html中的内容,如果不存在,则显示index.html内容。
显示:
3、默认发布目录修改
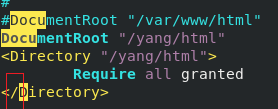
vim /etc/httpd/conf/httpd.conf
DocumentRoot "/yang/html"			##写入
<Directory "/yang/html">
Require all granted
</Directory>
修改:
注意“/”,不加会报错!!!!!
semanage fcontext -a -t httpd_sys_content_t '/yang(/.*)?'		##更改目录安全上下文
restorecon -RvvF /yang/			##刷新
systemctl restart httpd
firefox http://192.168.0.11			##用firefox访问
操作过程:

显示:

六、Apache的访问控制
实验素材:
mkdir /var/www/html/yang
vim /var/www/html/yang/index.html
yang page lalalalla							##写入
firefox http://192.168.0.11/yang
1、基于客户端ip的访问控制
(1)ip白名单:
<Directory "/var/www/html/yang">		##写入
Order Deny,Allow						##先加载deny,再加载allow
Allow from 172.25.254.217
Deny from All
</Directory>
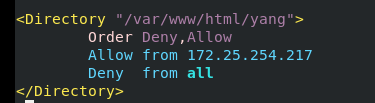
注意:
- 先读取deny文件,再读取allow文件。
- 后读取的文件会覆盖掉和先读取文件的重叠部分。
(2)ip黑名单:
<Directory "/var/www/html/yang">		##写入
Order Allow,Deny						##先加载allow,再加载deny
Allow from All
Deny from 172.25.254.217
</Directory>
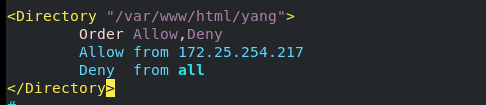
注意:
- 先读取allow文件,再读取deny文件。
- 后读取的文件会覆盖掉和先读取文件的重叠部分。
2、基于用户认证
vim /etc/httpd/conf/httpd.conf
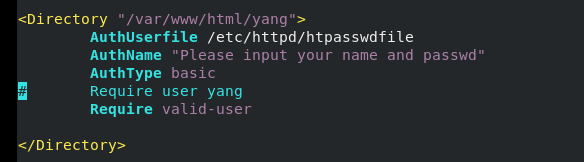
<Directory "/var/www/html/yang">
AuthUserfile /etc/httpd/htpasswdfile ##指定认证文件
AuthName "Please input your name and password" ##认证提示语
AuthType basic ##认证类型
Require user yang ##允许通过的认证用户
Require valid-user ##允许所有用户通过认证
</Directory>
htpasswd -cm /etc/httpd/htpasswdfile admin ##生成认证文件
注意:
- 当 /etc/httpd/htpasswdfile 已经存在时,添加用户时不要加 -c 参数否则会覆盖掉源文件内容。
操作过程:

注意: 此处生成的用户均为虚拟用户,不是真实存在的。
显示:

