本篇是上篇Qt开发总结(14)——Model/View 框架的延续,从这篇总结可以很具体的实现一些Model/View控件和效果,大部分都是干货,在最后还给出了官方的一些示例供学习参考。
一个简单的只读表
  //main.cpp
  #include <QtWidgets/QApplication>
  #include <QtWidgets/QTableView>
  #include "mymodel.h"

  int main(int argc, char *argv[])
  {
      QApplication a(argc, argv);
      QTableView tableView;
      MyModel myModel(0);
      tableView.setModel( &myModel );
      tableView.show();
      return a.exec();
  }
我们从上面的代码看到,一个表格的显示只需要为它set model,表格的数据显示变成了莫model的编写。Model可以用一些现有的model,比如上面提到的QStandardItemModel,这里我们新建一个自己的model,并用一个新建类MyModel实现它。
  // mymodel.h
  #include <QAbstractTableModel>

  class MyModel : public QAbstractTableModel
  {
      Q_OBJECT
  public:
      MyModel(QObject *parent);
      int rowCount(const QModelIndex &parent = QModelIndex()) const override ;
      int columnCount(const QModelIndex &parent = QModelIndex()) const override;
      QVariant data(const QModelIndex &index, int role = Qt::DisplayRole) const override;
  };
这里继承QAbstractTableModel抽象基类创建一个MyModel类,该类要实现3个虚函数:
  // mymodel.cpp
  #include "mymodel.h"

  MyModel::MyModel(QObject *parent)
      :QAbstractTableModel(parent)
  {
  }

  int MyModel::rowCount(const QModelIndex & /*parent*/) const
  {
     return 2;
  }

  int MyModel::columnCount(const QModelIndex & /*parent*/) const
  {
      return 3;
  }

  QVariant MyModel::data(const QModelIndex &index, int role) const
  {
      if (role == Qt::DisplayRole)
      {
         return QString("Row%1, Column%2")
                     .arg(index.row() + 1)
                     .arg(index.column() +1);
      }
      return QVariant();
  }
设置基本属性
行和列的数量由MyModel :: rowCount()和MyModel :: columnCount()提供。 当视图必须知道单元格的文本是什么时,它会调用方法MyModel :: data()。 使用参数索引指定行和列信息,并将角色设置为Qt :: DisplayRole。 在我们的示例中,生成了应显示的数据。 在实际的应用程序中,MyModel将有一个名为MyData的成员,它作为所有读写操作的目标。
除了控制视图显示的文本外,模型还控制文本的外观。事实上,除了data()方法外,不需要更改任何内容来设置字体、背景颜色、对齐方式和复选框。下面是产生上面所示结果的data()方法。不同的是,这次我们使用参数int role根据其值返回不同的信息片段。
  // mymodel.cpp
  QVariant MyModel::data(const QModelIndex &index, int role) const
  {
      int row = index.row();
      int col = index.column();
      // generate a log message when this method gets called
      qDebug() << QString("row %1, col%2, role %3")
              .arg(row).arg(col).arg(role);

      switch(role){
      case Qt::DisplayRole:
          if (row == 0 && col == 1) return QString("<--left");
          if (row == 1 && col == 1) return QString("right-->");

          return QString("Row%1, Column%2")
                  .arg(row + 1)
                  .arg(col +1);
          break;
      case Qt::FontRole:
          if (row == 0 && col == 0) //change font only for cell(0,0)
          {
              QFont boldFont;
              boldFont.setBold(true);
              return boldFont;
          }
          break;
      case Qt::BackgroundRole:

          if (row == 1 && col == 2)  //change background only for cell(1,2)
          {
              QBrush redBackground(Qt::red);
              return redBackground;
          }
          break;
      case Qt::TextAlignmentRole:

          if (row == 1 && col == 1) //change text alignment only for cell(1,1)
          {
              return Qt::AlignRight + Qt::AlignVCenter;
          }
          break;
      case Qt::CheckStateRole:

          if (row == 1 && col == 0) //add a checkbox to cell(1,0)
          {
              return Qt::Checked;
          }
      }
      return QVariant();
  }
每个格式化属性都将通过对data()方法的单独调用从模型中请求。角色参数用于让模型知道正在请求哪个属性:
| Meaning |
Type |
|
| 文本 |
||
| 字体 |
||
| 单元格北京画笔 |
||
| 对其方式 |
||
| 复选框 |
更新数据显示
这个小例子展示了模型的被动性。 该模型不知道何时使用或需要哪些数据。 它只是在每次视图请求时提供数据。当模型的数据需要更改时会发生什么? 视图如何实现数据已更改并需要再次读取? 该模型必须发出一个信号,指示哪些单元格范围已经改变。
//we identify the top left cell
QModelIndex topLeft = createIndex(0,0);
//emit a signal to make the view reread identified data
emit dataChanged(topLeft, topLeft);
我们要求视图通过发出dataChanged()信号再次读取左上角单元格中的数据。注意,我们没有显式地将dataChanged()信号连接到视图。这在我们调用setModel()时自动发生。
设置标题
可以通过该方法隐藏标题:tableView->verticalHeader()->hide();如果要显示标题,则需要重写headerdata()方法。
  QVariant MyModel::headerData(int section, Qt::Orientation orientation, int role) const
  {
      if (role == Qt::DisplayRole)
      {
          if (orientation == Qt::Horizontal) {
              switch (section)
              {
              case 0:
                  return QString("first");
              case 1:
                  return QString("second");
              case 2:
                  return QString("third");
              }
          }
      }
      return QVariant();
  }

表格内容编辑
模型决定了编辑功能是否可用。我们只需要修改模型就可以启用可用的编辑功能。这是通过重新实现以下虚函数来完成的:setdata()和flags()。
  bool MyModel::setData(const QModelIndex & index, const QVariant & value, int role)
  {
      if (role == Qt::EditRole)
      {
          //save value from editor to member m_gridData
          m_gridData[index.row()][index.column()] = value.toString();
          //for presentation purposes only: build and emit a joined string
          QString result;
          for (int row= 0; row < ROWS; row++)
          {
              for(int col= 0; col < COLS; col++)
              {
                  result += m_gridData[row][col] + ' ';
              }
          }
          emit editCompleted( result );
      }
      return true;
  }
每次用户编辑单元格时都会调用setdata()。index参数告诉我们哪个字段已被编辑,value提供编辑过程的结果。角色将始终设置为qt::editRole,因为我们的单元格只包含文本。如果存在复选框,并且用户权限设置为允许选中该复选框,则还将使用设置为qt::checkStateRole的角色进行调用。我们使用二维数组qstring m_griddata来存储数据。这使得m_griddata成为mymodel的核心。MyModel的其余部分就像一个包装器,将m_GridData适配到QabstratemModel接口。我们还引入了editCompleted()信号,这使得将修改后的文本传输到窗口标题成为可能。
可以使用flags()调整单元格的各种属性。返回Qt::ItemIsSelectable | Qt::ItemIsEditable | Qt::ItemIsEnabled足以显示可以选择单元格的编辑器。如果编辑一个单元格修改的数据多于该特定单元格中的数据,则模型必须发出dataChanged()信号,以便读取已更改的数据。
建立树形表
QListView, QTableView和QTreeView使用列表、表和树的抽象模型。这使得可以使用同一模型中的几种不同类型的视图类。

建立一个树形表,我们使用QStandardItemModel,它是一个层次数据容器,也实现了QAbstractItemModel。若要显示树,QStandardItemModel必须填充 QStandardItems,它能够保存文本、字体、复选框或画笔等项的所有标准属性。
treeView = new QTreeView(this);
standardModel = new QStandardItemModel ;
QList<QStandardItem *> preparedRow =prepareRow("first", "second", "third");
QStandardItem *item = standardModel->invisibleRootItem();
// adding a row to the invisible root item produces a root element
item->appendRow(preparedRow);
QList<QStandardItem *> secondRow =prepareRow("111", "222", "333");
// adding a row to an item starts a subtree
preparedRow.first()->appendRow(secondRow);
treeView->setModel(standardModel);
treeView->expandAll();
其中prepareRow是自己写的一个返回QStandardItem对象的接口函数:
  QList<QStandardItem *> MainWindow::prepareRow(const QString &first,
                                                  const QString &second,
                                                  const QString &third)
  {
      QList<QStandardItem *> rowItems;
      rowItems << new QStandardItem(first);
      rowItems << new QStandardItem(second);
      rowItems << new QStandardItem(third);
      return rowItems;
  }

树形表检索
视图管理单独选择模型中的选项,可以使用selectionModel()方法检索。 我们检索选择模型,以便将槽函数连接到其selectionChanged()信号。
  void MainWindow::selectionChangedSlot(const QItemSelection & /*newSelection*/, const QItemSelection & /*oldSelection*/)
  {
      //get the text of the selected item
      const QModelIndex index = treeView->selectionModel()->currentIndex();
      QString selectedText = index.data(Qt::DisplayRole).toString();
      //find out the hierarchy level of the selected item
      int hierarchyLevel=1;
      QModelIndex seekRoot = index;
      while(seekRoot.parent() != QModelIndex())
      {
          seekRoot = seekRoot.parent();
          hierarchyLevel++;
      }
      QString showString = QString("%1, Level %2").arg(selectedText)
                           .arg(hierarchyLevel);
      setWindowTitle(showString);
  }
我们通过调用treeView->selectionModel()->currentIndex()获得与选择相对应的模型索引,并通过使用模型索引获得字段的字符串。然后我们只计算项目的层次级别。顶级项没有父级,parent()方法将返回默认构造的QModelIndex()。这就是为什么我们使用parent()方法迭代到顶层,同时计算迭代期间执行的步骤。
代理
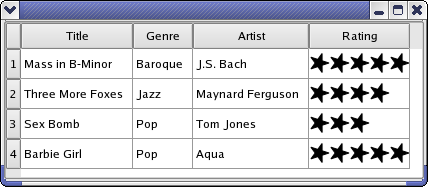
在目前为止的所有示例中,数据在单元格中显示为文本或复选框,并作为文本或复选框进行编辑。 提供这些演示和编辑服务的组件称为代理。 我们才刚刚开始使用代理,因为视图使用默认代理。 但是想象一下,我们想要一个不同的编辑器(例如,滑块或下拉列表)或想象我们想要将数据呈现为图形。 让我们来看一个名为Star Delegate的例子,其中星星用于显示评级:
视图有一个setItemDelegat()方法,该方法替换默认代理并安装自定义代理。可以通过创建继承自QStyledItemDelegate的类来编写新代理。为了编写一个显示星型并且没有输入功能的代理,我们只需要重写2个方法。
  class StarDelegate : public QStyledItemDelegate
  {
      Q_OBJECT
  public:
      StarDelegate(QWidget *parent = 0);
      void paint(QPainter *painter, const QStyleOptionViewItem &option,
                 const QModelIndex &index) const;
      QSize sizeHint(const QStyleOptionViewItem &option,
                     const QModelIndex &index) const;
  };
paint() 根据基础数据的内容绘制星号。可以通过调用index.data()来查找数据。代理的sizeHint()方法用于获取每个星的尺寸,因此单元将提供足够的高度和宽度来容纳星。如果要在视图类的网格中使用自定义图形表示来显示数据,则编写自定义代理是正确的选择。如果您想离开网格,您将不会使用自定义代理,而是使用自定义视图类。
源码示例
请移步本人下载频道下载典型应用实例:editabletreemodel https://download.csdn.net/download/bjtuwayne/12017958。
