Spring Cloud是一系列框架的有序集合。它利用Spring Boot的开发便利性巧妙地简化了分布式系统基础设施的开发,如服务发现注册、配置中心、消息总线、负载均衡、断路器、数据监控等,都可以用Spring Boot的开发风格做到一键启动和部署。Spring并没有重复制造轮子,它只是将目前各家公司开发的比较成熟、经得起实际考验的服务框架组合起来,通过Spring Boot风格进行再封装屏蔽掉了复杂的配置和实现原理,最终给开发者留出了一套简单易懂、易部署和易维护的分布式系统开发工具包。 ——摘自搜狗百科
本文主要从Eureka、Gateway、Feign、Hystrix、Ribbon、Config以及Nacos等SpringCloud的基本组件展开描述,这是一次微服务技术初探的旅程,既然已经准备好了,那就出发吧~
目录
二、API网关服务:Spring Cloud Gateway

一、服务治理:Spring Cloud Eureka
Spring Cloud Netflix的Eureka组件实现了服务治理,提供服务注册与发现的功能,类似于Zookeeper。服务提供者会注册服务到服务注册中心,并且每过一段时间都要发送心跳向服务注册中心,下线的时候也需要告知服务注册中心,还可以获取服务注册中心中的服务列表。服务消费者可以从服务注册中心中拉取服务列表。

服务注册与发现模块分为服务注册中心和服务提供者。A、B、C、D四个服务,在Eureka服务注册中心注册后,他们都可以拿到Eureka服务的注册清单,A、B、C、D四个服务互相调用不再通过具体的IP地址,而是通过服务名来调用。
1、服务注册中心
(1)首先,我们在IDEA中基于Maven构建一个空的工程,如下图所示。

(2)选择“Maven Project”。

(3)选择SpringBoot的版本-->“Spring Cloud”--> “Cloud Bootstrap”。

(4)核实项目名称等相关条件,点击“Finish”完成新建项目操作。

(5)新建的工程为主工程,在主工程上新建服务注册中心。右键-->“New”-->“Module”。

(6)接下来的步骤与上述建造新工程的步骤一样,值得注意的是在选择依赖的时候,如下所示。


(7)服务注册中心建完之后,在EurekaserverApplication中新加EnableEurekaServer注解,目的是标注该应用程序是一个注册服务中心。
package com.wzh.eurekaserver;

import org.springframework.boot.SpringApplication;
import org.springframework.boot.autoconfigure.SpringBootApplication;
import org.springframework.cloud.netflix.eureka.server.EnableEurekaServer;

@SpringBootApplication
//@EnableEurekaServer的作用:标注该应用程序是一个注册服务中心
@EnableEurekaServer
public class EurekaserverApplication {

    public static void main(String[] args) {
        SpringApplication.run(EurekaserverApplication.class, args);
    }

}
(8)修改resources下的application.properties配置文件,如下:
server.port=8761

spring.application.name=eurekaserver

spring.cloud.inetutils.preferred-networks=127.0.0.1
spring.cloud.inetutils.default-ip-address=127.0.0.1

eureka.server.peer-node-read-timeout-ms=3000
eureka.server.enable-self-preservation=false
eureka.instance.prefer-ip-address=true
eureka.instance.instance-id=127.0.0.1:8761

eureka.client.register-with-eureka=true
eureka.client.fetch-registry=false
eureka.client.healthcheck.enabled=true
eureka.client.service-url.defaultZone=http://127.0.0.1:8761/eureka
(9)启动应用程序,访问http://localhost:8761,如果出现以下界面说明服务注册中心启动成功。

2、服务提供者
(1)同样的,接下来的步骤与上述建造新工程的步骤一样,在选择依赖的时候同样需要注意(下面所涉及的新建Module的过程,如无特殊说明,除选择依赖的步骤,其余均与建造新工程的步骤一样)。如下所示,选择Spring Web、Eureka Discovery Client依赖。


(2)修改resources下的application.properties配置文件。
server.port=8762

spring.application.name=eurekaclient

eureka.client.service-url.defaultZone=http://127.0.0.1:8761/eureka

#出现错误时, 直接抛出异常
spring.mvc.throw-exception-if-no-handler-found=true
#不要为我们工程中的资源文件建立映射
spring.resources.add-mappings=false
(3)创建一个简单的UserCtrl测试类,对外提供服务。
package com.wzh.eurekaclient.users;

import org.springframework.beans.factory.annotation.Value;
import org.springframework.web.bind.annotation.GetMapping;
import org.springframework.web.bind.annotation.RestController;

/**
 * @author: xzw
 * @create_date: 2020/2/20 15:29
 * @desc: 创建UserCtrl对外提供服务
 * @modifier:
 * @modified_date:
 * @desc:
 */
@RestController
public class UserCtrl {
    @Value("${server.port}")
    private int port;

    @GetMapping("index")
    public String index(){
        return "Get users, port:" + port;
    }
}
(4)启动eurekaclient服务,发现已经被注册到注册中心。

(5)通过浏览器访问:http://127.0.0.1:8762/index。

二、API网关服务:Spring Cloud Gateway
在实际的项目中,一个项目可能会包含很多个服务,每个服务的端口和IP 都可能不一样。那么,如果我们以这种形式提供接口给外部调用,代价是非常大的。从安全性上考虑,系统对外提供的接口应该进行合法性校验,防止非法请求,如果按照这种形式,那每个服务都要写一遍校验规则,维护起来也很麻烦。这个时候,我们需要统一的入口,接口地址全部由该入口进入,而服务只部署在局域网内供这个统一的入口调用,这个入口就是我们通常说的服务网关。
Spring Cloud提供了这样一个解决方案,那就是zuul。它的作用就是进行路由转发、异常处理和过滤拦截。Spring Cloud Gateway取代了Zuul网关,是Spring Cloud官方推出的第二代网关框架。

1、创建Gateway工程
(1)新建Module并选择Eureka Discovery Client与Gateway依赖。


(2)修改resources下的application.properties配置文件。
server.port=8787

spring.application.name=gateway

spring.cloud.gateway.discovery.locator.enabled=true

# 微服务应用名默认大写访问,通过以下配置可以实现小写访问
spring.cloud.gateway.discovery.locator.lower-case-service-id=true

logging.level.org.springframework.cloud.gateway=trace

eureka.client.service-url.defaultZone=http://127.0.0.1:8761/eureka
(3)启动服务,查看注册中心。

(4)通过网关访问服务提供者。

2、服务拦截
Gateway 提供了多种 Filter 可供选择,如 GatewayFilter、GlobalFilter 等,不同的 Filter 的作用是不一样的,GatewayFilter 处理单个路由的请求,而 GlobalFilter 根据名字大致就能知道其作用,它是一个全局 Filter,可以过滤所有路由请求,下面以 GlobalFilter 为例。
package com.xzw.gateway.filter;

import com.google.gson.Gson;
import org.apache.commons.lang.StringUtils;
import org.springframework.cloud.gateway.filter.GatewayFilterChain;
import org.springframework.cloud.gateway.filter.GlobalFilter;
import org.springframework.core.Ordered;
import org.springframework.core.io.buffer.DataBuffer;
import org.springframework.http.HttpStatus;
import org.springframework.http.server.reactive.ServerHttpResponse;
import org.springframework.stereotype.Component;
import org.springframework.web.server.ServerWebExchange;
import reactor.core.publisher.Mono;

import java.nio.charset.StandardCharsets;
import java.util.HashMap;
import java.util.Map;

/**
 * @author: xzw
 * @create_date: 2020/2/23 15:28
 * @desc:
 * @modifier:
 * @modified_date:
 * @desc:
 */
@Component
public class TokenFilter implements GlobalFilter, Ordered {
    @Override
    public Mono<Void> filter(ServerWebExchange exchange, GatewayFilterChain chain) {
        String token = exchange.getRequest().getQueryParams().getFirst("token");

        if (StringUtils.isBlank(token)){
            ServerHttpResponse response = exchange.getResponse();

            Map<String, Object> msg = new HashMap<>();
            msg.put("code", -1);
            msg.put("msg", "鉴权失败");

            Gson gson = new Gson();
            byte[] bits = gson.toJson(msg).getBytes(StandardCharsets.UTF_8);
            DataBuffer buffer = response.bufferFactory().wrap(bits);

//            response.setStatusCode(HttpStatus.UNAUTHORIZED);
            response.getHeaders().add("Content-Type", "application/json;charset=UTF-8");

            return response.writeWith(Mono.just(buffer));
        }
        return chain.filter(exchange);
    }

    @Override
    public int getOrder() {
        return 0;
    }
}
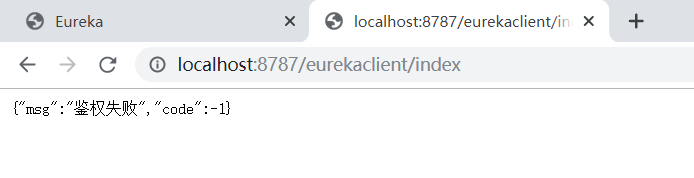
此时再次通过网关访问服务提供者,可以发现如下情况:
添加token再次访问:

3、错误拦截
在一个大型系统中,服务是部署在不同的服务器下面的,我们难免会遇到某一个服务挂掉或者请求不到的时候,如果不做任何处理,服务网关请求不到会抛出 500错误,对用户是不友好的。为了提供友好性服务,需要返回友好性提示,Spring Cloud Gateway 为我们提供了一个名叫 DefaultErrorWebExceptionHandler 的类,通过继承它我们就可以对这些请求不到的服务进行错误处理。
首先定义一个异常处理类:
package com.xzw.gateway.exception;

import org.springframework.boot.autoconfigure.web.ErrorProperties;
import org.springframework.boot.autoconfigure.web.ResourceProperties;
import org.springframework.boot.autoconfigure.web.reactive.error.DefaultErrorWebExceptionHandler;
import org.springframework.boot.web.reactive.error.ErrorAttributes;
import org.springframework.context.ApplicationContext;
import org.springframework.web.reactive.function.server.*;

import java.util.HashMap;
import java.util.Map;

/**
 * @author: xzw
 * @create_date: 2020/2/24 11:16
 * @desc:
 * @modifier:
 * @modified_date:
 * @desc:
 */
public class JsonExceptionHandler extends DefaultErrorWebExceptionHandler {
    public JsonExceptionHandler (ErrorAttributes errorAttributes, ResourceProperties resourceProperties,
                                 ErrorProperties errorProperties, ApplicationContext applicationContext) {
        super(errorAttributes, resourceProperties, errorProperties, applicationContext);
    }

    /**
     * 获取异常属性
     * @param request
     * @param includeStackTrace
     * @return
     */
    @Override
    protected Map<String, Object> getErrorAttributes(ServerRequest request, boolean includeStackTrace) {
        int code = 500;

        Throwable error = super.getError(request);

        if (error instanceof org.springframework.cloud.gateway.support.NotFoundException) {
            code = 404;
        }
        return response(code, this.buildMessage(request, error));
    }

    /**
     * 指定响应处理方法为JSON处理的方法
     * @param errorAttributes
     * @return
     */
    @Override
    protected RouterFunction<ServerResponse> getRoutingFunction(ErrorAttributes errorAttributes) {
        return RouterFunctions.route(RequestPredicates.all(), this::renderErrorResponse);
    }

    /**
     * 根据code获取对应的HttpStatus
     * @param errorAttributes
     * @return
     */
    @Override
    protected int getHttpStatus(Map<String, Object> errorAttributes) {
        int statusCode = (int)errorAttributes.get("no");
        return statusCode;
    }

    /**
     * 构建异常信息
     * @param request
     * @param ex
     * @return
     */
    private String buildMessage(ServerRequest request, Throwable ex) {
        StringBuilder message = new StringBuilder("Fail to handle request [");
        message.append(request.methodName());
        message.append(request.uri());
        message.append("]");

        if (ex != null) {
            message.append(":");
            message.append(ex.getMessage());
        }

        return message.toString();
    }

    /**
     * 构建返回的json格式
     * @param status
     * @param errorMessage
     * @return
     */
    public static Map<String, Object> response(int status, String errorMessage) {
        Map<String, Object> map = new HashMap<>();
        map.put("no", status);
        map.put("msg", errorMessage);

        return map;
    }
}
然后再定义一个异常处理配置类,以便发生异常时调用定义的异常处理类:
package com.xzw.gateway.config;

import com.xzw.gateway.exception.JsonExceptionHandler;
import org.springframework.beans.factory.ObjectProvider;
import org.springframework.boot.SpringBootConfiguration;
import org.springframework.boot.autoconfigure.web.ResourceProperties;
import org.springframework.boot.autoconfigure.web.ServerProperties;
import org.springframework.boot.context.properties.EnableConfigurationProperties;
import org.springframework.boot.web.reactive.error.ErrorAttributes;
import org.springframework.boot.web.reactive.error.ErrorWebExceptionHandler;
import org.springframework.context.ApplicationContext;
import org.springframework.context.annotation.Bean;
import org.springframework.core.Ordered;
import org.springframework.core.annotation.Order;
import org.springframework.http.codec.ServerCodecConfigurer;
import org.springframework.web.reactive.result.view.ViewResolver;

import java.util.Collections;
import java.util.List;

/**
 * @author: xzw
 * @create_date: 2020/2/24 12:32
 * @desc:
 * @modifier:
 * @modified_date:
 * @desc:
 */
@SpringBootConfiguration
@EnableConfigurationProperties({ServerProperties.class, ResourceProperties.class})
public class ErrorHandlerConfiguration {
    private final ServerProperties serverProperties;

    private final ApplicationContext applicationContext;

    private final ResourceProperties resourceProperties;

    private final List<ViewResolver> viewResolvers;

    private final ServerCodecConfigurer serverCodecConfigurer;

    public ErrorHandlerConfiguration(ServerProperties serverProperties, ResourceProperties resourceProperties,
                                     ObjectProvider<List<ViewResolver>> viewResolversProvider,
                                     ServerCodecConfigurer serverCodecConfigurer,
                                     ApplicationContext applicationContext) {
        this.serverProperties = serverProperties;
        this.applicationContext = applicationContext;
        this.resourceProperties = resourceProperties;
        this.viewResolvers = viewResolversProvider.getIfAvailable(Collections::emptyList);
        this.serverCodecConfigurer = serverCodecConfigurer;
    }

    /**
     * gateway启动时执行此方法,将JsonExceptionHandler注入到Spring容器中
     * 以便发生异常时执行自定义的JsonExceptionHandler
     * @param errorAttributes
     * @return
     */
    @Bean
    @Order(Ordered.HIGHEST_PRECEDENCE)
    public ErrorWebExceptionHandler errorWebExceptionHandler(ErrorAttributes errorAttributes){
        JsonExceptionHandler exceptionHandler = new JsonExceptionHandler(
                errorAttributes,
                this.resourceProperties,
                this.serverProperties.getError(),
                this.applicationContext
        );

        exceptionHandler.setViewResolvers(this.viewResolvers);
        exceptionHandler.setMessageWriters(this.serverCodecConfigurer.getWriters());
        exceptionHandler.setMessageReaders(this.serverCodecConfigurer.getReaders());

        return exceptionHandler;
    }
}
此时,若停掉eurekaclient服务,再通过网关访问服务提供者,便会出现以下情况:

三、 服务消费者:Feign
一个大型的系统由多个微服务模块组成,各模块之间不可避免需要进行通信,一般我们可以通过内部接口调用的形式,服务 A 提供一个接口,服务 B 通过 HTTP 请求调用服务 A 的接口,为了简化开发Spring Cloud 提供了一个基础组件OpenFeign,方便不同服务之间的 HTTP 调用。

接下来还是以调用eurekaclient的index服务为例。
(1)新建feign Module,选择Spring Web、OpenFeign、Eureka Discovery Client依赖。


(2)在启动类中增加@EnableFeignClients注解以开启OpenFeign。
package com.xzw.feign;

import org.springframework.boot.SpringApplication;
import org.springframework.boot.autoconfigure.SpringBootApplication;
import org.springframework.cloud.openfeign.EnableFeignClients;

@SpringBootApplication
//@EnableFeignClients:开启OpenFeign
@EnableFeignClients
public class FeignApplication {

    public static void main(String[] args) {
        SpringApplication.run(FeignApplication.class, args);
    }

}
(3)修改resources下的application.properties配置文件。
server.port=8081

spring.application.name=feign

eureka.client.service-url.defaultZone=http://127.0.0.1:8761/eureka/
(4)新建UserService接口。
package com.xzw.feign.service;

import org.springframework.cloud.openfeign.FeignClient;
import org.springframework.web.bind.annotation.RequestMapping;
import org.springframework.web.bind.annotation.RequestMethod;

/**
 * @author: xzw
 * @create_date: 2020/2/24 14:07
 * @desc:
 * @modifier:
 * @modified_date:
 * @desc:
 */
@FeignClient(value = "eurekaclient")
public interface UserService {
    @RequestMapping(value = "/index", method = RequestMethod.GET)
    String index();
}
(5)新建TestCtrl进行测试。
package com.xzw.feign.test;

import com.xzw.feign.service.UserService;
import org.springframework.beans.factory.annotation.Autowired;
import org.springframework.web.bind.annotation.GetMapping;
import org.springframework.web.bind.annotation.RestController;

/**
 * @author: xzw
 * @create_date: 2020/2/24 14:08
 * @desc:
 * @modifier:
 * @modified_date:
 * @desc:
 */
@RestController
public class TestCtrl {
    @Autowired
    private UserService userService;

    @GetMapping("test")
    public String test(){
        return userService.index();
    }
}
(6)启动服务。

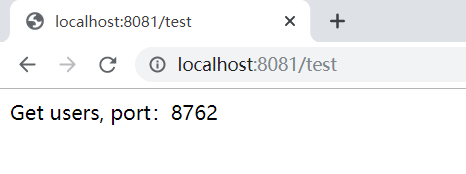
(7)访问测试。

四、服务异常处理:Hystrix
利用 OpenFeign 的声明式 HTTP 客户端,通过注解的形式很容易做到不同服务之间的相互调用。因为各种原因,服务难免会发生故障,那么其他服务去调用这个服务就会调不到,甚至会一直卡在那里,导致用户体验不好。针对这个问题,我们就需要对服务接口做错误处理,一旦发现无法访问服务,则立即返回并报错,我们捕捉到这个异常就可以以可读化的字符串返回到前端。

为了解决这个问题,业界提出了熔断器模型。SpringCloud 集成了 Netflix 开源的 Hystrix 组件,该组件实现了熔断器模型,它使得我们很方便地实现熔断器。
在很早的版本中,Feign的断路器默认是开启的。后来有人认为这样不方便。一旦使用Feign就默认使用了断路器功能,导致了一些问题。后面断路器就是默认关闭的,需要手动打开。我们可以在 application中进行启用。
1、熔断器
(1)启用熔断器服务:feign.hystrix.enabled=true。
server.port=8081

spring.application.name=feign

eureka.client.service-url.defaultZone=http://127.0.0.1:8761/eureka/

# 启用熔断器服务
feign.hystrix.enabled=true
(2) 在与UserService同一包下新建一个UserServiceError类。
package com.xzw.feign.service;

import org.springframework.stereotype.Component;

/**
 * @author: xzw
 * @create_date: 2020/3/1 10:28
 * @desc:
 * @modifier:
 * @modified_date:
 * @desc:
 */
@Component
public class UserServiceError implements UserService{
    @Override
    public String index() {
        return "服务发生故障!";
    }
}
(3)在UserService接口的注解上增加fallback = UserServiceError.class属性。
package com.xzw.feign.service;

import org.springframework.cloud.openfeign.FeignClient;
import org.springframework.web.bind.annotation.RequestMapping;
import org.springframework.web.bind.annotation.RequestMethod;

/**
 * @author: xzw
 * @create_date: 2020/2/24 14:07
 * @desc:
 * @modifier:
 * @modified_date:
 * @desc:
 */
@FeignClient(value = "eurekaclient", fallback = UserServiceError.class)
public interface UserService {
    @RequestMapping(value = "/index", method = RequestMethod.GET)
    String index();
}
(4)启动服务进行测试。
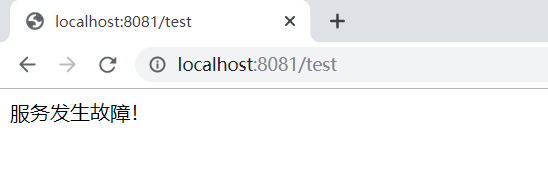
(5)关闭eurekaclient服务,再次访问,出现下图情况,说明熔断器生效。
2、熔断器监控
Hystrix 给我们提供了一个强大的功能,那就是 Dashboard。Dashboard 是一个 Web 界面,它可以让我们监控 Hystrix Command 的响应时间、请求成功率等数据。
(1)首先在Feign工程中添加如下配置。
        <dependency>
            <groupId>org.springframework.cloud</groupId>
            <artifactId>spring-cloud-starter-netflix-hystrix-dashboard</artifactId>
            <version>2.2.1.RELEASE</version>
        </dependency>
(2)在启动类中加入@EnableHystrixDashboard注解,并增加一个 Bean 方法。
package com.xzw.feign;

import com.netflix.hystrix.contrib.metrics.eventstream.HystrixMetricsStreamServlet;
import org.springframework.boot.SpringApplication;
import org.springframework.boot.autoconfigure.SpringBootApplication;
import org.springframework.boot.web.servlet.ServletRegistrationBean;
import org.springframework.cloud.netflix.hystrix.dashboard.EnableHystrixDashboard;
import org.springframework.cloud.openfeign.EnableFeignClients;
import org.springframework.context.annotation.Bean;

@SpringBootApplication
//@EnableFeignClients:开启OpenFeign
@EnableFeignClients
@EnableHystrixDashboard
public class FeignApplication {

    public static void main(String[] args) {
        SpringApplication.run(FeignApplication.class, args);
    }

    @Bean
    public ServletRegistrationBean getServlet(){
        HystrixMetricsStreamServlet streamServlet = new HystrixMetricsStreamServlet();

        ServletRegistrationBean registrationBean = new ServletRegistrationBean(streamServlet);
        registrationBean.setLoadOnStartup(1);
        registrationBean.addUrlMappings("/hystrix.stream");
        registrationBean.setName("HystrixMetricsStreamServlet");

        return registrationBean;
    }

}
(3)重启Feign服务,并访问localhost:8081/hystrix。

(4)访问http://127.0.0.1/8081/hystrix.stream,单击 Monitor Stream 按钮进入下一界面,打开新窗口访问 http://127.0.0.1:8081/test,在 Dashboard 界面即可看到 Hystrix 监控界面,如下所示。

五、配置中心:Config
SpringCloud 的很多组件,每个组件都创建了一个工程,而每个工程都会有一个配置文件,并且有些配置是一样的。例如:在实际项目中,我们创建了用户和订单两个服务,这两个服务是同一个数据库,那么我们在这两个服务的配置文件都会配置相同的数据源,一旦我们的数据库地址发生改变(只是一种情况),用户和订单两个服务的配置文件都需要改,这还是只是两个服务,在一个大型系统(比如淘宝),将会有成千上万个服务,按照这种方式代价无疑是巨大的。既然有这个问题,就一定会有解决方案,那就是创建一个配置中心,专门用于管理系统的所有配置,也就是我们将所有配置文件放到统一的地方进行管理。
Spring Cloud Config 是一个高可用的分布式配置中心,它支持将配置存放到内存(本地),也支持将其放到 Git 仓库进行统一管理。
1、创建Git仓库
为了方便测试,通过Github创建配置中心的Git仓库,地址为:https://github.com/Ericxzw/SpringCloudConfig.git。

2、创建配置中心
(1)选择Config Server、Eureka Discovery Client依赖。


(2)在启动类ConfigApplication中增加@EnableConfigServer注解。
package com.xzw.config;

import org.springframework.boot.SpringApplication;
import org.springframework.boot.autoconfigure.SpringBootApplication;
import org.springframework.cloud.config.server.EnableConfigServer;

@SpringBootApplication
@EnableConfigServer
public class ConfigApplication {

    public static void main(String[] args) {
        SpringApplication.run(ConfigApplication.class, args);
    }

}
(3)修改resources下的application.properties配置文件。
server.port=8585

spring.application.name=config
spring.profiles.active=dev

spring.cloud.config.server.git.uri=https://github.com/Ericxzw/SpringCloudConfig.git
spring.cloud.config.server.git.search-paths=config
spring.cloud.config.server.git.username=username
spring.cloud.config.server.git.password=password
spring.cloud.config.label=master

eureka.client.service-url.defaultZone=http://127.0.0.1:8761/eureka
(4)启动服务,访问:http://127.0.0.1:8585/config/dev。

3、配置中心的使用
(1)新建eurekaclient2服务,测试config的使用。增加Spring Web、Config Client、Eureka Discovery Client依赖。


(2)修改application.properties配置文件为bootstrap.properties文件。
spring.cloud.config.name=eurekaclient2
spring.cloud.config.label=master
spring.cloud.config.discovery.enabled=true
spring.cloud.config.discovery.serviceId=config

eureka.client.service-url.defaultZone=http://127.0.0.1:8761/eureka
(3)在Git仓库中增加eurekaclient2.properties配置文件。
server.port=8763
spring.application.name=eurekaclient2
(4) 添加测试文件。
package com.xzw.eurekaclient2.users;

import org.springframework.beans.factory.annotation.Value;
import org.springframework.web.bind.annotation.GetMapping;
import org.springframework.web.bind.annotation.RestController;

/**
 * @author: xzw
 * @create_date: 2020/2/20 15:29
 * @desc: 创建UserCtrl对外提供服务
 * @modifier:
 * @modified_date:
 * @desc:
 */
@RestController
public class UserCtrl {
    @Value("${server.port}")
    private int port;

    @GetMapping("index")
    public String index(){
        return "Get users, port:" + port;
    }
}
(5)启动eurekaserver服务、config服务和eurekaclient2服务。


4、配置自动刷新
每次修改配置都需要重新启动服务,配置才会生效,这种做法也比较麻烦,因此我们需要一个机制,每次修改了配置文件,各个服务配置自动生效。这里只介绍手动配置刷新,至于自动配置刷新,待以后有机会再行补充。
(1)手动配置刷新
1)在eurekaclient2工程中添加如下依赖。
        <dependency>
            <groupId>org.springframework.boot</groupId>
            <artifactId>spring-boot-starter-actuator</artifactId>
            <version>2.2.5.RELEASE</version>
        </dependency>
2)修改远程Git仓库的配置文件 eurekaclient2.properties,增加以下内容。
management.endpoints.web.exposure.include=refresh,health,infoSpring Boot 2.0 以后,actuator 默认只开启 health 和 info 端点,要使用 refresh 端点需要通过 management 指定。
3)在UserCtrl中增加@RefreshScope注解。
package com.xzw.eurekaclient2.users;

import org.springframework.beans.factory.annotation.Value;
import org.springframework.cloud.context.config.annotation.RefreshScope;
import org.springframework.web.bind.annotation.GetMapping;
import org.springframework.web.bind.annotation.RestController;

/**
 * @author: xzw
 * @create_date: 2020/2/20 15:29
 * @desc: 创建UserCtrl对外提供服务
 * @modifier:
 * @modified_date:
 * @desc:
 */
@RestController
@RefreshScope
public class UserCtrl {
    @Value("${server.port}")
    private int port;

    @GetMapping("index")
    public String index(){
        return "Get users, port:" + port;
    }
}
4)重启config服务和eurekaclient2服务,并修改 Git 仓库远程配置文件 eurekaclient2.properties中:server.port=8764,重新访问,发现端口并未改变。

通过POSTMAN的POST 方式请求地址:http://127.0.0.1:8763/actuator/refresh,可以在客户端控制台看到如下日志信息。


说明 refresh 端点已请求配置中心刷新配置,再次访问http://127.0.0.1:8763/index,发现端口发生改变,刷新成功。

(2)自动配置刷新
虚位以待……
六、服务治理与配置中心Nacos组件
首先访问https://github.com/alibaba/nacos/releases下载Nacos服务。启动成功,在浏览器上访问:http://localhost:8848/nacos,会跳转到登陆界面,默认的登陆用户名为nacos,密码也为nacos。

1、服务治理
(1)以eurekaclient工程为例,添加如下依赖。
        <dependency>
            <groupId>com.alibaba.cloud</groupId>
            <artifactId>spring-cloud-starter-alibaba-nacos-discovery</artifactId>
            <version>2.2.0.RELEASE</version>
        </dependency>
(2)在启动类中增加:@EnableDiscoveryClient注解。
package com.wzh.eurekaclient;

import org.springframework.boot.SpringApplication;
import org.springframework.boot.autoconfigure.SpringBootApplication;
import org.springframework.boot.autoconfigure.jdbc.DataSourceAutoConfiguration;
import org.springframework.boot.autoconfigure.orm.jpa.HibernateJpaAutoConfiguration;
import org.springframework.cloud.client.discovery.EnableDiscoveryClient;

@SpringBootApplication
@EnableDiscoveryClient
public class EurekaclientApplication {

    public static void main(String[] args) {
        SpringApplication.run(EurekaclientApplication.class, args);
    }

}
(3)修改resources下的application.properties配置文件。
server.port=8762

spring.application.name=eurekaclient

spring.cloud.nacos.discovery.server-addr=http://127.0.0.1:8848
(4)访问Nacos管理端,查看注册服务列表。

2、配置中心
(1)修改配置文件,添加依赖。
        <dependency>
            <groupId>com.alibaba.cloud</groupId>
            <artifactId>spring-cloud-alibaba-nacos-config</artifactId>
            <version>2.2.0.RELEASE</version>
        </dependency>
(2)移除application.properties配置文件,增加bootstrap.yml配置文件。
spring:
  application:
    name: eurekaclient
  cloud:
    nacos:
      config:
        server-addr: 127.0.0.1:8848
        file-extension: properties
        prefix: eurekaclient
      discovery:
        server-addr: 127.0.0.1:8848
  profiles:
    active: dev
(3)在Nacos中进行配置管理。


(4)启用自动刷新,在bean中需要使用 @RefreshCode注解去刷新,示例如下。
package com.wzh.eurekaclient.users;

import org.springframework.beans.factory.annotation.Value;
import org.springframework.cloud.context.config.annotation.RefreshScope;
import org.springframework.web.bind.annotation.GetMapping;
import org.springframework.web.bind.annotation.RestController;

/**
 * @author: xzw
 * @create_date: 2020/2/20 15:29
 * @desc: 创建UserCtrl对外提供服务
 * @modifier:
 * @modified_date:
 * @desc:
 */
@RestController
@RefreshScope
public class UserCtrl {
    @Value("${server.port}")
    private int port;

    @Value("${app.title}")
    private String title;

    @GetMapping("index")
    public String index(){
        return "Get users, port:" + port + ",app title:" + title;
    }
}
你们在此过程中遇到了什么问题,欢迎留言,让我看看你们都遇到了哪些问题。
