脚本分析
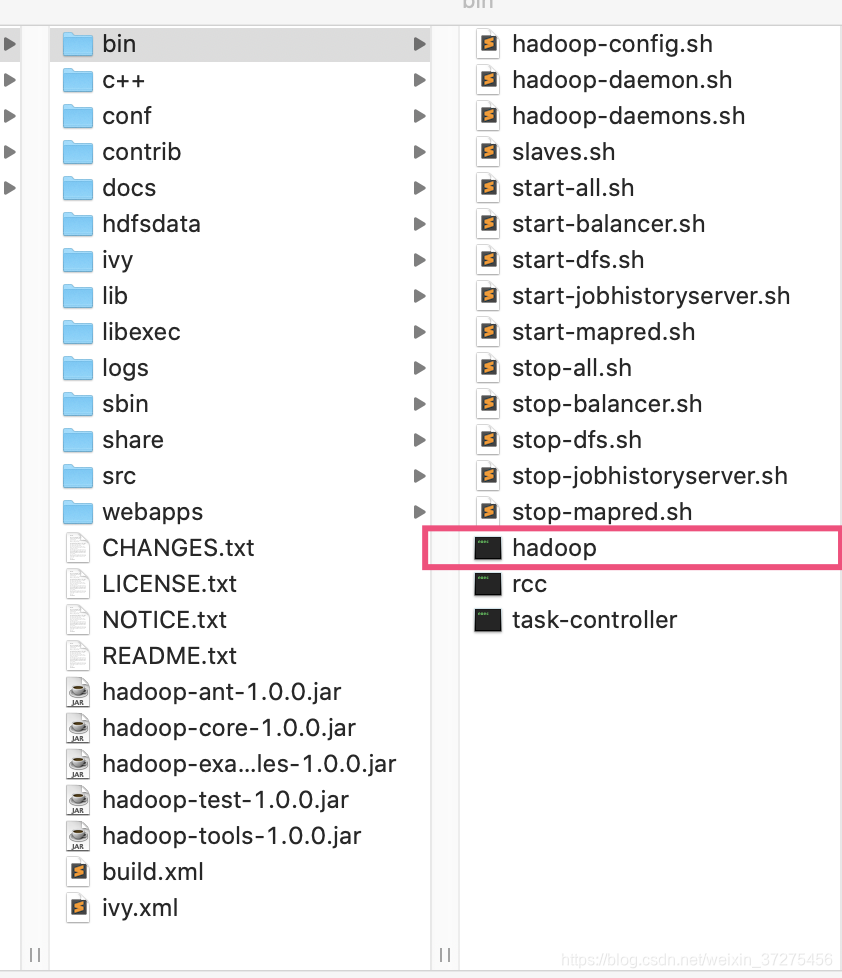
hadoop的bin目录如下:
当调用 hadoop jar XXX.jar 命令后。hadoop脚本对应的是如下内容:


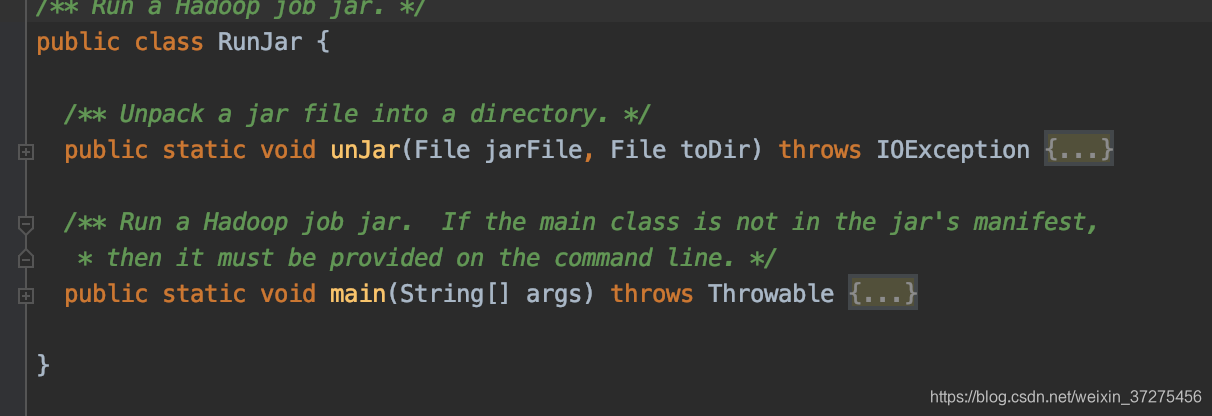
由此可知,hadoop 是通过org.apache.hadoop.util.RunJar类开始任务的
RunJar类分析
概览
RunJar类是个含有main函数的启动类,包含两个静态方法:
分析main函数:
 public static void main(String[] args) throws Throwable {
    String usage = "RunJar jarFile [mainClass] args...";

    if (args.length < 1) {
      System.err.println(usage);
      System.exit(-1);
    }

    int firstArg = 0;
    String fileName = args[firstArg++]; // 第一个参数是jar包名
    File file = new File(fileName);
    String mainClassName = null;

    JarFile jarFile;
    try {
      jarFile = new JarFile(fileName);
    } catch(IOException io) {
      throw new IOException("Error opening job jar: " + fileName)
        .initCause(io);
    }

    Manifest manifest = jarFile.getManifest();
    if (manifest != null) {
      mainClassName = manifest.getMainAttributes().getValue("Main-Class");
    }
    jarFile.close();

    if (mainClassName == null) {
      if (args.length < 2) {
        System.err.println(usage);
        System.exit(-1);
      }
      mainClassName = args[firstArg++]; // 第二个参数是 main 类
    }
    mainClassName = mainClassName.replaceAll("/", ".");

    File tmpDir = new File(new Configuration().get("hadoop.tmp.dir"));  // 在hdfs上建立临时目录
    tmpDir.mkdirs();
    if (!tmpDir.isDirectory()) {
      System.err.println("Mkdirs failed to create " + tmpDir);
      System.exit(-1);
    }
    final File workDir = File.createTempFile("hadoop-unjar", "", tmpDir);
    workDir.delete();
    workDir.mkdirs();
    if (!workDir.isDirectory()) {
      System.err.println("Mkdirs failed to create " + workDir);
      System.exit(-1);
    }

    Runtime.getRuntime().addShutdownHook(new Thread() {
        public void run() {  // 如果意外失败,删除临时目录
          try {
            FileUtil.fullyDelete(workDir);
          } catch (IOException e) {
          }
        }
      });

    unJar(file, workDir);  // 将 jar 包里的文件解压到临时目录

    ArrayList<URL> classPath = new ArrayList<URL>();  // 添加依赖
    classPath.add(new File(workDir+"/").toURL());
    classPath.add(file.toURL());
    classPath.add(new File(workDir, "classes/").toURL());
    File[] libs = new File(workDir, "lib").listFiles();
    if (libs != null) {
      for (int i = 0; i < libs.length; i++) {
        classPath.add(libs[i].toURL());
      }
    }

    ClassLoader loader =
      new URLClassLoader(classPath.toArray(new URL[0]));

    Thread.currentThread().setContextClassLoader(loader);
    Class<?> mainClass = Class.forName(mainClassName, true, loader);  //在当前线程通过反射生成用户编写的main类实例
    Method main = mainClass.getMethod("main", new Class[] {
      Array.newInstance(String.class, 0).getClass()
    });
    String[] newArgs = Arrays.asList(args)  //获取main类的执行参数
      .subList(firstArg, args.length).toArray(new String[0]);
    try {
      main.invoke(null, new Object[] { newArgs }); // 执行main类
    } catch (InvocationTargetException e) {
      throw e.getTargetException();
    }
  }
总结一下RunJar类主要做如下几件事:
- 在hdfs上建立临时文件夹
- 将jar包的文件解压到临时文件夹,并添加环境变量
- 通过反射机制启动用户编写的main函数
用户主函数分析
通过用户和JobTracker之间的通信协议,分析用户架构
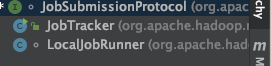
通过之前的文章,我们知道客户端和JobTracker通过JobSubmissionProtocol协议进行通信,且通过submitJob方法提交任务.那我们看看哪些类实现了该协议:
然后看看哪些地方使用率该协议:
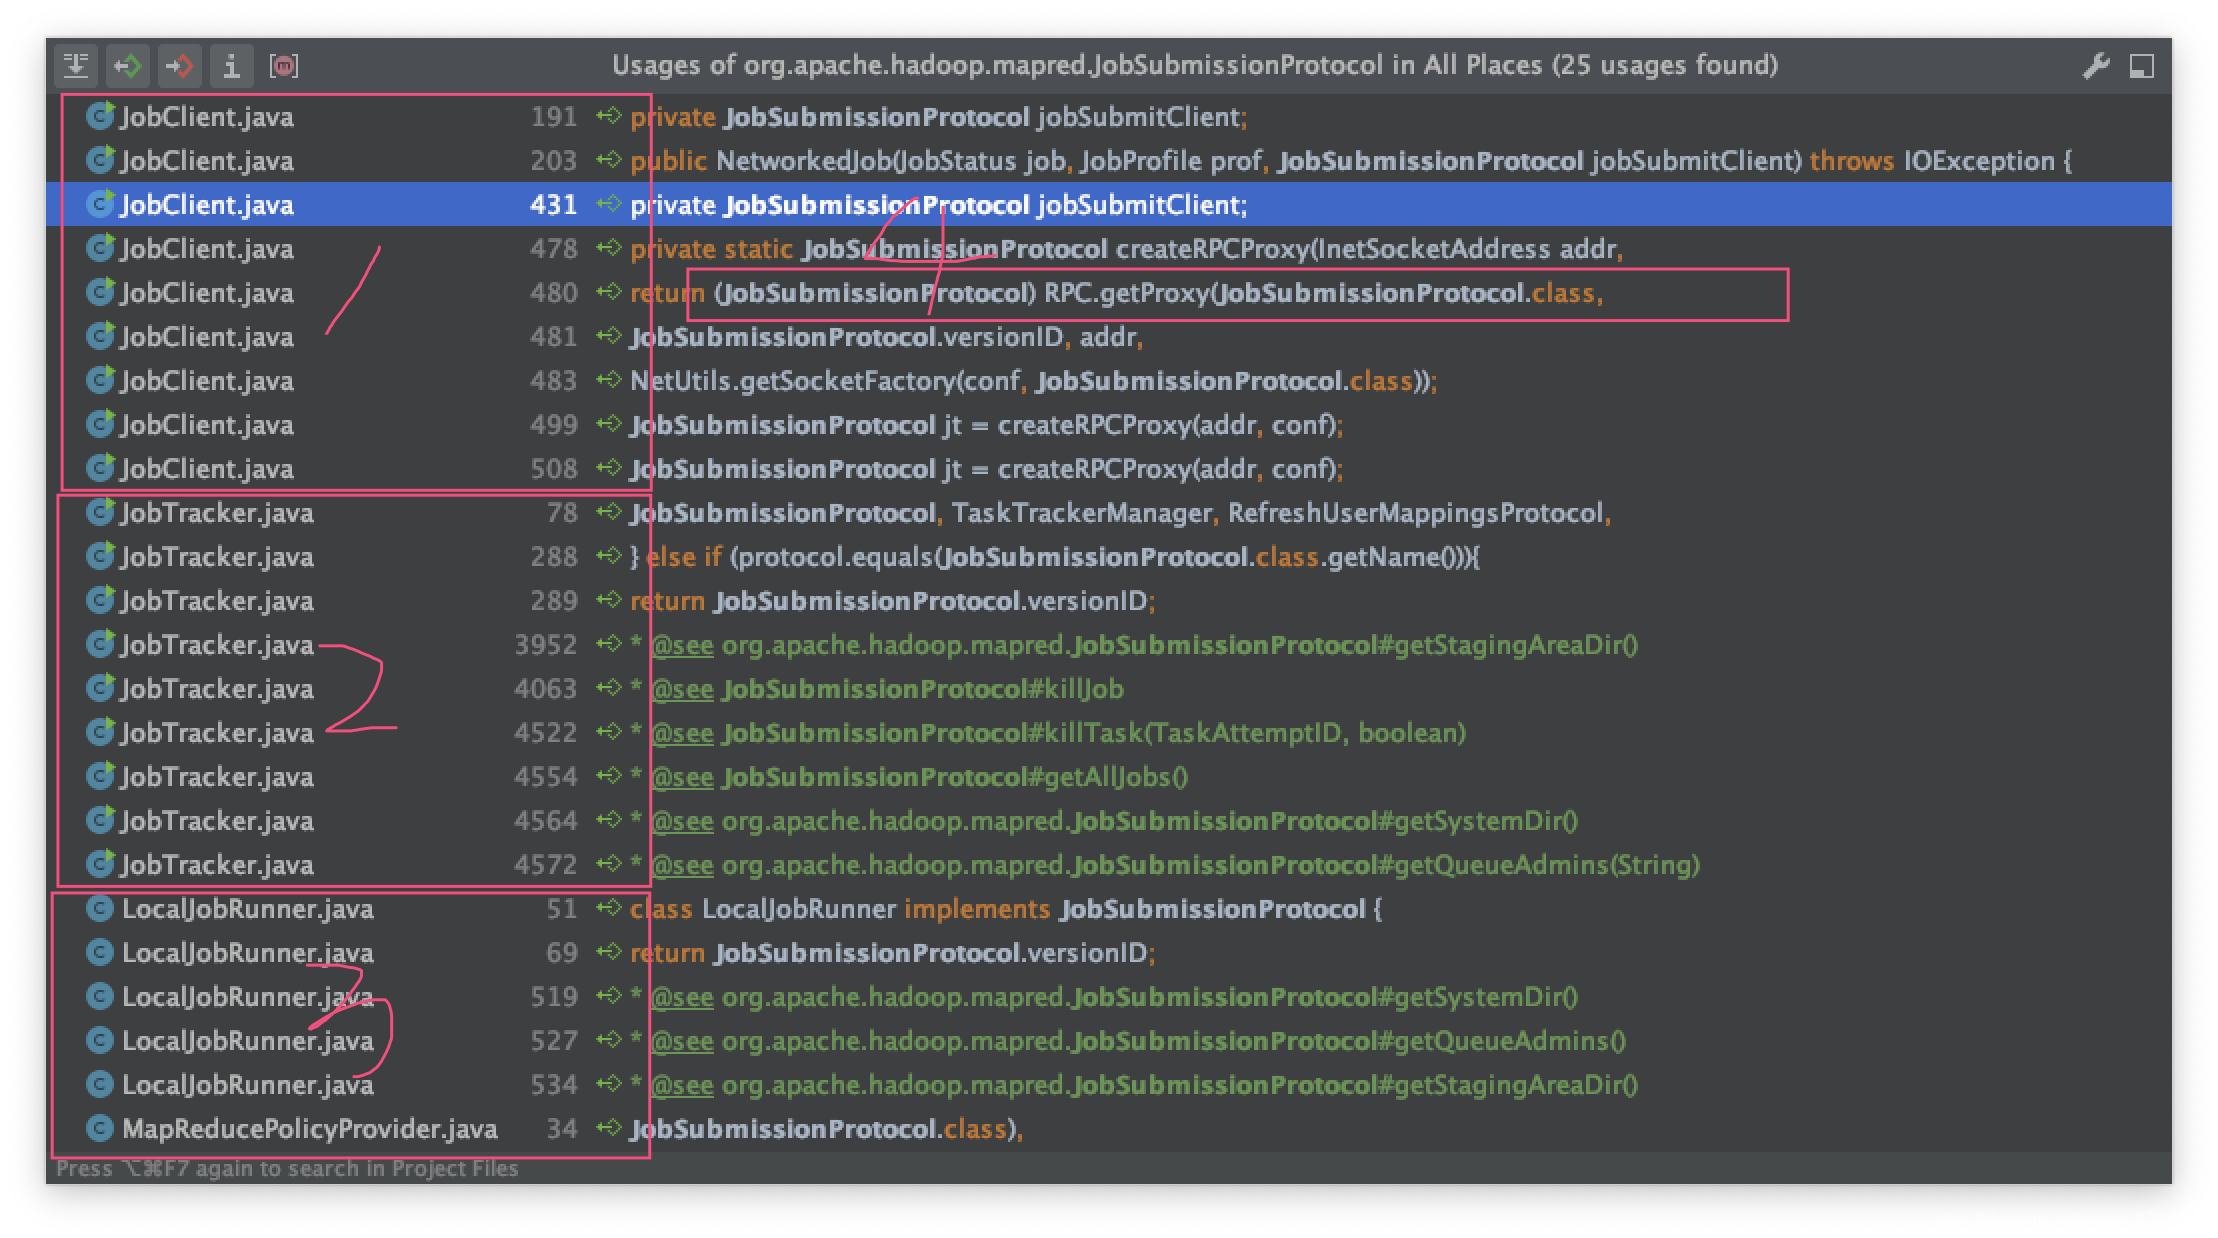
显然① JobClient是客户端,而且 ④位置的RPC反射是获取远程连接的地方.
接下来我们看看④
  private static JobSubmissionProtocol createRPCProxy(InetSocketAddress addr,
      Configuration conf) throws IOException {
    return (JobSubmissionProtocol) RPC.getProxy(JobSubmissionProtocol.class,
        JobSubmissionProtocol.versionID, addr,
        UserGroupInformation.getCurrentUser(), conf,
        NetUtils.getSocketFactory(conf, JobSubmissionProtocol.class));
  }
然后我们追踪哪里使用了该方法,显然第二块是临时变量,用完就毁,然后jobSubmitClient属性才是真正连接服务器的句柄.

最后我们结合一下前面的代码,得到一个架构图:

用户拥有Job类的实例,Job类拥有JobClient的实例,JobClient通过jobSubmitClient属性和JobTracker通信
用户main函数概率
下面是用户编写的mapreduce程序
public class WCRunner {

	public static void main(String[] args) throws Exception {

        Configuration conf = new Configuration();

		Job wcjob = new Job(conf);

		wcjob.setJarByClass(WCRunner.class);
		wcjob.setMapperClass(WCMapper.class);
		wcjob.setReducerClass(WCReducer.class);
		wcjob.setOutputKeyClass(Text.class);
		wcjob.setOutputValueClass(LongWritable.class);
		wcjob.setMapOutputKeyClass(Text.class);
		wcjob.setMapOutputValueClass(LongWritable.class);
		FileInputFormat.setInputPaths(wcjob, new Path(args[0]));
		FileOutputFormat.setOutputPath(wcjob, new Path(args[1]));

		wcjob.waitForCompletion(true);
	}
}
该程序展示了一个mapreduce程序的基本要素:
- 输入(InputFromat)
- map函数
- reduce函数
- 输出(OutputFormat)
mapreduce编程的基本模型见另一篇文档:mapreduce编程模型
用户main函数运行全流程分析
对于用户而言,不需要了解复杂的mapreduce程序执行机制,只需要按照需求编写maper和reducer函数之后,然后所有的内容都会交给Job类来管理.
Job类是JobContext类的一个子类,有几个重要的属性:
-
private JobState state该属性的值是Job内部定义的一个枚举值:public static enum JobState {DEFINE, RUNNING}. 任务提交之前,一直是DEFINE状态,任务提交之后是RUNNING状态. -
private JobClient jobClient: 和集群中的Jobtracker交互的类 -
private RunningJob info: 这里的RunningJob是个接口,实际使用的是JobClient的内部类NetworkedJob,用于监控运行中的任务 -
protected UserGroupInformation ugi;这个类很重要,属于Job继承自JobContext的属性,在JobContext初始化的时候赋值.是hadoop的一种权限验证机制.Job类想要和集群进行通信(建立连接)的时候要先验证通过才能执行ugi.doAs(run)里面的run方法.除了Job类以外,JobClient也有ugi属性,所以JobClient和集群进行互操作的时候一般也会写入到doAs方法里面.
主函数运行到Job实例的Job.waitForCompletion()方法时,开始提交程序:
- 当 执行到
  public boolean waitForCompletion(boolean verbose
                                   ) throws IOException, InterruptedException,
                                            ClassNotFoundException {
    if (state == JobState.DEFINE) {
    //1.通过connect函数建立和集群的连接,并将建立的连接终端赋值给jobClient
    //2.提交任务,并返回一个任务监控实例赋值给info
      submit();
    }
    if (verbose) {
      jobClient.monitorAndPrintJob(conf, info);
    } else {
      info.waitForCompletion();
    }
    return isSuccessful();
  }
  public void submit() throws IOException, InterruptedException,
                              ClassNotFoundException {
    ensureState(JobState.DEFINE);
    setUseNewAPI();

    // 连接至集群的jobtracker,连接终端是jobClient
    connect();
    // 真正提交任务的地方
    // 通过jobClient向终端提交任务,并返回一个NetworkedJob实例,监控任务执行状态
    info = jobClient.submitJobInternal(conf);
    super.setJobID(info.getID());
    state = JobState.RUNNING;
   }
在最后submitJobInternal方法里,客户端调用了如下代码和JobTracker通信
          status = jobSubmitClient.submitJob(
              jobId, submitJobDir.toString(), jobCopy.getCredentials());
这个代码里发送了jobId,提交文件的地址,以及权限验证,然而除此以为并没有提供任何关于数据及数据分片的信息,那这些信息放在哪里了?继续追踪代码,我们看到:
          // Write job file to JobTracker's fs
          FSDataOutputStream out =
            FileSystem.create(fs, submitJobFile,
                new FsPermission(JobSubmissionFiles.JOB_FILE_PERMISSION));

          try {
            jobCopy.writeXml(out);
          } finally {
            out
显然,任务的具体信息是已xml的形式存在hdfs上了.这就需要JobTracker自己得到任务后去读取任务信息流.
