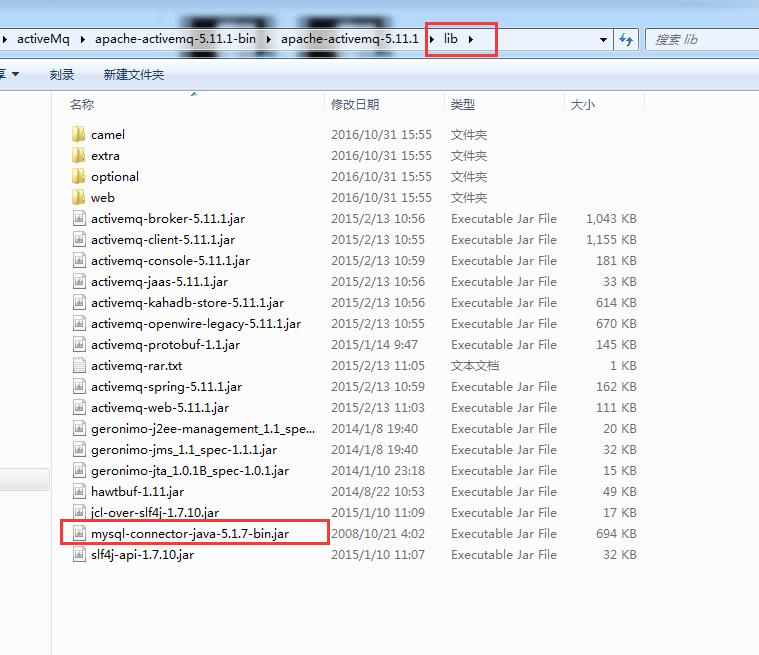
1、将连接Mysql数据库的jar文件,放到ActiveMQ的lib目录下
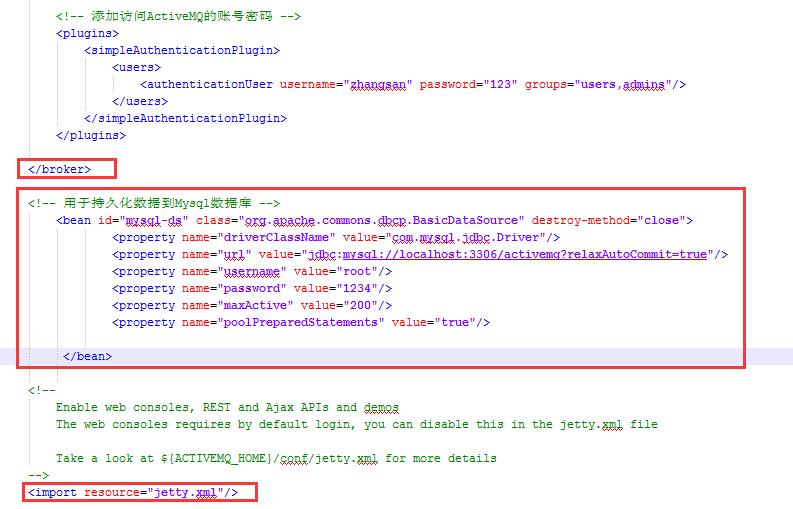
2、修改ActiveMQ的conf目录下的active.xml文件,修改数据持久化的方式
2.1 修改原来的kshadb的持久化数据的方式
<persistenceAdapter>
        <!--  <kahaDB directory="${activemq.data}/kahadb"/> -->
    <jdbcPersistenceAdapter  dataSource="#mysql-ds"/>
 </persistenceAdapter>
2.2 连接Mysql的配置(注意配置文件放置的位置)
3、将数据持久化Mysql的运行截图
3.1 重新启动ActiveMQ,并运行程序,放入持久化数据,查看Mysql的active数据库

4、放入持久化数据的代码
import javax.jms.Connection;
import javax.jms.ConnectionFactory;
import javax.jms.DeliveryMode;
import javax.jms.Destination;
import javax.jms.MessageProducer;
import javax.jms.Session;
import javax.jms.TextMessage;

import org.apache.activemq.ActiveMQConnectionFactory;

public class Sender {

    public static void main(String[] args) throws Exception {

        // 1、建立ConnectionFactory工厂对象,需要填入用户名,密码,以及连接的地址
        // 仅使用默认。端口号为"tcp://localhost:61616"
        ConnectionFactory connectionFactory = new ActiveMQConnectionFactory(
                "zhangsan",// ActiveMQConnectionFactory.DEFAULT_USER,
                "123",// ActiveMQConnectionFactory.DEFAULT_PASSWORD,
                "tcp://localhost:61616");
        // 2、通过ConnectionFactory工厂对象创建一个Connection连接
        // 并且调用Connection的start方法开启连接,Connection默认是不开启的
        Connection connection = connectionFactory.createConnection();
        connection.start();

        // 3、通过Connection对象创建Session会话(上下文环境对象),
        // 参数一,表示是否开启事务
        // 参数二,表示的是签收模式,一般使用的有自动签收和客户端自己确认签收

        // 第一个参数设置为true,表示开启事务
        // 开启事务后,记得要手动提交事务

        Session session = connection.createSession(Boolean.TRUE,
                Session.CLIENT_ACKNOWLEDGE);

        // 4、通过Session创建Destination对象,指的是一个客户端用来指定生产消息目标和消费消息来源的对象。
        // 在PTP模式中,Destination指的是Queue
        // 在发布订阅模式中,Destination指的是Topic
        Destination destination = session.createQueue("queue1");

        // 5、使用Session来创建消息对象的生产者或者消费者
        MessageProducer messageProducer = session.createProducer(destination);

        // 6、如果是,生产者,使用MessageProducer的setDeliverMode方法设置,消息的持久化和非持久化
        messageProducer.setDeliveryMode(DeliveryMode.PERSISTENT);
        // 7、最后使用JMS规范的TextMessage形式创建数据(通过Session对象)
        // 并利用MessageProducer的send方法发送数据
        for (int i = 0; i < 5; i++) {
            TextMessage textMessage = session.createTextMessage();
            textMessage.setText("我是消息" + i);
            messageProducer.send(textMessage);
        }

        // 手动提交开启的事务
        session.commit();

        // 释放连接
        if (connection != null) {
            connection.close();
        }
    }
}