springboot使用Application.properties和Application.yml这两个作为全局配置文件,properties是一种常见的配置文件的形式
配置文件的作用就是来配置某些信息,修改某些默认值,在我们快速创建的springboot项目中就是Application.properties
这里引入一种新的配置文件的形式就是yaml配置文件,后缀名为yml
它以数据为中心,比json和xml更高效
比如我们要配置服务器端口号
properties要这样server.port=8888
xml要这样
<server>
	<port>8888<port>
</server>
而yml要这样,而不是把大量时间放在标签的开闭上边,以数据为中心
server:
	port: 8888
yml基本语法
key:(空格)value
这种形式,其中value前边的空格是要有的,这是规定
如果有包含关系,比如port在server里边,那么就用空格来表示缩进,具体缩进多少无所谓,其实只要对其就好,有点类似于Python的语法格式
它的属性也是大小写敏感的
yml值的写法
1.对于字面量的写法,比如数字,字符串,布尔类型,直接用key: value的写法就行,而且字符串默认不用加引号,
在此,单引号和双引号的含义也不太一样
单引号: 显示原生的字符串,比如'hello \n world'那么他表示的就是Hello \n world这个字符串
双引号: 可以包含特殊字符,比如"hello \n world" 打印出来就是hello (回车) world
2.对于对象或者map类型来说,我们可以吧对象写到下一行,如下
cat:
	legs: 4
	tails: 1
	eyes: 2
也可以这么写
cat: {legs: 4, tails: 1, eyes: 2}
3.对于数组的写法,如下
第一种写法,用短横线
animal:
	- cat
	- dog
	- pig
	- fox
或者这样
animal: [cat, dog, pig, fox]
我们新建一个工程,然后创建2个bean对象Dog.java和Person.java
Dog.java
package com.zhanshen.domain;


public class Dog {
    private Integer age;
    private Integer legs;

    public Integer getAge() {
        return age;
    }

    public void setAge(Integer age) {
        this.age = age;
    }

    public Integer getLegs() {
        return legs;
    }

    public void setLegs(Integer legs) {
        this.legs = legs;
    }

    @Override
    public String toString() {
        return "Dog{" +
                "age=" + age +
                ", legs=" + legs +
                '}';
    }
}
Person.java
package com.zhanshen.domain;

import java.util.Date;
import java.util.List;
import java.util.Map;


/**
 *
 * 将配置文件中的每一个值映射到bean里边,我们就需要一个注解
 * @ConfigurationProerties 该注解就是springboot将配置文件中的值与该类所有属性相绑定
 * 里边有一个prefix的值,就是要指明绑定那一个数据,这里边server 和 person要选一个,明显我们要绑定Person
 * 只有这个组件是容器中的组件,才能使用容器中的功能.所以我们再添加一个注解@Component
 */

@Component
@ConfigurationProperties(prefix = "Person")
public class Person {
    private String username;
    private Integer age;
    private Date birthday;
    private boolean boss;

    private Map<String, Object> maps;
    private List<Object> lists;
    private Dog dog;

    public String getUsername() {
        return username;
    }

    public void setUsername(String username) {
        this.username = username;
    }

    public Integer getAge() {
        return age;
    }

    public void setAge(Integer age) {
        this.age = age;
    }

    public Date getBirthday() {
        return birthday;
    }

    public void setBirthday(Date birthday) {
        this.birthday = birthday;
    }

    public boolean isBoss() {
        return boss;
    }

    public void setBoss(boolean boss) {
        this.boss = boss;
    }

    public Map<String, Object> getMaps() {
        return maps;
    }

    public void setMaps(Map<String, Object> maps) {
        this.maps = maps;
    }

    public List<Object> getLists() {
        return lists;
    }

    public void setLists(List<Object> lists) {
        this.lists = lists;
    }

    public Dog getDog() {
        return dog;
    }

    public void setDog(Dog dog) {
        this.dog = dog;
    }

    @Override
    public String toString() {
        return "Person{" +
                "username='" + username + '\'' +
                ", age=" + age +
                ", birthday=" + birthday +
                ", boss=" + boss +
                ", maps=" + maps +
                ", lists=" + lists +
                ", dog=" + dog +
                '}';
    }
}
然后我们在resources里边新建Application.yml文件,内容如下
server:
  port: 8888


Person:
  username: 张三
  age: 18
  birthday: 2000/05/02
  boss: false

  maps: {k1: v1,k2: v2}
  lists:
    - 1
    - 2
    - 3
    - 4

  dog:
    age: 12
    legs: 4
然后我们就要想办法,把这里边的yml绑定到bean文件里边,这里用到了@ConfigurationProperties注解,详细使用写在了注释里边
我们还可以导入一个依赖在pom.xml中,他会对你写的yml进行提示,有助于编写
 <dependency>
            <groupId>org.springframework.boot</groupId>
            <artifactId>spring-boot-configuration-processor</artifactId>
            <optional>true</optional>
        </dependency>
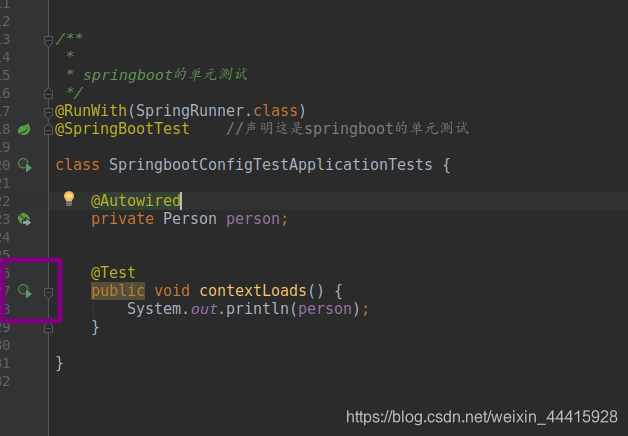
接下来我们进入test里边
代码如下
package com.zhanshen.springboot;

import com.zhanshen.domain.Person;

import org.junit.jupiter.api.Test;
import org.junit.runner.RunWith;
import org.springframework.beans.factory.annotation.Autowired;
import org.springframework.boot.test.context.SpringBootTest;
import org.springframework.test.context.junit4.SpringRunner;


/**
 *
 * springboot的单元测试
 */
@RunWith(SpringRunner.class)
@SpringBootTest    //声明这是springboot的单元测试

class SpringbootConfigTestApplicationTests {

    @Autowired
    private Person person;


    @Test
    public void contextLoads() {
        System.out.println(person);
    }

}
这里注意若无法引入@RunWith注解,则可以查看自己的pom.xml文件,找到下边这一条配置,把<exclusion>这个标签注释掉就可以了
 <dependency>
    <groupId>org.springframework.boot</groupId>
       <artifactId>spring-boot-starter-test</artifactId>
       <scope>test</scope>
       <!--<exclusions>-->
           <!--<exclusion>-->
               <!--<groupId>org.junit.vintage</groupId>-->
               <!--<artifactId>junit-vintage-engine</artifactId>-->
           <!--</exclusion>-->
       <!--</exclusions>-->
</dependency>
另外还可以看到测试类里边有一个报错

这个时候我们需要在Application类里边引入要扫描的包,注意这个是Java目录下的主文件

然后我们运行测试类

可以看到注入成功了
