一、Vue工作机制
1.1 什么是mvvm?
Vue就是基于MVVM模式实现的一套构建用户界面的渐进式框架。MVVM是Model-View-ViewModel的简写。其中,Model指的是js中的数据,如对象,数组等等,View指的是页面视图,ViewModel指的是vue实例化对象,是连接view和model的桥梁。ViewModel的主要作用是实现Model和View之间的转换。即将后端传递的数据转化成所看到的页面,或者将所看到的页面转化成后端的数据。我们也称之为“数据的双向绑定”。
1.2 Vue的组成
Observer:监控Vue实例属性的变化;
Compile:解析指令,负责把数据模型解析成视图;
Dep:依赖管理器,负责管理所有订阅者,以及通知所有订阅者执行更新操作;
Watcher:订阅者,Dep和Updater的桥梁,用于接收Dep的通知,然后通知Updater执行更新操作;
Updater:更新器。不同类型的指令对应不同的更新器,更新器负责执行更新视图的操作;
1.3 Vue工作流程
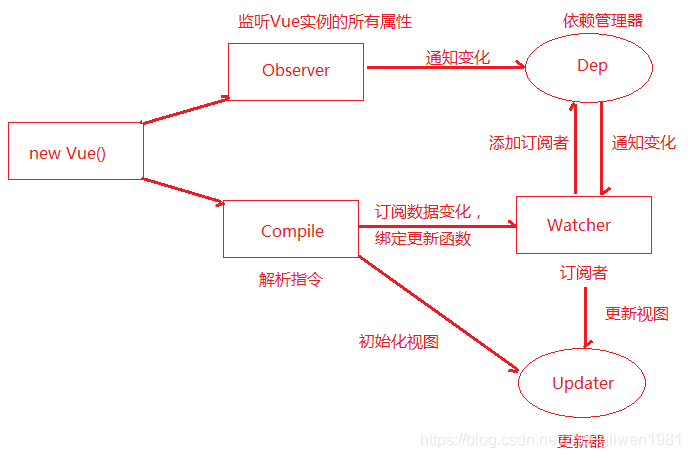
从图中可以看出,当执行 new Vue() 时,Vue 就进入了初始化阶段。初始化阶段主要完成两个工作:
1)Vue 会遍历 data 属性,并通过Object.defineProperty 方法为每一个属性添加setter和getter方法。这两个方法实现了数据变化监听功能;
2)另一方面,Compile(编译器)对元素节点的指令(如v-for、@click等)进行解析。解析完成后订阅Watcher 来更新视图, 此时Wather 会将自己添加到Dep(依赖管理器)中,完成初始化。
当数据发生变化时,Observer 中的 setter方法被触发,setter 会立即调用Dep.notify()方法,该方法会遍历所有订阅的Watcher,并调用 update 方法执行更新操作。另外,查看vue原代码,发现在vue初始化实例时, 有一个proxy代理方法,它的作用就是遍历data中的属性,把它代理到vue的实例上。
下面模拟Vue的核心功能,实现MVVM的数据双向绑定。
二、自定义MVVM框架
2.1 Object.defineProperty用法
Object.defineProperty函数的作用就是直接在一个对象上定义一个新属性,或者修改一个已经存在的属性。通过Object.defineProperty()定义属性,通过描述符的设置可以进行更精准的控制对象属性。
命令格式:
Object.defineProperty(obj, prop, desc)
obj:需要定义属性的当前对象
prop:当前需要定义的属性名
desc:属性描述符
其中,属性描述符有以下这些:
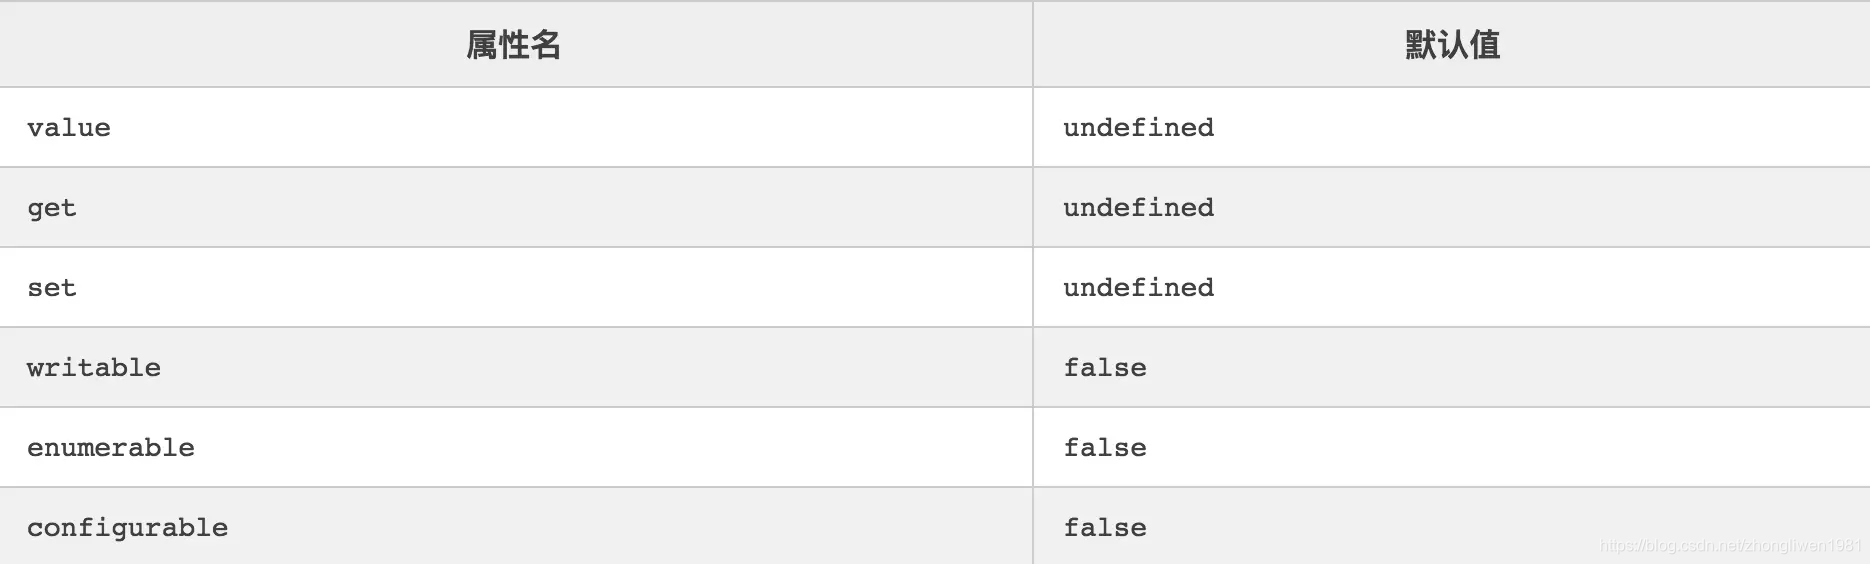
1)value:属性的值。
2)writable:代表该属性是否可以被改变。writable默认为false,即属性的值默认不可以被改变。
3)configrable:是否可配置,以及可否删除。当configrable为false,不能删除当前属性,且不能重新配置当前属性的描述符,但是在writable为true的情况下,可以改变value的值;当configrable为true时,可以删除当前属性,也可以配置当前属性所有描述符;
4)enumerable:是否会出现在for in 或者 Object.keys()的遍历中;
5)get:一个给属性提供getter的方法,如果没有getter则为undefined。该方法返回值被用作属性值。默认为undefined。
6)set:一个给属性提供setter的方法,如果没有setter则为undefined。该方法将接受唯一参数,并将该参数的新值分配给该属性。默认值为undefined。
<!DOCTYPE html>
<html>
	<head>
		<meta charset="utf-8" />
		<title></title>
	</head>
	<body>
		<div id="app">
			<p>您好,<span id="name"></span></p>
		</div>
		<script>
			var obj = {};
			Object.defineProperty(obj, 'name', {
				get() {
					return document.getElementById("name").innerHTML;
				},
				set(inner) {
					document.getElementById("name").innerHTML = inner;
				},
			});

			console.log(obj.name); // 空
			obj.name = 'zhong';
			console.log(obj.name); // zhong
		</script>
	</body>
</html>
2.2 依赖管理器
依赖管理器主要负责管理所有订阅者,以及通知所有订阅者执行更新操作。
第一步:新建一个js文件,并命名为kvue.js文件;
第二步:新建一个类,并命名为Dep;
class Dep {

}
第三步:定义constructor方法,该方法初始化watchers数组,该数组用于存储所有订阅的watcher;
constructor() {
	this.watchers = [];
}
第四步:定义addWatcher方法,用于往数组添加watcher;
addWatch(w) {
	this.watchers.push(w);
}
第五步:定义notify方法,该方法用于通知watcher执行更新操作;
notify() {
	// 通知所有watch执行更新操作
	this.watchers.forEach(w => {
		w.update();
	});
}
2.3 定义Watcher
第一步:定义一个类,并命名为Watcher;
class Watcher {

}
第二步:定义constructor方法;
constructor(vue, key, fn) {
	Dep.target = this;  // 将当前wathcer实例添加到Dep.target属性中

	this.vue = vue;
	this.key = key;
	this.fn = fn;
}
vue:代表当前KVue实例;
key:代表data对象中的某个属性;
fn:更新器函数,负责更新视图;
第三步:定义一个update方法,模拟视图更新操作;
update() {
	console.log('视图更新啦...');
}
2.4 定义KVue实例
第一步:新建一个class,并命名为KVue;
第二步:定义constructor方法,该方法包含一个options参数,该参数封装了KVue对象的所有选项;
class KVue {
	constructor(options) {
		this.$methods= options.methods;
		this.$data = options.data;
		this.observe(this.$data);
	}
}
从上面代码看到,options中应该包含data和methods属性。
第三步:定义observe方法,该方法用于监听KVue实例中所有属性;
observe(obj) {
	if (!obj || typeof obj !== 'object') {
		return;
	}
	// 遍历对象中所有属性,并且为每一个属性添加setter和getter方法
	Object.keys(obj).forEach(key => {
		this.defineReactive(obj, key, obj[key]);
	});
}

defineReactive(obj, key, val) {
	// 创建依赖管理器
	const dep = new Dep();
	// 为对象属性添加setter和getter方法
	Object.defineProperty(obj, key, {
		enumerable: true,
		configurable: true,
		get() {
			// 如果Dep.target属性存在,则将Dep.target属性中的watcher添加到依赖管理器中存储起来
			Dep.target && dep.addWatch(Dep.target);
			return val;
		},
		set(newVal) {
			// 如果修改数据没有发生变化,则直接返回;否则才进行修改操作
			if (newVal === val) {
				return;
			}
			val = newVal;
			// 修改完成后,通知订阅watcher执行更新操作
			dep.notify();
		}
	});
}
2.5 定义编译器
第一步:新建一个js文件,并命名为compile.js;
第二步:定义一个类,并命名为Compile;
class Compile {

}
第三步:定义constructor方法;
constructor(el, vue) {
	// 将KVue对象以及el选择器对应的DOM元素添加到$vue和$el属性中
	this.$vue = vue;
	this.$el = document.querySelector(el);

	// 如果dom元素存在,则执行编译操作
	if (this.$el) {
		// 将dom元素转换为Fragment,以提高执行效率
		this.$fragment = this.node2Fragment(this.$el);
		// 执行编译
		this.compile(this.$fragment);
		// 将编译后的结果重新添加到宿主元素中
		this.$el.appendChild(this.$fragment);
	}
}
第四步:定义node2Fragment方法,该方法将DOM元素转换为fragment对象;
node2Fragment(el) {
	// 创建一个新的Fragment
	const fragment = document.createDocumentFragment();
	let child;
	// 将原生节点移动到Fragment
	while (child = el.firstChild) {
		fragment.appendChild(child);
	}
	return fragment;
}
第五步:定义compile方法,执行编译操作,即把模版中的关键字替换成实际值;
compile(fragment) {
	// 获取fragment中所有孩子节点
	let childNodes = fragment.childNodes;
	// 遍历所有孩子节点
	Array.from(childNodes).forEach(child => {
		// 判断孩子节点的类型,根据不同类型做相应的处理
		if (this.isElementNode(child)) {
			// 如果是元素节点
			this.compileElement(child);
		} else if (this.isTextNode(child) && /\{\{(.*)\}\}/.test(child.textContent)) {
			// 如果是文本节点,只关心{{xx}}格式
			this.compileText(child, RegExp.$1); // RegExp.$1用于获取正则分组的数据
		}
		// 递归遍历可能存在的子节点
		if (child.childNodes && child.childNodes.length) {
			this.compile(child);
		}
	});
}
第六步:定义isElementNode、isTextNode、compileElement、compileText方法;
// 判断是否是元素节点,如果是返回true,否则返回false
isElementNode(node) {
	return node.nodeType == 1;
}

// 判断是否是文本节点,如果是返回true,否则返回false
isTextNode(node) {
	return node.nodeType == 3;
}

// 编译元素节点
compileElement(el) {
	// 例如:<div k-text="test" @click="clickHandler">
	console.log('编译元素节点...');
	// 获取所有属性节点
	const attrs = el.attributes;
	// 遍历元素属性
	Array.from(attrs).forEach(attr => {
		const name = attr.name; // 属性名,如:k-text 或 @click
		const expr = attr.value; // 属性值:如:test 或 clickHandler
		if (this.isDirective(name)) {
			// 如果是指令,获取指令名称
			const dir = name.substr(2);
			// 调用指令对应的处理函数
			this[dir] && this[dir](el, this.$vue, expr);
		} else if (this.isEventDirective(name)) {
			// 如果是事件,获取事件名
			const dir = name.substr(1);
			// 调用事件处理函数
			this.eventHandler(el, this.$vue, expr, dir);
		}
	});
}

// 编译文本节点
compileText(node, textContent) {
	console.log('编译文本节点...');
	this.text(node, this.$vue, textContent);
}
第七步:定义isDirective、isEventDirective、eventHandler方法;
// 判断是否是指令,如果是则返回true,否则返回false
isDirective(attr) {
	return attr.indexOf('k-') == 0;
}

// 判断是否是事件,如果是则返回true,否则返回false
isEventDirective(attr) {
	return attr.indexOf('@') == 0;
}

// 执行事件
eventHandler(node, vue, exp, dir) { // dir = click exp = onClick
	let fn = vue.$methods && vue.$methods[exp];
	if (dir && fn) {
		// 第一个参数是监听的事件名称
		// 第二个参数fn.bind(vue)就是把vue实例绑定到fn函数中,那么fn函数就可以通过this访问vue实例啦。
		// 第三个参数表示是否启用捕获阶段。
		node.addEventListener(dir, fn.bind(vue), false);
	}
}
第八步:定义text、html、model方法,它们负责执行视图的更新操作;
text(node, vue, exp) {
	this.update(node, vue, exp, 'text');
}

html(node, vue, exp) {
	this.update(node, vue, exp, 'html');
}

model(node, vue, exp) {
	this.update(node, vue, exp, 'model');
	// 监听模node元素的input事件
	node.addEventListener('input', e => {
		vue[exp] = e.target.value; // 把input元素的输入内容设置到模型的value属性中
	});
}

// 更新dom
update(node, vue, exp, type) {
	let updaterFn = this[type + 'Updateor'];
	updaterFn && updaterFn(node, vue[exp]); // 执行更新
	new Watcher(vue, exp, function(value) {
		updaterFn && updaterFn(node, value);
	});
}
第九步:定义更新处理函数;
textUpdateor(node, value) {
	node.textContent = value;
}

htmlUpdateor(node, value) {
	node.innerHTML = value;
}

modelUpdateor(node, value) {
	node.value = value;
}
2.6 改造KVue实例
第一步:在constructor方法中构建Compile实例;
constructor(options) {
	...
	new Compile(options.el, this);
}
第二步:修改observe方法,给data属性设置代理。
observe(obj) {
	// 如果val不存在,或者val不是对象,则不需要执行响应式,直接返回
	if (!obj || typeof obj !== 'object') {
		return;
	}

	// 遍历val对象所有属性
	Object.keys(obj).forEach(key => {
		// 为每一个key定义响应式
		this.defineReactive(obj, key, obj[key]);
		// 为vue的data属性做代理,相当于把所有key添加到vue实例中
		this.proxyData(key);
	});
}

proxyData(key) {
	Object.defineProperty(this, key, {
		get() {
			return this.$data[key];
		},
		set(newVal) {
			this.$data[key] = newVal;
		}
	});
}
2.7 改造Watcher
第一步:修改constructor方法,在构建Watcher实例时将当前watcher实例添加到Dep中;
constructor(vue, key, fn) {
	...

	// 执行该行代码的主要作用是触发一下get方法,在get方法把当前watcher添加到dep依赖管理器中
	this.vue[this.key];
	// 把Dep.target属性清空是为了避免不必要的重复添加
	Dep.target = null;
}
第二步:修改update方法,调用fn函数执行视图的更新操作;
update() {
	// 执行回调函数,更新视图
	this.fn.call(this.vue, this.vue[this.key]);
}
2.8 测试
构建测试页:
<!DOCTYPE html>
<html>
	<head>
		<meta charset="UTF-8">
		<title></title>
		<script type="text/javascript" src="js/kvue.js"></script>
		<script type="text/javascript" src="js/compile.js"></script>
	</head>
	<body>
		<div id="app">
			{{test}}
			<p k-text="test"></p>
			<p k-html="html"></p>
			<p>
				<input k-model="test" />
			</p>
			<p>
				<button @click="onClick">按钮</button>
			</p>
		</div>
		<script>
			const o = new KVue({
				el: '#app',
				data: {
					test: 'hehe',
					foo: {
						bar: 'bar123',
					},
					html: '<h1>奇迹来了。。。</h1>'
				},
				methods: {
					onClick() {
						alert('balabala');
					}
				}
			});
		</script>
	</body>
</html>
运行效果: