使用WebJars
spring boot整合WebJars进行前端静态js和css。
1.引入Bootstrap和jQuery
1.1 引入相关依赖
<!-- 引入bootstrap -->
        <dependency>
            <groupId>org.webjars</groupId>
            <artifactId>bootstrap</artifactId>
            <version>4.3.1</version>
        </dependency>
        <!-- 引入jQuery -->
        <dependency>
            <groupId>org.webjars</groupId>
            <artifactId>jquery</artifactId>
            <version>3.4.1</version>
        </dependency>
1.2 HTML页面加入头文件
<link rel="stylesheet" href="/webjars/bootstrap/4.3.1/css/bootstrap.min.css" />
    <script src="/webjars/jquery/3.41.1/jquery.min.js"></script>
    <script src="/webjars/bootstrap/4.3.1/js/bootstrap.min.js"></script>
ok。
还有其他很多可用的,以后再说。
国际化使用
thymeleaf对国际化使用有些支持。
1.写静态页面
<!DOCTYPE html>
<html lang="en" xmlns:th="http://www.thymeleaf.org">
    <head>
        <meta http-equiv="Content-Type" content="text/html; charset=UTF-8">
        <meta name="viewport" content="width=device-width, initial-scale=1, shrink-to-fit=no">
        <meta name="description" content="">
        <meta name="author" content="">
        <title>Signin Template for Bootstrap</title>

        Bootstrap core CSS
        <link href="asserts/css/bootstrap.min.css" th:href="@{asserts/css/bootstrap.min.css}" rel="stylesheet">
        Custom styles for this template
        <link href="asserts/css/signin.css" th:href="@{asserts/css/signin.css}" rel="stylesheet">
    </head>

    <body class="text-center">
        <form class="form-signin" action="dashboard.html">
            <img class="mb-4" src="asserts/img/bootstrap-solid.svg" th:href="@{asserts/img/bootstrap-solid.svg}" alt="" width="72" height="72">
            <h1 class="h3 mb-3 font-weight-normal" th:text="#{login.tip}">Please sign in</h1>
            <label class="sr-only" th:text="#{login.username}">Username</label>
            <input type="text" class="form-control" placeholder="Username" required="" autofocus="">
            <label class="sr-only" th:text="#{login.password}">Password</label>
            <input type="password" class="form-control" placeholder="Password" required="">
            <div class="checkbox mb-3">
                <label>
          <input type="checkbox" value="remember-me"/> [[#{login.remember}]]
        </label>
            </div>
            <button class="btn btn-lg btn-primary btn-block" type="submit" th:text="#{login.btn}">Sign in</button>
            <p class="mt-5 mb-3 text-muted">© 2018-2019</p>
            <a class="btn btn-sm" th:href="@{/index.html(l='zh_Cn')}">中文</a>
            <a class="btn btn-sm" th:href="@{/index.html(l='en_US')}">English</a>
        </form>

    </body>

</html>
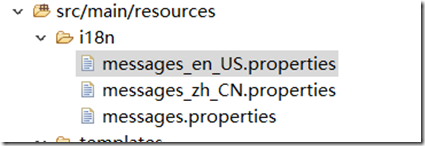
2.在国际化配置文件中配置属性
相应的写入属性,比如中文的:
login.tip=请登录
login.username=用户名
login.password=密码
login.remember=记住我
login.btn=登录
3.解析所属区域
package com.example.demo;

import java.util.Locale;

import javax.servlet.http.HttpServletRequest;
import javax.servlet.http.HttpServletResponse;

import org.springframework.util.StringUtils;
import org.springframework.web.servlet.LocaleResolver;

public class MyLocaleResolver implements LocaleResolver {

    @Override
    public Locale resolveLocale(HttpServletRequest request) {
        // 由thymeleaf静态页面返回l来判断
        String l=request.getParameter("l");
        Locale locale=Locale.getDefault();
        if(!StringUtils.isEmpty(l)) {
            String[] split=l.split("_");
            locale=new Locale(split[0],split[1]);
        }
        return locale;
    }

    @Override
    public void setLocale(HttpServletRequest request, HttpServletResponse response, Locale locale) {
        // TODO Auto-generated method stub

    }

}
4.设置登录反射
//继承WebMvcConfigurationSupport或者implements WebMvcConfigurer,重写addViewControllers方法
@Configuration
public class MyMvcConfig extends WebMvcConfigurationSupport{

    public void addViewControllers(ViewControllerRegistry registry) {
        registry.addViewController("/").setViewName("index");
        //registry.addViewController("/index.html").setViewName("index");
        registry.addViewController("/index.html");

    }
    //注意是org.springframework.web.servlet.LocaleResolver;
    @Bean
    public LocaleResolver localeResolver() {
        return new MyLocaleResolver();
    }
}
其实这里像以前一样,在写一个controller,设置相应的映射,也是ok的。
启动,测试成功。
文件的上传和下载
1.创建Controller,写入代码逻辑
package com.example.demo.controller;

import java.io.BufferedInputStream;
import java.io.BufferedOutputStream;
import java.io.File;
import java.io.FileInputStream;
import java.io.FileOutputStream;
import java.io.IOException;
import java.io.OutputStream;
import java.io.UnsupportedEncodingException;
import java.net.URLDecoder;
import java.net.URLEncoder;
import java.util.List;

import javax.servlet.http.HttpServletRequest;
import javax.servlet.http.HttpServletResponse;

import org.slf4j.Logger;
import org.slf4j.LoggerFactory;
import org.springframework.web.bind.annotation.GetMapping;
import org.springframework.web.bind.annotation.PostMapping;
import org.springframework.web.bind.annotation.RequestMapping;
import org.springframework.web.bind.annotation.RequestParam;
import org.springframework.web.bind.annotation.RestController;
import org.springframework.web.multipart.MultipartFile;
import org.springframework.web.multipart.MultipartHttpServletRequest;

@RestController
public class FileController {
    //最后面的/要加上就是放到这个文件夹里,不加名字就会加上downloads放在d盘里
    private static final String filePath="D:/downloads/";
    private static final Logger log=LoggerFactory.getLogger(FileController.class);
    //单文件上传
    //MultipartFile对象接收文件
    @RequestMapping(value="/upload")
    //@RequestParam:将请求参数绑定到你控制器的方法参数上(是springmvc中接收普通参数的注解)
    public String upload(@RequestParam("file") MultipartFile file) {
        try {
            if(file.isEmpty()) {
                return "文件为空";
            }
        //获取文件名
        String fileName=file.getOriginalFilename();
        log.info("上传的文件名为:"+fileName);
        //设置文件存储路径
        String path=filePath+fileName;
        File dest=new File(path);
        //检测是否存在目录
        if(!dest.getParentFile().exists()) {
            dest.getParentFile().mkdirs();//新建文件夹
        }
        file.transferTo(dest);//刚开始只是设置好了名字,存储路径,这是才把文件内容真正写入
        return "上传成功";

    }catch(IllegalStateException e){
            e.printStackTrace();
        }catch(IOException e){
            e.printStackTrace();
        }
        return "上传失败";
    }
    //多文件上传
    @PostMapping("/batch")
    public String handleFileUpload(HttpServletRequest request) {

        List<MultipartFile> files=((MultipartHttpServletRequest) request).getFiles("file");
        MultipartFile file=null;
        BufferedOutputStream stream=null;
        //for循环里i++和++i没区别,++i效率还高点,但是其他情况是有区别的
        for(int i=0;i<files.size();++i) {
            file=files.get(i);
            if(!file.isEmpty()) {
                try {
                    byte[] bytes=file.getBytes();
                    stream=new BufferedOutputStream(new FileOutputStream(new File(filePath+file.getOriginalFilename())));//设置文件路径及名字
                    stream.write(bytes);//也是创建一个文件再真正写入内容
                    stream.close();
                }catch(Exception e) {
                    stream=null;
                    return "第"+i+"个文件上传失败==>"+e.getMessage();
                }
            }else {
                return "第"+i+"个文件上传失败,因为文件为空";
            }
        }
        return "上传成功";
    }
    //文件下载
    @GetMapping("/download")
    public String downloadFile(HttpServletResponse response) throws UnsupportedEncodingException {
        String fileName="MySQL必知必会(文字版).pdf";
        if(fileName!= null) {
            //设置文件路径
            File file=new File(filePath+fileName);
            if(file.exists()) {
                response.setContentType("application/force-download");//设置强制下载不打开
                fileName = URLEncoder.encode(fileName,"utf-8");//header中只支持ASCII,所以中文需要解码
                response.addHeader("Content-Disposition", "attachment;fileName="+fileName);//设置文件名
                byte[] buffer=new byte[1024];
                FileInputStream fis=null;
                BufferedInputStream bis=null;
                try {
                    fis=new FileInputStream(file);
                    bis=new BufferedInputStream(fis);
                    OutputStream os=response.getOutputStream();
                    int i=bis.read(buffer);
                    while(i!=-1) {
                        os.write(buffer, 0, i);
                        i=bis.read(buffer);
                    }
                    return "下载成功";

                }catch(Exception e) {
                    e.printStackTrace();
                }finally {
                    if(bis!=null) {
                        try {
                            bis.close();
                        }catch(IOException e) {
                            e.printStackTrace();
                        }
                    }
                    if(fis!=null) {
                        try {
                            fis.close();
                        }catch(IOException e) {
                            e.printStackTrace();
                        }
                    }
                }
            }
        }

        return "下载失败";
    }
}
2.配置FreeMarker
#是否开启缓存,开发时建议关闭,否则更改页面后不会实时展示效果
spring.freemarker.cache=false
#编码格式
spring.freemarker.charset=UTF-8
#前缀
spring.freemarker.template-load-path=classpath:/templates/
#后缀
spring.freemarker.suffix=.ftl
3.创建index.ftl
<!DOCTYPE html>
<html lang="en">
<head>
<meta charset="UTF-8">
<title>${msg}</title>
</head>
<body>
<p>单文件上传</p>
<form action="upload" method="POST" enctype="multipart/form-data">
<!-- 选择文件 -->
    文件:<input type="file" name="file"/>
<!--     提交,上传 -->
    <input type="submit"/>
</form>
<hr>
<p>文件下载</p>
<a href="download">下载文件</a>
<hr/>
<p>多文件上传</p>
<form action="batch" method="POST" enctype="multipart/form-data">
    <p>文件1:<input type="file" name="file"/></p>
    <p>文件2:<input type="file" name="file"/></p>
    <p><input type="submit" value="上传"/></p>
</form>
</body>
</html>
4.创建映射
package com.example.demo;

import org.springframework.boot.SpringApplication;
import org.springframework.boot.autoconfigure.SpringBootApplication;
import org.springframework.stereotype.Controller;
import org.springframework.ui.ModelMap;
import org.springframework.web.bind.annotation.GetMapping;
@Controller
@SpringBootApplication
public class Demo3Application {

    @GetMapping("/")
    public String index(ModelMap modelMap) {
        modelMap.addAttribute("msg", "文件上传下载");
        return "index";
    }

    public static void main(String[] args) {
        SpringApplication.run(Demo3Application.class, args);
    }

}
