准备工作:
- 添加 okhttp 依赖,最新版为 4.0.0,在 build.gradle 中添加如下代码:
implementation 'com.squareup.okhttp3:okhttp:4.0.0'
- 申请网络权限,在清单文件中添加如下代码:
<uses-permission android:name="android.permission.INTERNET"/>
思路:
- 注册:后台获取客户端数据,查询数据库此账号是否已经注册,没有则插入数据库,并返回注册成功,否则返回注册失败。
- 登陆:本质为查询操作,获取客户端数据,查询数据库是否存在该账号,并判断账号密码是否匹配,最后返回登陆结果。
注意事项:
- 需要真机测试,不能采用模拟器测试。
一:安卓客户端代码。
1.布局代码
<?xml version="1.0" encoding="utf-8"?>
<LinearLayout xmlns:android="http://schemas.android.com/apk/res/android"
    xmlns:app="http://schemas.android.com/apk/res-auto"
    xmlns:tools="http://schemas.android.com/tools"
    android:orientation="vertical"
    android:layout_width="match_parent"
    android:layout_height="match_parent"
    tools:context=".MainActivity">

    <LinearLayout
        android:orientation="horizontal"
        android:layout_height="60dp"
        android:layout_width="match_parent"
        android:layout_marginLeft="16dp"
        android:layout_marginRight="16dp">

        <TextView
            android:layout_width="60dp"
            android:layout_height="wrap_content"
            android:text="账号"
            android:layout_gravity="center_vertical"
            android:textSize="20sp"/>

        <EditText
            android:id="@+id/account"
            android:layout_height="wrap_content"
            android:layout_width="0dp"
            android:layout_weight="1"
            android:layout_gravity="center_vertical"/>

    </LinearLayout>

    <LinearLayout
        android:orientation="horizontal"
        android:layout_height="60dp"
        android:layout_width="match_parent"
        android:layout_marginLeft="16dp"
        android:layout_marginRight="16dp">

        <TextView
            android:layout_width="60dp"
            android:layout_height="wrap_content"
            android:text="密码"
            android:layout_gravity="center_vertical"
            android:textSize="20sp"/>

        <EditText
            android:id="@+id/password"
            android:layout_height="wrap_content"
            android:layout_width="0dp"
            android:layout_weight="1"
            android:inputType="textPassword"
            android:layout_gravity="center_vertical"/>

    </LinearLayout>

    <Button
        android:id="@+id/login_btn"
        android:layout_height="40dp"
        android:layout_width="match_parent"
        android:text="登陆"
        android:textSize="18sp"
        android:layout_marginLeft="16dp"
        android:layout_marginRight="16dp"/>

    <Button
        android:id="@+id/register_btn"
        android:layout_height="40dp"
        android:layout_width="match_parent"
        android:text="注册"
        android:textSize="18sp"
        android:layout_marginLeft="16dp"
        android:layout_marginRight="16dp"/>

</LinearLayout>
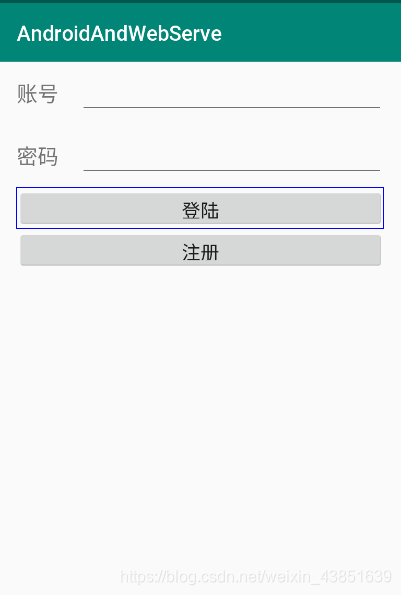
效果如图:
2.MainActivity
public class MainActivity extends AppCompatActivity implements View.OnClickListener{

    //账号密码文本框内容
    private EditText accountText;
    private EditText passwordText;

    @Override
    protected void onCreate(Bundle savedInstanceState) {
        super.onCreate(savedInstanceState);
        setContentView(R.layout.activity_main);

        accountText = (EditText) findViewById(R.id.account);
        passwordText = (EditText) findViewById(R.id.password);
        Button loginBtn = (Button) findViewById(R.id.login_btn);
        Button registerBtn = (Button) findViewById(R.id.register_btn);
        loginBtn.setOnClickListener(this);
        registerBtn.setOnClickListener(this);
    }

    @Override
    public void onClick(View v) {
        switch (v.getId()) {
            //登陆按钮
            case R.id.login_btn:
                String loginAccount = accountText.getText().toString();
                String loginPassword = passwordText.getText().toString();
                loginWithOkHttp(loginAccount,loginPassword);
                break;
            //注册按钮
            case R.id.register_btn:
                String registerAccount = accountText.getText().toString();
                String registerPassword = passwordText.getText().toString();
                registerWithOkHttp(registerAccount,registerPassword);
                break;
            default:
                break;
        }
    }

    //实现登陆
    private void loginWithOkHttp(String account, String password) {
        OkHttpUtil.loginWithOkHttp(account, password, new okhttp3.Callback() {
            @Override
            public void onFailure(Call call, IOException e) {
                Log.d("MianActivity","登陆请求失败");
            }

            //请求成功,获取服务器返回数据
            @Override
            public void onResponse(Call call, Response response) throws IOException {
                //获取返回内容
                final String responseData = response.body().string();
                //在主线程更新ui和响应用户操作
                runOnUiThread(new Runnable() {
                    @Override
                    public void run() {
                        if (responseData.equals("true")) {
                            Toast.makeText(MainActivity.this,"登陆成功",Toast.LENGTH_SHORT).show();
                            Intent intent = new Intent(MainActivity.this,AppActivity.class);
                            intent.putExtra("login","登陆成功");
                            startActivity(intent);
                        } else {
                            Toast.makeText(MainActivity.this,"登陆失败",Toast.LENGTH_SHORT).show();
                        }
                    }
                });
            }
        });
    }

    //实现注册
    private void registerWithOkHttp(String account,String password) {
        OkHttpUtil.registerWithOkHttp(account, password, new okhttp3.Callback() {
            @Override
            public void onFailure(Call call, IOException e) {
                Log.d("MianActivity","注册请求失败");
            }

            //请求成功,获取服务器返回数据
            @Override
            public void onResponse(Call call, Response response) throws IOException {
                //获取返回内容
                final String responseData = response.body().string();
                //在主线程更新ui和响应用户操作
                runOnUiThread(new Runnable() {
                    @Override
                    public void run() {
                        if (responseData.equals("true")) {
                            Toast.makeText(MainActivity.this,"注册成功",Toast.LENGTH_SHORT).show();
                            Intent intent = new Intent(MainActivity.this,AppActivity.class);
                            intent.putExtra("login","注册成功");
                            startActivity(intent);
                        } else {
                            Toast.makeText(MainActivity.this,"注册失败",Toast.LENGTH_SHORT).show();
                        }
                    }
                });
            }
        });
    }
}
3 .okhttputil工具类,采用静态方法,分别处理注册和登陆请求。
public class OkHttpUtil {
    //登陆请求
    public static void loginWithOkHttp(String account,String password,okhttp3.Callback callback) {
        OkHttpClient client = new OkHttpClient();
        RequestBody body = new FormBody.Builder()
                .add("loginAccount",account)
                .add("loginPassword",password)
                .build();
        Request request = new Request.Builder()
                .url( "http://111.111.11.111:8081/AndroidLogin/LoginServlet")
                .post(body)
                .build();
        client.newCall(request).enqueue(callback);
    }
    //注册请求
    public static void registerWithOkHttp(String account,String password,okhttp3.Callback callback) {
        OkHttpClient client = new OkHttpClient();
        RequestBody body = new FormBody.Builder()
                .add("registerAccount",account)
                .add("registerPassword",password)
                .build();
        Request request = new Request.Builder()
                .url("http://111.111.11.111:8081/AndroidLogin/RegisterServlet")
                .post(body)
                .build();
        client.newCall(request).enqueue(callback);
    }
}
安卓端到这里就全部实现了。
二:服务器端。
- 导入数据库驱动
- 在数据库中建好数据库和表。
- 如果你的 servlet 生成了注解 @WebServlet ,那么就不需要编辑 web.xml 文件了,否则会发生冲突。
1 .注册 servlet
@WebServlet("/RegisterServlet")
public class RegisterServlet extends HttpServlet {
	private static final long serialVersionUID = 1L;

    public RegisterServlet() {
        super();
    }

	protected void doGet(HttpServletRequest request, HttpServletResponse response) throws ServletException, IOException {
		System.out.println("this is get");
		request.setCharacterEncoding("UTF-8");
		//获取客户端数据
		String registerAccount = request.getParameter("registerAccount");
        String registerPassword = request.getParameter("registerPassword");

        boolean result= Model.register(registerAccount,registerPassword);
        System.out.println("注册账号:"+registerAccount+",注册密码:"+registerPassword+",注册结果"+result);

        //通过PrintWriter返回给客户端操作结果
        PrintWriter writer = response.getWriter();
        writer.print(result);
        writer.flush();
        writer.close();
	}

	protected void doPost(HttpServletRequest request, HttpServletResponse response) throws ServletException, IOException {
		System.out.println("this is post");
		doGet(request, response);
	}

}
2 .登陆 servlet
@WebServlet("/LoginServlet")
public class LoginServlet extends HttpServlet {
	private static final long serialVersionUID = 1L;

    public LoginServlet() {
        super();
    }

	protected void doGet(HttpServletRequest request, HttpServletResponse response) throws ServletException, IOException {
		System.out.println("this is get");
		request.setCharacterEncoding("UTF-8");

		//获取客户端传递值
		String loginAccount = request.getParameter("loginAccount");
		String loginPassword = request.getParameter("loginPassword");

		boolean result = Model.login(loginAccount,loginPassword);
		System.out.println("登陆账号:" + loginAccount + "登陆密码:" + loginPassword + "登陆结果:" + result);

		response.setCharacterEncoding("UTF-8");
		//返回客户端结果
		PrintWriter writer = response.getWriter();
		writer.print(result);
		writer.flush();
        writer.close();
	}

	protected void doPost(HttpServletRequest request, HttpServletResponse response) throws ServletException, IOException {
		System.out.println("this is post");
		doGet(request,response);
	}

}
3 .数据库操作类,采用静态函数。
public class Model {

	private static String usr = "root";
	private static String password = "password";
	private static String driver = "com.mysql.cj.jdbc.Driver";
	private static String url = "jdbc:mysql://11.111.111.111:3306/test?serverTimezone=UTC";

	/**
	 *登陆操作,本质是数据库查询
	 *查询数据库是否存在此账号
	 *存在返回true,不存在返回false
	 */
	public static boolean login(String loginAccount ,String loginPassword) {
		Connection conn = null;
		PreparedStatement pstmt = null;
		ResultSet rs = null;
		int count = 0;
		try {
			Class.forName(driver);
			conn = DriverManager.getConnection(url,usr,password);
			pstmt = conn.prepareStatement("select count(*) from android where account=? and password=?");
			pstmt.setString(1, loginAccount);
			pstmt.setString(2, loginPassword);
			rs = pstmt.executeQuery();
			if (rs.next()) {
				count = rs.getInt(1);
			}
		} catch (Exception e) {
			e.printStackTrace();
		} finally {
			...//rs,pstmt,conn回收
		}

		if (count == 1) {
			return true;
		} else {
			return false;
		}
	}

	/**
	 * 注册操作
	 * 注册前查询账号是否存在
	 * 存在则注册失败
	 */
	public static boolean register(String registerAccount ,String registerPassword) {
		//如果数据库存在该用户,则注册失败
		if (Model.login(registerAccount ,registerPassword)) {
			return false;
		}
		Connection conn = null;
		PreparedStatement pstmt = null;
		int count = 0;
		try {
			Class.forName(driver);
			conn = DriverManager.getConnection(url,usr,password);
			pstmt = conn.prepareStatement("insert into android values(?,?)");
			pstmt.setString(1, registerAccount );
			pstmt.setString(2, registerPassword);
			//返回受影响的行数
			count = pstmt.executeUpdate();
		} catch (Exception e) {
			e.printStackTrace();
		} finally {
			...//pstmt,conn回收
		}

		if (count == 1) {
			return true;
		} else {
			return false;
		}
	}
}
服务器端到这里就完成了。
三:登陆注册结果。
真机中输入账号:123123,密码:111
分别点击注册和登陆按钮后,在 tomcat 中结果如图:
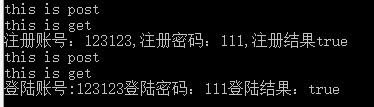
- 关于okhttp:okhttp 发起网络请求很方便,网络请求属于耗时操作,不能在主线程中进行,否则会阻塞主线程,而 okhttp 在 enqueue 方法内部会自动帮我们开好线程,并在子线程中进行 http 请求,并将请求结果回调到 okhttp3.Callback 中。但要注意的是,更新 UI 操作是不能在子线程中进行的,所以需要使用 runOnUiThread 方法转换为主线程。
最后附上参考链接,感谢。
https://www.cnblogs.com/HenuAJY/p/10884055.html
