Maven私服构建与插件开发
一、maven生命周期
知识点概要:
- 生命周期的概念与意义
- maven三大生命周期与其对应的phase(阶段)
- 生命周期与插件的关系
- 生命周期与默认插件的绑定
1、生命周期的概念与意义
在项目构建时通常会包含清理、编译、测试、打包、验证、部署、文档生成等步骤,maven统一对其进行了整理抽象成三个生命周期(ilfecycle)及各自对应的多个阶段(phase)。这么做的意义是:
- 每一个阶段都成为一个扩展点,可以采用不同的方式来实现,提高了扩展性与灵活性。
- 规范统一了maven的执行路径。
在执行项目构建阶段是可以采用jar方式构建也可以采用war包方式构建提高了灵活性。我们可以通过mvn$(phase name)直接触发指定阶段的执行如:
演示phase的执行
#执行清理phase
mvn clean
#执行compile phase
mvn compile
#也可以同时执行 清理加编译
mvn clean comile
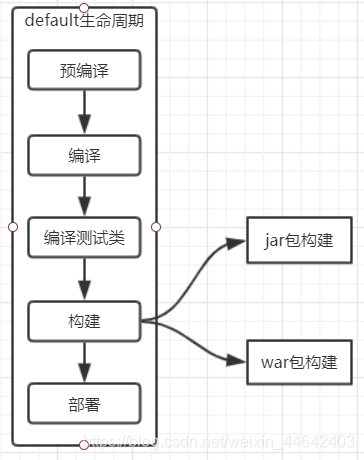
2、maven三大生命周期与对应的phase(阶段)
maven 总共包含三大生生命周期
-
clean Lifecycle :清理生命周期,用于于清理项目
-
default Lifecycle:默认生命周期,用于编译、打包、测试、部署等
-
site Lifecycle 站点文档生成,用于构建站点文档
clean Lifecycle
#阶段(phase)
pre-clean		#预清理
clean			#清理
post-clean		#清理之后
default Lifecycle
#阶段(phase)
validate				#验证
initialize				#初始化
generate-sources
process-sources
generate-resources
process-resources
compile					#编译
process-classes
generate-test-sources
process-test-sources
generate-test-resources
process-test-resources
test-compile			#编译测试类
process-test-classes
test					#执行测试
prepare-package			#构建前准备
package					#打包构建
pre-integration-test
integration-test
post-integration-test
verify					#验证
install					#上传到本地仓库
deploy					#上传到远程仓库
site Lifecycle
#阶段(phase)
pre-site		#准备构建站点
site			#构建站点
post-site		#构建站点之后
site-deploy	 	#站点部署
在生命周期里,是有严格执行的顺序的,比如你要执行pakcage阶段前必须是先执行完compile先,当你没有compile直接pakcage,在pakcage前面的阶段会自动执行
小案例
# 执行编译
mvn compile
# 执行打包
mvn package
# 清理项目
mvn clean
# 直接执行打包就包含了编译指令的执行
mvn package
通过上面案例会发现我不执行compile阶段直接执行package阶段我的项目仍然可以进行打包,因为在我们执行package阶段前maven自动执行了在package阶段前需要执行的全部阶段
3、生命周期与插件的关系
什么是插件?当我们执行mvn compile或者mvn package这些阶段时是如何实现的呢?这些阶段谁来实现呢?这就是插件,maven的核心代码其实很少,大部分实现都是由插件来完成的。
https://maven.apache.org/ref/3.6.2/maven-core/lifecycles.html 我们可以去maven官网看看每一个阶段的插件
[外链图片转存失败,源站可能有防盗链机制,建议将图片保存下来直接上传(img-Qo0OU0e4-1574345407762)(E:\架构师\git与svn原理截图\image-20191120213252397.png)]
这是我们用的clean命令其实他是由 org.apache.maven.plugins:maven-clean-plugin:2.5:clean 插件实现的
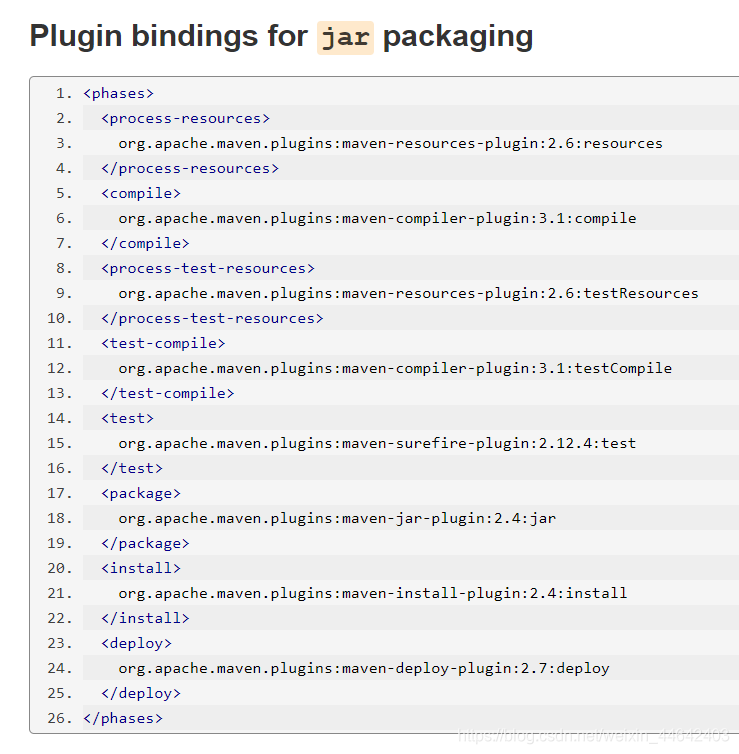
这是我们用的打包jar命令我们可以发现这里面用到了不止一个插件,从中我们可以得出一个阶段可以使用多个插件,当我们执行packege时插件会从上往下依次执行到packege
总结:
生命周期的阶段可以绑定具体的插件及目标
同一个阶段可以对应多个插件和目标
phase(阶段)》plugin(插件)》goal(实现)
4、生命周期与插件的默认绑定
既然执行每一个阶段需要插件,为什么我们不用配置任何插件就可以执行了呢,其实maven都有一些默认的绑定插件我们

就拿clean来举例子,clean中有3个命令 pre-clean clean post-clean我们可以看到这3个命令只有clean绑定了插件所以只有clean是有用的 pre-clean命令其实是没反应的,但是没有任何插件绑定的post-clean执行之后会有反应呢,因为每一个阶段是生命周期都是严格按照顺序执行的在执行post-clean之前许先执行pre-clean和clean所以执行post-clean就会把项目clean
那么这些插件配置在哪里呢?
apache-maven-3.6.1\maven-core-3.6.1.jar\lib\META-INF\plexus\default-bindings.xml
二、maven自定义插件开发
知识点:
- 插件的相关概念
- 常用插件的使用
- 开发一个自定义插件
1、maven插件相关概念
插件坐标定位:
插件和普通jar包一样包含 一组坐标定位属性
groupId、artifactId、version,当使用该插件时会从本地仓库中搜索,如果没有即从远程仓库下载
<!-- 唯一定位到dependency 插件 -->
<groupId>org.apache.maven.plugins</groupId>
<artifactId>maven-dependency-plugin</artifactId>
<version>2.10</version>
插件执行 execution:
execution 配置包含一组指示插件如何执行的属性:
id : 执行器命名
phase:在什么阶段执行?
goals:执行一组什么目标或功能?
configuration:执行目标所需的配置文件?
小案例
<!--将插件依赖拷贝到指定目录-->
<plugin>
    <groupId>org.apache.maven.plugins</groupId>
    <artifactId>maven-dependency-plugin</artifactId>
    <version>3.1.1</version>
    <executions>
        <execution><!--配置执行-->
            <id>copy-dep</id>
            <phase>package</phase><!--当执行到package阶段触发goals-->
            <goals><!--触发的内容-->
                <goal>copy-dependencies</goal>
            </goals>
            <configuration><!--配置拷贝的目录-->        					<outputDirectory>${project.build.directory}/alternateLocation</outputDirectory>
                <overWriteReleases>false</overWriteReleases>
                <overWriteSnapshots>true</overWriteSnapshots>
                <excludeTransitive>true</excludeTransitive>
            </configuration>
        </execution>
    </executions>
</plugin>
2、常用插件的使用
除了通过配置的方式使用插件以外,Maven也提供了通过命令直接调用插件目标其命令格式如下:
mvn groupId:artifactId:version:goal -D{参数名}
如果使用maven原生的插件则可以简化书写
# 展示pom的依赖关系树
mvn org.apache.maven.plugins:maven-dependency-plugin:2.10:tree
# 也可以直接简化版的命令,但前提必须是maven 官方插件
mvn dependency:tree
其它常用插件
# 查看pom 文件的最终配置
mvn help:effective-pom
# 原型项目生成
archetype:generate
#快速创建一个WEB程序
mvn archetype:generate -DgroupId=xxx -DartifactId=xxx -DarchetypeArtifactId=maven-archetype-webapp -DinteractiveMode=false
#快速创建一个java 项目
mvn archetype:generate -DgroupId=xxx -DartifactId=xxx -DarchetypeArtifactId=maven-archetype-quickstart -DinteractiveMode=false
3、开发自定义插件
实现步骤:
-
创建maven 插件项目
-
设定packaging 为maven-plugin
-
添加插件依赖
-
编写插件实现逻辑
-
打包构建插件
<!--新建一个项目-->
<?xml version="1.0" encoding="UTF-8"?>
<project xmlns="http://maven.apache.org/POM/4.0.0"
         xmlns:xsi="http://www.w3.org/2001/XMLSchema-instance"
         xsi:schemaLocation="http://maven.apache.org/POM/4.0.0 http://maven.apache.org/xsd/maven-4.0.0.xsd">
    <modelVersion>4.0.0</modelVersion>

    <groupId>lzj</groupId>
    <artifactId>lzj-maven-plugin</artifactId>
    <version>1.0-SNAPSHOT</version>
    <packaging>maven-plugin</packaging><!--设为插件项目-->

    <dependencies>
        <dependency>
            <groupId>org.apache.maven</groupId>
            <artifactId>maven-plugin-api</artifactId>
            <version>3.0.3</version>
        </dependency>
        <dependency>
            <groupId>org.apache.maven.plugin-tools</groupId>
            <artifactId>maven-plugin-annotations</artifactId>
            <version>3.1</version>
        </dependency>
    </dependencies>

</project>
/**
 * @Author: LZJ
 * @Date: 2019/11/20 22:49
 * @Version 1.0
 */
@Mojo(name = "lzj") //goal名称
public class LuzjPlugin extends AbstractMojo { //继承AbstractMojo
    @Parameter //需要传入参数
    String sex;
    @Parameter //需要传入参数
    String describe;
    public void execute() throws MojoExecutionException, MojoFailureException {
        getLog().info(String.format("lzj sex=%s,describe=%s",sex,describe)); //打印
    }
}

运行install把插件 装入maven本地仓库
<!--在项目里使用插件-->
<build>
    <plugins>
        <plugin>
            <!--插件版本-->
            <groupId>lzj</groupId>
            <artifactId>lzj-maven-plugin</artifactId>
            <version>1.0-SNAPSHOT</version>
            <executions>
                <execution>
                    <id>print-info</id>
                    <phase>compile</phase><!--在那个阶段触发-->
                    <goals>
                        <goal>lzj</goal><!--goal名称-->
                    </goals>
                    <configuration><!--传入参数-->
                        <sex>man</sex>
                        <describe>good</describe>
                    </configuration>
                </execution>
            </executions>
        </plugin>
    </plugins>
</build>
三、nexus 私服搭建与核心功能
知识点概要:
-
私服的使用场景
-
nexus 下载安装
-
nexus 仓库介绍
-
本地远程仓库配置
-
发布项目至nexus 远程仓库
-
关于SNAPSHOT(快照)与RELEASE(释放) 版本说明
1、私服使用场景
私服使用场景如下:
-
公司不能连接公网,可以用一个私服务来统一连接
-
公司内部jar 组件的共享
nexus 下载安装
nexus 下载地址:
https://sonatype-download.global.ssl.fastly.net/nexus/oss/nexus-2.14.5-02-bundle.tar.gz
解压并配置环境变量
#解压
tar -zxvf nexus-2.14.5-02-bundle.tar.gz
#在环境变量当中设置启动用户
vim /etc/profile
#添加profile文件。安全起见不建议使用root用户,如果使用其它用户需要加相应权限
export RUN_AS_USER=root
#读取并执行
source /etc/profile
配置启动参数
 vi ${nexusBase}/conf/nexus.properties
 #端口号
 application-port=9999
启动与停止nexus
#启动
 ${nexusBase}/bin/nexus start
#停止
  ${nexusBase}/bin/nexus stop
登录nexus 界面
地址:http://{ip}:9999/nexus/
用户名:admin
密码:admin123
3、仓库介绍
3rd party:第三方仓库
Apache Snapshots:apache 快照仓库
Central: maven 中央仓库
Releases:私有发布版本仓库
Snapshots:私有 快照版本仓库
4、本地远程仓库配置
<!--在pom 中配置远程仓库-->
<repositories>
    <repository>
        <id>nexus-public</id>
        <name>my nexus repository</name>
		<url>http://192.168.0.147:9999/nexus/content/groups/public/</url>
    </repository>
</repositories>
<!--或者在settings.xml 文件中配置远程仓库镜像 效果一样,但作用范围广了-->
<mirror>
  <id>nexus-aliyun</id>
        <mirrorOf>*</mirrorOf>
        <name>Nexus aliyun</name>
  		<url>http://192.168.0.147:9999/nexus/content/groups/public/</url>
</mirror>
5、发布项目至nexus 远程仓库
<!--配置仓库地址-->
<distributionManagement>
    <repository>
        <id>nexus-release</id>
        <name>nexus release</name>
        <url>http://192.168.0.147:9999/nexus/content/repositories/releases/</url>
    </repository>
    <snapshotRepository>
        <id>nexus-snapshot</id>
        <name>nexus snapshot</name>
        <url>http://192.168.0.147:9999/nexus/content/repositories/snapshots/</url>
    </snapshotRepository>
</distributionManagement>
<!--设置 setting.xml 中设置server-->
<server>
      <id>nexus-snapshot</id> <!--id要和你项目中的pom中id一致-->
      <username>deployment</username>
      <password>deployment123</password>
    </server>
<server>
      <id>nexus-release</id> <!--id要和你项目中的pom中id一致-->
      <username>deployment</username>
      <password>deployment123</password>
    </server>
执行deploy 命令
/snapshots/
执行deploy 命令

mvn deploy
