1 前言
Spring 中使用了 jdk 代理 跟 CGLIB 代理 实现 AOP 编程,我们将使用 jdk 代理一个简单的例子概述 Spring AOP 遵循的约定编程。
2 手动实现
2.1 service 接口与实现(被代理类)
1 /**
2  * @author pancc
3  * @version 0.0.1
4  */
5 public interface HelloService {
6     void sayHello(String name);
7 }
 1 /**
 2  * @author pancc
 3  * @version 0.0.1
 4  */
 5 public class HelloServiceImpl implements HelloService {
 6     @Override
 7     public void sayHello(String name) {
 8         if (Objects.isNull(name) || name.isEmpty()) {
 9             throw new IllegalArgumentException();
10         }
11         System.out.printf("hello , %s\n", name);
12     }
13 }
2.2 Interceptor 接口与实现
其中的 Invocation 是 2.3 中的。
 1 /**
 2  * The interface Interceptor.
 3  *
 4  * @author pancc
 5  * @version 1.0
 6  */
 7 public interface Interceptor {
 8
 9     /**
10      * 事前方法
11      *
12      */
13     void before();
14
15     /**
16      * 事后方法
17      */
18     void after();
19
20     /**
21      * 取代原有事件方法
22      *
23      * @param invocation 回调参数,通过他的 proceed 方法回调原有方法
24      * @return 原有事件返回对象 object
25      * @throws InvocationTargetException the invocation target exception
26      * @throws IllegalAccessException    the illegal access exception
27      */
28     Object around(Invocation invocation) throws InvocationTargetException, IllegalAccessException;
29
30     /**
31      * 事后返回方法。事件没有发生异常执行
32      */
33     void afterReturning();
34
35     /**
36      * 事后异常方法。当事件发生异常后执行
37      */
38     void afterThrowing();
39
40     /**
41      * 是否使用 around 的方法取代原有方法
42      *
43      * @return the boolean
44      */
45     boolean useAround();
46 }
 1 /**
 2  * @author pancc
 3  * @version 0.0.1
 4  */
 5 public class MyInterceptorImpl implements Interceptor {
 6     @Override
 7     public void before() {
 8         System.out.println("before ......");
 9     }
10
11     @Override
12     public void after() {
13         System.out.println("after ......");
14     }
15
16     @Override
17     public Object around(Invocation invocation) throws InvocationTargetException, IllegalAccessException {
18         System.out.println("around before ......");
19         Object o = invocation.proceed();
20         System.out.println("around after ......");
21         return o;
22     }
23
24     @Override
25     public void afterReturning() {
26         System.out.println("afterReturning ......");
27     }
28
29     @Override
30     public void afterThrowing() {
31         System.out.println("afterThrowing ......");
32
33     }
34
35     @Override
36     public boolean useAround() {
37         return true;
38     }
39 }
2.3 Invocation 类
proceed 方法通过反射调用原有的方法。
 1 /**
 2  * @author pancc
 3  * @version 0.0.1
 4  */
 5 @AllArgsConstructor
 6 public class Invocation {
 7
 8     private Object[] params;
 9
10     private Method method;
11
12     private Object target;
13
14     /**
15      * Proceed object.
16      *
17      * @return the object
18      * @throws InvocationTargetException the invocation target exception
19      * @throws IllegalAccessException    the illegal access exception
20      */
21     public Object proceed() throws InvocationTargetException, IllegalAccessException {
22         return method.invoke(target, params);
23     }
24 }
2.4 ProxyBean
按照 aop 的设计本质,我们将编写一个工具类,我们向这个工具类的方法 getProxyBean() 传入需要被代理的实例(service),与代理事件(Interceptor),并通过 jdk 代理获得一个被代理的对象 (特点在debug 视图以 $Proxy0 开始)。我们使用 jdk 代理,我们还需要实现 InvocationHandler 接口。
 1 /**
 2  * The type Proxy bean.
 3  *
 4  * @author pancc
 5  * @version 0.0.1
 6  */
 7 public class ProxyBean implements InvocationHandler {
 8
 9     private Object target;
10     private Interceptor interceptor;
11
12     /**
13      * Gets proxy bean.
14      *
15      * @param target      the target
16      * @param interceptor the interceptor
17      * @return the proxy bean
18      */
19     public static Object getProxyBean(Object target, Interceptor interceptor) {
20
21         ProxyBean proxyBean = new ProxyBean();
22         proxyBean.target = target;
23         proxyBean.interceptor = interceptor;
24         return Proxy.newProxyInstance(target.getClass().getClassLoader(), target.getClass().getInterfaces(), proxyBean);
25     }
26
27     @Override
28     public Object invoke(Object proxy, Method method, Object[] args) {
29         boolean e = false;
30         Object ret = null;
31         Invocation invocation = new Invocation(args, method, target);
32         interceptor.before();
33         try {
34             if (interceptor.useAround()) {
35                 ret = interceptor.around(invocation);
36             } else {
37                 ret = method.invoke(target, args);
38             }
39         } catch (InvocationTargetException | IllegalAccessException | IllegalArgumentException ex) {
40             e = true;
41         }
42         interceptor.after();
43         if (e) {
44             interceptor.afterThrowing();
45         } else {
46             interceptor.afterReturning();
47             return ret;
48         }
49         return null;
50     }
51 }
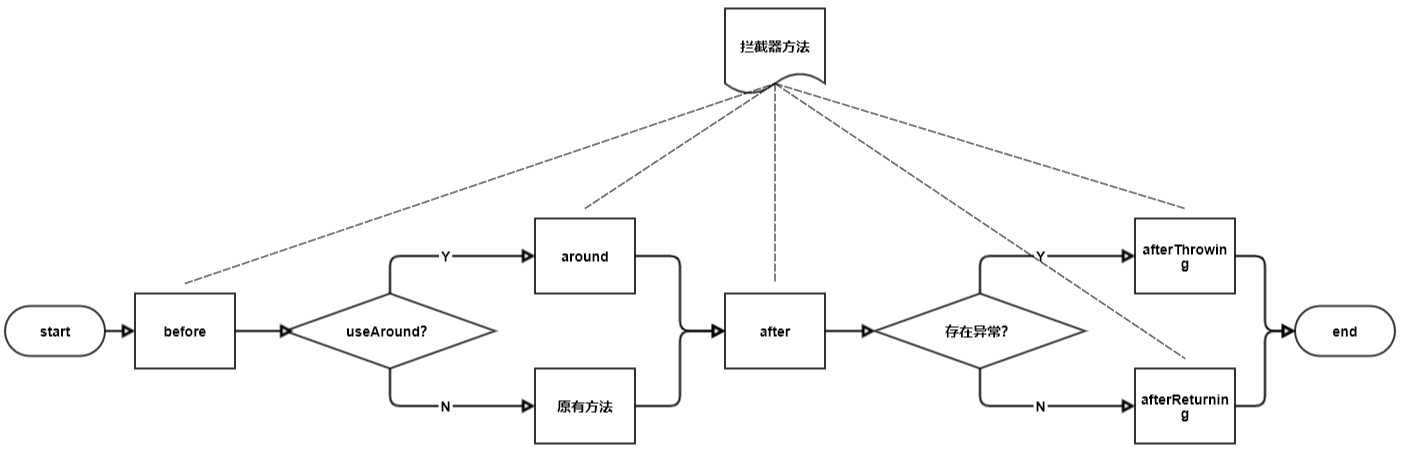
3 工作视图
上述的代码工作流程十分简单:
根据上述的描述我们可以写出下边的测试代码:
 1 /**
 2  * @author pancc
 3  * @version 0.0.1
 4  */
 5 public class PreTest {
 6     public static void main(String[] args) {
 7         HelloService service = new HelloServiceImpl();
 8
 9         HelloService proxy = (HelloService) ProxyBean.getProxyBean(service, new MyInterceptorImpl());
10         proxy.sayHello("pen");
11     }
12 }
并且得到如下结果:
