文章目录
Arm开发虚拟环境准备实验
由于开发板携带不太方便,所以打算使用Qemu来模拟开发板进行嵌入式开发学习。
宿主操作系统
为方便起见,采用 Ubuntu 18.04.3 LTS (Bionic Beaver) 作为宿主系统,采用默认配置进行虚拟机安装。虚拟机为4GB内存、8核心CPU、60GB硬盘。系统交换分区设置为8GB。
macrofun@QemuLab:~$ uname -a
Linux QemuLab 5.0.0-29-generic #31~18.04.1-Ubuntu SMP Thu Sep 12 18:29:21 UTC 2019 x86_64 x86_64 x86_64 GNU/Linux
Qemu
由于三星猎户座4412现在是用于自学的主流开发板,所以为了方便起见,使用Qemu来模拟ARM vexpress-a9电路板。 vexpress(Versatile Express Family)是ARM自己推出的开发板,主要是方便SOC厂商设计、验证和测试自己的SOC芯片。
The Versatile Express development platform provides an ultra fast environment for prototyping the next generation of System-on-Chip designs, such as the Cortex-A9 Quad Core. Through a range of plug-in daughterboards hardware and software applications can be developed and debugged.
ARM架构和对应的Soc之间的关系如下表所示:
| ARM架构 | ARM7 | ARM9 | ARM11 | Cotex-A8 | Cotex-A9 |
|---|---|---|---|---|---|
| 对应Soc | S3C44B0 | S3C2440 | S3C6410 | S5PV210 | Exynos4412 |
- 安装Qemu1工具
macrofun@QemuLab:~$ sudo apt-get install qemu qemu-system qemu-utils
- 查看Qemu支持的ARM开发板的型号,可以看到它支持 vexpress-a9开发板
macrofun@QemuLab:~$ qemu-system-arm -M help
Qemu网络设置
虚拟网络一般有三种模式,即Host-Only、NAT、Bridge,目前应用最广泛的模式当属桥接模式。因为在该模式下,开发板相当于同网段内的一台独立的主机,使用很方便。
网桥设置
对于网桥的设置,主要有两种方式,即brctl和iproute2。需要注意的是,如果将一个设备接口加入到某一网桥当中,那么这个设备接口原有的IP地址信息将被丢弃。显然,此时连接到该设备接口上的网络会被中断一会儿。
- 方法一:通过bridge-utils 软件包里面的 brctl 工具管理网桥。
# 新建一个网桥,名称为br0
brctl addbr br0
# 将网络设备(例如ens38)添加到网桥br0
brctl addif br0 ens38
# 显示当前存在的网桥及其所连接的网络端口
brctl show
# 启动网桥
ip link set up dev br0
# 删除网桥,首先需要先关闭它
ip link set dev br0 down
brctl delbr br0
- 方法二:通过iproute2软件包中的ip工具来管理网桥。
# 新建一个网桥,名称为br0
ip link add name br0 type bridge
# 启动网桥br0
ip link set dev br0 up
# 将一个网络端口ens38设置为混杂模式,并添加到网桥br0中
ip link set dev ens38 promisc on
# 将端口ens38添加到网桥中,并将其所有者设置为 br0
ip link set dev ens38 master br0
# 启动网络端口ens38
ip link set dev ens38 up
# 显示现存的网桥及其关联的端口,使用iproute2中的bridge工具
bridge link show
# 若要删除网桥,应首先移除它所关联的所有端口,同时关闭端口的混杂模式并关闭端口以将其恢复至原始状态
ip link set ens38 promisc off
ip link set ens38 down
ip link set dev ens38 nomaster
# 当网桥的配置清空后,删除该网桥br0
ip link delete br0 type bridge
添加虚拟网卡
Linux添加虚拟网卡有三种方法:
方法1: ifconfig命令创建\删除虚拟网卡
macrofun@QemuLab:~$ ifconfig ens38:0 192.168.1.10 netmask 255.255.255.0 up
删除虚拟网卡:
macrofun@QemuLab:~$ ifconfig ens38:0 down
方法2: 修改网卡配置文件
修改网卡的配置文件/etc/network/interfaces
auto eth0 iface eth0 inet dhcp auto eth0:1
iface eth0:1 inet static
address 192.168.11.1
netmask 255.255.255.0
gateway 192.168.11.1 auto eth0:2 iface eth0:2 inet static
address 192.168.12.1
netmask 255.255.255.0
gateway 192.168.12.1
修改之后,使用如下命令重启网卡
macrofun@QemuLab:~$ sudo service networking restart
方法3:创建tap
前两种方法都有一个特点,创建的网卡可有不同的ip地址,但是Mac地址相同,无法用来创建虚拟机。
使用命令tunctl添加虚拟网卡tap。tun/tap 驱动程序实现了虚拟网卡的功能,tun表示虚拟的是点对点设备,tap表示虚拟的是以太网设备,这两种设备针对网络包实施不同的封装。
首先安装uml-utilities软件包以获得tunctl工具
macrofun@QemuLab:~$ sudo apt-get install uml-utilities
添加虚拟网卡设备tap0
# TUNCTL(8)              System Manager's Manual              TUNCTL(8)
# NAME
#       tunctl — create and manage persistent TUN/TAP interfaces
# SYNOPSIS
#       tunctl [-f tun-clone-device]  [-u owner]  [-t device-name]
#       tunctl [-f tun-clone-device]  -d device-name

# 创建虚拟网卡设备,我的ubuntu的用户名是macrofun
macrofun@QemuLab:~$ tunctl -t tap0 -u macrofun
# 设置虚拟网卡
macrofun@QemuLab:~$ ifconfig tap0 10.8.8.4 netmask 255.255.255.0 promisc up
根据上面的介绍,可以编写如下网桥管理脚本工具tuptap.sh:
#!/bin/bash
if test -z $1 ; then
	echo need a argument: down/up
	exit
fi

if [ "up" = $1 ] ; then
	# 新建一个网桥,名称为br0
	brctl addbr br0
	# 将网络设备ens38添加到网桥br0
	ifconfig ens38 down
	brctl addif br0 ens38
	# 关闭生成树协议
	brctl stp br0 off

	ifconfig br0 10.8.8.3 netmask 255.255.255.0 promisc up
	ifconfig ens38 10.8.8.2 netmask 255.255.255.0 promisc up
 	# 使用命令tunctl添加虚拟网卡tap
	tunctl -t tap0 -u macrofun
	ifconfig tap0 10.8.8.4 netmask 255.255.255.0 promisc up
	brctl addif br0 tap0
else
	ifconfig tap0 down
	brctl delif br0 tap0

	ifconfig ens38 down
	brctl delif br0 ens38

	ifconfig br0 down
	brctl delbr br0

	ifconfig ens38 10.8.8.2 netmask 255.255.255.0
fi
脚本编写完毕后,修改~/.bashrc,在尾部添加
alias tuptapup=‘sudo ~/BIN/tuptap.sh up’
alias tuptapdown=‘sudo ~/BIN/tuptap.sh down’
同时,将tuptap.sh拷贝至/home/macrofun/BIN目录下。
交叉编译工具
从网上找的arm-2014.05-29-arm-none-linux-gnueabi-i686-pc-linux-gnu.tar.bz2,解压至任意目录
macrofun@QemuLab:~/BIN/arm-2014.05$ ls
arm-none-linux-gnueabi  bin  i686-pc-linux-gnu  lib  libexec  share
查看arm-none-linux-gnueabi-gcc的版本信息,结果报错
macrofun@QemuLab:~/BIN/arm-2014.05/bin$ ./arm-none-linux-gnueabi-gcc -v
bash: ./arm-none-linux-gnueabi-gcc: No such file or directory
显然这是64位系统缺少32位兼容库造成的,安装32位运行库即可
网上说是安装sudo apt-get install ia32-libs,但是新版本的ubuntu已不再支持这个软件包,安装时会有错误提示。新版本已经使用lib32ncurses5 lib32z1这两个软件包进行了替代。
故执行如下命令即可。
macrofun@QemuLab:~$ sudo apt-get install lib32ncurses5 lib32z1
之后,在环境变量PATH中添加该路径/home/macrofun/BIN/arm-2014.05/bin即可
PATH=$PATH:/home/macrofun/BIN/arm-2014.05/bin
之后即可查看该交叉编译工具的版本信息
macrofun@QemuLab:~$ arm-none-linux-gnueabi-gcc -v
Using built-in specs.
COLLECT_GCC=arm-none-linux-gnueabi-gcc
COLLECT_LTO_WRAPPER=/home/macrofun/BIN/arm-2014.05/bin/../libexec/gcc/arm-none-linux-gnueabi/4.8.3/lto-wrapper
Target: arm-none-linux-gnueabi
Configured with: /scratch/maciej/arm-linux-2014.05-rel/src/gcc-4.8-2014.05/configure
--build=i686-pc-linux-gnu
--host=i686-pc-linux-gnu --target=arm-none-linux-gnueabi --enable-threads
--disable-libmudflap --disable-libssp --disable-libstdcxx-pch
--enable-extra-sgxxlite-multilibs --with-arch=armv5te --with-gnu-as
--with-gnu-ld --with-specs='%{save-temps: -fverbose-asm} %{funwind-tables|fno-unwind-tables|mabi=*|ffreestanding|nostdlib:;:-funwind-tables} -D__CS_SOURCERYGXX_MAJ__=2014 -D__CS_SOURCERYGXX_MIN__=5 -D__CS_SOURCERYGXX_REV__=29'
--enable-languages=c,c++ --enable-shared --enable-lto --enable-symvers=gnu
--enable-__cxa_atexit --with-pkgversion='Sourcery CodeBench Lite 2014.05-29' --with-bugurl=https://sourcery.mentor.com/GNUToolchain/ --disable-nls
--prefix=/opt/codesourcery --with-sysroot=/opt/codesourcery/arm-none-linux-gnueabi/libc
--with-build-sysroot=/scratch/maciej/arm-linux-2014.05-rel/install/opt/codesourcery/arm-none-linux-gnueabi/libc
--with-gmp=/scratch/maciej/arm-linux-2014.05-rel/obj/pkg-2014.05-29-arm-none-linux-gnueabi/arm-2014.05-29-arm-none-linux-gnueabi.extras/host-libs-i686-pc-linux-gnu/usr
--with-mpfr=/scratch/maciej/arm-linux-2014.05-rel/obj/pkg-2014.05-29-arm-none-linux-gnueabi/arm-2014.05-29-arm-none-linux-gnueabi.extras/host-libs-i686-pc-linux-gnu/usr
--with-mpc=/scratch/maciej/arm-linux-2014.05-rel/obj/pkg-2014.05-29-arm-none-linux-gnueabi/arm-2014.05-29-arm-none-linux-gnueabi.extras/host-libs-i686-pc-linux-gnu/usr
--with-isl=/scratch/maciej/arm-linux-2014.05-rel/obj/pkg-2014.05-29-arm-none-linux-gnueabi/arm-2014.05-29-arm-none-linux-gnueabi.extras/host-libs-i686-pc-linux-gnu/usr
--with-cloog=/scratch/maciej/arm-linux-2014.05-rel/obj/pkg-2014.05-29-arm-none-linux-gnueabi/arm-2014.05-29-arm-none-linux-gnueabi.extras/host-libs-i686-pc-linux-gnu/usr
--disable-libgomp --disable-libitm --enable-libatomic --disable-libssp
--enable-poison-system-directories
--with-build-time-tools=/scratch/maciej/arm-linux-2014.05-rel/install/opt/codesourcery/arm-none-linux-gnueabi/bin
--with-build-time-tools=/scratch/maciej/arm-linux-2014.05-rel/install/opt/codesourcery/arm-none-linux-gnueabi/bin SED=sed
Thread model: posix
gcc version 4.8.3 20140320 (prerelease) (Sourcery CodeBench Lite 2014.05-29)
Uboot
- 从Uboot官网FTP服务器上ftp://ftp.denx.de/pub/u-boot/下载较新的源码文件u-boot-2018.11.tar.bz2
- 解压至当前目录
macrofun@QemuLab:~$ tar -xjvf u-boot-2018.11.tar.bz2 -C .
- 解压后进入Uboot目录,内容如下:
macrofun@QemuLab:~/Qemu/u-boot-2018.11$ ls
api        configs        env       lib          README
arch       disk           examples  Licenses     runVexpress-a9.sh
board      doc            fs        MAINTAINERS  scripts
cmd        Documentation  include   Makefile     test
common     drivers        Kbuild    net          tools
config.mk  dts            Kconfig   post
- 查看vexpress开发板默认配置文件
macrofun@QemuLab:~/Qemu/u-boot-2018.11$ ls configs/vex*
configs/vexpress_aemv8a_dram_defconfig
configs/vexpress_aemv8a_juno_defconfig
configs/vexpress_aemv8a_semi_defconfig
configs/vexpress_ca15_tc2_defconfig
configs/vexpress_ca5x2_defconfig
configs/vexpress_ca9x4_defconfig
- 可以看到,Uboot默认就支持vexpress-a9开发板,所以直接修改Makefile,配置交叉编译工具即可。
在Makefile里面增加两行:
ARCH ?= arm
CROSS_COMPILE ?= arm-none-linux-gnueabi-
注意,arm-none-linux-gnueabi-后面不要有空格。
之后执行make命令即可。
macrofun@QemuLab:~/Qemu/u-boot-2018.11$ make vexpress_ca9x4_defconfig
  HOSTCC  scripts/basic/fixdep
  HOSTCC  scripts/kconfig/conf.o
  YACC    scripts/kconfig/zconf.tab.c
  LEX     scripts/kconfig/zconf.lex.c
  HOSTCC  scripts/kconfig/zconf.tab.o
  HOSTLD  scripts/kconfig/conf
#
# configuration written to .config
#
macrofun@QemuLab:~/Qemu/u-boot-2018.11$ make
执行时报错
/bin/sh: 1: cc: not found
/bin/sh: 1: bison: not found
/bin/sh: 1: flex: not found
原因是缺少相应的软件包,安装即可
macrofun@QemuLab:~$ sudo apt-get install build-essential bison flex
安装完毕后,再次执行make命令,报错
macrofun@QemuLab:~/Qemu/u-boot-2018.11$ make vexpress_ca9x4_defconfig
  HOSTCC  scripts/basic/fixdep
  HOSTCC  scripts/kconfig/conf.o
  YACC    scripts/kconfig/zconf.tab.c
  LEX     scripts/kconfig/zconf.lex.c
  HOSTCC  scripts/kconfig/zconf.tab.o
  HOSTLD  scripts/kconfig/conf
#
# configuration written to .config
#
之后,通过menuconfig来设置bootargs和bootcmd
bootcmd: tftp 0x60003000 uImage;tftp 0x60500000 vexpress-v2p-ca9.dtb; bootm 0x60003000 - 0x60500000;

bootargs: root=/dev/nfs rw nfsroot=10.8.8.3:/home/macrofun/NFS_HOME,proto=tcp,nfsvers=4,nolock init=/linuxrc ip=10.8.8.100 console=ttyAMA0
macrofun@QemuLab:~/Qemu/u-boot-2018.11$ make -j8
scripts/kconfig/conf  --syncconfig Kconfig
  CHK     include/config.h
  CFG     u-boot.cfg
  GEN     include/autoconf.mk.dep
  GEN     include/autoconf.mk
*** Your GCC is older than 6.0 and is not supported
arch/arm/config.mk:66: recipe for target 'checkgcc6' failed
make: *** [checkgcc6] Error 1
解决这个错误有两个思路:
其一是升级自己的交叉编译器版本https://www.linaro.org/downloads/,使其高于6.0;
Latest Linux Targeted Binary Toolchain Releases
| arm-linux-gnueabihf | 32-bit Armv7 Cortex-A, hard-float, little-endian |
|---|---|
| armv8l-linux-gnueabihf | 32-bit Armv8 Cortex-A, hard-float, little-endian |
| aarch64-linux-gnu | 64-bit Armv8 Cortex-A, little-endian |
Latest Bare-Metal Targeted Binary Toolchain Releases
| arm-eabi | 32-bit Armv7 Cortex-A, hard-float, little-endian |
|---|---|
| aarch64-elf | 32-bit Armv8 Cortex-A, hard-float, little-endian |
macrofun@QemuLab:~/Qemu/u-boot-2018.11$ vim arch/arm/config.mk +66
 49 # Only test once
 50 ifeq ($(CONFIG_$(SPL_)SYS_THUMB_BUILD),y)
 51 #archprepare: checkthumb checkgcc6
 52 archprepare: checkthumb
 53
 54 checkthumb:
 55         @if test "$(call cc-name)" = "gcc" -a \
 56                         "$(call cc-version)" -lt "0404"; then \
 57                 echo -n '*** Your GCC does not produce working '; \
 58                 echo 'binaries in THUMB mode.'; \
 59                 echo '*** Your board is configured for THUMB mode.'    ; \
 60                 false; \
 61         fi
 62 else
 63 #archprepare: checkgcc6
 64 archprepare:
 65 endif
 66
 67 #checkgcc6:
 68 #       @if test "$(call cc-name)" = "gcc" -a \
 69 #                       "$(call cc-version)" -lt "0600"; then \
 70 #               echo '*** Your GCC is older than 6.0 and is not sup    ported'; \
 71 #               false; \
 72 #       fi
 73
linux内核
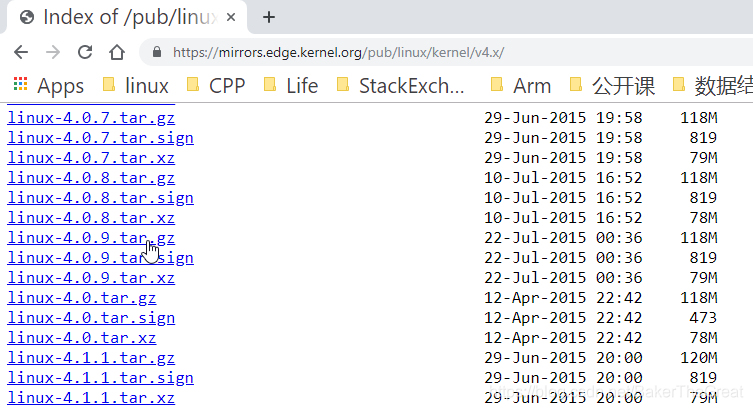
从官方网站https://mirrors.edge.kernel.org/pub/linux/kernel/下载linux内核,这里选择的是linux-4.0.9.tar.gz
同样,在顶层Makefile文件中添加如下两行代码
ARCH ?= arm
CROSS_COMPILE ?= arm-none-linux-gnueabi-
同样注意,arm-none-linux-gnueabi-后面不要有空格。
之后,到 arch/arm/configs/ 目录查看所有自带的配置文件。
macrofun@QemuLab:~/Qemu/linux-4.0.9$ ls arch/arm/configs/vex*
arch/arm/configs/vexpress_defconfig
使用内核的默认配置进行编译
macrofun@QemuLab:~/Qemu/linux-4.0.9$ make vexpress_defconfig
  HOSTCC  scripts/basic/fixdep
  HOSTCC  scripts/basic/bin2c
  HOSTCC  scripts/kconfig/conf.o
  HOSTCC  scripts/kconfig/zconf.tab.o
  HOSTLD  scripts/kconfig/conf
#
# configuration written to .config
#
因为ubuntu18.04使用的是NFS version 4,所以需要通过menuconfig配置内核,使其支持nfs v4版本,同时支持nfs根文件系统。
File systems  --->  Network File Systems
<*>   NFS client support
<*>     NFS client support for NFS version 2
<*>     NFS client support for NFS version 3
[*]       NFS client support for the NFSv3 ACL protocol extension
<*>     NFS client support for NFS version 4
[*]     Provide swap over NFS support
[*]   NFS client support for NFSv4.1
[*]     NFS client support for NFSv4.2
(kernel.org) NFSv4.1 Implementation ID Domain
[*]     NFSv4.1 client support for migration
[*]   Root file system on NFS
配置完毕后,开始生成用于u-boot引导的uImage
macrofun@QemuLab:~/Qemu/linux-4.0.9$ make uImage -j8
编译报错
  AS      arch/arm/boot/compressed/piggy.gzip.o
  LD      arch/arm/boot/compressed/vmlinux
  OBJCOPY arch/arm/boot/zImage
  Kernel: arch/arm/boot/zImage is ready
multiple (or no) load addresses:
This is incompatible with uImages
Specify LOADADDR on the commandline to build an uImage
arch/arm/boot/Makefile:79: recipe for target 'arch/arm/boot/uImage' failed
make[1]: *** [arch/arm/boot/uImage] Error 1
arch/arm/Makefile:308: recipe for target 'uImage' failed
make: *** [uImage] Error 2
这里需要指定内核的加载地址LOADADDR,参考ARM® CoreTile Express A9×4Cortex®
-A9 MPCore (V2P-CA9)Technical Reference Manual.pdf(http://infocenter.arm.com/help/topic/com.arm.doc.dui0448i/DUI0448I_v2p_ca9_trm.pdf),选择LOADADDR=0x60003000,重新执行内核编译命令。
macrofun@QemuLab:~/Qemu/linux-4.0.9$ make clean
  CLEAN   .
  CLEAN   arch/arm/kernel
  CLEAN   drivers/tty/vt
  CLEAN   drivers/video/logo
  CLEAN   kernel/time
  CLEAN   kernel
  CLEAN   lib
  CLEAN   usr
  CLEAN   arch/arm/boot/compressed
  CLEAN   arch/arm/boot
  CLEAN   .tmp_versions
macrofun@QemuLab:~/Qemu/linux-4.0.9$ make vexpress_defconfig
  HOSTCC  scripts/basic/fixdep
  HOSTCC  scripts/basic/bin2c
  HOSTCC  scripts/kconfig/conf.o
  HOSTCC  scripts/kconfig/zconf.tab.o
  HOSTLD  scripts/kconfig/conf
#
# configuration written to .config
#
macrofun@QemuLab:~/Qemu/linux-4.0.9$ make LOADADDR=0x60003000 uImage -j8
再次有新的错误产生。
  AS      arch/arm/boot/compressed/piggy.gzip.o
  LD      arch/arm/boot/compressed/vmlinux
  OBJCOPY arch/arm/boot/zImage
  Kernel: arch/arm/boot/zImage is ready
  UIMAGE  arch/arm/boot/uImage
"mkimage" command not found - U-Boot images will not be built
arch/arm/boot/Makefile:79: recipe for target 'arch/arm/boot/uImage' failed
make[1]: *** [arch/arm/boot/uImage] Error 1
arch/arm/Makefile:308: recipe for target 'uImage' failed
make: *** [uImage] Error 2
这是ubuntu缺少mkimage工具,无法生成uImage,该工具在编译uboot的时候,在tools目录下已经生成,将其拷贝到自己的BIN目录即可。
macrofun@QemuLab:~/Qemu/linux-4.0.9$ cp ../u-boot-2018.11/tools/mkimage ~/BIN
macrofun@QemuLab:~/Qemu/linux-4.0.9$ make LOADADDR=0x60003000 uImage -j8
  CHK     include/config/kernel.release
  CHK     include/generated/uapi/linux/version.h
  CHK     include/generated/utsrelease.h
make[1]: 'include/generated/mach-types.h' is up to date.
  CALL    scripts/checksyscalls.sh
  CHK     include/generated/compile.h
  CHK     kernel/config_data.h
  Kernel: arch/arm/boot/Image is ready
  Kernel: arch/arm/boot/zImage is ready
  UIMAGE  arch/arm/boot/uImage
Image Name:   Linux-4.0.9
Created:      Tue Sep 24 14:39:48 2019
Image Type:   ARM Linux Kernel Image (uncompressed)
Data Size:    3422648 Bytes = 3342.43 KiB = 3.26 MiB
Load Address: 60003000
Entry Point:  60003000
  Image arch/arm/boot/uImage is ready
编译生成设备树文件
macrofun@QemuLab:~/Qemu/linux-4.0.9$ make dtbs
  CHK     include/config/kernel.release
  CHK     include/generated/uapi/linux/version.h
  CHK     include/generated/utsrelease.h
make[1]: 'include/generated/mach-types.h' is up to date.
  CALL    scripts/checksyscalls.sh
  DTC     arch/arm/boot/dts/vexpress-v2p-ca5s.dtb
  DTC     arch/arm/boot/dts/vexpress-v2p-ca9.dtb
  DTC     arch/arm/boot/dts/vexpress-v2p-ca15-tc1.dtb
  DTC     arch/arm/boot/dts/vexpress-v2p-ca15_a7.dtb
根文件系统
使用busybox来制作根文件系统。首先到https://busybox.net/downloads/下载较新的Busybox源码进行编译。这里选择的是busybox-1.30.1.tar.bz2。
同样,在顶层Makefile文件中添加如下两行代码
ARCH ?= arm
CROSS_COMPILE ?= arm-none-linux-gnueabi-
同样注意,arm-none-linux-gnueabi-后面不要有空格。
直接make menuconfig
勾选Settings —> [*]Build static binary (no shared libs)
设置Cross compiler prefix为arm-none-linux-gnueabi-
make -j8
make install
之后,在busybox主目录的_install下面,就生成了busybox根文件系统。
之后,在该目录下补全标准的linux目录结构。
macrofun@QemuLab:~/Qemu/busybox-1.30.1$ cd _install/
macrofun@QemuLab:~/Qemu/busybox-1.30.1/_install$ ls
bin  linuxrc  sbin  usr
macrofun@QemuLab:~/Qemu/busybox-1.30.1/_install$ mkdir dev etc lib proc sys tmp etc/init.d
macrofun@QemuLab:~/Qemu/busybox-1.30.1/_install$ ls
bin  dev  etc  lib  linuxrc  proc  sbin  sys  tmp  usr
最后,把交叉编译工具自带的库拷贝过来。
同时,在根文件系统的etc目录下添加四个配置文件 fstab inittab profile init.d/rcS
macrofun@QemuLab:~/Qemu/busybox-1.30.1/_install/etc$ tree
.
├── fstab
├── init.d
│   └── rcS
├── inittab
└── profile

1 directory, 4 files
profile文件
#!/bin/sh
export HOSTNAME=MacrofunArm
export USER=root
export HOME=root
export PS1="[$USER@$HOSTNAME \W]\# "
PATH=/bin:/sbin:/usr/bin:/usr/sbin
LD_LIBRARY_PATH=/lib:/usr/lib:$LD_LIBRARY_PATH
export PATH LD_LIBRARY_PATH
inittab文件
::sysinit:/etc/init.d/rcS
::askfirst:-/bin/sh
::restart:/sbin/init
::ctrlaltdel:/sbin/reboot
fstab文件
#device mount-point type options dump fsck orde
proc   /proc  proc  defaults  0  0
tmpfs  /tmp   tmpfs defaults  0  0
sysfs  /sys   sysfs defaults  0  0
tmpfs  /dev   tmpfs defaults  0  0
etc/rcS文件
#!/bin/sh
/bin/mount -a
echo /sbin/mdev > /proc/sys/kernel/hotplug
/sbin/mdev -s
TFTP服务
- 安装tftp服务器和客户端
macrofun@QemuLab:~$ sudo apt-get install tftp-hpa tftpd-hpa
- 修改tftp配置文件
macrofun@QemuLab:~$ cat /etc/default/tftpd-hpa
# /etc/default/tftpd-hpa

TFTP_USERNAME="tftp"
TFTP_DIRECTORY="/home/macrofun/TFTP_HOME"
TFTP_ADDRESS=":69"
TFTP_OPTIONS="--secure"
- 重启tftp服务
macrofun@QemuLab:~$ sudo service tftpd-hpa restart
- 测试tftp服务是否正常
macrofun@QemuLab:~$ ls
BIN      Documents  examples.desktop  Pictures  Qemu       TFTP_HOME
Desktop  Downloads  Music             Public    Templates  Videos

macrofun@QemuLab:~$ ls /home/macrofun/TFTP_HOME/
Image  uImage  vexpress-v2p-ca9.dtb  zImage

macrofun@QemuLab:~$ tftp localhost
tftp> get uImage
tftp> quit

macrofun@QemuLab:~$ ls
BIN      Documents  examples.desktop  Pictures  Qemu       TFTP_HOME  Videos
Desktop  Downloads  Music             Public    Templates  uImage
可以发现,uImage可以通过tftp服务正常下载。
NFS服务
- 安装 NFS服务器和客户端
macrofun@QemuLab:~$ sudo apt-get install nfs-kernel-server nfs-common
- 修改nfs配置文件
macrofun@QemuLab:~$ cat /etc/exports
# /etc/exports: the access control list for filesystems which may be exported
#		to NFS clients.  See exports(5).
#
# Example for NFSv2 and NFSv3:
# /srv/homes       hostname1(rw,sync,no_subtree_check) hostname2(ro,sync,no_subtree_check)
#
# Example for NFSv4:
# /srv/nfs4        gss/krb5i(rw,sync,fsid=0,crossmnt,no_subtree_check)
# /srv/nfs4/homes  gss/krb5i(rw,sync,no_subtree_check)
#
/home/macrofun/NFS_HOME *(rw,sync,no_root_squash,no_subtree_check)
- 创建NFS_HOME目录并将根文件系统全部拷贝至此目录下
macrofun@QemuLab:~$ mkdir NFS_HOME
macrofun@QemuLab:~$ cp Qemu/busybox-1.30.1/_install/* -ra NFS_HOME/
- 重启nfs服务
macrofun@QemuLab:~$ sudo service nfs-kernel-server restart
- 测试nfs服务是否正常
macrofun@QemuLab:~$ ls NFS_HOME/
bin  dev  etc  lib  linuxrc  proc  sbin  sys  tmp  usr
macrofun@QemuLab:~$ ls /opt
macrofun@QemuLab:~$ sudo mount -t nfs -o nolock 192.168.3.100:/home/macrofun/NFS_HOME /opt
macrofun@QemuLab:~$ ls /opt
bin  dev  etc  lib  linuxrc  proc  sbin  sys  tmp  usr
macrofun@QemuLab:~$ sudo umount /opt
仿真开发板
- 将前几步生成的镜像文件拷贝至TFTP目录
macrofun@QemuLab:~/Qemu/linux-4.0.9$ rm ~/TFTP_HOME/*
macrofun@QemuLab:~/Qemu/linux-4.0.9$ ls /home/macrofun/TFTP_HOME/
macrofun@QemuLab:~/Qemu/linux-4.0.9$ cp -f arch/arm/boot/uImage  ~/TFTP_HOME/
macrofun@QemuLab:~/Qemu/linux-4.0.9$ cp -f arch/arm/boot/zImage  ~/TFTP_HOME/
macrofun@QemuLab:~/Qemu/linux-4.0.9$ cp -f arch/arm/boot/dts/vexpress-v2p-ca9.dtb  ~/TFTP_HOME/
macrofun@QemuLab:~/Qemu/linux-4.0.9$ ls /home/macrofun/TFTP_HOME/
uImage  vexpress-v2p-ca9.dtb  zImage
- 使用qemu启动u-boot
macrofun@QemuLab:~/Qemu/u-boot-2018.11$ tuptapup
Set 'tap0' persistent and owned by uid 1000
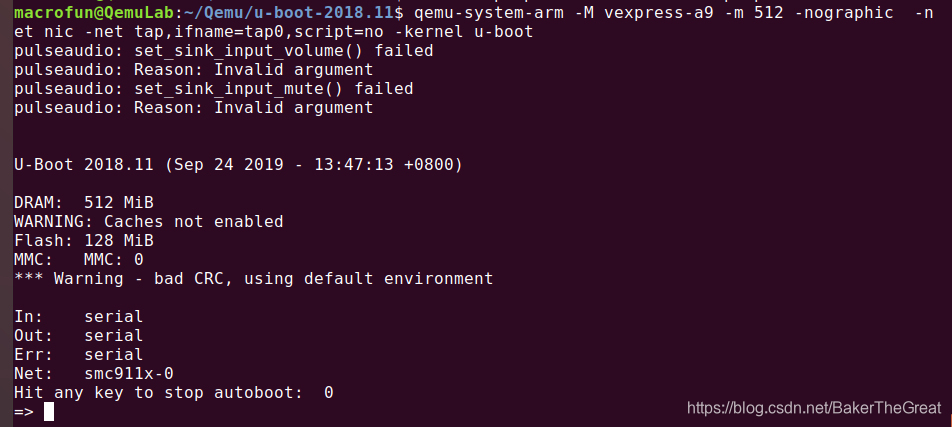
macrofun@QemuLab:~/Qemu/u-boot-2018.11$ qemu-system-arm -M vexpress-a9 -m 512 -nographic -net nic -net tap,ifname=tap0,script=no -kernel u-boot
查看主机虚拟网卡:
启动界面如下所示:
- 设置u-boot的IP、网关和子网掩码,内核启动参数bootargs
=> setenv ipaddr 10.8.8.100; setenv netmask 255.255.255.0; setenv serverip 10.8.8.3;
=> setenv bootargs 'root=/dev/nfs rw nfsroot=10.8.8.3:/home/macrofun/NFS_HOME init=/linuxrc ip=10.8.8.100 console=ttyAMA0';
=> saveenv

Saving Environment to Flash... . done
Un-Protected 1 sectors
Erasing Flash...
. done
Erased 1 sectors
Writing to Flash... done
. done
Protected 1 sectors
OK
=>
- 测试uboot和ubuntu主机网络是否连通
=> ping 10.8.8.3

smc911x: MAC 52:54:00:12:34:56
smc911x: detected LAN9118 controller
smc911x: phy initialized
smc911x: MAC 52:54:00:12:34:56
Using smc911x-0 device
smc911x: MAC 52:54:00:12:34:56
host 10.8.8.3 is alive
- 加载内核镜像和设备树文件
=> tftp 0x60003000 uImage;

smc911x: MAC 52:54:00:12:34:56
smc911x: detected LAN9118 controller
smc911x: phy initialized
smc911x: MAC 52:54:00:12:34:56
Using smc911x-0 device
TFTP from server 10.8.8.3; our IP address is 10.8.8.100
Filename 'uImage'.
Load address: 0x60003000
Loading: #################################################################
	 #################################################################
	 #################################################################
	 #######################################
	 5.7 MiB/s
done
Bytes transferred = 3422712 (3439f8 hex)
smc911x: MAC 52:54:00:12:34:56


=> tftp 0x60500000 vexpress-v2p-ca9.dtb;

smc911x: MAC 52:54:00:12:34:56
smc911x: detected LAN9118 controller
smc911x: phy initialized
smc911x: MAC 52:54:00:12:34:56
Using smc911x-0 device
TFTP from server 10.8.8.3; our IP address is 10.8.8.100
Filename 'vexpress-v2p-ca9.dtb'.
Load address: 0x60500000
Loading: #
	 3.3 MiB/s
done
Bytes transferred = 14048 (36e0 hex)
smc911x: MAC 52:54:00:12:34:56


=> bootm 0x60003000 - 0x60500000;
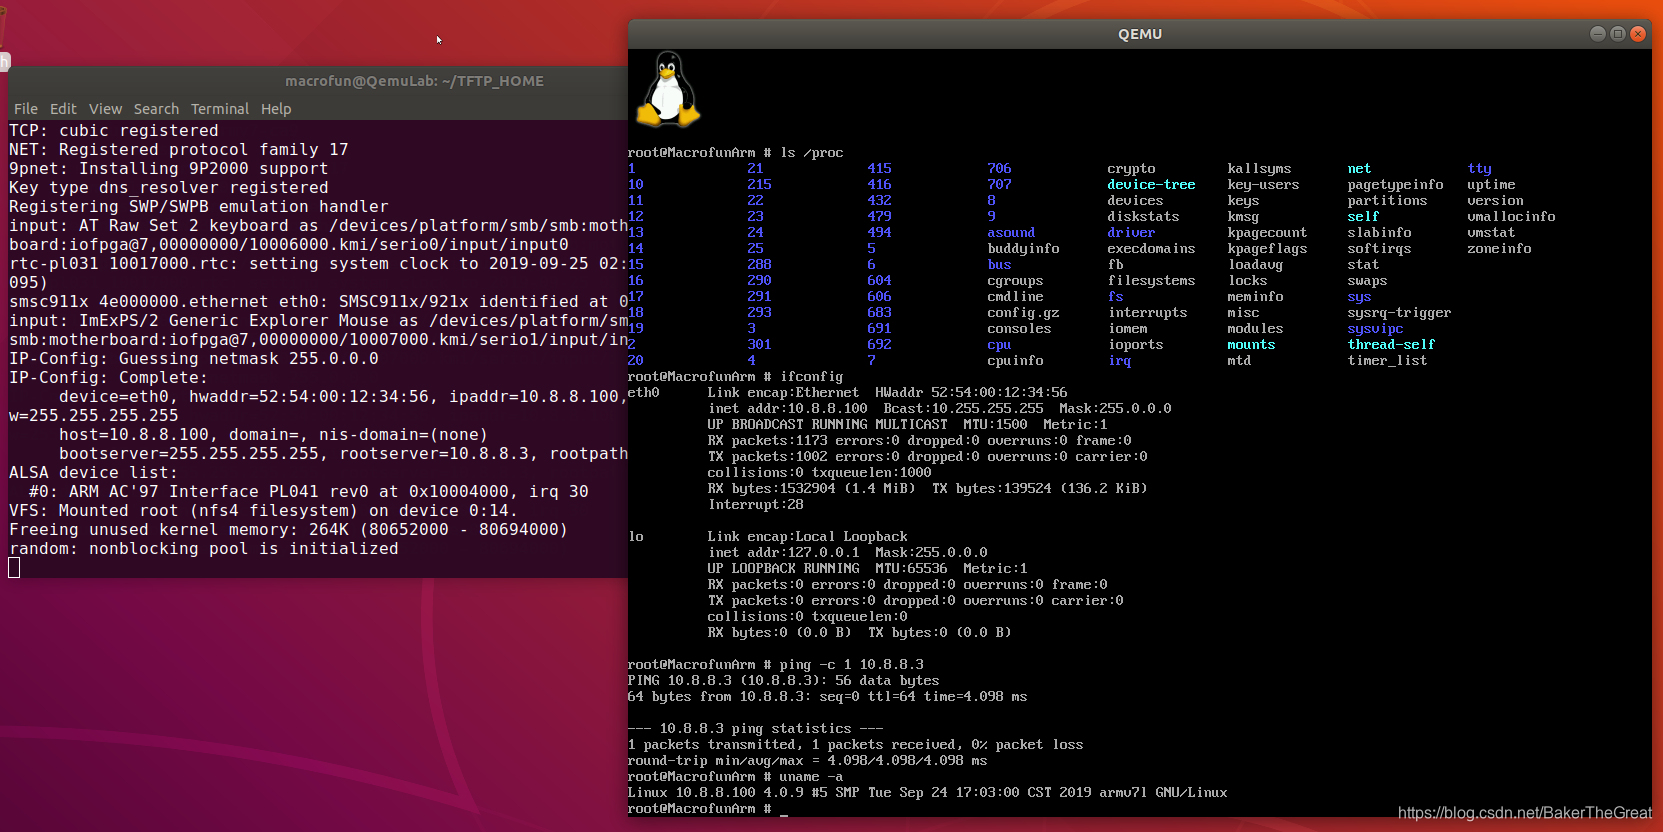
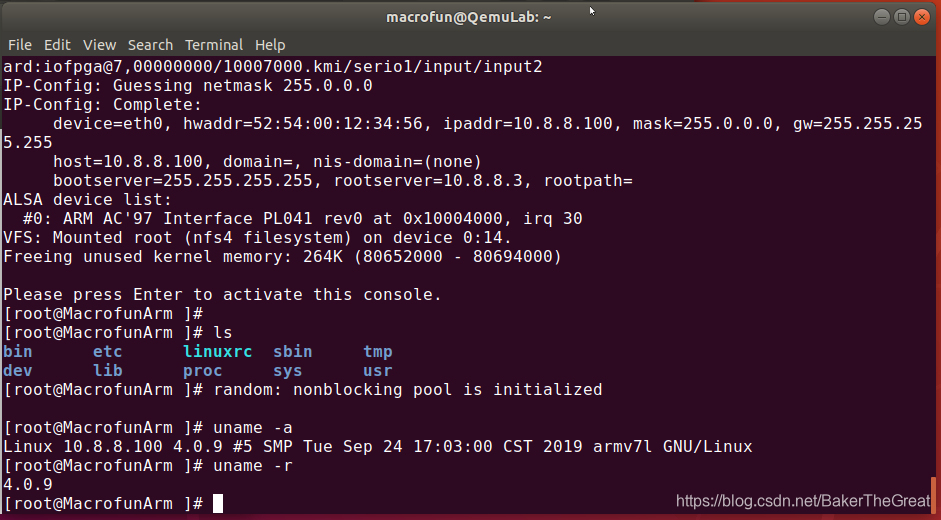
等待linux内核启动完毕之后,效果如下所示:
图形界面启动
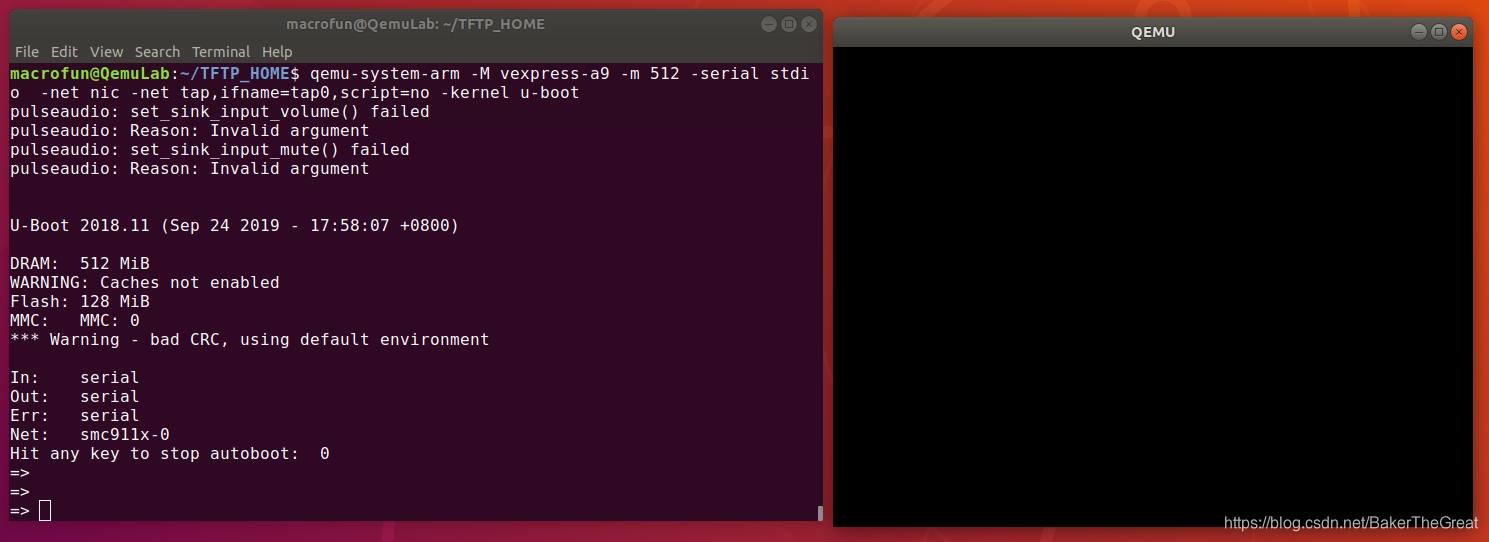
命令很简单,在启动u-boot的时候,就通过图形界面启动,启动命令如下:
macrofun@QemuLab:~/Qemu/u-boot-2018.11$ tuptapup
Set 'tap0' persistent and owned by uid 1000
macrofun@QemuLab:~/Qemu/u-boot-2018.11$ qemu-system-arm -M vexpress-a9 -m 512 -serial stdio  -net nic -net tap,ifname=tap0,script=no -kernel u-boot
uboot启动后界面如下所示:
在u-boot命令行中修改启动参数bootargs如下
=> setenv bootargs root=/dev/nfs rw nfsroot=10.8.8.3:/home/macrofun/NFS_HOME,proto=tcp,nfsvers=4,nolock init=/linuxrc ip=10.8.8.100 console=ttyAMA0 console=tty0
-> saveenv
=> run bootcmd
启动后界面如下所示: