目录
一.实验环境与分析
- 本次实验我们搭建的是开源平台OpenStack的自动化安装,且选择两种方法安装(线网安装与本地源安装)
- 现在来说一下实验环境由于后面我们要在Openstack平台上安装实例所以,节点上必须分配足够的资源,但是也要视情况而定
- 由于笔者是20G内存,512G固态盘,双核四线程CPU,所以资源分配如下
| 主机名 | IP地址 | cpu | 内存 | 硬盘 | 操作系统 |
| control(控制节点) | 192.168.43.88/24(NAT模式,NAT充当外部的外部的浮动IP地址,远程能访问内部主机) 192.168.100.10/24(VMnet1,仅主机模式) |
单核双线程 | 6G | 150G系统盘 300G数据盘(CEPH块存储) |
Centos 7.7(1908)-最小化安装 |
| compute01(计算节点) | 192.168.100.11/24/(VMnet1,仅主机模式) | 单核双线程 | 6G | 150G系统盘 300G数据盘 |
Centos 7.7(1908)-最小化安装 |
| compute02(计算节点) | 192.168.100.12/24(VMnet1,仅主机模式) | 单核双线程 | 6G | 150G系统盘 300G数据盘 |
Centos 7.7(1908)-最小化安装 |
注:到阿里云下载1908系统https://mirrors.aliyun.com/centos/7.7.1908/isos/x86_64/CentOS-7-x86_64-DVD-1908.iso
关于资源的分配可以视情况而定,但是控制节点资源一定要给足够
由于笔者资源不足,所以把网络节点的功能配置在控制节点上,且在控制节点配置本地源或现网源
二.各节点环境配置
配置步骤简析
##系统环境配置,控制节点、计算节点01、计算节点02都要进行配置
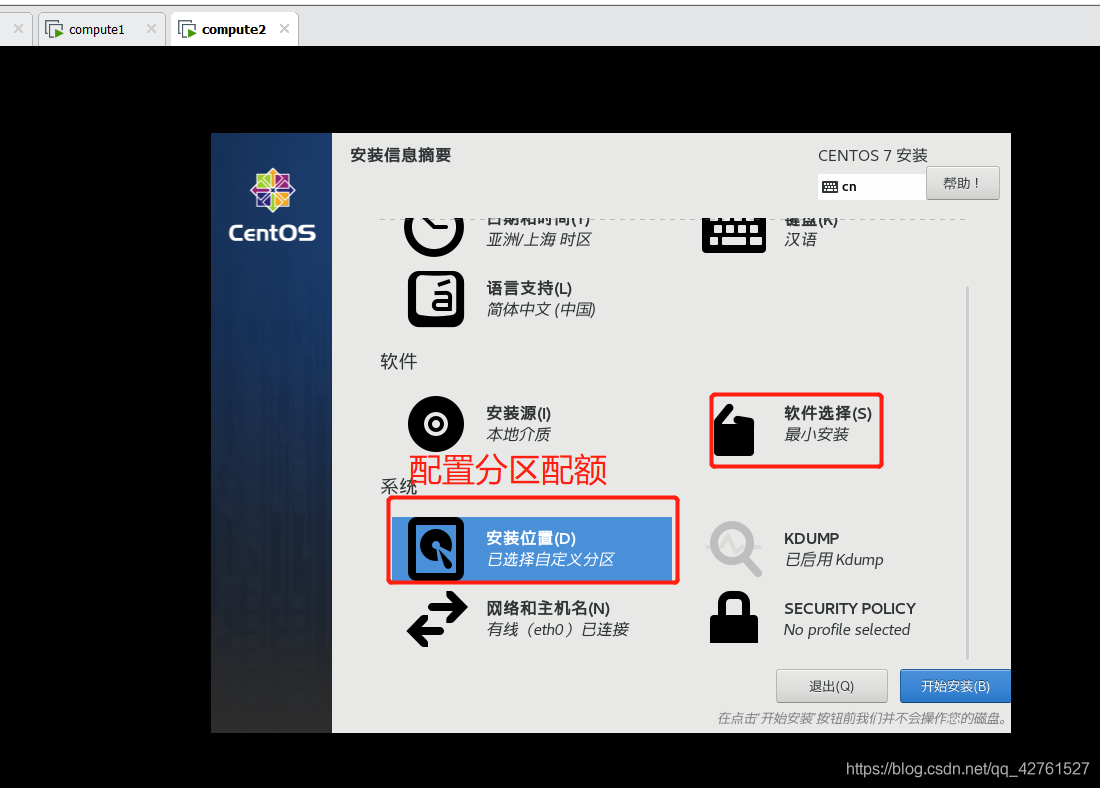
1.安装系统,配置硬件设置
2.规划网络,配置网卡和IP地址
3.配置本地YUM源仓库
4.关闭防火墙
5.关闭网络管理
6.配置地址映射
7.配置RSA密钥免交互
8.配置时间同步
##避免后面出错,可以快照一下
##部署OpneStack,只在控制节点上进行
1.部署Opnestack安装工具
2.配置应答文件
3.一键部署
4.登录后台测试配置控制节点(control)
- 控制节点的硬件配置

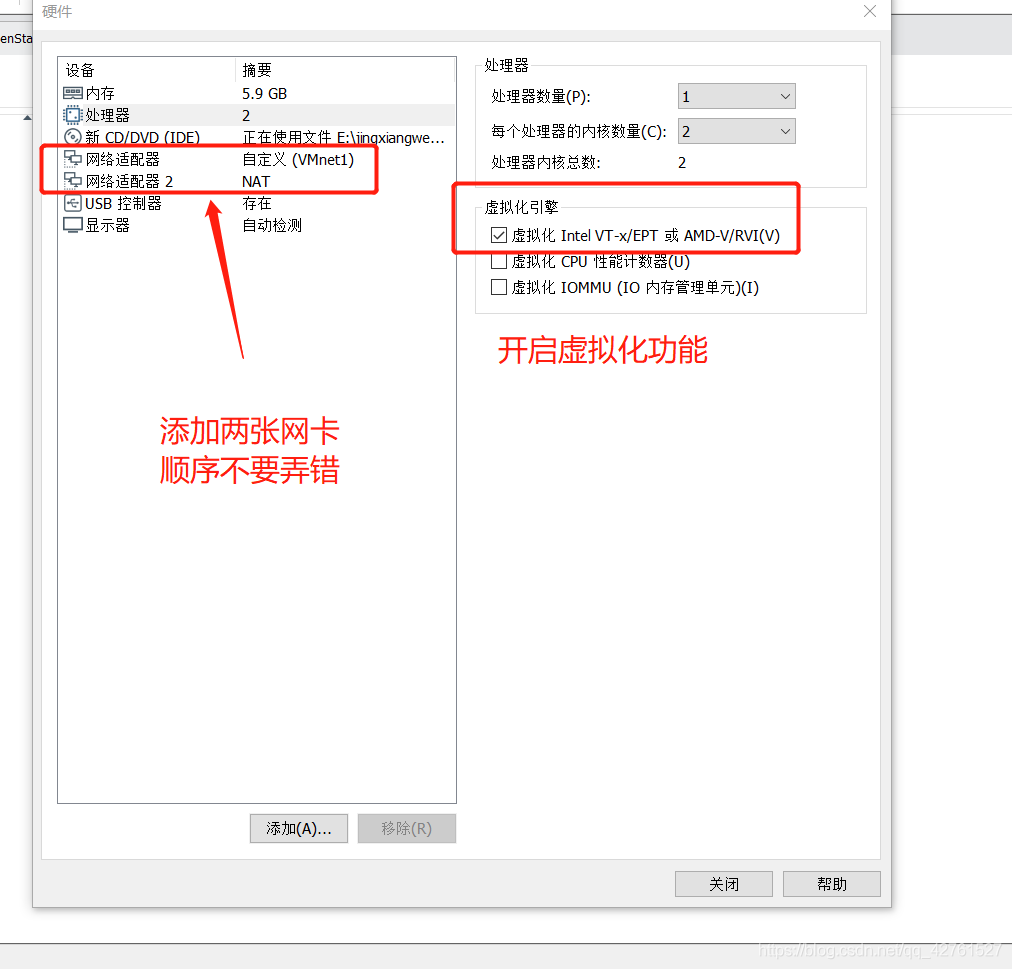

注:选择VMnet1是因为,物理机上的VMnet网卡配置的IP地址是192.168.100.1,为了方便远程登录虚拟机
- 配置网络


1.进入网卡配置文件开启eth1
vi /etc/sysconfig/network-scripts/ifcfg-eth1

TYPE=Ethernet
PROXY_METHOD=none
BROWSER_ONLY=no
BOOTPROTO=none
DEFROUTE=yes
IPV4_FAILURE_FATAL=no
IPV6INIT=yes
IPV6_AUTOCONF=yes
IPV6_DEFROUTE=yes
IPV6_FAILURE_FATAL=no
IPV6_ADDR_GEN_MODE=stable-privacy
NAME=eth1
UUID=fd203a9f-a7f4-4360-9c62-faeeb1f8fb25
DEVICE=eth1
ONBOOT=yes
IPADDR=192.168.43.88
PREFIX=24
GATEWAY=192.168.43.2
DNS1=192.168.43.2
IPV6_PRIVACY=no

2.关闭eth0网卡,双网卡会造成网络不通
ifdown eth0

3.测试网络是否畅通
[root@control ~]# ping www.baidu.com
PING www.a.shifen.com (14.215.177.39) 56(84) bytes of data.
64 bytes from 14.215.177.39 (14.215.177.39): icmp_seq=1 ttl=128 time=26.7 ms
64 bytes from 14.215.177.39 (14.215.177.39): icmp_seq=2 ttl=128 time=27.6 ms
^C
--- www.a.shifen.com ping statistics ---
2 packets transmitted, 2 received, 0% packet loss, time 1002ms
rtt min/avg/max/mdev = 26.789/27.205/27.621/0.416 ms
[root@control ~]#


4.下载ifconfig命令软件包
 yum install net-tools.x86_64

5.使用ifconfig查看IP地址
[root@control ~]# ifconfig
eth0: flags=4163<UP,BROADCAST,RUNNING,MULTICAST>  mtu 1500
        ether 00:0c:29:bd:30:b2  txqueuelen 1000  (Ethernet)
        RX packets 49  bytes 5097 (4.9 KiB)
        RX errors 0  dropped 0  overruns 0  frame 0
        TX packets 195  bytes 17331 (16.9 KiB)
        TX errors 0  dropped 0 overruns 0  carrier 0  collisions 0

eth1: flags=4163<UP,BROADCAST,RUNNING,MULTICAST>  mtu 1500
        inet 192.168.43.88  netmask 255.255.255.0  broadcast 192.168.43.255
        inet6 fe80::7d46:b5a5:9644:b890  prefixlen 64  scopeid 0x20<link>
        ether 00:0c:29:bd:30:bc  txqueuelen 1000  (Ethernet)
        RX packets 16224  bytes 15107922 (14.4 MiB)
        RX errors 0  dropped 0  overruns 0  frame 0
        TX packets 12227  bytes 1194624 (1.1 MiB)
        TX errors 0  dropped 0 overruns 0  carrier 0  collisions 0

lo: flags=73<UP,LOOPBACK,RUNNING>  mtu 65536
        inet 127.0.0.1  netmask 255.0.0.0
        inet6 ::1  prefixlen 128  scopeid 0x10<host>
        loop  txqueuelen 1000  (Local Loopback)
        RX packets 48  bytes 3888 (3.7 KiB)
        RX errors 0  dropped 0  overruns 0  frame 0
        TX packets 48  bytes 3888 (3.7 KiB)
        TX errors 0  dropped 0 overruns 0  carrier 0  collisions 0

[root@control ~]#
- 配置YUM源仓库
1将光盘挂载到/mnt目录
vi /etc/fstab
##在最后一行添加
/dev/cdrom      /mnt    iso9660 defaults        0 0
2.使得挂载生效
mount -a
[root@control ~]# df -hT
Filesystem     Type      Size  Used Avail Use% Mounted on
devtmpfs       devtmpfs  2.8G     0  2.8G   0% /dev
tmpfs          tmpfs     2.8G     0  2.8G   0% /dev/shm
tmpfs          tmpfs     2.8G   12M  2.8G   1% /run
tmpfs          tmpfs     2.8G     0  2.8G   0% /sys/fs/cgroup
/dev/sda3      xfs        50G  1.9G   49G   4% /
/dev/sda5      xfs        94G   33M   94G   1% /home
/dev/sda1      xfs      1014M  141M  874M  14% /boot
tmpfs          tmpfs     567M     0  567M   0% /run/user/0
/dev/sr0       iso9660   4.4G  4.4G     0 100% /mnt
[root@control ~]#


4.安装rz工具获得源
yum install lrzsz -y
##使用rz,从物理机上传数据包
rz

[root@control ~]# ls
anaconda-ks.cfg  openstack_rocky.tar.gz
[root@control ~]#


5.解压到/opt目录下
tar xzvf openstack_rocky.tar.gz -C /opt
[root@control opt]# ls
openstack_rocky
[root@control opt]#

6.制作本地源
[root@control ~]# cd /etc/yum.repos.d/
[root@control yum.repos.d]# mkdir bak
[root@control yum.repos.d]# mv C* bak
[root@control yum.repos.d]#vi local.repo

[openstack]
name=openstack
baseurl=file:///opt/openstack_rocky
gpgcheck=0
enabled=1

[centos]
name=centos
baseurl=file:///mnt
gpgcheck=0
enabled=1


7.将openstack R版的源包,传输到两个计算节点上
[root@control ~]# scp openstack_rocky.tar.gz [email protected]:/opt
[root@control ~]# scp openstack_rocky.tar.gz [email protected]:/opt
- 关闭核心防护和网络管理
[root@control ~]# systemctl stop firewalld
[root@control ~]# systemctl disable firewalld
Removed symlink /etc/systemd/system/multi-user.target.wants/firewalld.service.
Removed symlink /etc/systemd/system/dbus-org.fedoraproject.FirewallD1.service.
[root@control ~]#  vi /etc/sysconfig/selinux

SELINUX=disabled

[root@control ~]# systemctl stop NetworkManager
[root@control ~]# systemctl disable NetworkManager
Removed symlink /etc/systemd/system/multi-user.target.wants/NetworkManager.service.
Removed symlink /etc/systemd/system/dbus-org.freedesktop.nm-dispatcher.service.
Removed symlink /etc/systemd/system/network-online.target.wants/NetworkManager-wait-online.service.
- 配置地址映射
[root@control ~]# vi /etc/hosts
192.168.100.10  control
192.168.100.11  compute1
192.168.100.12 compute2- 配置免交互
ssh-keygen -t rsa   		####一路默认回车键
ssh-copy-id control     	###交互提示 输入yes 然后输入密码 Abc123
ssh-copy-id compute1	###交互提示 输入yes 然后输入密码 Abc123
ssh-copy-id compute2	###交互提示 输入yes 然后输入密码 Abc123
- 配置时间同步
1.同步阿里云的时钟
yum -y install ntpdate
ntpdate ntp.aliyun.com

2.创建日志文件,和计划性任务表
ntpdate ntp.aliyun.com >>/var/log/ntpdate.log
 crontab -e
*/30 * * * * /usr/sbin/ntpdate ntp.aliyun.com >>/var/log/ntpdate.log
##开机自启计划性任务表功能
systemctl restart crond
systemctl enable crond

3.配置时钟服务器,使得计算节点能够同步时间服务器
yum -y install ntp
vi /etc/ntp.conf
restrict default nomodify   ###第8行改
restrict 192.168.100.0 mask 255.255.255.0 nomodify notrap  ###第17行改
###将21行到24行删除##
     21 server 0.centos.pool.ntp.org iburst
     22 server 1.centos.pool.ntp.org iburst
     23 server 2.centos.pool.ntp.org iburst
     24 server 3.centos.pool.ntp.org iburst
###删除的插入下面内容###
fudeg 127.127.1.0 stratum 10
server 127.127.1.0

systemctl restart ntpd  ###重启ntp服务端
systemctl enable ntpd  ###开机启动ntp服务端
配置计算节点(compute01)
- 控制节点的硬件配置

- 配置网络


[root@compute1 ~]# ip addr
1: lo: <LOOPBACK,UP,LOWER_UP> mtu 65536 qdisc noqueue state UNKNOWN group default qlen 1000
    link/loopback 00:00:00:00:00:00 brd 00:00:00:00:00:00
    inet 127.0.0.1/8 scope host lo
       valid_lft forever preferred_lft forever
    inet6 ::1/128 scope host
       valid_lft forever preferred_lft forever
2: eth0: <BROADCAST,MULTICAST,UP,LOWER_UP> mtu 1500 qdisc pfifo_fast state UP group default qlen 1000
    link/ether 00:0c:29:3a:5c:90 brd ff:ff:ff:ff:ff:ff
    inet 192.168.100.11/24 brd 192.168.100.255 scope global noprefixroute eth0
       valid_lft forever preferred_lft forever
    inet6 fe80::b78:f349:9fa3:1e98/64 scope link noprefixroute
       valid_lft forever preferred_lft forever
[root@compute1 ~]#


##由于是仅主机模式所以不能联网,不能使用yum
##可以通过ssh服务,在控制节点远程计算节点
- 配置YUM源仓库
1.解压数据包
[root@compute1 opt]# tar xzvf openstack_rocky.tar.gz
2.永久挂载光盘
[root@compute1 ~]# vi /etc/fstab
/dev/cdrom      /mnt    iso9660 defaults        0 0

[root@compute1 ~]# mount -a
mount: /dev/sr0 is write-protected, mounting read-only
[root@compute1 ~]# df -hT
Filesystem     Type      Size  Used Avail Use% Mounted on
devtmpfs       devtmpfs  2.8G     0  2.8G   0% /dev
tmpfs          tmpfs     2.8G     0  2.8G   0% /dev/shm
tmpfs          tmpfs     2.8G   12M  2.8G   1% /run
tmpfs          tmpfs     2.8G     0  2.8G   0% /sys/fs/cgroup
/dev/sda3      xfs        50G  1.8G   49G   4% /
/dev/sda5      xfs        94G   33M   94G   1% /home
/dev/sda1      xfs      1014M  141M  874M  14% /boot
tmpfs          tmpfs     567M     0  567M   0% /run/user/0
/dev/sr0       iso9660   4.4G  4.4G     0 100% /mnt

3.配置本地源
[root@compute1 ~]# cd /etc/yum.repos.d/
[root@compute1 yum.repos.d]# ls
CentOS-Base.repo  CentOS-Debuginfo.repo  CentOS-Media.repo    CentOS-Vault.repo
CentOS-CR.repo    CentOS-fasttrack.repo  CentOS-Sources.repo
[root@compute1 yum.repos.d]# mkdir bak
[root@compute1 yum.repos.d]# mv C* bak
[root@compute1 yum.repos.d]# ls
bak
[root@compute1 yum.repos.d]# vi local.repo

[openstack]
name=openstack
baseurl=file:///opt/openstack_rocky
gpgcheck=0
enabled=1

[centos]
name=centos
baseurl=file:///mnt
gpgcheck=0
enabled=1
~ - 关闭核心防护和网络管理
[root@compute1 ~]# systemctl stop firewalld
[root@compute1 ~]# systemctl disable firewalld
[root@compute1 ~]# setenforce 0
[root@compute1 ~]# vi /etc/sysconfig/selinux
SELINUX=disabled
[root@compute1 ~]# systemctl stop NetworkManager
[root@compute1 ~]# systemctl disable NetworkManager
- 配置地址映射
[root@compute1 ~]# vi /etc/hosts
192.168.100.10  control
192.168.100.11  compute1
192.168.100.12 compute2- 配置免交互
ssh-keygen -t rsa   		####一路默认回车键
ssh-copy-id control     	###交互提示 输入yes 然后输入密码 Abc123
ssh-copy-id compute1	###交互提示 输入yes 然后输入密码 Abc123
ssh-copy-id compute2 ###交互提示 输入yes 然后输入密码 Abc123- 配置时间同步
yum insatll ntp -y
vi /etc/ntp.conf
  8 restrict 192.168.100.11 nomodify notrap nopeer noquery
17 restrict 192.168.100.1 mask 255.255.255.0 nomodify notrap
 26 server 192.168.100.10
 27 fudge 192.168.100.10 stratum 10

 systemctl start ntpd
 systemctl enable ntpd


[root@compute1 ~]# ntpdate -u 192.168.100.10 >> /var/log/ntpdate.log
[root@compute1 ~]# crontab -e
*/2 * * * * /usr/sbin/ntpdate 192.168.100.10 >>/var/log/ntpdate.log
[root@compute1 ~]# systemctl enable crond
配置计算节点(compute02)
- 控制节点的硬件配置

- 配置网络


[root@compute2 ~]# ip addr
1: lo: <LOOPBACK,UP,LOWER_UP> mtu 65536 qdisc noqueue state UNKNOWN group default qlen 1000
    link/loopback 00:00:00:00:00:00 brd 00:00:00:00:00:00
    inet 127.0.0.1/8 scope host lo
       valid_lft forever preferred_lft forever
    inet6 ::1/128 scope host
       valid_lft forever preferred_lft forever
2: eth0: <BROADCAST,MULTICAST,UP,LOWER_UP> mtu 1500 qdisc pfifo_fast state UP group default qlen 1000
    link/ether 00:0c:29:a9:63:8c brd ff:ff:ff:ff:ff:ff
    inet 192.168.100.12/24 brd 192.168.100.255 scope global noprefixroute eth0
       valid_lft forever preferred_lft forever
    inet6 fe80::566:a375:d7c0:7c59/64 scope link noprefixroute
       valid_lft forever preferred_lft forever
[root@compute2 ~]#
- 配置YUM源仓库
1.解压数据包
[root@compute2 opt]# tar xzvf openstack_rocky.tar.gz

2.永久挂载光盘
[root@compute2 opt]# vi /etc/fstab
/dev/cdrom      /mnt    iso9660 defaults        0 0

[root@compute2 opt]# mount -a
mount: /dev/sr0 is write-protected, mounting read-only
mount: no medium found on /dev/sr0
[root@compute2 opt]# mount -a
mount: /dev/sr0 is write-protected, mounting read-only
[root@compute2 opt]# df -hT
Filesystem     Type      Size  Used Avail Use% Mounted on
devtmpfs       devtmpfs  2.8G     0  2.8G   0% /dev
tmpfs          tmpfs     2.8G     0  2.8G   0% /dev/shm
tmpfs          tmpfs     2.8G   12M  2.8G   1% /run
tmpfs          tmpfs     2.8G     0  2.8G   0% /sys/fs/cgroup
/dev/sda3      xfs        50G  1.8G   49G   4% /
/dev/sda5      xfs        94G   33M   94G   1% /home
/dev/sda1      xfs      1014M  141M  874M  14% /boot
tmpfs          tmpfs     567M     0  567M   0% /run/user/0
/dev/sr0       iso9660   4.4G  4.4G     0 100% /mnt

3.制作本地源
[root@compute2 opt]# cd /etc/yum.repos.d/
[root@compute2 yum.repos.d]# ls
CentOS-Base.repo  CentOS-Debuginfo.repo  CentOS-Media.repo    CentOS-Vault.repo
CentOS-CR.repo    CentOS-fasttrack.repo  CentOS-Sources.repo
[root@compute2 yum.repos.d]# mkdir bak
[root@compute2 yum.repos.d]# mv C* bak
[root@compute2 yum.repos.d]# ls
bak
[root@compute2 yum.repos.d]# vi local.repo

[openstack]
name=openstack
baseurl=file:///opt/openstack_rocky
gpgcheck=0
enabled=1

[centos]
name=centos
baseurl=file:///mnt
gpgcheck=0
enabled=1
- 关闭核心防护和网络管理
[root@compute2 ~]# systemctl stop firewalld
[root@compute2 ~]# setenforce 0
[root@compute2 ~]# vi /etc/sysconfig/selinux
SELINUX=disabled
[root@compute2 ~]# systemctl disable firewalld
Removed symlink /etc/systemd/system/multi-user.target.wants/firewalld.service.
Removed symlink /etc/systemd/system/dbus-org.fedoraproject.FirewallD1.service.
[root@compute2 ~]# systemctl stop NetworkManager
[root@compute2 ~]# systemctl disable NetworkManager
Removed symlink /etc/systemd/system/multi-user.target.wants/NetworkManager.service.
Removed symlink /etc/systemd/system/dbus-org.freedesktop.nm-dispatcher.service.
Removed symlink /etc/systemd/system/network-online.target.wants/NetworkManager-wait-online.service.
- 配置地址映射
[root@compute2 ~]# vi /etc/hosts
192.168.100.10  control
192.168.100.11  compute1
192.168.100.12 compute2- 配置免交互
ssh-keygen -t rsa   		####一路默认回车键
ssh-copy-id control     	###交互提示 输入yes 然后输入密码 Abc123
ssh-copy-id compute1	###交互提示 输入yes 然后输入密码 Abc123
ssh-copy-id compute2 ###交互提示 输入yes 然后输入密码 Abc123- 配置时间同步
yum insatll ntp -y
vi /etc/ntp.conf
  8 restrict 192.168.100.12 nomodify notrap nopeer noquery
17 restrict 192.168.100.1 mask 255.255.255.0 nomodify notrap
 26 server 192.168.100.10
 27 fudge 192.168.100.10 stratum 10

 systemctl start ntpd
 systemctl enable ntpd


 ntpdate -u 192.168.100.10 >> /var/log/ntpdate.log
crontab -e
*/2 * * * * /usr/sbin/ntpdate 192.168.100.10 >>/var/log/ntpdate.log
systemctl enable crond
三.在控制节点上,进行OpenStack安装与登录测试
- 安装OpenStack工具
[root@control ~]# yum -y install openstack-packstack- 配置应答文件
[root@control ~]# packstack --gen-answer-file=openstack.txt
[root@control ~]#vi openstack.txt
19 CONFIG_MARIADB_INSTALL=y    ###第19行 MARIADB数据库默认要安装 ,默认是Y,不需要更改
22 CONFIG_GLANCE_INSTALL=y       ###第22行 GLANCE镜像组将必须要装,默认是Y,不需要更改
25 CONFIG_CINDER_INSTALL=y        ###第25行 CINDER组件块存储的,必须要装,默认是Y,不需要更改
29 CONFIG_MANILA_INSTALL=n       ###第29行MANILA组件是openstack的扩展系统 ,默认N,不需要更改
32 CONFIG_NOVA_INSTALL=y           ###第32行NOVA组件是openstack计算组件,默认Y,不需要更改
35 CONFIG_NEUTRON_INSTALL=y     ###第35行NEUTRON是openstack的网络组件,默认Y,不需要更改
38 CONFIG_HORIZON_INSTALL=y     ###第38行HORIZON是OpenStack的Dashboard组件,默认Y,不需要更改
41 CONFIG_SWIFT_INSTALL=n           ###●第41行SWIFT是OpenStack的对象存储组件,默认是Y,在生产环境中一般是不装,所以该n
46 CONFIG_CEILOMETER_INSTALL=y  ###第46行CEILOMETER是OpenStack的计量组件 默认是Y,不需要更改
50 CONFIG_AODH_INSTALL=n           ###●第50行,默认是Y 需要改n
53 CONFIG_PANKO_INSTALL=n         ####第53行, 默认是n  不需要更改
60 CONFIG_HEAT_INSTALL=n             ###第60行,HEAT是OpenStack是编排组件 ,默认是n ,不需要更改
94 CONFIG_CONTROLLER_HOST=192.168.100.10   ###第94行CONTROLLER是OpenStack的控制节点,在控制节点上配置的,不需要更改IP地址。
97 CONFIG_COMPUTE_HOSTS=192.168.100.11,192.168.100.12,  ###●第97行需要更改计算节点的IP地址
101 CONFIG_NETWORK_HOSTS=192.168.100.10    ###●第101行 需要更改网络节点的IP地址
557 CONFIG_CINDER_VOLUMES_SIZE=1G    ###●第557行 系统在创建CINDER组件的的时候回创建一个20G卷,因为我们虚拟机空间有限所以把空间改下点1G
778 CONFIG_NEUTRON_METADATA_PW=29948657b3aa409c    ### ●第778行 ,像这样的29948657b3aa409c是密码,有后面有专门的脚本改,好记。
782 CONFIG_LBAAS_INSTALL=y           ###●第782行  LBAAS负载均衡组件。必选要装 选y
790 CONFIG_NEUTRON_FWAAS=y       ###●第790行 FWAAS是防火墙组件。必选要装 选y
794 CONFIG_NEUTRON_VPNAAS=y     ###●第794行 VPNAAS是VPN组件。必选要装 选y
817 CONFIG_NEUTRON_ML2_FLAT_NETWORKS=physnet1   ###●第817行,FLAT网络这边要设置物理网卡名字
862 CONFIG_NEUTRON_OVS_BRIDGE_MAPPINGS=physnet1:br-ex       ###●第862行,这边要设置物理网卡的名字
873 CONFIG_NEUTRON_OVS_BRIDGE_IFACES=br-ex:eth1   ###●第873行,这边br-ex:eth1是网络节点的nat网卡
1185 CONFIG_PROVISION_DEMO=n    ###●第1185行 是OpenStack联网下载一个测试镜像,这边没联网。说以改成n

##修改登录界面的密码
[root@control ~]# sed -i -r 's/(.+_PW)=.+/\1=123123/' openstack.txt

[root@control ~]# sed -i -r 's/192.168.43.88/192.168.100.10/g' openstack.txt- 一键部署OpenStack-Rocky
[root@control ~]# packstack --answer-file=openstack.txt
Welcome to the Packstack setup utility

The installation log file is available at: /var/tmp/packstack/20200228-225638-dMHC_d/openstack-setup.log

Installing:
Clean Up                                             [ DONE ]
Discovering ip protocol version                      [ DONE ]
Setting up ssh keys                                  [ DONE ]
Preparing servers                                    [ DONE ]
Pre installing Puppet and discovering hosts' details [ DONE ]
Preparing pre-install entries                        [ DONE ]
Setting up CACERT                                    [ DONE ]
Preparing AMQP entries                               [ DONE ]
Preparing MariaDB entries                            [ DONE ]
Fixing Keystone LDAP config parameters to be undef if empty[ DONE ]
Preparing Keystone entries                           [ DONE ]
Preparing Glance entries                             [ DONE ]
Checking if the Cinder server has a cinder-volumes vg[ DONE ]
Preparing Cinder entries                             [ DONE ]
Preparing Nova API entries                           [ DONE ]
Creating ssh keys for Nova migration                 [ DONE ]
Gathering ssh host keys for Nova migration           [ DONE ]
Preparing Nova Compute entries                       [ DONE ]
Preparing Nova Scheduler entries                     [ DONE ]
Preparing Nova VNC Proxy entries                     [ DONE ]
Preparing OpenStack Network-related Nova entries     [ DONE ]
Preparing Nova Common entries                        [ DONE ]
Preparing Neutron LBaaS Agent entries                [ DONE ]
Preparing Neutron API entries                        [ DONE ]
Preparing Neutron L3 entries                         [ DONE ]
Preparing Neutron L2 Agent entries                   [ DONE ]
Preparing Neutron DHCP Agent entries                 [ DONE ]
Preparing Neutron Metering Agent entries             [ DONE ]
Checking if NetworkManager is enabled and running    [ DONE ]
Preparing OpenStack Client entries                   [ DONE ]
Preparing Horizon entries                            [ DONE ]
Preparing Gnocchi entries                            [ DONE ]
Preparing Redis entries                              [ DONE ]
Preparing Ceilometer entries                         [ DONE ]
Preparing Puppet manifests                           [ DONE ]
Copying Puppet modules and manifests                 [ DONE ]
Applying 192.168.100.10_controller.pp
Testing if puppet apply is finished: 192.168.100.10_controller.pp  [ \ ]
192.168.100.10_controller.pp:                        [ DONE ]
Applying 192.168.100.10_network.pp
192.168.100.10_network.pp:                           [ DONE ]
Applying 192.168.100.11_compute.pp
Applying 192.168.100.12_compute.pp
192.168.100.11_compute.pp:                           [ DONE ]
192.168.100.12_compute.pp:                           [ DONE ]
Applying Puppet manifests                            [ DONE ]
Finalizing                                           [ DONE ]

 **** Installation completed successfully ******

Additional information:
 * Time synchronization installation was skipped. Please note that unsynchronized time on server instances might be problem for some OpenStack components.
 * File /root/keystonerc_admin has been created on OpenStack client host 192.168.100.10. To use the command line tools you need to source the file.
 * To access the OpenStack Dashboard browse to http://192.168.100.10/dashboard .
Please, find your login credentials stored in the keystonerc_admin in your home directory.
 * The installation log file is available at: /var/tmp/packstack/20200228-225638-dMHC_d/openstack-setup.log
 * The generated manifests are available at: /var/tmp/packstack/20200228-225638-dMHC_d/manifests
您在 /var/spool/mail/root 中有新邮件
[root@control ~]# - 后台查看部署情况
[root@control ~]# tail -f /var/log/messages
Feb 28 22:59:36 control systemd-logind: New session 364 of user root.
Feb 28 22:59:36 control systemd: Started Session 365 of user root.
Feb 28 22:59:36 control systemd-logind: New session 365 of user root.
Feb 28 22:59:37 control systemd-logind: Removed session 365.
Feb 28 22:59:40 control systemd: Started Session 366 of user root.
Feb 28 22:59:40 control systemd-logind: New session 366 of user root.
Feb 28 22:59:40 control systemd-logind: Removed session 366.
Feb 28 22:59:40 control kernel: IPv6: ADDRCONF(NETDEV_UP): veth1_1: link is not ready
Feb 28 22:59:40 control kernel: IPv6: ADDRCONF(NETDEV_UP): veth1_2: link is not ready
Feb 28 22:59:40 control kernel: IPv6: ADDRCONF(NETDEV_CHANGE): veth1_1: link becomes ready
Feb 28 22:59:41 control kernel: IPv6: ADDRCONF(NETDEV_CHANGE): veth1_2: link becomes ready
Feb 28 22:59:42 control su: (to rabbitmq) root on none
Feb 28 22:59:43 control ovs-vsctl: ovs|00001|db_ctl_base|ERR|unix:/var/run/openvswitch/db.sock: database connection failed (No such file or directory)
Feb 28 22:59:44 control systemd: Started Session 367 of user root.
Feb 28 22:59:44 control systemd-logind: New session 367 of user root.
Feb 28 22:59:44 control systemd-logind: Removed session 367.
Feb 28 22:59:47 control yum[114393]: Installed: ldns-1.6.16-10.el7.x86_64
Feb 28 22:59:47 control systemd: Started Session 368 of user root.
Feb 28 22:59:47 control systemd-logind: New session 368 of user root.
Feb 28 22:59:47 control systemd-logind: Removed session 368.
Feb 28 22:59:47 control systemd: Reloading.
Feb 28 22:59:47 control yum[114393]: Installed: libreswan-3.25-4.8.el7_6.x86_64
Feb 28 22:59:48 control systemd: Reloading.
Feb 28 22:59:49 control yum[114429]: Installed: 1:openstack-neutron-lbaas-13.0.0-1.el7.noarch
Feb 28 22:59:49 control systemd: Reloading.
Feb 28 22:59:49 control systemd: Starting Open vSwitch Database Unit...
Feb 28 22:59:49 control ovs-ctl: /etc/openvswitch/conf.db does not exist ... (warning).
Feb 28 22:59:49 control ovs-ctl: Creating empty database /etc/openvswitch/conf.db [  OK  ]
Feb 28 22:59:49 control ovs-ctl: Starting ovsdb-server [  OK  ]
Feb 28 22:59:49 control ovs-vsctl: ovs|00001|vsctl|INFO|Called as ovs-vsctl --no-wait -- init -- set Open_vSwitch . db-version=7.16.1
Feb 28 22:59:49 control ovs-vsctl: ovs|00001|vsctl|INFO|Called as ovs-vsctl --no-wait set Open_vSwitch . ovs-version=2.10.1 "external-ids:system-id=\"6caa3006-cfe1-4f9f-9df8-e4e5a45d6127\"" "external-ids:rundir=\"/var/run/openvswitch\"" "system-type=\"centos\"" "system-version=\"7\""
Feb 28 22:59:49 control ovs-ctl: Configuring Open vSwitch system IDs [  OK  ]
Feb 28 22:59:49 control ovs-vsctl: ovs|00001|vsctl|INFO|Called as ovs-vsctl --no-wait set Open_vSwitch . external-ids:hostname=control
Feb 28 22:59:49 control ovs-ctl: Enabling remote OVSDB managers [  OK  ]
Feb 28 22:59:49 control systemd: Started Open vSwitch Database Unit.
Feb 28 22:59:49 control systemd: Starting Open vSwitch Delete Transient Ports...
Feb 28 22:59:49 control systemd: Started Open vSwitch Delete Transient Ports.
Feb 28 22:59:49 control systemd: Starting Open vSwitch Forwarding Unit...
Feb 28 22:59:49 control kernel: openvswitch: Open vSwitch switching datapath
Feb 28 22:59:49 control ovs-ctl: Inserting openvswitch module [  OK  ]
Feb 28 22:59:49 control ovs-ctl: Starting ovs-vswitchd [  OK  ]
Feb 28 22:59:49 control ovs-vsctl: ovs|00001|vsctl|INFO|Called as ovs-vsctl --no-wait set Open_vSwitch . external-ids:hostname=control
Feb 28 22:59:49 control ovs-ctl: Enabling remote OVSDB managers [  OK  ]
Feb 28 22:59:49 control systemd: Started Open vSwitch Forwarding Unit.
Feb 28 22:59:49 control systemd: Starting Open vSwitch...
Feb 28 22:59:49 control systemd: Started Open vSwitch.
Feb 28 22:59:49 control systemd: Reloading.
Feb 28 22:59:49 control systemd: Reloading.
Feb 28 22:59:50 control systemd: Reloading.
Feb 28 22:59:50 control systemd: Reloading.
Feb 28 22:59:50 control yum[114651]: Installed: 1:openstack-neutron-openvswitch-13.0.2-1.el7.noarch
Feb 28 22:59:51 control systemd: Started Session 369 of user root.
Feb 28 22:59:51 control systemd-logind: New session 369 of user root.
Feb 28 22:59:51 control systemd-logind: Removed session 369.
Feb 28 22:59:51 control kernel: bridge: filtering via arp/ip/ip6tables is no longer available by default. Update your scripts to load br_netfilter if you need this.
Feb 28 22:59:51 control kernel: Bridge firewalling registered
Feb 28 22:59:52 control systemd: Reloading.
Feb 28 22:59:52 control yum[114712]: Installed: 1:openstack-neutron-metering-agent-13.0.2-1.el7.noarch
Feb 28 22:59:52 control systemd: Reloading.
Feb 28 22:59:52 control systemd: Reloading.
Feb 28 22:59:53 control systemd: Reloading.
Feb 28 22:59:53 control systemd: Started OpenStack Neutron Load Balancing as a Service (API v2.x) Agent.
Feb 28 22:59:53 control systemd: Reloading.
Feb 28 22:59:53 control systemd: Reloading.
Feb 28 22:59:53 control systemd: Reloading.
Feb 28 22:59:53 control systemd: Starting OpenStack Neutron Destroy Patch Ports...
Feb 28 22:59:54 control systemd: Started Session 370 of user root.
Feb 28 22:59:54 control systemd-logind: New session 370 of user root.
Feb 28 22:59:54 control systemd-logind: Removed session 370.
Feb 28 22:59:55 control systemd: Started Session c119 of user root.
Feb 28 22:59:55 control ovs-vsctl: ovs|00001|vsctl|INFO|Called as /bin/ovs-vsctl --timeout=5 --id=@manager -- create Manager "target=\"ptcp:6640:127.0.0.1\"" -- add Open_vSwitch . manager_options @manager
Feb 28 22:59:55 control systemd: Started OpenStack Neutron Destroy Patch Ports.
Feb 28 22:59:55 control systemd: Reloading.
Feb 28 22:59:56 control systemd: Reloading.
Feb 28 22:59:56 control systemd: Reloading.
Feb 28 22:59:56 control systemd: Started OpenStack Neutron DHCP Agent.
Feb 28 22:59:56 control systemd: Reloading.
Feb 28 22:59:56 control systemd: Reloading.
Feb 28 22:59:56 control systemd: Reloading.
Feb 28 22:59:56 control systemd: Started OpenStack Neutron Metadata Agent.
Feb 28 22:59:57 control systemd: Reloading.
Feb 28 22:59:57 control systemd: Reloading.
Feb 28 22:59:57 control systemd: Reloading.
Feb 28 22:59:57 control systemd: Started OpenStack Neutron Metering Agent.
Feb 28 22:59:58 control systemd: Reloading.
Feb 28 22:59:58 control systemd: Reloading.
Feb 28 22:59:59 control systemd: Started Session 371 of user root.
Feb 28 22:59:59 control systemd-logind: New session 371 of user root.
Feb 28 22:59:59 control systemd-logind: Removed session 371.
Feb 28 23:00:00 control ovs-vsctl: ovs|00001|vsctl|INFO|Called as /usr/bin/ovs-vsctl add-br br-ex
Feb 28 23:00:00 control kernel: device ovs-system entered promiscuous mode
Feb 28 23:00:00 control kernel: device br-ex entered promiscuous mode
Feb 28 23:00:00 control ovs-vsctl: ovs|00001|vsctl|INFO|Called as /usr/bin/ovs-vsctl -- --id=@iface0 create Interface name=eth1 -- add-port br-ex eth1 interfaces=@iface0
Feb 28 23:00:00 control kernel: device eth1 entered promiscuous mode
Feb 28 23:00:00 control ovs-vsctl: ovs|00001|vsctl|INFO|Called as ovs-vsctl -t 10 -- --if-exists del-br br-ex
Feb 28 23:00:00 control kernel: device br-ex left promiscuous mode
Feb 28 23:00:00 control kernel: device eth1 left promiscuous mode
Feb 28 23:00:00 control kernel: device ovs-system left promiscuous mode
Feb 28 23:00:01 control ovs-vsctl: ovs|00001|vsctl|INFO|Called as ovs-vsctl -t 10 -- --if-exists del-port br-ex eth1
Feb 28 23:00:01 control ovs-vsctl: ovs|00001|vsctl|INFO|Called as ovs-vsctl -t 10 -- --may-exist add-br br-ex -- set bridge br-ex fail_mode=standalone
Feb 28 23:00:01 control kernel: device ovs-system entered promiscuous mode
Feb 28 23:00:01 control kernel: device br-ex entered promiscuous mode
Feb 28 23:00:01 control systemd: Started Session 372 of user root.
Feb 28 23:00:03 control systemd: Started Session 373 of user root.
Feb 28 23:00:03 control systemd-logind: New session 373 of user root.
Feb 28 23:00:03 control systemd-logind: Removed session 373.
Feb 28 23:00:04 control ntpd[12818]: Listen normally on 8 br-ex fe80::9445:d8ff:feb6:674c UDP 123
Feb 28 23:00:04 control ntpd[12818]: Deleting interface #6 eth1, fe80::7d46:b5a5:9644:b890#123, interface stats: received=0, sent=0, dropped=0, active_time=3929 secs
Feb 28 23:00:04 control ntpd[12818]: Deleting interface #4 eth1, 192.168.43.88#123, interface stats: received=0, sent=0, dropped=0, active_time=3929 secs
Feb 28 23:00:05 control kernel: e1000: eth1 NIC Link is Up 1000 Mbps Full Duplex, Flow Control: None
Feb 28 23:00:05 control kernel: IPv6: ADDRCONF(NETDEV_UP): eth1: link is not ready
Feb 28 23:00:05 control kernel: IPv6: ADDRCONF(NETDEV_CHANGE): eth1: link becomes ready
Feb 28 23:00:05 control ovs-vsctl: ovs|00001|vsctl|INFO|Called as ovs-vsctl -t 10 -- --if-exists del-port br-ex eth1 -- add-port br-ex eth1
Feb 28 23:00:05 control kernel: device eth1 entered promiscuous mode
Feb 28 23:00:05 control systemd: Reloading.
Feb 28 23:00:05 control systemd: Starting OpenStack Neutron Open vSwitch Agent...
Feb 28 23:00:05 control neutron-enable-bridge-firewall.sh: net.bridge.bridge-nf-call-iptables = 1
Feb 28 23:00:05 control neutron-enable-bridge-firewall.sh: net.bridge.bridge-nf-call-ip6tables = 1
Feb 28 23:00:05 control systemd: Started OpenStack Neutron Open vSwitch Agent.
Feb 28 23:00:05 control systemd: Reloading.
Feb 28 23:00:05 control systemd: Reloading.
Feb 28 23:00:06 control systemd: Started Session 374 of user root.
Feb 28 23:00:06 control systemd-logind: New session 374 of user root.
Feb 28 23:00:06 control systemd-logind: Removed session 374.
Feb 28 23:00:07 control systemd-logind: Removed session 364.
Feb 28 23:00:08 control kernel: device br-int entered promiscuous mode
Feb 28 23:00:08 control kernel: device br-tun entered promiscuous mode
Feb 28 23:00:08 control systemd: Started Session c120 of user root.
Feb 28 23:00:08 control ovs-vsctl: ovs|00001|vsctl|INFO|Called as /bin/ovs-vsctl --timeout=5 --id=@manager -- create Manager "target=\"ptcp:6640:127.0.0.1\"" -- add Open_vSwitch . manager_options @manager
Feb 28 23:00:08 control ovs-vsctl: ovs|00002|ovsdb_idl|WARN|transaction error: {"details":"Transaction causes multiple rows in \"Manager\" table to have identical values (\"ptcp:6640:127.0.0.1\") for index on column \"target\".  First row, with UUID 6c931024-19cb-498c-9689-6db9d8675d5f, existed in the database before this transaction and was not modified by the transaction.  Second row, with UUID 8e3b3e71-eb01-42d5-ae62-748a8fb94639, was inserted by this transaction.","error":"constraint violation"}
Feb 28 23:00:08 control ovs-vsctl: ovs|00003|db_ctl_base|ERR|transaction error: {"details":"Transaction causes multiple rows in \"Manager\" table to have identical values (\"ptcp:6640:127.0.0.1\") for index on column \"target\".  First row, with UUID 6c931024-19cb-498c-9689-6db9d8675d5f, existed in the database before this transaction and was not modified by the transaction.  Second row, with UUID 8e3b3e71-eb01-42d5-ae62-748a8fb94639, was inserted by this transaction.","error":"constraint violation"}
Feb 28 23:00:08 control ovs-vsctl: ovs|00001|vsctl|INFO|Called as /bin/ovs-vsctl --timeout=5 --id=@manager -- create Manager "target=\"ptcp:6640:127.0.0.1\"" -- add Open_vSwitch . manager_options @manager
Feb 28 23:00:08 control ovs-vsctl: ovs|00002|ovsdb_idl|WARN|transaction error: {"details":"Transaction causes multiple rows in \"Manager\" table to have identical values (\"ptcp:6640:127.0.0.1\") for index on column \"target\".  First row, with UUID 68e7b151-a18d-4030-9982-6e8d3d5f3418, was inserted by this transaction.  Second row, with UUID 6c931024-19cb-498c-9689-6db9d8675d5f, existed in the database before this transaction and was not modified by the transaction.","error":"constraint violation"}
Feb 28 23:00:08 control ovs-vsctl: ovs|00003|db_ctl_base|ERR|transaction error: {"details":"Transaction causes multiple rows in \"Manager\" table to have identical values (\"ptcp:6640:127.0.0.1\") for index on column \"target\".  First row, with UUID 68e7b151-a18d-4030-9982-6e8d3d5f3418, was inserted by this transaction.  Second row, with UUID 6c931024-19cb-498c-9689-6db9d8675d5f, existed in the database before this transaction and was not modified by the transaction.","error":"constraint violation"}
Feb 28 23:00:09 control systemd: Started Session 375 of user root.
Feb 28 23:00:09 control systemd-logind: New session 375 of user root.
Feb 28 23:00:10 control systemd-logind: Removed session 375.
Feb 28 23:00:10 control systemd: Started Session c121 of user root.
Feb 28 23:00:10 control ntpd[12818]: Listen normally on 9 br-ex 192.168.43.88 UDP 123
Feb 28 23:00:10 control ntpd[12818]: Listen normally on 10 eth1 fe80::20c:29ff:febd:30bc UDP 123
Feb 28 23:00:10 control systemd: Started Session c122 of user root.
Feb 28 23:00:10 control systemd: Started Session c123 of user root.
Feb 28 23:00:11 control systemd: Started Session c124 of user root.
Feb 28 23:01:01 control systemd: Started Session 376 of user root.
Feb 28 23:01:10 control systemd: Started Session c125 of user root.
Feb 28 23:01:10 control systemd: Started Session c126 of user root.
Feb 28 23:01:11 control systemd: Started Session c127 of user root.
Feb 28 23:01:11 control systemd: Started Session c128 of user root.
Feb 28 23:02:10 control systemd: Started Session c129 of user root.
Feb 28 23:02:10 control systemd: Started Session c130 of user root.
Feb 28 23:02:10 control systemd: Started Session c131 of user root.
Feb 28 23:02:10 control systemd: Started Session c132 of user root.
Feb 28 23:03:10 control systemd: Started Session c133 of user root.
Feb 28 23:03:10 control systemd: Started Session c134 of user root.
Feb 28 23:03:11 control systemd: Started Session c135 of user root.
Feb 28 23:03:11 control systemd: Started Session c136 of user root.
Feb 28 23:03:29 control kernel: device vxlan_sys_4789 entered promiscuous mode
Feb 28 23:03:31 control kernel: device vxlan_sys_4789 left promiscuous mode
Feb 28 23:03:31 control kernel: device vxlan_sys_4789 entered promiscuous mode
Feb 28 23:03:34 control ntpd[12818]: Listen normally on 11 vxlan_sys_4789 fe80::8c65:fff:fe64:f37c UDP 123
Feb 28 23:03:49 control systemd-logind: New session 377 of user root.
Feb 28 23:03:49 control systemd: Started Session 377 of user root.
Feb 28 23:03:50 control systemd-logind: Removed session 377.
Feb 28 23:03:51 control systemd-logind: New session 378 of user root.
Feb 28 23:03:51 control systemd: Started Session 378 of user root.
Feb 28 23:03:51 control systemd-logind: Removed session 378.
Feb 28 23:04:10 control systemd: Started Session c137 of user root.
- 登录测试
[root@control ~]# ls
anaconda-ks.cfg  keystonerc_admin  openstack_rocky.tar.gz  openstack.txt
[root@control ~]# cat keystonerc_admin
unset OS_SERVICE_TOKEN
    export OS_USERNAME=admin        ##登录名
    export OS_PASSWORD='123123'        ##登录密码
    export OS_AUTH_URL=http://192.168.100.10:5000/v3
    export PS1='[\u@\h \W(keystone_admin)]\$ '

export OS_PROJECT_NAME=admin
export OS_USER_DOMAIN_NAME=Default
export OS_PROJECT_DOMAIN_NAME=Default
export OS_IDENTITY_API_VERSION=3
    [root@control ~]#


注:现网源的部署方法,只需要把源的地址指向阿里云源地址,参考单节点部署https://blog.csdn.net/qq_42761527/article/details/104415701
