今天,带大家了解一种目标检测,语义分割,什么是语义分割呢,这里我简单地说明一下,语义分割是目标检测,一般我们看到的目标检测用一个矩形的方框给围起来,而语义分割就是能在目标下将其轮廓给勾画起来,我们可以对比一下:
如下图,这张就是一般的目标检测。

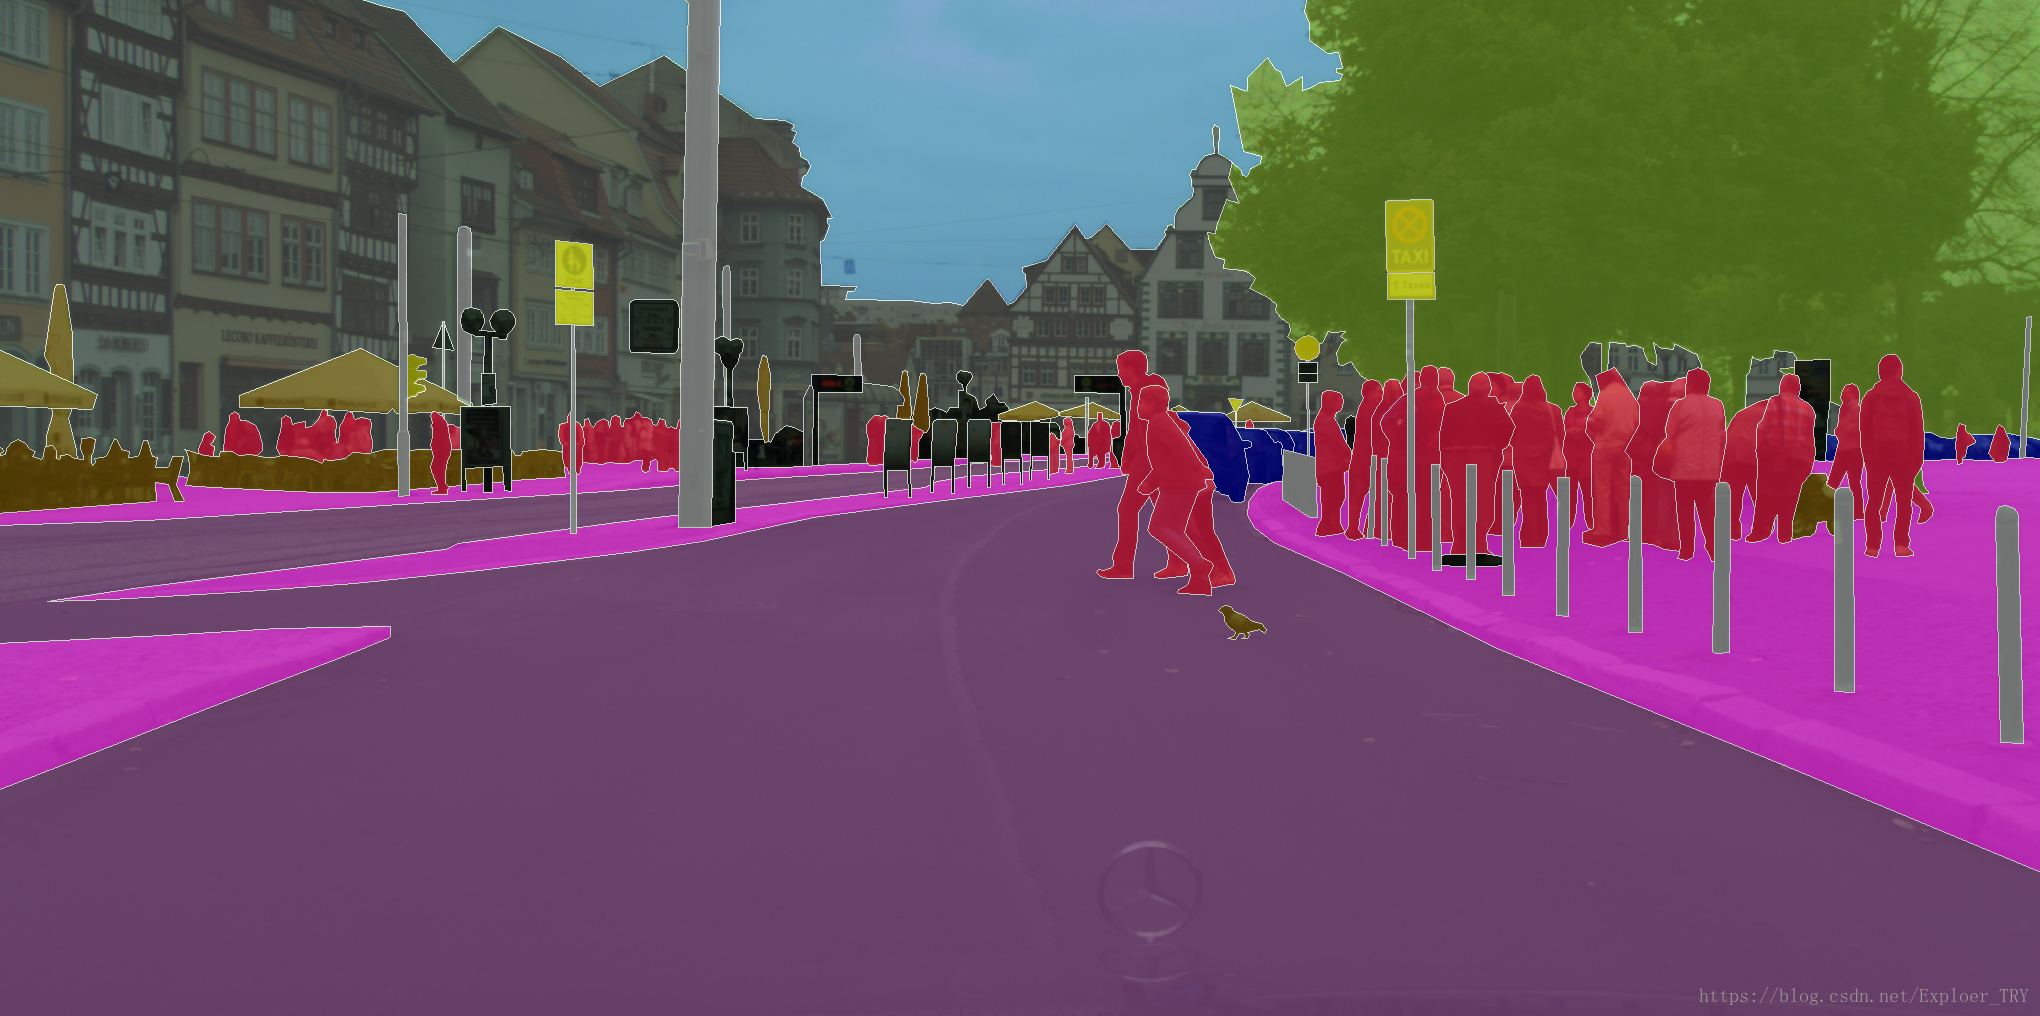
如下图,这个就是语义分割,将一张图轮廓都标注好的:
那么我将手把手带你走进这个项目的实战中,我将以带大家安装环境,测试图片,标注训练集以及训练代码为目的,在之后我会不断地更新这篇博客,最终我希望能带大家做一个能实时的语义分割的图像检测。那么现在我们就开始吧:
注意:该篇博客暂时没有更新训练与实时检测的部分,不过博主后期一定会研究出来此篇代码,然后和大家一起分享成果。
这个项目的源码在GitHub上,大家可以前往下载
论文地址:https://arxiv.org/abs/1703.06870
源码地址: https://github.com/matterport/Mask_RCNN
1.环境安装
首先就是环境,大家需要去下载anaconda的安装包,如果你安装过了那么请跳过这段,如果没有安装的具体安装方法见我的上篇博客:https://blog.csdn.net/Exploer_TRY/article/details/81434985
这个项目基于tensorflow和keras,还有pycocotools等主要包,建议是安装tensorflow-gpu版本,当然CPU也是可以的,只是训练部分时可能会很卡。tensorflow的安装方式这里我不再做介绍,下面是如何安装keras,我们用pip命令:
pip install keras等待安装完成后,我们还需要对一个叫做pycocotools的包进行安装,如果是windows环境则无法直接pip install pycocotools,因为这个包本来就不支持Windows的,我们采取在命令行输入以下命令的方式在Windows上安装:
pip install git+https://github.com/philferriere/cocoapi.git#subdirectory=PythonAPI
这时候基本的环境应该已经安装完成,如果显示还有包没有安装请使用pip命令安装。
2.代码测试
我们下载好这个项目的源码后(源码地址是https://github.com/matterport/Mask_RCNN),我们打开这个文件夹,进入samples,会发现一个叫demo.ipynb的文件,我们在cmd里定位到这个文件的位置,然后输入:
jupyter notebook我们就进入到了这个页面,就可以开始代码测试环境了。
我们先看第一段代码:_
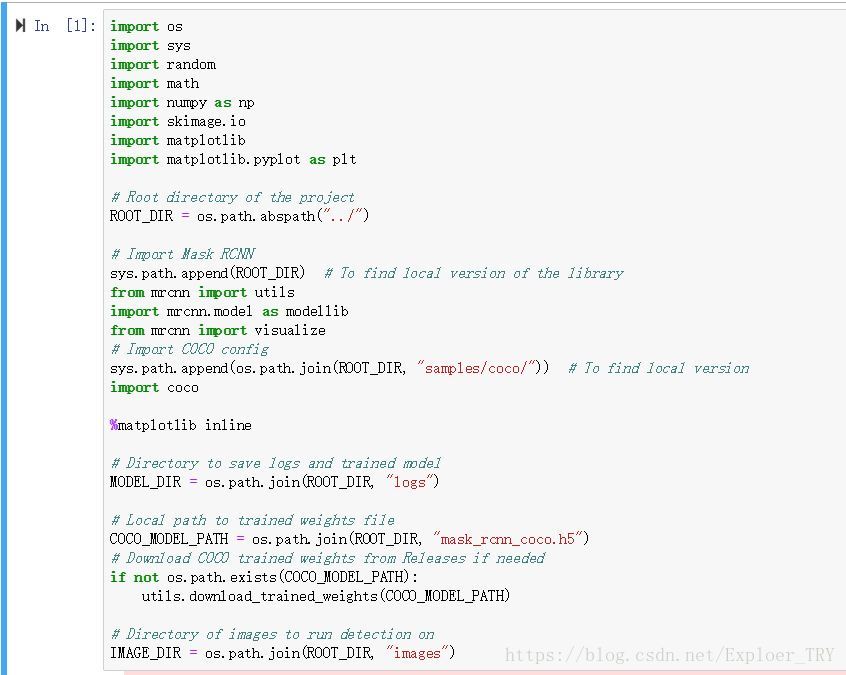
这里看红字部分,mask_rcnn_coco.h5,这个是训练保存的文件,比如我们在tensorflow的api里是.pb文件。
这个文件会自动下载,但是很慢,而且可能不成功,因此我直接把这个文件上传到百度网盘里,大家从网盘下载。链接永久有效。
网盘链接:https://pan.baidu.com/s/1L6G2h9MOHjwxBpoExVcJwA
下载好后我们放在文件夹的根目录,就是和samples文件夹一个目录。
接着,我们开始测试吧,现在可以直接跑到尾,然后看输出的图片,最后一段是随机读取图片的,但是大家可以改变变量image,让他读固定的图片

这个是随机的图片。
如果大家想读取固定的图片,把最后一段代码修改,比如我下载了一张图片,我命名为test.jpg放在images文件夹下,然后我只需要把image变量后面代码修改,如果大家想读取固定图片直接重属名,放在images文件夹下,然后把我下面写的代码的test.jpg改成相应的名字就行了,代码如下:
# Load a random image from the images folder
file_names = next(os.walk(IMAGE_DIR))[2]
image = skimage.io.imread(os.path.join(IMAGE_DIR,'test.jpg'))

# Run detection
results = model.detect([image], verbose=1)

# Visualize results
r = results[0]
visualize.display_instances(image, r['rois'], r['masks'], r['class_ids'],
                            class_names, r['scores'])
测试图片:

那么测试到这里就结束了,接下来带大家标注训练集并转换格式。
3.训练集的制作
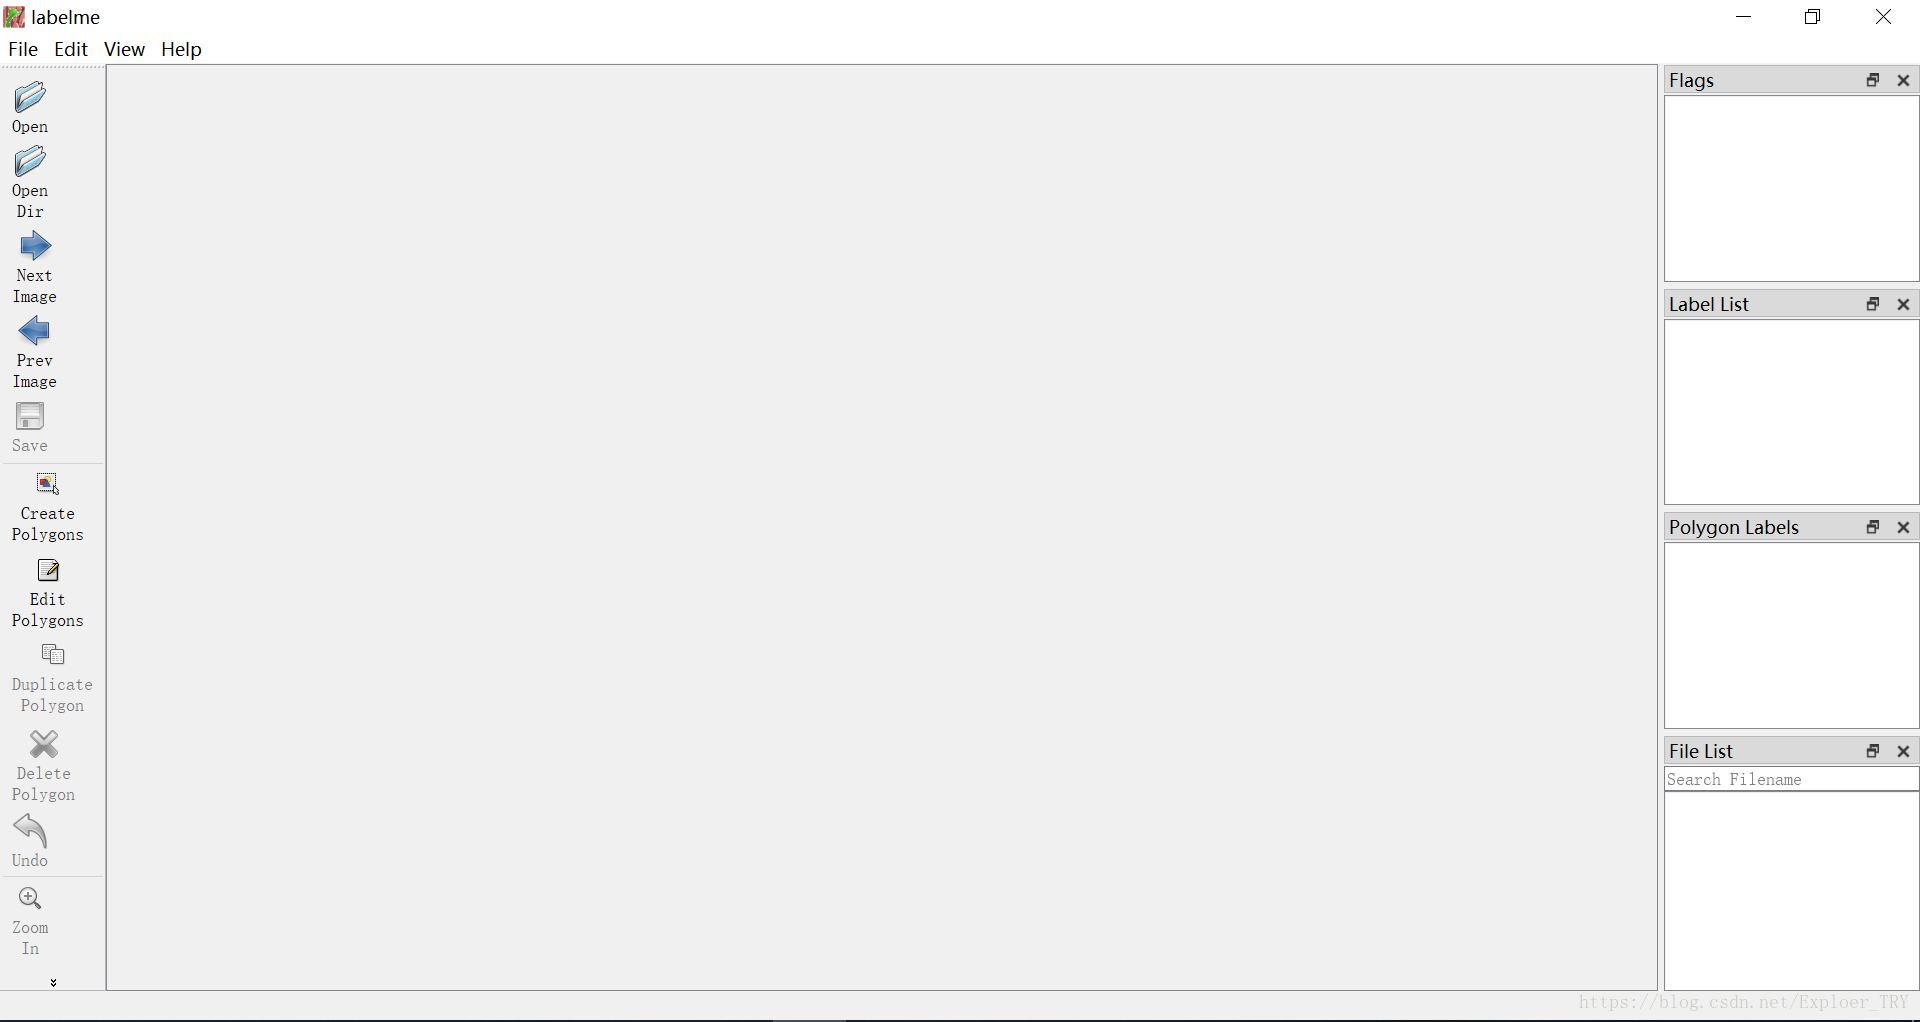
接下来我将带大家一起标注训练集,首先我们需要一个标注工具,这个工具有很多,这里我用Labelme这个标注工具带大家来标注。首先我们用命令行安装这个工具:
pip install labelme接着,我们启动它,启动很简单,直接在命令行输入labelme即可:
lableme我们把收集好的图片放在一个文件夹里,然后打开软件界面后,我们点击Open Dir,打开你放置图片的目录即可。
标注的话我们点击这里:
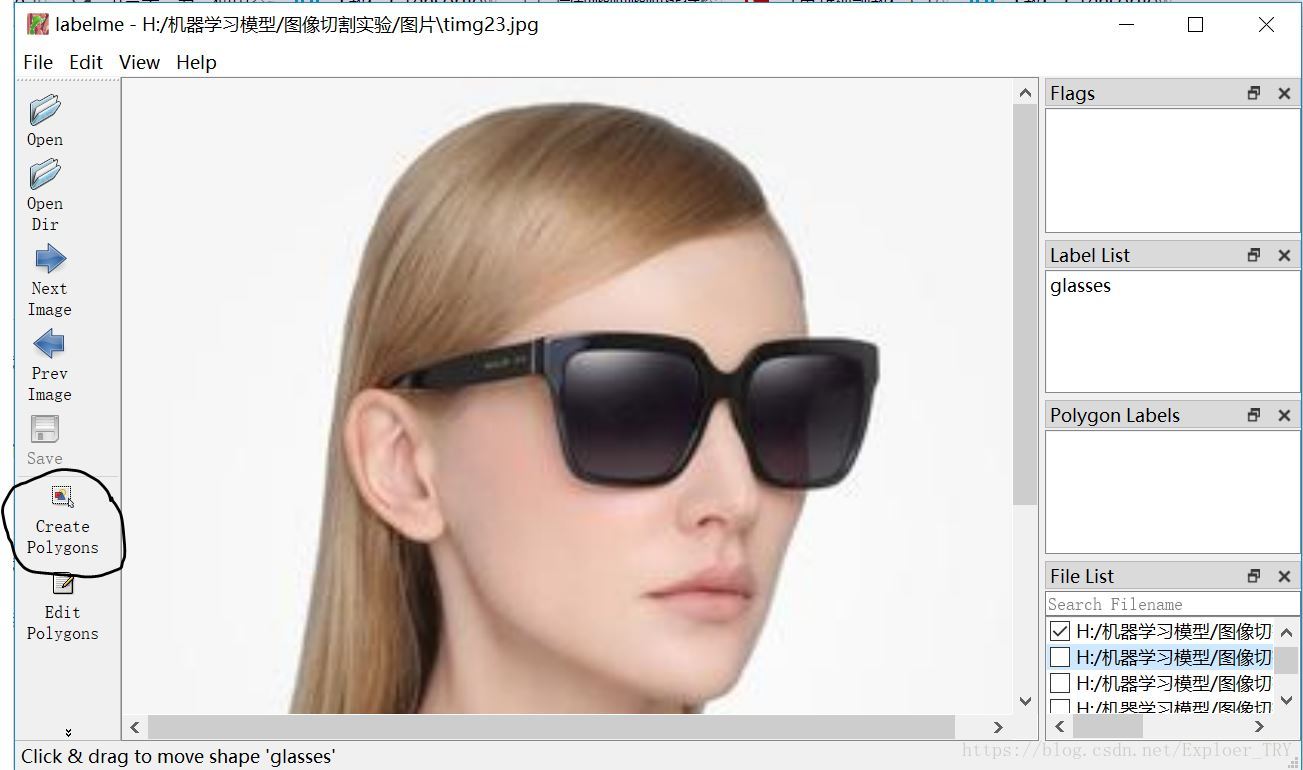
然后就一个点一个点标注,把你想标注的物体轮廓标注出来,最后连在一起,然后给它做好标签,那么我们就保存完成。得到的文件是.json文件,我们需要对其转化:
我们打开你的anconda的目录,在Lib\site-packages\labelme\cli\json_to_dataset.py这个文件,如果找不到不要紧,直接给出这个文件的代码:
import argparse
import base64
import json
import os
import os.path as osp
import warnings

import PIL.Image
import yaml

from labelme import utils


def main():
    warnings.warn("This script is aimed to demonstrate how to convert the\n"
                  "JSON file to a single image dataset, and not to handle\n"
                  "multiple JSON files to generate a real-use dataset.")

    parser = argparse.ArgumentParser()
    parser.add_argument('json_file')
    parser.add_argument('-o', '--out', default=None)
    args = parser.parse_args()

    json_file = args.json_file

    if args.out is None:
        out_dir = osp.basename(json_file).replace('.', '_')
        out_dir = osp.join(osp.dirname(json_file), out_dir)
    else:
        out_dir = args.out
    if not osp.exists(out_dir):
        os.mkdir(out_dir)

    data = json.load(open(json_file))

    if data['imageData']:
        imageData = data['imageData']
    else:
        imagePath = os.path.join(os.path.dirname(json_file), data['imagePath'])
        with open(imagePath, 'rb') as f:
            imageData = f.read()
            imageData = base64.b64encode(imageData).decode('utf-8')
    img = utils.img_b64_to_arr(imageData)

    label_name_to_value = {'_background_': 0}
    for shape in sorted(data['shapes'], key=lambda x: x['label']):
        label_name = shape['label']
        if label_name in label_name_to_value:
            label_value = label_name_to_value[label_name]
        else:
            label_value = len(label_name_to_value)
            label_name_to_value[label_name] = label_value
    lbl = utils.shapes_to_label(img.shape, data['shapes'], label_name_to_value)

    label_names = [None] * (max(label_name_to_value.values()) + 1)
    for name, value in label_name_to_value.items():
        label_names[value] = name
    lbl_viz = utils.draw_label(lbl, img, label_names)

    PIL.Image.fromarray(img).save(osp.join(out_dir, 'img.png'))
    utils.lblsave(osp.join(out_dir, 'label.png'), lbl)
    PIL.Image.fromarray(lbl_viz).save(osp.join(out_dir, 'label_viz.png'))

    with open(osp.join(out_dir, 'label_names.txt'), 'w') as f:
        for lbl_name in label_names:
            f.write(lbl_name + '\n')

    warnings.warn('info.yaml is being replaced by label_names.txt')
    info = dict(label_names=label_names)
    with open(osp.join(out_dir, 'info.yaml'), 'w') as f:
        yaml.safe_dump(info, f, default_flow_style=False)

    print('Saved to: %s' % out_dir)


if __name__ == '__main__':
    main()
使用方法是在命令行中输入如下:
python json_to_dataset.py -w path/to/your/json这个路径一定是要精确到.json文件,但是大家会发现,我们有那么多的训练集,如果这么做,一个个转换会很不方便,个大家提供一个批处理的代码。
首先,在大家的图片文件夹里,图片和.josn文件如果是混在一起的,可以在这里创建一个记事本,把后缀名改成.bat然后编辑这个文件如下:
md json
copy *.json json
然后双击运行,你也可以在命令行cmd里输入以下命令,效果是一样的。首先创建一个叫json的文件夹,然后把这里面所以的.json文件复制到这个文件夹里。
然后给出下一个代码,处理全部的.json文件:
import argparse
import json
import os
import os.path as osp
import base64
import warnings

import PIL.Image
import yaml

from labelme import utils

import cv2
import numpy as np
from skimage import img_as_ubyte

# from sys import argv

def main():
    warnings.warn("This script is aimed to demonstrate how to convert the\n"
                  "JSON file to a single image dataset, and not to handle\n"
                  "multiple JSON files to generate a real-use dataset.")

    parser = argparse.ArgumentParser()
    parser.add_argument('json_file')
    parser.add_argument('-o', '--out', default=None)
    args = parser.parse_args()

    json_file = args.json_file

    #freedom
    list_path = os.listdir(json_file)
    print('freedom =', json_file)
    for i in range(0,len(list_path)):
        path = os.path.join(json_file,list_path[i])
        if os.path.isfile(path):

            data = json.load(open(path))
            img = utils.img_b64_to_arr(data['imageData'])
            lbl, lbl_names = utils.labelme_shapes_to_label(img.shape, data['shapes'])

            captions = ['%d: %s' % (l, name) for l, name in enumerate(lbl_names)]

            lbl_viz = utils.draw_label(lbl, img, captions)
            out_dir = osp.basename(path).replace('.', '_')
            save_file_name = out_dir
            out_dir = osp.join(osp.dirname(path), out_dir)

            if not osp.exists(json_file + '\\' + 'labelme_json'):
                os.mkdir(json_file + '\\' + 'labelme_json')
            labelme_json = json_file + '\\' + 'labelme_json'

            out_dir1 = labelme_json + '\\' + save_file_name
            if not osp.exists(out_dir1):
                os.mkdir(out_dir1)

            PIL.Image.fromarray(img).save(out_dir1+'\\'+save_file_name+'_img.png')
            PIL.Image.fromarray(lbl).save(out_dir1+'\\'+save_file_name+'_label.png')

            PIL.Image.fromarray(lbl_viz).save(out_dir1+'\\'+save_file_name+
            '_label_viz.png')

            if not osp.exists(json_file + '\\' + 'mask_png'):
                os.mkdir(json_file + '\\' + 'mask_png')
            mask_save2png_path = json_file + '\\' + 'mask_png'
            ################################
            #mask_pic = cv2.imread(out_dir1+'\\'+save_file_name+'_label.png',)
            #print('pic1_deep:',mask_pic.dtype)

            mask_dst = img_as_ubyte(lbl)  #mask_pic
            print('pic2_deep:',mask_dst.dtype)
            cv2.imwrite(mask_save2png_path+'\\'+save_file_name+'_label.png',mask_dst)
            ##################################

            with open(osp.join(out_dir1, 'label_names.txt'), 'w') as f:
                for lbl_name in lbl_names:
                    f.write(lbl_name + '\n')

            warnings.warn('info.yaml is being replaced by label_names.txt')
            info = dict(label_names=lbl_names)
            with open(osp.join(out_dir1, 'info.yaml'), 'w') as f:
                yaml.safe_dump(info, f, default_flow_style=False)

            print('Saved to: %s' % out_dir1)

if __name__ == '__main__':
    #base64path = argv[1]
    main()
给这个代码命名,比如还是json_to_dataset,那么我们在cmd里这样运行:
python json_to_dataset.py path/to/your/json路径直接输入.json文件所在的文件夹,然后就会一次处理完全部的.json文件的转化。我们需要的是yaml和一个.png作为其训练集的,那么我们现在的训练集制作就制作好了,下一步就是测试了。
