1.首先搭建一个maven工程
2.在pom.xml中设置 springboot的parent
	<!-- 设置spring boot的parent -->
	<parent>
		<groupId>org.springframework.boot</groupId>
		<artifactId>spring-boot-starter-parent</artifactId>
		<version>1.5.2.RELEASE</version>
	</parent>
说明:Spring boot的项目必须要将parent设置为spring boot的parent,该parent包含了大量默认的配置,大大简化了我们的开发。
3.在pom.xml中导入 springboot的web支持
	<!-- 导入spring boot的web支持 -->
	<dependency>
		<groupId>org.springframework.boot</groupId>
		<artifactId>spring-boot-starter-web</artifactId>
	</dependency>
4.在pom.xml中添加springboot插件
	<!-- 添加Spring boot的插件 -->
	<plugin>
		<groupId>org.springframework.boot</groupId>
		<artifactId>spring-boot-maven-plugin</artifactId>
	</plugin>
5.完整pom.xml
<project xmlns="http://maven.apache.org/POM/4.0.0" xmlns:xsi="http://www.w3.org/2001/XMLSchema-instance"
	xsi:schemaLocation="http://maven.apache.org/POM/4.0.0 http://maven.apache.org/maven-v4_0_0.xsd">
	<modelVersion>4.0.0</modelVersion>
	<groupId>com.springBoot</groupId>
	<artifactId>firstSpringBoot</artifactId>
	<packaging>war</packaging>
	<version>0.0.1-SNAPSHOT</version>
	<name>firstSpringBoot Maven Webapp</name>
	<url>http://maven.apache.org</url>
	<!-- 设置spring boot的parent -->
	<parent>
		<groupId>org.springframework.boot</groupId>
		<artifactId>spring-boot-starter-parent</artifactId>
		<version>1.5.2.RELEASE</version>
	</parent>

	<dependencies>
		<!-- 导入spring boot的web支持 -->
		<dependency>
			<groupId>org.springframework.boot</groupId>
			<artifactId>spring-boot-starter-web</artifactId>
		</dependency>

		<dependency>
			<groupId>org.springframework</groupId>
			<artifactId>spring-webmvc</artifactId>
			<version>4.3.7.RELEASE</version>
		</dependency>
		<!-- 连接池 -->
		<dependency>
			<groupId>com.jolbox</groupId>
			<artifactId>bonecp-spring</artifactId>
			<version>0.8.0.RELEASE</version>
		</dependency>
	</dependencies>
	<build>
		<finalName>${project.artifactId}</finalName>
		<plugins>
			<!-- 资源文件拷贝插件 -->
			<plugin>
				<groupId>org.apache.maven.plugins</groupId>
				<artifactId>maven-resources-plugin</artifactId>
				<configuration>
					<encoding>UTF-8</encoding>
				</configuration>
			</plugin>
			<!-- java编译插件 -->
			<plugin>
				<groupId>org.apache.maven.plugins</groupId>
				<artifactId>maven-compiler-plugin</artifactId>
				<configuration>
					<source>1.7</source>
					<target>1.7</target>
					<encoding>UTF-8</encoding>
				</configuration>
			</plugin>
			<!-- 添加Spring boot的插件 -->
			<plugin>
				<groupId>org.springframework.boot</groupId>
				<artifactId>spring-boot-maven-plugin</artifactId>
			</plugin>

		</plugins>
		<pluginManagement>
			<plugins>
				<!-- 配置Tomcat插件 -->
				<plugin>
					<groupId>org.apache.tomcat.maven</groupId>
					<artifactId>tomcat7-maven-plugin</artifactId>
					<version>2.2</version>
				</plugin>
			</plugins>
		</pluginManagement>
	</build>
</project>
6.编写第一个springboot应用
/**
 * Spring Boot的项目一般都会有*Application的入口类, 入口类中会有main方法,这是一个标准的Java应用程序的入口方法
 *
 * @SpringBootApplication注解是Spring Boot的核心注解,它其实是一个组合注解
 */

@Controller // 标明这是一个SpringMVC的Controller控制器
@SpringBootApplication(exclude = { RedisAutoConfiguration.class }) // SpringBoot项目的核心注解,主要目的是开启自动配置。
@Configuration // 这是一个配置Spring的配置类
public class HelloApplication {

	@RequestMapping("hello")
	@ResponseBody
	public String hello() {
		return "hello world!";
	}

	public static void main(String[] args) {
		// SpringApplication.run(HelloApplication.class, args);
		SpringApplication springApplication = new SpringApplication(HelloApplication.class);
		// 关闭banner
		springApplication.setBannerMode(Banner.Mode.OFF);
		springApplication.run(args);
	}

}
代码说明:
6.1@SpringBootApplication:Spring Boot项目的核心注解,主要目的是开启自动配置。;
6.2@Configuration:这是一个配置Spring的配置类;
6.3@Controller:标明这是一个SpringMVC的Controller控制器;
6. 4main方法:在main方法中启动一个应用,即:这个应用的入口;
7.启动应用
7.1在Spring Boot项目中,启动的方式有两种:
第一种:直接run Java Application
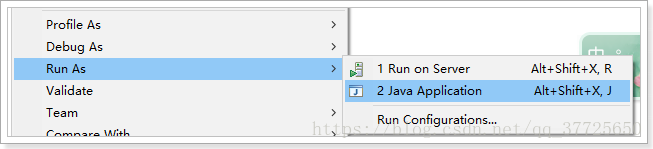
第二种:通过Spring Boot的Maven插件运行

7.2启动效果
  .   ____          _            __ _ _
 /\\ / ___'_ __ _ _(_)_ __  __ _ \ \ \ \
( ( )\___ | '_ | '_| | '_ \/ _` | \ \ \ \
 \\/  ___)| |_)| | | | | || (_| |  ) ) ) )
  '  |____| .__|_| |_|_| |_\__, | / / / /
 =========|_|==============|___/=/_/_/_/
 :: Spring Boot ::        (v1.5.2.RELEASE)
看到如下信息就说明启动成功了:
2018-05-01 20:12:10.837  INFO 18780 --- [           main] o.s.j.e.a.AnnotationMBeanExporter        : Registering beans for JMX exposure on startup
2018-05-01 20:12:10.984  INFO 18780 --- [           main] s.b.c.e.t.TomcatEmbeddedServletContainer : Tomcat started on port(s): 8080 (http)
2018-05-01 20:12:10.994  INFO 18780 --- [           main] c.springboot.firstdemo.HelloApplication  : Started HelloApplication in 6.612 seconds (JVM running for 7.201)
7.3测试,打开浏览器输入地址

8.至此,第一个springboot项目完成。