转载注明出处:https://www.jianshu.com/p/ec0d4a73c970
最近公司的项目刚好需要这个效果,虽然GitHub上有很多成型的开源项目,不过都附带了很多其他的东西,为了这个效果去引用一个第三方库明显不合适,所以就决定自力更生了。
其实在日常软件中还是挺常见的,比如带Banner广告图的首页或者是带头部的个人中心,下面是美团和摩拜单车的实现效果:
实现思路:
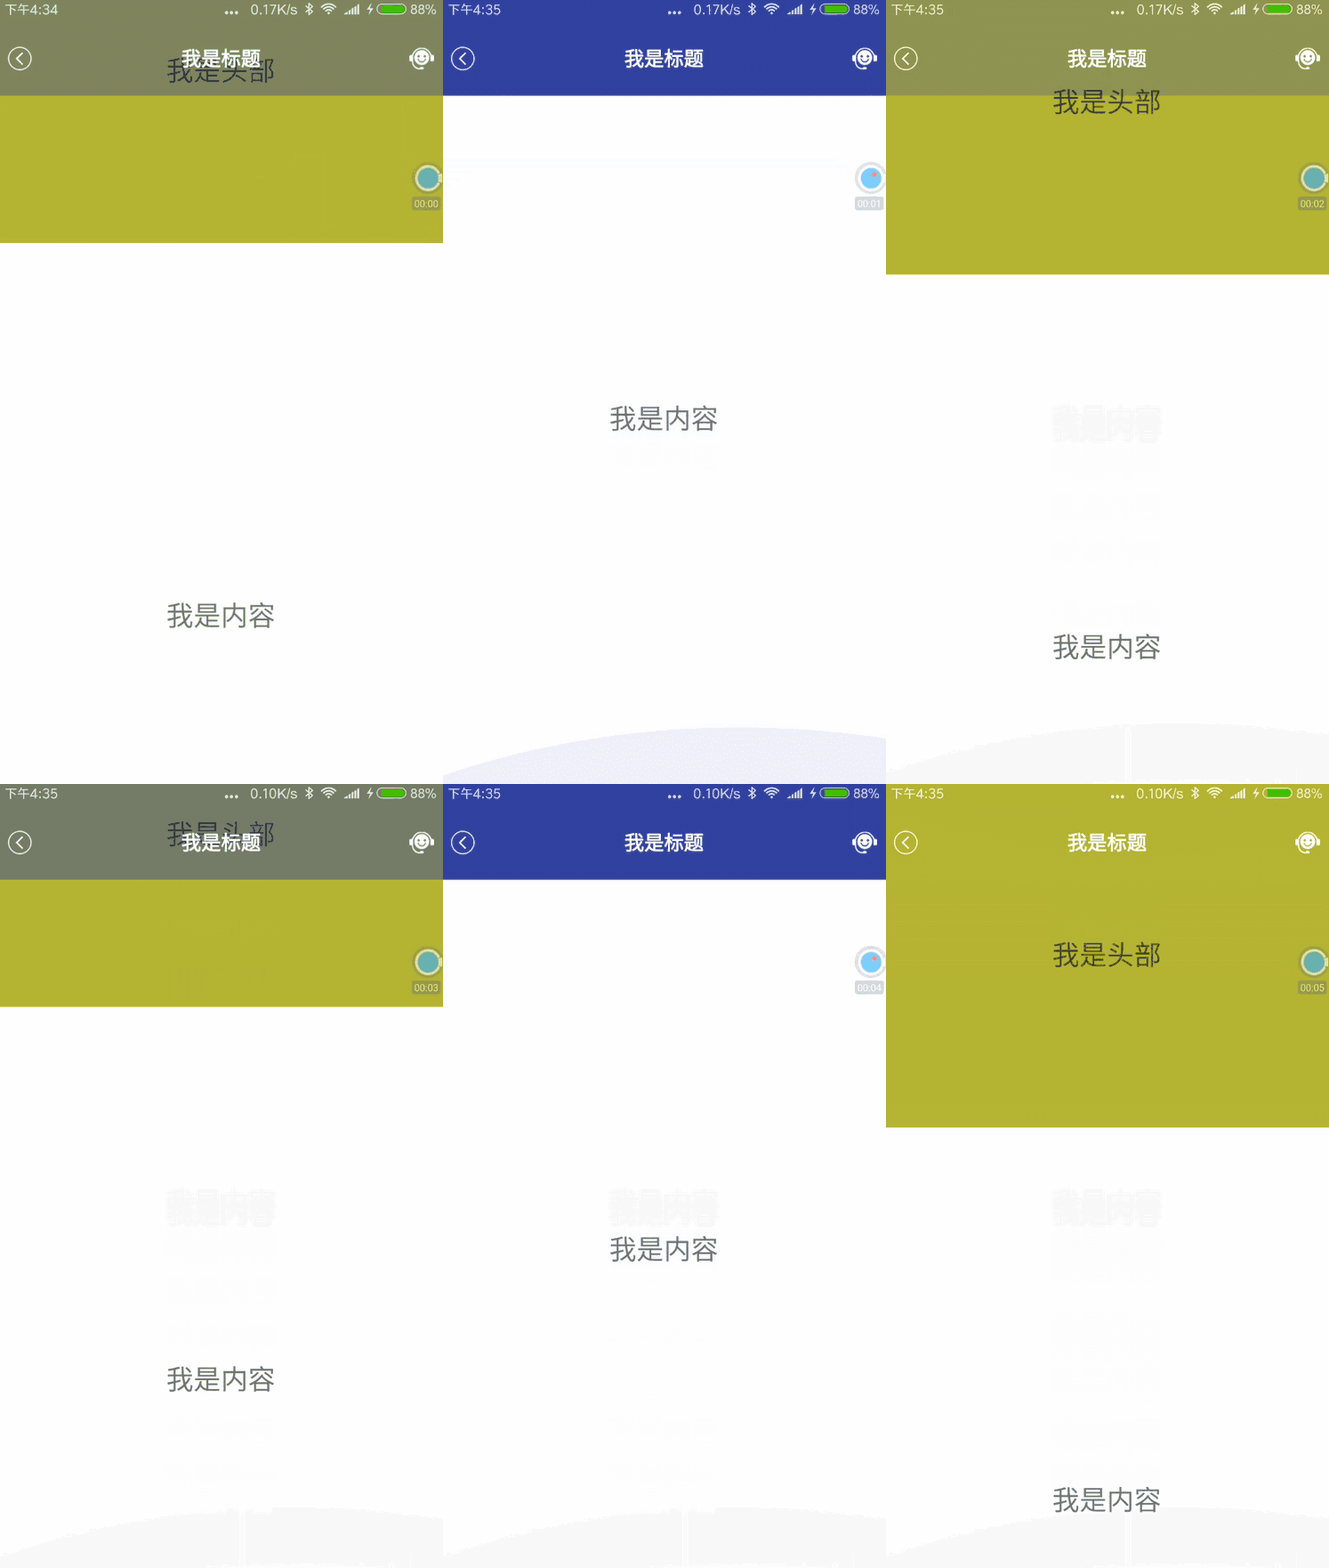
如果单纯看摩拜单车这张效果图,由于背景色重叠的原因,可能看的不是那么的清楚,再看下美团的效果图,其实就可以很明显的发现头部(标题栏+状态栏)其实是没有动的,只是一开始呈透明装,然后随着内容的向上滑动在某个坐标点开始渐变颜色。
基于这样的思考,我们把代码实现拆分3点:
1、整体界面是个ScrollView,并且我们需要对滑动进行监听
2、确定坐标点,在什么时候开始变色,在什么时候停止变色
3、需要将状态栏透明化,并且让我们的内容区域可以扩展到状态栏
好了,理清思路,我们就可以开始干活了!
先看下我们实现的效果:
ObservableScrollView的实现
虽然谷歌官方给ScrollView提供了一个设置滑动监听方法setOnScrollChangeListener,不过这个方法需要基于API23之上(Android6.0系统),在日常开发中,我们需要对老系统用户进行兼容(当前兼容版本为Android4.1系统以上),所以这里我们需要去继承ScrollView并把这个监听事件通过接口的方式对外暴露,这里把这个View取名为ObservableScrollView。
package com.lcw.view;

import android.content.Context;
import android.util.AttributeSet;
import android.widget.ScrollView;

/**
 * 重写ScrollView对外抛出滑动监听数据
 * Create by: chenwei.li
 * Date: 2017/4/18
 * time: 10:09
 * Email: [email protected]
 */
public class ObservableScrollView extends ScrollView {

    /**
     * 回调接口监听事件
     */
    private OnObservableScrollViewListener mOnObservableScrollViewListener;

    public ObservableScrollView(Context context) {
        super(context);
    }

    public ObservableScrollView(Context context, AttributeSet attrs) {
        super(context, attrs);
    }

    public ObservableScrollView(Context context, AttributeSet attrs, int defStyleAttr) {
        super(context, attrs, defStyleAttr);
    }


    /**
     * 添加回调接口,便于把滑动事件的数据向外抛
     */
    public interface OnObservableScrollViewListener {
        void onObservableScrollViewListener(int l, int t, int oldl, int oldt);
    }

    /**
     * 注册回调接口监听事件
     *
     * @param onObservableScrollViewListener
     */
    public void setOnObservableScrollViewListener(OnObservableScrollViewListener onObservableScrollViewListener) {
        this.mOnObservableScrollViewListener = onObservableScrollViewListener;
    }

    /**
     * This is called in response to an internal scroll in this view (i.e., the
     * view scrolled its own contents). This is typically as a result of
     * {@link #scrollBy(int, int)} or {@link #scrollTo(int, int)} having been
     * called.
     *
     * @param l Current horizontal scroll origin. 当前滑动的x轴距离
     * @param t Current vertical scroll origin. 当前滑动的y轴距离
     * @param oldl Previous horizontal scroll origin. 上一次滑动的x轴距离
     * @param oldt Previous vertical scroll origin. 上一次滑动的y轴距离
     */
    @Override
    protected void onScrollChanged(int l, int t, int oldl, int oldt) {
        super.onScrollChanged(l, t, oldl, oldt);
        if (mOnObservableScrollViewListener != null) {
            //将监听到的数据向外抛
            mOnObservableScrollViewListener.onObservableScrollViewListener(l, t, oldl, oldt);
        }
    }
}
开始变色的坐标点
首先我们需要先了解Android系统的坐标轴,这里不像我们以前学数学的坐标轴一样,在中心建轴,以中心向上和右为正方向,向下和左为负方向。
在Android系统里是以屏幕的左上角为原点(0,0),向右为X正轴,向下为Y正轴。
知道了坐标系,我们再来分解下效果图:
实现代码:
package com.lcw.view;

import android.graphics.Color;
import android.os.Bundle;
import android.support.v7.app.AppCompatActivity;
import android.view.ViewTreeObserver;
import android.widget.LinearLayout;
import android.widget.TextView;

/**
 * 高仿美团APP页面滑动标题栏渐变效果
 * Create by: chenwei.li
 * Date: 2017/4/18
 * Time: 下午10:51
 * Email: [email protected]
 */
public class MainActivity extends AppCompatActivity implements ObservableScrollView.OnObservableScrollViewListener {

    private ObservableScrollView mObservableScrollView;
    private TextView mImageView;
    private LinearLayout mHeaderContent;

    private int mHeight;

    @Override
    protected void onCreate(Bundle savedInstanceState) {
        super.onCreate(savedInstanceState);
        //设置透明状态栏
        StatusbarUtils.enableTranslucentStatusbar(this);
        setContentView(R.layout.activity_main);

        //初始化控件
        mObservableScrollView = (ObservableScrollView) findViewById(R.id.sv_main_content);
        mImageView = (TextView) findViewById(R.id.iv_main_topImg);
        mHeaderContent = (LinearLayout) findViewById(R.id.ll_header_content);

        //获取标题栏高度
        ViewTreeObserver viewTreeObserver = mImageView.getViewTreeObserver();
        viewTreeObserver.addOnGlobalLayoutListener(new ViewTreeObserver.OnGlobalLayoutListener() {
            @Override
            public void onGlobalLayout() {
                mImageView.getViewTreeObserver().removeOnGlobalLayoutListener(this);
                mHeight = mImageView.getHeight() - mHeaderContent.getHeight();//这里取的高度应该为图片的高度-标题栏
                //注册滑动监听
                mObservableScrollView.setOnObservableScrollViewListener(MainActivity.this);
            }
        });
    }


    /**
     * 获取ObservableScrollView的滑动数据
     *
     * @param l
     * @param t
     * @param oldl
     * @param oldt
     */
    @Override
    public void onObservableScrollViewListener(int l, int t, int oldl, int oldt) {
        if (t <= 0) {
            //顶部图处于最顶部,标题栏透明
            mHeaderContent.setBackgroundColor(Color.argb(0, 48, 63, 159));
        } else if (t > 0 && t < mHeight) {
            //滑动过程中,渐变
            float scale = (float) t / mHeight;//算出滑动距离比例
            float alpha = (255 * scale);//得到透明度
            mHeaderContent.setBackgroundColor(Color.argb((int) alpha, 48, 63, 159));
        } else {
            //过顶部图区域,标题栏定色
            mHeaderContent.setBackgroundColor(Color.argb(255, 48, 63, 159));
        }
    }

}
透明状态栏的实现
关于透明状态栏这个东西,国内很多人把它叫成沉浸式状态栏,有人认同有人反对,因为谷歌官方对这个没有具体的定义,所以这里我就不发表看法了,反正我们就是要让状态栏变成透明,然后内容区域可以扩展到状态栏,这样就可以了。
1、首先我们需要对app的风格进行设置:
<style name="AppTheme" parent="Theme.AppCompat.Light.DarkActionBar">
        <!-- Customize your theme here. -->
        <item name="colorPrimary">@color/colorPrimary</item>
        <item name="colorPrimaryDark">@color/colorPrimaryDark</item>
        <item name="colorAccent">@color/colorAccent</item>
        <item name="android:windowActionBar">false</item>
        <item name="windowActionBar">false</item>
        <item name="windowNoTitle">true</item>
</style>android:windowTranslucentStatus,不过现在国产手机满天飞的ROM真是无奈,有些奇葩的机型是没办法识别的,所以这里为了更好的兼容,我们可以在代码里面去实现。首先,我们需要判断当前的手机系统版本,4.4以上和5.0以上的处理方法是有区别的,具体实现代码:
package com.lcw.view;

import android.app.Activity;
import android.graphics.Color;
import android.os.Build;
import android.view.View;
import android.view.Window;
import android.view.WindowManager;

/**
 * 设置系统状态栏和导航栏透明化
 * Create by: chenwei.li
 * Date: 2017/4/18
 * Time: 下午11:01
 * Email: [email protected]
 */

public class StatusbarUtils {
    /**
     * 启用 透明状态栏
     *
     * @param activity
     */
    public static void enableTranslucentStatusbar(Activity activity) {


        if (Build.VERSION.SDK_INT >= Build.VERSION_CODES.KITKAT) {
            Window window = activity.getWindow();
            window.addFlags(WindowManager.LayoutParams.FLAG_TRANSLUCENT_STATUS);
            window.addFlags(WindowManager.LayoutParams.FLAG_TRANSLUCENT_NAVIGATION);
        }

        if (Build.VERSION.SDK_INT >= Build.VERSION_CODES.LOLLIPOP) {
            Window window = activity.getWindow();
            window.clearFlags(WindowManager.LayoutParams.FLAG_TRANSLUCENT_STATUS
                    | WindowManager.LayoutParams.FLAG_TRANSLUCENT_NAVIGATION);
            window.getDecorView().setSystemUiVisibility(View.SYSTEM_UI_FLAG_LAYOUT_FULLSCREEN
                    | View.SYSTEM_UI_FLAG_LAYOUT_HIDE_NAVIGATION
                    | View.SYSTEM_UI_FLAG_LAYOUT_STABLE);
            window.addFlags(WindowManager.LayoutParams.FLAG_DRAWS_SYSTEM_BAR_BACKGROUNDS);
            window.setStatusBarColor(Color.TRANSPARENT);
            window.setNavigationBarColor(Color.TRANSPARENT);
        }
    }
}关于上面的属性设置,从字面上大家应该也能看得懂,如果有不清楚的,可以查下谷歌方法提供的API:WindowManager.LayoutParams
在4.4以上及5.0以下的系统状态栏会成半透明状,在5.0及以上的系统可以实现完全透明。
如果此时你运行了代码你会发现,虽然状态栏透明化了,但是我们的布局内容并没有扩展到状态栏中,这里需要而外的提到一个属性fitsSystemWindows它是在Android4.4系统以后引入的,当你的内容需要显示在系统作用域中时(比如顶部状态栏,底部导航栏等),此时你需要在相关的第一个View属性中添加该属性,并设置属性值为true,它会按照View的排列顺序进行深度优先的作用在View上。
3、实现了以上的操作后,我们基本上已经成功了,此时你会发现你的标题栏已经可以扩展到透明的系统状态栏了,不过此时你会发现,状态栏离你的标题栏太靠近了,如果你想实现和上面效果图一样的效果,只需要在你的标题栏添加一个paddingTop值就可以,一般系统是25dp,当然如果你采用代码动态获取的方式也是可以的,这样可以做好更好的适配,毕竟国内各大厂商都有自己的一套标准。
具体实现代码:
activity_mian.xml
<?xml version="1.0" encoding="utf-8"?>
<RelativeLayout xmlns:android="http://schemas.android.com/apk/res/android"
    xmlns:tools="http://schemas.android.com/tools"
    android:layout_width="match_parent"
    android:layout_height="match_parent">


    <com.lcw.view.ObservableScrollView
        android:id="@+id/sv_main_content"
        android:layout_width="match_parent"
        android:layout_height="match_parent"
        android:layout_alignParentLeft="true"
        android:layout_alignParentStart="true"
        android:layout_alignParentTop="true"
        android:scrollbars="none">

        <LinearLayout
            android:layout_width="match_parent"
            android:layout_height="match_parent"
            android:orientation="vertical">

            <TextView
                android:id="@+id/tv_main_topContent"
                android:layout_width="match_parent"
                android:layout_height="280dp"
                android:background="#b5b433"
                android:gravity="center"
                android:src="@mipmap/ic_launcher"
                android:text="我是头部"
                android:textSize="22sp" />

            <TextView
                android:layout_width="match_parent"
                android:layout_height="600dp"
                android:background="#ffffff"
                android:gravity="center"
                android:src="@mipmap/ic_launcher"
                android:text="我是内容"
                android:textSize="22sp" />

        </LinearLayout>
    </com.lcw.view.ObservableScrollView>


    <include layout="@layout/include_header_itl" />

</RelativeLayout><?xml version="1.0" encoding="utf-8"?>
<LinearLayout xmlns:android="http://schemas.android.com/apk/res/android"
android:id="@+id/ll_header_content"
android:layout_width="match_parent"
android:layout_height="wrap_content"
android:background="#00000000"
android:fitsSystemWindows="true"
android:orientation="vertical">
<RelativeLayout
android:layout_width="match_parent"
android:layout_height="80dp"
android:orientation="horizontal"
android:paddingTop="25dp">
<ImageView
android:id="@+id/iv_header_left"
android:layout_width="40dp"
android:layout_height="match_parent"
android:paddingLeft="8dp"
android:paddingRight="12dp"
android:src="@mipmap/icon_header_back" />
<TextView
android:id="@+id/tv_header_title"
android:layout_width="wrap_content"
android:layout_height="match_parent"
android:layout_centerHorizontal="true"
android:ellipsize="end"
android:gravity="center"
android:maxLines="2"
android:text="我是标题"
android:textColor="#ffffff"
android:textSize="16sp"
android:textStyle="bold" />
<ImageView
android:id="@+id/iv_header_img"
android:layout_width="40dp"
android:layout_height="match_parent"
android:layout_alignParentRight="true"
android:layout_gravity="center"
android:paddingLeft="12dp"
android:paddingRight="8dp"
android:src="@mipmap/icon_header_kefu" />
</RelativeLayout>
</LinearLayout>


