事务是数据库中非常重要的概念,在编写博客的时候反复提到,但是由于博主能力有限,感谢自己事务的理解还比较浅,所以迟迟没有更新一篇关于数据库事务概念性相关的博客。为了写好此篇Spring的事务管理博客,特意写了一篇事务概念区分的博客 数据库事务概念理解(通俗易懂,东半球最详细~),有兴趣的可以去看看。
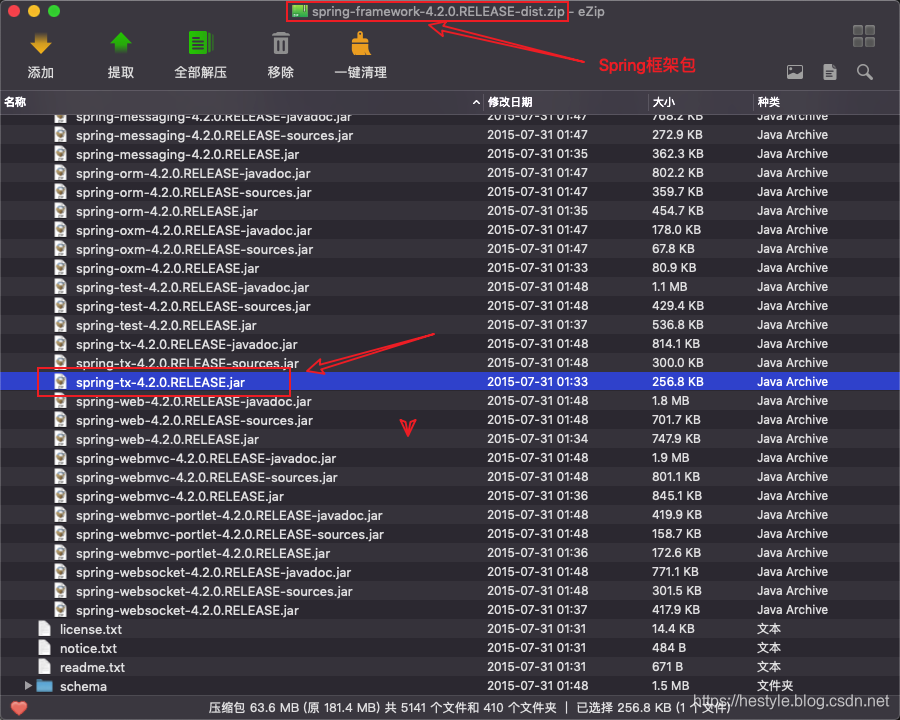
Spring框架的事务主要由spring-tx.RELEASE.jar提供,下面将由此展开介绍并结合一个转账的Demo进行配置演示。
一、Spring框架事务管理
1、Spring框架的事务支持包spring-tx.RELEASE.jar
此包在Spring框架包中,

2、Jar包中的三个顶级接口
①PlatformTransactionManager接口
平台事务管理器,spring要管理事务,必须使用事务管理器,进行事务配置时。

②、TransactionDefinition接口
事务详情(事务定义、事务属性),spring用于确定事务具体详情,
例如:隔离级别、是否只读(设置事务只可读数据不可修改)、超时时间等
进行事务配置时,必须配置详情。spring将配置项封装到该对象实例。

:传播行为,在两个业务之间如何共享事务
| 传播行为 | 两个业务之间如何共享事务 |
|---|---|
| PROPAGATION_REQUIRED required , 必须 【默认值】 | 支持当前事务,A如果有事务,B将使用该事务。如果A没有事务,B将创建一个新的事务。 |
| PROPAGATION_SUPPORTS supports ,支持 | 支持当前事务,A如果有事务,B将使用该事务。如果A没有事务,B将以非事务执行。 |
| PROPAGATION_MANDATORY mandatory ,强制 | 支持当前事务,A如果有事务,B将使用该事务。如果A没有事务,B将抛异常 |
| PROPAGATION_REQUIRES_NEW requires_new ,必须新的 | 如果A有事务,将A的事务挂起,B创建一个新的事务 如果A没有事务,B创建一个新的事务 |
| PROPAGATION_NOT_SUPPORTED not_supported ,不支持 | 如果A有事务,将A的事务挂起,B将以非事务执行 如果A没有事务,B将以非事务执行 |
| PROPAGATION_NEVER never,从不 | 如果A有事务,B将抛异常 如果A没有事务,B将以非事务执行 |
| PROPAGATION_NESTED nested ,嵌套 | A和B底层采用保存点机制,形成嵌套事务。 |
通常PROPAGATION_REQUIRED、PROPAGATION_REQUIRES_NEW、PROPAGATION_NESTED使用较多。
③、TransactionStatus接口
事务状态,spring用于记录当前事务运行状态。例如:是否有保存点,事务是否完成。
spring底层根据状态进行相应操作。
:假设事务α包含ABCD四个子过程,并且执行到D子过程时发生异常,按照常理我们需要回滚到事务α未开始执行的状态。但是现在需求发生变化,我们可以在BC子过程中定义一个保存点,发生异常时,并且AB子过程已经正常执行完成,我们可以保存AB子过程,而CD子过程进行回滚,这就称为保存点回滚。

3、PlatformTransactionManager接口实现
先导入spring-jdbc.RELEASE.jar、spring-ormRELEASE.jar两个jar包,在spring框架包中。


二、银行转账Demo
1、项目搭建
①、创建数据库
#创建数据库spring_project_03
create database spring_project_03;
#选中数据库spring_project_03
use spring_project_03;
#创建账户表account
create table account(
	#主键,自动增长标识
    id int primary key auto_increment,
    username varchar(20),
	#账户余额
    money double
);
#插入两条测试数据
insert into account(username,money) values('张三',10000),('李四',10000);


②、创建一个普通java项目、导入jar包


导入jar包


③、Account模型
package cn.hestyle.model;

/**
 * @program: Spring Project 03->Account
 * @description: Account账户模型
 * @author: hestyle
 * @create: 2019-12-04 15:27
 **/
public class Account {
    private Integer id;
    private String username;
    private Double money;

    public Account() {
    }

    public Account(String username, Double money) {
        this.username = username;
        this.money = money;
    }

    public Integer getId() {
        return id;
    }

    public void setId(Integer id) {
        this.id = id;
    }

    public String getUsername() {
        return username;
    }

    public void setUsername(String username) {
        this.username = username;
    }

    public Double getMoney() {
        return money;
    }

    public void setMoney(Double money) {
        this.money = money;
    }

    @Override
    public String toString() {
        return "Account{" +
                "id=" + id +
                ", username='" + username + '\'' +
                ", money=" + money +
                '}';
    }
}
④、Dao层编写
AccountDao接口
package cn.hestyle.dao;

public interface AccountDao {
    /**
     * 账户转出
     * @param outerName 账户名(本应该是id)
     * @param money 转出金额大小
     */
    public void out(String outerName, Double money);

    /**
     * 账户转入
     * @param inName 账户名(本应该是id)
     * @param money 转入金额大小
     */
    public void in(String inName, Double money);
}
AccountDaoImpl实现类
package cn.hestyle.dao.impl;

import cn.hestyle.dao.AccountDao;
import org.springframework.jdbc.core.JdbcTemplate;

/**
 * @program: Spring Project 03->AccountDaoImpl
 * @description: AccountDao实现类
 * @author: hestyle
 * @create: 2019-12-04 15:32
 **/
public class AccountDaoImpl implements AccountDao {
    /**
     * jdbcTemplate对象(通过spring注入)
     */
    private JdbcTemplate jdbcTemplate;

    public void setJdbcTemplate(JdbcTemplate jdbcTemplate) {
        this.jdbcTemplate = jdbcTemplate;
    }

    @Override
    public void out(String outerName, Double money) {
        String sql = "UPDATE account SET money = money - ? WHERE username = ?";
        jdbcTemplate.update(sql, money, outerName);
    }

    @Override
    public void in(String inName, Double money) {
        String sql = "UPDATE account SET money = money + ? WHERE username = ?";
        jdbcTemplate.update(sql, money, inName);
    }
}
⑤、Service层编写
AccountService接口
package cn.hestyle.service;

public interface AccountService {
    /**
     * outerName转给inName,金额为money
     * @param outerName 转出者
     * @param inName 转入者
     * @param money 金额大小
     */
    public void transfer(String outerName, String inName, Double money);
}
AccountServiceImpl实现类
package cn.hestyle.service.impl;

import cn.hestyle.dao.AccountDao;
import cn.hestyle.service.AccountService;

/**
 * @program: Spring Project 03->AccountServiceImpl
 * @description: AccountService实现类
 * @author: hestyle
 * @create: 2019-12-04 15:40
 **/
public class AccountServiceImpl implements AccountService {
    /**
     * 通过spring-bean依赖注入(其实也可以使用注解)
     */
    private AccountDao accountDao;

    public void setAccountDao(AccountDao accountDao) {
        this.accountDao = accountDao;
    }

    @Override
    public void transfer(String outerName, String inName, Double money) {
        //分转出、转入两个子过程,但是不手动开启事务,使用Spring+AOP进行事务管理
        accountDao.out(outerName, money);
        accountDao.in(inName, money);
    }
}
⑥、配置Spring
配置c3p0数据源->dao -> service
在src根目录下新建文件dp.properties

#如果你的MySQL驱动是5.x的版本,需要去掉cj子路径
driverClassName=com.mysql.cj.jdbc.Driver
url=jdbc:mysql://localhost:3306/spring_project_03
#mysql数据库账号,自行修改
username=root
password=123456
在src根目录下新建文件beans-1.xml

<?xml version="1.0" encoding="UTF-8"?>
<beans xmlns="http://www.springframework.org/schema/beans"
       xmlns:context="http://www.springframework.org/schema/context"
       xmlns:xsi="http://www.w3.org/2001/XMLSchema-instance"
       xsi:schemaLocation="http://www.springframework.org/schema/beans
                           http://www.springframework.org/schema/beans/spring-beans.xsd
                           http://www.springframework.org/schema/context
                           http://www.springframework.org/schema/context/spring-context.xsd">

    <!-- dp.properties位置信息配置 -->
    <context:property-placeholder location="classpath*:dp.properties"/>

    <!-- 声明C3P0数据库连接池的数据源 -->
    <bean id="dataSource" class="com.mchange.v2.c3p0.ComboPooledDataSource">
        <property name="driverClass" value="${driverClassName}"/>
        <property name="jdbcUrl" value="${url}"/>
        <property name="user" value="${username}"/>
        <property name="password" value="${password}"/>
    </bean>

    <!-- 声明使用C3P0数据库连接池数据源的jdbcTemplate -->
    <bean id="jdbcTemplate" class="org.springframework.jdbc.core.JdbcTemplate">
        <property name="dataSource" ref="dataSource"/>
    </bean>
    <!-- 申明使用jdbcTemplate的accountDao -->
    <bean id="accountDao" class="cn.hestyle.dao.impl.AccountDaoImpl">
        <property name="jdbcTemplate" ref="jdbcTemplate"/>
    </bean>
    <!-- 申明使用accountDao的accountService -->
    <bean id="accountService" class="cn.hestyle.service.impl.AccountServiceImpl">
        <property name="accountDao" ref="accountDao"/>
    </bean>
</beans>
⑦、测试配置
package cn.hestyle.test;

import cn.hestyle.service.AccountService;
import org.springframework.context.ApplicationContext;
import org.springframework.context.support.ClassPathXmlApplicationContext;

/**
 * @program: Spring Project 03->Test01
 * @description: 测试配置
 * @author: hestyle
 * @create: 2019-12-04 15:58
 **/
public class Test01 {
    public static void main(String[] args) {
        ApplicationContext context = new ClassPathXmlApplicationContext("beans-1.xml");
        AccountService accountService = (AccountService) context.getBean("accountService");
        //张三转给李四100.0元
        accountService.transfer("张三", "李四", 100.0);
    }
}
执行后,数据库account表:

三、配置Spring事务管理的方式
1、手动配置事务管理(少用)
使用TransactionTemplate进行事务管理。
1.service 需要获得 TransactionTemplate
2.spring 配置模板,并注入给service
3.模板需要注入事务管理器
4.配置事务管理器:DataSourceTransactionManager ,需要注入DataSource
①、在service层增加实现类AccountServiceImpl2

package cn.hestyle.service.impl;

import cn.hestyle.dao.AccountDao;
import cn.hestyle.service.AccountService;
import org.springframework.transaction.TransactionStatus;
import org.springframework.transaction.support.TransactionCallbackWithoutResult;
import org.springframework.transaction.support.TransactionTemplate;

/**
 * @program: Spring Project 03->AccountServiceImpl
 * @description: AccountService实现类
 * @author: hestyle
 * @create: 2019-12-04 15:40
 **/
public class AccountServiceImpl2 implements AccountService {
    /**
     * 通过spring-bean依赖注入(其实也可以使用注解)
     */
    private AccountDao accountDao;
    /**
     * 事务管理,通过spring-bean依赖注入(其实也可以使用注解)
     */
    private TransactionTemplate transactionTemplate;

    public void setAccountDao(AccountDao accountDao) {
        this.accountDao = accountDao;
    }

    public void setTransactionTemplate(TransactionTemplate transactionTemplate) {
        this.transactionTemplate = transactionTemplate;
    }

    @Override
    public void transfer(String outerName, String inName, Double money) {
        //将转账的两个过程包裹在transactionTemplate.execute方法中(开始事务)
        transactionTemplate.execute(new TransactionCallbackWithoutResult() {
            @Override
            protected void doInTransactionWithoutResult(TransactionStatus transactionStatus) {
                //分转出、转入两个子过程
                accountDao.out(outerName, money);
                accountDao.in(inName, money);
            }
        });
    }
}
②、在src根目录下新增配置文件beans-2.xml

<?xml version="1.0" encoding="UTF-8"?>
<beans xmlns="http://www.springframework.org/schema/beans"
       xmlns:context="http://www.springframework.org/schema/context"
       xmlns:xsi="http://www.w3.org/2001/XMLSchema-instance"
       xsi:schemaLocation="http://www.springframework.org/schema/beans
                           http://www.springframework.org/schema/beans/spring-beans.xsd
                           http://www.springframework.org/schema/context
                           http://www.springframework.org/schema/context/spring-context.xsd">

    <!-- dp.properties位置信息配置 -->
    <context:property-placeholder location="classpath*:dp.properties"/>

    <!-- 声明C3P0数据库连接池的数据源 -->
    <bean id="dataSource" class="com.mchange.v2.c3p0.ComboPooledDataSource">
        <property name="driverClass" value="${driverClassName}"/>
        <property name="jdbcUrl" value="${url}"/>
        <property name="user" value="${username}"/>
        <property name="password" value="${password}"/>
    </bean>

    <!-- 声明使用C3P0数据库连接池数据源的jdbcTemplate -->
    <bean id="jdbcTemplate" class="org.springframework.jdbc.core.JdbcTemplate">
        <property name="dataSource" ref="dataSource"/>
    </bean>
    <!-- 申明使用jdbcTemplate的accountDao -->
    <bean id="accountDao" class="cn.hestyle.dao.impl.AccountDaoImpl">
        <property name="jdbcTemplate" ref="jdbcTemplate"/>
    </bean>

    <!-- 1、申明事务管理器 -->
    <bean id="dataSourceTransactionManager" class="org.springframework.jdbc.datasource.DataSourceTransactionManager">
        <property name="dataSource" ref="dataSource"/>
    </bean>
    <!-- 2、申明transactionTemplate -->
    <bean id="transactionTemplate" class="org.springframework.transaction.support.TransactionTemplate">
        <property name="transactionManager" ref="dataSourceTransactionManager"/>
    </bean>
    <!-- 3、申明使用accountDao的accountService,注意是AccountServiceImpl2实现类 -->
    <bean id="accountService" class="cn.hestyle.service.impl.AccountServiceImpl2">
        <!-- 依赖注入accountDao属性(AccountServiceImpl2需要提供属性的setter方法) -->
        <property name="accountDao" ref="accountDao"/>
        <!-- 依赖注入transactionTemplate属性(AccountServiceImpl2需要提供属性的setter方法) -->
        <property name="transactionTemplate" ref="transactionTemplate"/>
    </bean>
</beans>
③、编写测试类
package cn.hestyle.test;

import cn.hestyle.service.AccountService;
import org.springframework.context.ApplicationContext;
import org.springframework.context.support.ClassPathXmlApplicationContext;

/**
 * @program: Spring Project 03->Test01
 * @description: 测试手动配置事务管理
 * @author: hestyle
 * @create: 2019-12-04 15:58
 **/
public class Test02 {
    public static void main(String[] args) {
        //注意此时beans-2.xml配置文件
        ApplicationContext context = new ClassPathXmlApplicationContext("beans-2.xml");
        AccountService accountService = (AccountService) context.getBean("accountService");
        //张三转给李四100.0元
        accountService.transfer("张三", "李四", 100.0);
    }
}

④、修改AccountServiceImpl2.transfer方法

再次执行Test02测试类


2、工厂bean生成代理:半自动(少用)
使用TransactionProxyFactoryBean进行事务管理。
①、在src根目录下新建配置文件beans-3.xml
<?xml version="1.0" encoding="UTF-8"?>
<beans xmlns="http://www.springframework.org/schema/beans"
       xmlns:context="http://www.springframework.org/schema/context"
       xmlns:aop="http://www.springframework.org/schema/aop"
       xmlns:xsi="http://www.w3.org/2001/XMLSchema-instance"
       xsi:schemaLocation="http://www.springframework.org/schema/beans
                           http://www.springframework.org/schema/beans/spring-beans.xsd
                           http://www.springframework.org/schema/context
                           http://www.springframework.org/schema/context/spring-context.xsd
                           http://www.springframework.org/schema/aop
                           http://www.springframework.org/schema/aop/spring-aop.xsd">

    <!-- dp.properties位置信息配置 -->
    <context:property-placeholder location="classpath*:dp.properties"/>

    <!-- 声明C3P0数据库连接池的数据源 -->
    <bean id="dataSource" class="com.mchange.v2.c3p0.ComboPooledDataSource">
        <property name="driverClass" value="${driverClassName}"/>
        <property name="jdbcUrl" value="${url}"/>
        <property name="user" value="${username}"/>
        <property name="password" value="${password}"/>
    </bean>

    <!-- 声明使用C3P0数据库连接池数据源的jdbcTemplate -->
    <bean id="jdbcTemplate" class="org.springframework.jdbc.core.JdbcTemplate">
        <property name="dataSource" ref="dataSource"/>
    </bean>
    <!-- 申明使用jdbcTemplate的accountDao -->
    <bean id="accountDao" class="cn.hestyle.dao.impl.AccountDaoImpl">
        <!-- 依赖注入 -->
        <property name="jdbcTemplate" ref="jdbcTemplate"/>
    </bean>
    <!-- 申明使用accountDao的accountService(注意是AccountServiceImpl类) -->
    <bean id="accountService" class="cn.hestyle.service.impl.AccountServiceImpl">
        <!-- 依赖注入 -->
        <property name="accountDao" ref="accountDao"/>
    </bean>

    <!-- 申明事务管理器 -->
    <bean id="dataSourceTransactionManager" class="org.springframework.jdbc.datasource.DataSourceTransactionManager">
        <property name="dataSource" ref="dataSource"/>
    </bean>
    <!-- 配置代理对象 -->
    <bean id="proxyAccountService" class="org.springframework.transaction.interceptor.TransactionProxyFactoryBean">
        <!-- 被代理的类的接口,AccountService -->
        <property name="proxyInterfaces" value="cn.hestyle.service.AccountService"/>
        <!-- 被代理的类,引用AccountServiceImpl -->
        <property name="target" ref="accountService"/>
        <property name="transactionManager" ref="dataSourceTransactionManager"/>
        <!--
            transactionAttributes:事务详情
            prop.key :确定哪些方法使用当前事务配置
                prop.text:用于配置事务详情
                格式:PROPAGATION,ISOLATION,readOnly,-Exception,+Exception
                传播行为		 隔离级别	      是否只读	异常回滚	      异常提交
        -->
        <property name="transactionAttributes">
            <props>
                <prop key="transfer">PROPAGATION_REQUIRED,ISOLATION_DEFAULT</prop>
            </props>
        </property>
    </bean>
</beans>
②、编写测试类Test03
package cn.hestyle.test;

import cn.hestyle.service.AccountService;
import org.springframework.context.ApplicationContext;
import org.springframework.context.support.ClassPathXmlApplicationContext;

/**
 * @program: Spring Project 03->Test03
 * @description: 测试工厂bean生成代理:半自动
 * @author: hestyle
 * @create: 2019-12-04 15:58
 **/
public class Test03 {
    public static void main(String[] args) {
        //注意此时beans-3.xml配置文件
        ApplicationContext context = new ClassPathXmlApplicationContext("beans-3.xml");
        //获取代理后的对象
        AccountService accountService = (AccountService) context.getBean("proxyAccountService");
        //张三转给李四100.0元
        accountService.transfer("张三", "李四", 100.0);
    }
}
执行测试类后,数据库中发生转账

③、修改AccountServiceImpl.transfer方法

再次执行Test03


3、基于AOP的事务配置(常用)
把事务当做通知/增强,通过AOP面向切面编程,插入到需要开启事务的方法中。
①、在src根目录下增加配置文件beans-4.xml
<?xml version="1.0" encoding="UTF-8"?>
<beans xmlns="http://www.springframework.org/schema/beans"
       xmlns:context="http://www.springframework.org/schema/context"
       xmlns:aop="http://www.springframework.org/schema/aop"
       xmlns:tx="http://www.springframework.org/schema/tx"
       xmlns:xsi="http://www.w3.org/2001/XMLSchema-instance"
       xsi:schemaLocation="http://www.springframework.org/schema/beans
                           http://www.springframework.org/schema/beans/spring-beans.xsd
                           http://www.springframework.org/schema/context
                           http://www.springframework.org/schema/context/spring-context.xsd
                           http://www.springframework.org/schema/aop
                           http://www.springframework.org/schema/aop/spring-aop.xsd
                           http://www.springframework.org/schema/tx
                           http://www.springframework.org/schema/tx/spring-tx.xsd">

    <!-- dp.properties位置信息配置 -->
    <context:property-placeholder location="classpath*:dp.properties"/>

    <!-- 声明C3P0数据库连接池的数据源 -->
    <bean id="dataSource" class="com.mchange.v2.c3p0.ComboPooledDataSource">
        <property name="driverClass" value="${driverClassName}"/>
        <property name="jdbcUrl" value="${url}"/>
        <property name="user" value="${username}"/>
        <property name="password" value="${password}"/>
    </bean>

    <!-- 声明使用C3P0数据库连接池数据源的jdbcTemplate -->
    <bean id="jdbcTemplate" class="org.springframework.jdbc.core.JdbcTemplate">
        <property name="dataSource" ref="dataSource"/>
    </bean>
    <!-- 申明使用jdbcTemplate的accountDao -->
    <bean id="accountDao" class="cn.hestyle.dao.impl.AccountDaoImpl">
        <!-- 依赖注入 -->
        <property name="jdbcTemplate" ref="jdbcTemplate"/>
    </bean>
    <!-- 申明使用accountDao的accountService(注意是AccountServiceImpl类) -->
    <bean id="accountService" class="cn.hestyle.service.impl.AccountServiceImpl">
        <!-- 依赖注入 -->
        <property name="accountDao" ref="accountDao"/>
    </bean>

    <!-- 1、申明事务管理器 -->
    <bean id="dataSourceTransactionManager" class="org.springframework.jdbc.datasource.DataSourceTransactionManager">
        <property name="dataSource" ref="dataSource"/>
    </bean>
    <!-- 2、申明事务通知 -->
    <tx:advice id="txAdvice" transaction-manager="dataSourceTransactionManager">
        <tx:attributes>
            <!--
                配置需要通知/增强的方法
                默认propagation是REQUIRED,isolation是DEFAULT,可不写
            -->
            <tx:method name="transfer" propagation="REQUIRED" isolation="DEFAULT"/>
        </tx:attributes>
    </tx:advice>
    <!-- 3、配置aop -->
    <aop:config>
        <aop:pointcut id="myPointCut" expression="execution(* cn.hestyle.service..*(..))"/>
        <aop:advisor advice-ref="txAdvice" pointcut-ref="myPointCut"/>
    </aop:config>
</beans>
②、编写测试类Test04
package cn.hestyle.test;

import cn.hestyle.service.AccountService;
import org.springframework.context.ApplicationContext;
import org.springframework.context.support.ClassPathXmlApplicationContext;

/**
 * @program: Spring Project 03->Test04
 * @description: 测试基于AOP的事务配置
 * @author: hestyle
 * @create: 2019-12-04 15:58
 **/
public class Test04 {
    public static void main(String[] args) {
        //注意此时beans-4.xml配置文件
        ApplicationContext context = new ClassPathXmlApplicationContext("beans-4.xml");
        AccountService accountService = (AccountService) context.getBean("accountService");
        //张三转给李四100.0元
        accountService.transfer("张三", "李四", 100.0);
    }
}
执行测试类,控制台报错,因为AccountServiceImpl.transfer有除零异常


③去掉AccountServiceImpl.transfer除零异常

再次执行测试类Test04

4、基于AOP的事务配置注解方法(常用、简便)
①、在src根目录下新建配置文件beans-5.xml
<?xml version="1.0" encoding="UTF-8"?>
<beans xmlns="http://www.springframework.org/schema/beans"
       xmlns:context="http://www.springframework.org/schema/context"
       xmlns:aop="http://www.springframework.org/schema/aop"
       xmlns:tx="http://www.springframework.org/schema/tx"
       xmlns:xsi="http://www.w3.org/2001/XMLSchema-instance"
       xsi:schemaLocation="http://www.springframework.org/schema/beans
                           http://www.springframework.org/schema/beans/spring-beans.xsd
                           http://www.springframework.org/schema/context
                           http://www.springframework.org/schema/context/spring-context.xsd
                           http://www.springframework.org/schema/aop
                           http://www.springframework.org/schema/aop/spring-aop.xsd
                           http://www.springframework.org/schema/tx
                           http://www.springframework.org/schema/tx/spring-tx.xsd">

    <!-- dp.properties位置信息配置 -->
    <context:property-placeholder location="classpath*:dp.properties"/>

    <!-- 声明C3P0数据库连接池的数据源 -->
    <bean id="dataSource" class="com.mchange.v2.c3p0.ComboPooledDataSource">
        <property name="driverClass" value="${driverClassName}"/>
        <property name="jdbcUrl" value="${url}"/>
        <property name="user" value="${username}"/>
        <property name="password" value="${password}"/>
    </bean>

    <!-- 声明使用C3P0数据库连接池数据源的jdbcTemplate -->
    <bean id="jdbcTemplate" class="org.springframework.jdbc.core.JdbcTemplate">
        <property name="dataSource" ref="dataSource"/>
    </bean>
    <!-- 申明使用jdbcTemplate的accountDao -->
    <bean id="accountDao" class="cn.hestyle.dao.impl.AccountDaoImpl">
        <!-- 依赖注入 -->
        <property name="jdbcTemplate" ref="jdbcTemplate"/>
    </bean>
    <!-- 申明使用accountDao的accountService(注意是AccountServiceImpl类) -->
    <bean id="accountService" class="cn.hestyle.service.impl.AccountServiceImpl">
        <!-- 依赖注入 -->
        <property name="accountDao" ref="accountDao"/>
    </bean>

    <!-- 申明事务管理器 -->
    <bean id="dataSourceTransactionManager" class="org.springframework.jdbc.datasource.DataSourceTransactionManager">
        <property name="dataSource" ref="dataSource"/>
    </bean>
    <!-- 申明扫描事务tx的注解 -->
    <tx:annotation-driven transaction-manager="dataSourceTransactionManager"/>
</beans>
②、在AccountServiceImpl类增加注解
@Transactional(isolation = Isolation.DEFAULT, propagation = Propagation.REQUIRED)

③、编写测试类Test05
package cn.hestyle.test;

import cn.hestyle.service.AccountService;
import org.springframework.context.ApplicationContext;
import org.springframework.context.support.ClassPathXmlApplicationContext;

/**
 * @program: Spring Project 03->Test04
 * @description: 测试基本AOP的事务配置
 * @author: hestyle
 * @create: 2019-12-04 15:58
 **/
public class Test05 {
    public static void main(String[] args) {
        //注意此时beans-5.xml配置文件
        ApplicationContext context = new ClassPathXmlApplicationContext("beans-5.xml");
        AccountService accountService = (AccountService) context.getBean("accountService");
        //张三转给李四100.0元
        accountService.transfer("张三", "李四", 100.0);
    }
}
执行测试类,数据库发生转账

④、增加AccountServiceImpl.transfer除零异常

再次执行Test05测试类,控制台报错


其实Spring事务管理配置方法常见的只有三种,第一种使用TransactionTemplate,第二种使用TransactionProxyFactoryBean代理,第三种使用AOP面向切面编程,本篇博客已经全部介绍了。
以上就是Spring框架中的事务管理以及常见的配置方法,谢谢阅读。
