SpringBoot
面试20道题目:https://blog.csdn.net/zl1zl2zl3/article/details/83715633
springBoot的源码分析讲解的非常好,感谢!!!https://www.cnblogs.com/hello-shf/p/10976646.html
1、springBoot初始化过程:

AOP:
- 是什么?
AOP 是软件设计领域中的面向切面编程,它是面向对象编程的一种补充和完善 - 解决什么问题?
实际项目中通常会将系统两大部分:核心关注点和非核心关注点
AOP就是要在基于OCP(开闭原则)在不改变原有系统核心业务代码的基础上动态添加一些扩展功能并可以控制对象的执行。允许扩展,不允许修改。 - 实际项目应用场景
AOP 通常应用于日志的处理,事务处理,权限处理,缓存处理等等。 - AOP底层原理实现分析?
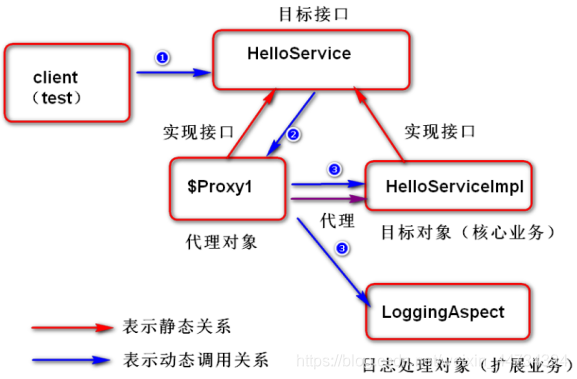
AOP底层基于代理机制实现功能扩展:(了解)
1)假如目标对象(被代理对象)实现接口,则底层默认采用JDK动态代理机制为目标对象创建代理对象(目标类和代理类会实现共同接口)
2)假如目标对象(被代理对象)没有实现接口,则底层默认采用CGLIB代理机制为目标对象创建代理对象(默认创建的代理类会继承目标对象类型)。 - 相关术语
切面(aspect): 横切面对象,一般为一个具体类对象(可以借助@Aspect声明)
连接点(joinpoint):程序执行过程中某个特定的点,一般指被拦截到的的方法
切入点(pointcut):对连接点拦截内容的一种定义,一般可以理解为多个连接点的结合.
通知(Advice):在切面的某个特定连接点上执行的动作(扩展功能),例如around,before,after等
很晦涩难懂,多做例子,做完就会清晰。先可以按白话去理解。 - 实现xml方式
 创建接口:
public interface HelloService {
	 void sayHello(String msg);
}
创建接口实现类:
public class HelloServiceImpl implements HelloService {
	public void sayHello(String msg) {
		//假设这条语句是我们系统中的核心业务
		System.out.println(msg);
	}
}
创建日志处理类:
public class LoggingAspect {
	 public void beforeMethod(){
		 System.out.println("method start");
	 }
	 public void afterMethod(){
		 System.out.println("method end");
	 }
}
配置bean对象:
<?xml version="1.0" encoding="UTF-8"?>
<beans
    default-lazy-init="true"
    xmlns="http://www.springframework.org/schema/beans"
    xmlns:p="http://www.springframework.org/schema/p"
    xmlns:xsi="http://www.w3.org/2001/XMLSchema-instance"
    xmlns:context="http://www.springframework.org/schema/context"
    xmlns:tx="http://www.springframework.org/schema/tx"
    xmlns:aop="http://www.springframework.org/schema/aop"
    xmlns:mvc="http://www.springframework.org/schema/mvc"
    xmlns:util="http://www.springframework.org/schema/util"
    xmlns:jpa="http://www.springframework.org/schema/data/jpa"
    xsi:schemaLocation="
       http://www.springframework.org/schema/beans
       http://www.springframework.org/schema/beans/spring-beans-4.3.xsd
       http://www.springframework.org/schema/mvc
       http://www.springframework.org/schema/mvc/spring-mvc-4.3.xsd
       http://www.springframework.org/schema/tx
       http://www.springframework.org/schema/tx/spring-tx-4.3.xsd
       http://www.springframework.org/schema/aop
       http://www.springframework.org/schema/aop/spring-aop-4.3.xsd
       http://www.springframework.org/schema/util
       http://www.springframework.org/schema/util/spring-util-4.3.xsd
       http://www.springframework.org/schema/data/jpa
       http://www.springframework.org/schema/data/jpa/spring-jpa-1.3.xsd
       http://www.springframework.org/schema/context
       http://www.springframework.org/schema/context/spring-context-4.3.xsd">

    <!-- 核心业务对象 -->
    <bean id="helloService"
          class="spring.beans.HelloServiceImpl"/>
<!-- 配置非核心业务对象(日志处理对象):切面 -->
<bean id="log"
          class="spring.aop.LoggingAspect"/>
    <!-- AOP配置(切入点,切面) -->
    <aop:config>
       <!-- 配置切入点(bean,@annotation,within) -->
       <aop:pointcut
            expression="within(spring.beans.HelloServiceImpl)"
            id="logPointCut"/>
       <!-- 配置日志处理 -->
       <aop:aspect ref="log" >
           <aop:before method="beforeMethod"
<!—-一系列的对impl的功能实现:-->
                       pointcut-ref="logPointCut"/>
           <aop:after  method="afterMethod"
                       pointcut-ref="logPointCut"/>
       </aop:aspect>
    </aop:config>
</beans>
编写测试类:
public class TestAOP01 {

	private ClassPathXmlApplicationContext ctx;
	@Before
	public void init(){
	    ctx=new ClassPathXmlApplicationContext("spring-configs.xml");
	}
	@Test
	public void testSayHello(){
		HelloService helloService=
ctx.getBean("helloService",HelloService.class);
		helloService.sayHello("cgb1712");
	}
	@After
	public void destory(){
		ctx.close();
	}
}
通知类型:
在AOP编程中有五种类型的通知:
1)前置通知 (@Before) 方法执行之前执行
2)返回通知 (@AfterReturning) 方法return之后执行
3)异常通知 (@AfterThrowing) 方法出现异常之后执行
4)后置通知 (@After) : 又称之为最终通知(finally)
5)环绕通知 (@Around) :重点掌握
其结构如下:
Try{
   @Before
   核心业务
   @AfterReturning
}catch(Exception e){
   ….
   @AfterThrowing
}finally{
   ….
   @After
}
如上四个一起使用时可以直接使用@Around通知替换
原理分析:代理方式实现
IOC:
解释
- 是什么?
“控制反转” 它还有一个别名为 DI(Dependency Injection),即依赖注入 - 谁控制谁:在传统的开发模式下,我们都是采用直接 new 一个对象的方式来创建对象,也就是说你依赖的对象直接由你自己控制,但是有了 IOC
容器后,则直接由 IoC 容器来控制。所以“谁控制谁”,当然是 IoC 容器控制对象。 - 控制什么:控制对象。
- 为何是反转:没有 IoC 的时候我们都是在自己对象中主动去创建被依赖的对象,这是正转。但是有了 IoC 后,所依赖的对象直接由 IoC
容器创建后注入到被注入的对象中,依赖的对象由原来的主动获取变成被动接受,所以是反转。 - 哪些方面反转了:所依赖对象的获取被反转了
- 功能有:对象的创建,存储(map),依赖注入、
创建对象的几种方法:怎么创建?
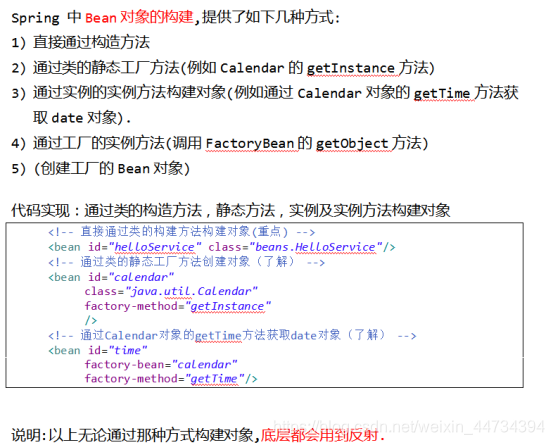
生命周期:
- 单例模式(spring容器创建和销毁 全局的 容器关闭时销毁)数据库连接池是单例模式;多例模式(spring容器不负责销毁)。
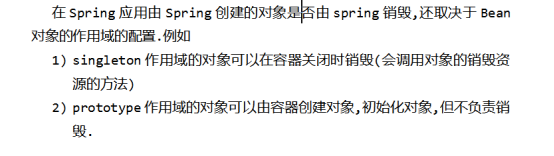
- 何时创建:单例模式加载xml时候 创建bean对象,而且只有一个
- 多例模式时候,加载xml遇到bean则管理起来,每次使用的时候都创建一个新的对象
作用域:
- Singleton:全局唯一性。
- Prototype:每次获取都会创建新的对象。
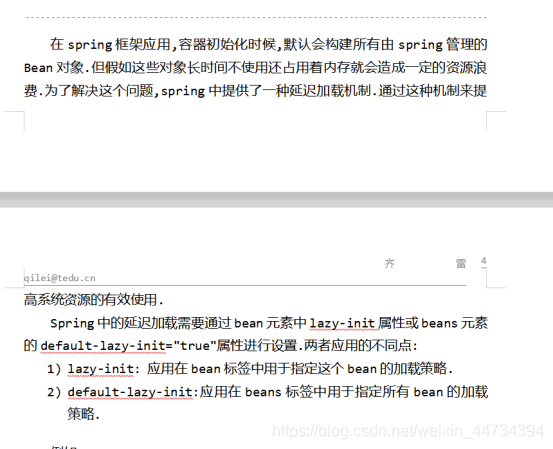
延迟加载策略:
依赖注入方式:
- 构造注入
public class StudentService {

    private StudentDao studentDao;

    public StudentService(StudentDao studentDao) {
        this.studentDao = studentDao;
    }

    public String save(){
       return studentDao.save();
    }

}
<?xml version="1.0" encoding="UTF-8"?>
<beans xmlns="http://www.springframework.org/schema/beans"
       xmlns:xsi="http://www.w3.org/2001/XMLSchema-instance"
       xsi:schemaLocation="http://www.springframework.org/schema/beans http://www.springframework.org/schema/beans/spring-beans.xsd">

    <bean id="studentService" class="StudentService">
            <constructor-arg ref="studentDao"/>
    </bean>
    <bean id="studentDao" class="StudentDao"/>

</beans>
- Set注入
public class StudentService {

    private StudentDao studentDao;

    public void setStudentDao(StudentDao studentDao) {
        this.studentDao = studentDao;
    }

    public String save(){
       return studentDao.save();
    }

}
<?xml version="1.0" encoding="UTF-8"?>
<beans xmlns="http://www.springframework.org/schema/beans"
       xmlns:xsi="http://www.w3.org/2001/XMLSchema-instance"
       xsi:schemaLocation="http://www.springframework.org/schema/beans http://www.springframework.org/schema/beans/spring-beans.xsd">

    <bean id="studentService" class="StudentService">
            <property name="studentDao" ref="studentDao"/>
    </bean>
    <bean id="studentDao" class="StudentDao"/>
</beans>
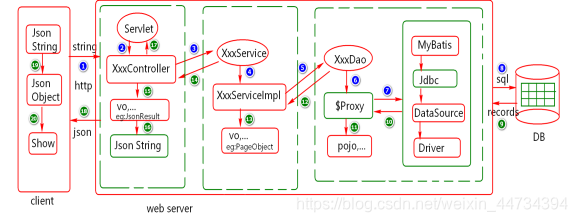
Spring:附送一张调用图
MVC:
-
理解
model (模型)数据
view(视图)页面
controller(控制器)业务逻辑 -
官方架构
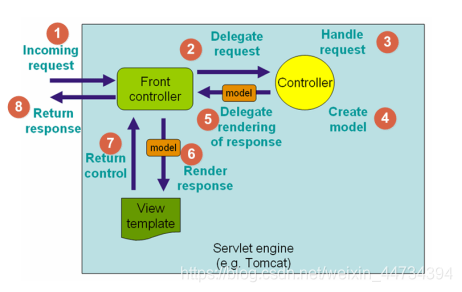
-
底层原理(图片看不清可以参考官网)
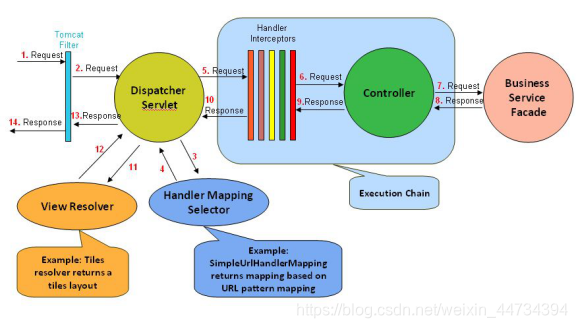
Dispatcher:前端控制器
HandlerMapping:url映射器
HandlerIntercepters:拦截器
Controller:控制器
ViewResolver:视图解析器
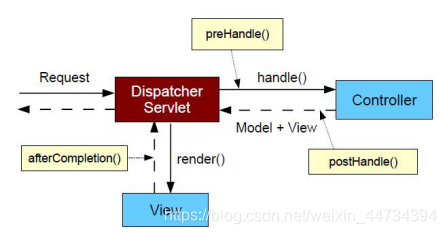
流程:参考以上图片 -
拦截器的三个过程执行方法
MyBatis:
- 是什么

- 实现原理

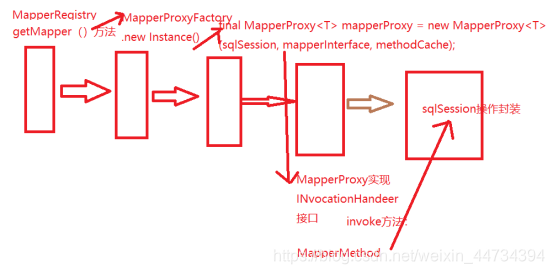
使用jdk的动态代理实现的
源码分析
final MapperProxy<T> mapperProxy = new MapperProxy<T>(sqlSession, mapperInterface, methodCache);

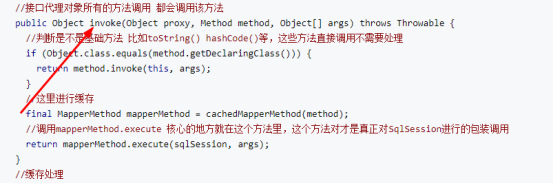
会自动执行invoke()方法的。
MyBatis整个过程分析:
- Mybatis的缓存级别:
一级缓存:sqlSession级别。二级缓存:作用域为mapper的namespace。
Spring事务管理:
- 什么是事务
1.原子性(Atomicity)事务是一个原子操作,由一系列动作组成。事务的原子性确保动作要么全部完成,要么完全 不起作用。
2.一致性(Consistency)事务在完成时,必须是所有的数据都保持一致状态。
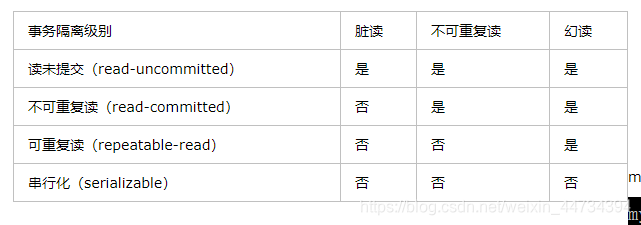
3.隔离性(Isolation)并发事务执行之间无影响,在一个事务内部的操作对其他事务是不产生影响,这需要事务隔离级别来指定隔离性。
4.持久性(Durability)一旦事务完成,数据库的改变必须是持久化的。 - 在企业级应用中,多用户访问数据库是常见的场景,这就是所谓的事务的并发。事务并发所可能存在的问题:
1.脏读:一个事务读到另一个事务未提交的更新数据。
2.不可重复读:一个事务两次读同一行数据,可是这两次读到的数据不一样。
3.幻读:一个事务执行两次查询,但第二次查询比第一次查询多出了一些数据行。
4.丢失更新:撤消一个事务时,把其它事务已提交的更新的数据覆盖了。 - 实现的原理
事务不成功就需要回滚,事务底层是基于Aop实现的。AOP底层是动态代理。动态代理底层是反射。
InvocationHandler接口的invoke方法