1、计算机网络
计算机网络就是将地理位置不同的具有独立功能的多台计算机及其外部设备,通过通信线路来连接起来,在网络操作系统,网络管理软件及网络通信协议的管理和协调下,实现资源共享和信息传递的计算机系统。
2、网络编程
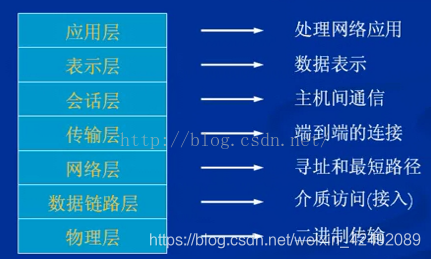
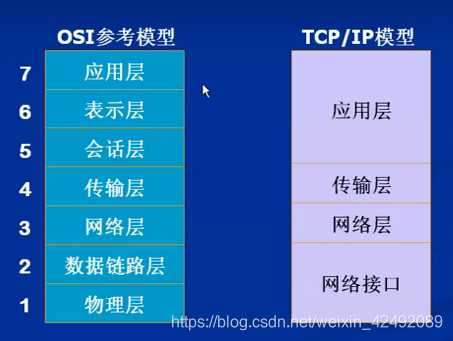
2.1、网络模型
OSI 模型
2.2、网络编程三要素
(1)IP地址: InetAddress:网络设备的标识,不容易记忆,可用主机名。
(2)端口号: 用于标识进程的逻辑地址,不同进程有不同的标识。
(3)传输协议: 通讯的规则常见协议:TCP、UDP。
2.3、网络编程之IP
(1)IP概述: IP就是给每个连接在Internet上的主机分配的一个32bit地址。
(2)IP地址的组成: IP地址 = 网络地址+主机地址
    A类IP地址:第一段号码为网络地址,剩下的三段号码为本地计算机的号码
	B类IP地址:前二段号码为网络地址,剩下的二段号码为本地计算机的号码
	C类IP地址:前三段号码为网络地址,剩下的一段号码为本地计算机的号码
(3)IP地址分类:
    A类1.0.0.1---127.255.255.254
	(1)10.X.X.X是私有地址(私有地址就是在互联网上不使用,而被用在局域网络中的地址)
	(2)127.X.X.X是保留地址,用做循环测试用的。
	B类	128.0.0.1---191.255.255.254	   172.16.0.0---172.31.255.255是私有地址。
	C类	192.0.0.1---223.255.255.254	   192.168.X.X是私有地址
	D类	224.0.0.1---239.255.255.254
	E类	240.0.0.1---247.255.255.254
(4)特殊地址:
	127.0.0.1 回环地址,可用于测试本机的网络是否有问题. ping 127.0.0.1
	DOS命令 ipconfig:查看本机IP地址
	xxx.xxx.xxx.255 广播地址
代码演示:
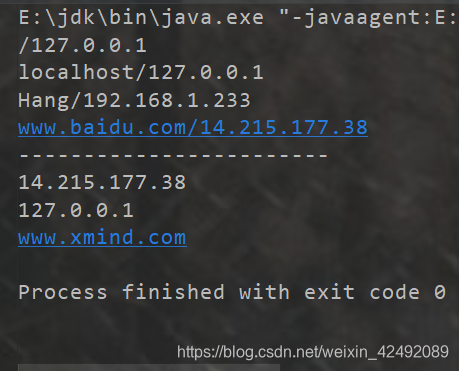
import java.net.InetAddress;
import java.net.UnknownHostException;

public class InetAddressDemo {
    public static void main(String[] args) {
        try {
            //获取本机地址的方式
            InetAddress inetAddress1 = InetAddress.getByName("127.0.0.1");
            System.out.println(inetAddress1);
            InetAddress inetAddress2 = InetAddress.getByName("localhost");
            System.out.println(inetAddress2);
            //本机局域网的IP地址
            InetAddress inetAddress3 = InetAddress.getLocalHost();
            System.out.println(inetAddress3);
            //通过域名获取网站IP地址
            InetAddress inetAddress4 = InetAddress.getByName("www.baidu.com");
            System.out.println(inetAddress4);
            System.out.println("------------------------");
            //常用的方法
            System.out.println(inetAddress4.getCanonicalHostName());//获取规范的主机名
            System.out.println(inetAddress1.getHostAddress());//获取主机IP地址
            System.out.println(inetAddress1.getHostName());//获取主机名或域名
        } catch (UnknownHostException e) {
            e.printStackTrace();
        }
    }
}
2.4、网络编程之端口和协议
(1)端口:
物理端口: 网卡端口;
逻辑端口: 用于标识进程的逻辑地址,有效端口:0-65535;其中0-1023为公有端口。
(2)协议:
UDP: 将数据源和目的封装在数据包中,不需要建立连接,每个数据包的大小限制在64k;因为是不需要连接的,所以不可靠,但速度很快。
TCP: 在传输数据前在发送端和接收端建立逻辑连接,然后再传输数据,提供了两台计算机之间的可靠无差错的数据传输。每次建立连接都需要经过 “三次握手” 。
● 第一次握手:客户端向服务端发出连接请求,等待服务器的确认;

● 第二次握手: 服务端向客户端回送一个响应,通知客户端收到了连接请求;

● 第三次握手:客户端再次向服务器端发送确认请求,确认连接。
DOS下的命令:
1、netstat -ano  查看所有的端口
2、netstat -ano|findstr "8990" 查看指定的端口
3、tasklist|findstr "8990" 查看指定端口的进程
代码演示:
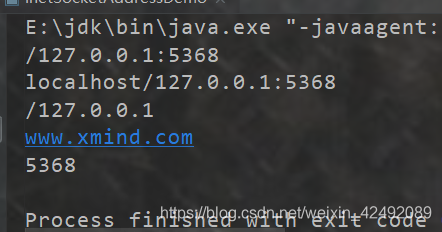
import java.net.InetSocketAddress;

/**
 * IP地址+端口
 */
public class InetSocketAddressDemo {
    public static void main(String[] args) {
        //封装计算机的IP地址和端口号
        InetSocketAddress socketAddress1 = new InetSocketAddress("127.0.0.1",5368);
        InetSocketAddress socketAddress2 = new InetSocketAddress("localhost", 5368);

        System.out.println(socketAddress1);
        System.out.println(socketAddress2);

        System.out.println(socketAddress1.getAddress());
        System.out.println(socketAddress1.getHostName());
        System.out.println(socketAddress1.getPort());

    }
}
TCP实现客户端和服务器发消息:
在JDK中提供了两个类用于实现TCP程序,一个是 ServerSocket 类,用于表示服务器,一个是 Socket 类,用于表示客户端。
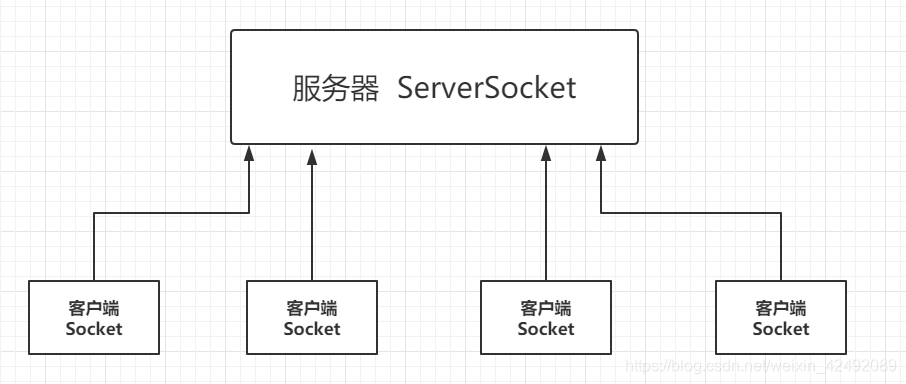
客户端 Socket 向服务器 ServerSocket 请求连接 ——> 实现了数据的通路连接。
在连接的过程中,IO流对象就已经创建完毕了。
服务器和客户端就通过字节流来通信。

import java.io.IOException;
import java.io.OutputStream;
import java.net.InetAddress;
import java.net.Socket;

/**
 * 客户端
 */
public class TCPClientDemo {
    public static void main(String[] args) {
        Socket socket = null;
        OutputStream os = null;
        try {
            //1、创建出服务器的地址和端口号
            InetAddress inetAddress = InetAddress.getByName("127.0.0.1");
            int port = 9999;

            //2、创建一个Socket连接
            socket = new Socket(inetAddress, port);
            os = socket.getOutputStream();
            os.write("你好啊服务器".getBytes());

        } catch (IOException e) {
            e.printStackTrace();
        } finally {
            if (os != null) {
                try {
                    os.close();
                } catch (IOException e) {
                    e.printStackTrace();
                }
            }
            if (socket != null){
                try {
                    socket.close();
                } catch (IOException e) {
                    e.printStackTrace();
                }
            }
        }
    }
}

import java.io.ByteArrayOutputStream;
import java.io.IOException;
import java.io.InputStream;
import java.net.ServerSocket;
import java.net.Socket;

/**
 * 服务器端
 */
public class TCPServerDemo {
    public static void main(String[] args) {
        ServerSocket serverSocket = null;
        Socket socket = null;
        ByteArrayOutputStream baos = null;
        InputStream is = null;
        try {
            while (true) {
                //1、根据地址连接客户端
                serverSocket = new ServerSocket(9999);
                socket = serverSocket.accept();
                //2、读取客户端的消息
                is = socket.getInputStream();

                //字节流把读取到的信息打印到控制台
                baos = new ByteArrayOutputStream();
                byte[] buffer = new byte[1024];
                int len = 0;
                while ((len = is.read(buffer)) != -1) {
                    baos.write(buffer,0,len);
                }
                System.out.println(baos.toString());
            }

        } catch (IOException e) {
            e.printStackTrace();
        } finally {
            if (is != null) {
                try {
                    is.close();
                } catch (IOException e) {
                    e.printStackTrace();
                }
            }
            if (baos != null) {
                try {
                    baos.close();
                } catch (IOException e) {
                    e.printStackTrace();
                }
            }
            if (socket != null) {
                try {
                    socket.close();
                } catch (IOException e) {
                    e.printStackTrace();
                }
            }
            if (serverSocket != null) {
                try {
                    serverSocket.close();
                } catch (IOException e) {
                    e.printStackTrace();
                }
            }
        }
    }
}
TCP实现客户端和服务器之间文件的上传:
import java.io.*;
import java.net.InetAddress;
import java.net.Socket;
/**
 * 客户端
 */
public class TCPClientDemo {
    public static void main(String[] args) throws IOException {
        //1、创建Socket连接
        Socket socket = new Socket(InetAddress.getByName("127.0.0.1"), 8000);
        //2、创建的输出流
        OutputStream os = socket.getOutputStream();

        //3、读取文件写进输出流中
        FileInputStream fis = new FileInputStream(new File("Krile.jpg"));

        byte[] buffer = new byte[1024];
        int len;
        while ((len = fis.read(buffer)) != -1) {
            os.write(buffer, 0, len);
        }
        //4、通知服务器已经传输完毕
        socket.shutdownOutput();
        //5、确认服务器完成接收,断开连接
        InputStream is = socket.getInputStream();
        ByteArrayOutputStream bos = new ByteArrayOutputStream();

        byte[] buffer2 = new byte[1024];
        int len2;
        while ((len2 = is.read(buffer2)) != -1){
            bos.write(buffer2,0,len2);
        }
        System.out.println(bos.toString());
        bos.close();
        is.close();
        fis.close();
        os.close();
        socket.close();
    }
}
import java.io.*;
import java.net.ServerSocket;
import java.net.Socket;

/**
 * 服务器端
 */
public class TCPServerDemo {
    public static void main(String[] args) {
        ServerSocket serverSocket = null;
        Socket socket = null;
        InputStream is = null;
        FileOutputStream fos = null;
        OutputStream os = null;
        try {
            //1、创建服务
            serverSocket = new ServerSocket(8000);
            //2、连接客户端
            socket = serverSocket.accept();
            //3、读取客户端的文件
            is = socket.getInputStream();
            //4、输出文件
            fos = new FileOutputStream(new File("receive.jpg"));
            byte[] buffer = new byte[1024];
            int len = 0;
            while ((len = is.read(buffer)) != -1) {
                fos.write(buffer, 0, len);
            }
            //通知客户端接收完毕
            os = socket.getOutputStream();
            os.write("接受完成,可以断开连接".getBytes());

        } catch (IOException e) {
            e.printStackTrace();
        } finally {
            if (os != null){
                try {
                    os.close();
                } catch (IOException e) {
                    e.printStackTrace();
                }
            }
            if (fos != null){
                try {
                    fos.close();
                } catch (IOException e) {
                    e.printStackTrace();
                }
            }
            if (is != null){
                try {
                    is.close();
                } catch (IOException e) {
                    e.printStackTrace();
                }
            }
            if (socket != null){
                try {
                    socket.close();
                } catch (IOException e) {
                    e.printStackTrace();
                }
            }
            if (serverSocket != null){
                try {
                    serverSocket.close();
                } catch (IOException e) {
                    e.printStackTrace();
                }
            }
        }
    }
}
UDP实现发送消息
import java.net.DatagramPacket;
import java.net.DatagramSocket;
import java.net.InetAddress;

/**
 * 发送端
 */
public class UDPClientDemo {
    public static void main(String[] args) throws Exception {
        //1、建立一个Socket
        DatagramSocket socket = new DatagramSocket();
        //2、建个地址端口包
        InetAddress inetAddress = InetAddress.getByName("127.0.0.1");
        int port = 9991;
        String msg = "你好,接收端!";
        //发送的目标和数据
        DatagramPacket packet = new DatagramPacket(msg.getBytes(), 0, msg.length(),inetAddress,port);
        //3、发包
        socket.send(packet);
        socket.close();
    }
}
import java.net.DatagramPacket;
import java.net.DatagramSocket;

/**
 * 接收端
 */
public class UDPServerDemo {
    public static void main(String[] args) throws Exception {
        //开放客户端端口
        DatagramSocket socket = new DatagramSocket(9991);
        //接收数据包
        byte[] buffer = new byte[1024];
        DatagramPacket packet = new DatagramPacket(buffer, 0, buffer.length);
        socket.receive(packet);
        System.out.println(packet.getAddress().getHostAddress());
        System.out.println(new String(packet.getData(), 0, packet.getLength()));
        socket.close();
    }
}
UDP实现控制台发送消息接收消息
import java.io.IOException;
import java.net.*;
import java.util.Scanner;

/**
 * UDP协议的发送端:
 * DatagramPacket:将你的数据包装
 * DatagramSocket:将你的数据发送出去
 * <p>
 * 实现步骤:
 * 1、创建DatagramPacket对象,封装数据,接收的地址和端口
 * 2、创建DatagramSocket对象
 * 3、发送数据
 * 4、关闭资源
 */
public class UDPSend {
    public static void main(String[] args) {
        Scanner scanner = null;
        InetAddress ip = null;
        DatagramSocket socket = null;
        int port = 9999;
        while (true) {
            try {
                scanner = new Scanner(System.in);
                ip = InetAddress.getByName("hang");
                String str = scanner.nextLine();
                byte[] data = str.getBytes();
                DatagramPacket packet = new DatagramPacket(data, 0, data.length, ip, port);
                socket = new DatagramSocket();
                socket.send(packet);
                if (str.equals("Bye")){
                    socket.close();
                    scanner.close();
                    return;
                }
            } catch (UnknownHostException e) {
                e.printStackTrace();
            } catch (SocketException e) {
                e.printStackTrace();
            } catch (IOException e) {
                e.printStackTrace();
            }
        }
    }
}
import java.io.IOException;
import java.net.DatagramPacket;
import java.net.DatagramSocket;

/**
 * UDP协议接收数据端:
 * DatagramPacket:接收数据
 * DatagramSOcket:接收数据包
 * <p>
 * 实现步骤:
 * 1、创建DatagramSocket对象,绑定端口号和发送端一致
 * 2、创建字节数组接收发来的数据
 * 3、创建DatagramPacket对象
 * 4、调用DatagramSocket对象方法接受数据,将数据放在数据包中。
 * 5、拆包
 * 发送的IP地址
 * 接收的字节个数
 * 发送端的端口
 */
public class UDPReceive {
    public static void main(String[] args) throws IOException {
        //1、创建DatagramSocket对象,绑定端口号和发送端一致
        DatagramSocket socket = new DatagramSocket(9999);
        while (true) {
            // 2、创建字节数组接收发来的数据
            byte[] data = new byte[1024];
            //3、创建DatagramPacket对象
            DatagramPacket packet = new DatagramPacket(data, 0, data.length);
            //4、调用DatagramSocket对象方法接受数据,将数据放在数据包中。
            socket.receive(packet);//线程阻塞接受数据
            //5
            //获取发送端的IP地址和端口号
            String ip = packet.getAddress().getHostAddress();
            int port = packet.getPort();
            //打印输出接受到的数据
            int length = packet.getLength();
            String str = new String(data, 0, length);
            System.out.println(ip + ":" + port + " " + str);
            if (str.equals("Bye")) {
                socket.close();
                return;
            }
        }
    }
}
获取指定URL资源
import java.net.MalformedURLException;
import java.net.URL;

/**
 * URL获取网络资源
 */
public class URLDemo01 {
    public static void main(String[] args) throws MalformedURLException {
        URL url = new URL("http://localhost/helloworld/index.jsp?username=zhao&password=1123");
        System.out.println(url.getProtocol());//获取网络协议
        System.out.println(url.getHost());//获取主机IP
        System.out.println(url.getPort());//获取端口
        System.out.println(url.getPath());//获取文件路径
        System.out.println(url.getFile());//获取文件全路径
        System.out.println(url.getQuery());//获取文件参数
    }
}
