PyTorch是一个基于Python的科学计算框架,用于进行深度学习相关研究。
张量Tensor
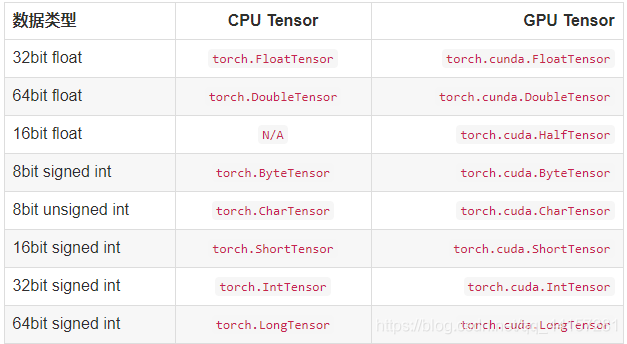
- Tensor的类型
Tensor是PyTorch的数据类型,torch定义了7中CPU类型的Tensor, 以及8种GPU类型的Tensor
https://pytorch-cn.readthedocs.io/zh/latest/package_references/Tensor/
- Tensor的创建
将List,Numpy转换为Tensor
#导入相应的库
import numpy as np
import torch

x = [1,2,3,4]
y = np.arange(1,4)
print(x) #[1, 2, 3, 4]
print(y) #[1 2 3]

#将List转换为tensor
z1 = torch.tensor(x)
print(z1)#tensor([1, 2, 3, 4])

#将arrage转换为tensor
z2 = torch.from_numpy(y)
print(z2)#tensor([1, 2, 3], dtype=torch.int32)
随机初始化法
# 采样自0~1均匀分布
a = torch.rand(3,3)
tensor([[0.2556, 0.6495, 0.2267],
        [0.5367, 0.6287, 0.3143],
        [0.0946, 0.5261, 0.0413]])
#
生成和a大小的Tebsor
b = torch.rand_like(a)
tensor([[0.8962, 0.7645, 0.8433],
        [0.8876, 0.3550, 0.7918],
        [0.3892, 0.0642, 0.5240]])

#生成3*3的Tensor[1,10]
c = rorch.randint(1,10,[3,3])
c
tensor([[3, 7, 9],
        [5, 1, 3],
        [5, 3, 1]])

#采样自N(0,1)
d = torch.randn(2,3)
tensor([[ 0.7113,  0.7134, -1.3212],
        [-0.5364, -1.2826, -0.1041]])
相同的数
# shape=2,3,所使用的相同的元素为7
b = torch.full([2, 3], 7)
tensor([[7., 7., 7.],
        [7., 7., 7.]])
全1
a = torch.ones(3,3)
a
tensor([[1., 1., 1.],
        [1., 1., 1.],
        [1., 1., 1.]])
全0
 b = torch.zeros(3,3)
 b
tensor([[0., 0., 0.],
        [0., 0., 0.],
        [0., 0., 0.]])
对角阵
c = torch.eye(3,3)
c
tensor([[1., 0., 0.],
        [0., 1., 0.],
        [0., 0., 1.]])
基本操作
torch的加法运算
x = torch.full([5,3],8)
y = torch.full([5,3],1)
print(x,"\n",y)
print(torch.add(x,y))#或者print(x+y) or print(x.add_(y))
#输出结果:
tensor([[8., 8., 8.],
        [8., 8., 8.],
        [8., 8., 8.],
        [8., 8., 8.],
        [8., 8., 8.]])
 tensor([[1., 1., 1.],
        [1., 1., 1.],
        [1., 1., 1.],
        [1., 1., 1.],
        [1., 1., 1.]])
tensor([[9., 9., 9.],
        [9., 9., 9.],
        [9., 9., 9.],
        [9., 9., 9.],
        [9., 9., 9.]])
任何使张量就地变化的操作都用固定_。例如:x.copy_(y),x.t_(),将改变x。
调整大小:如果要调整张量的大小/形状,可以使用torch.view:
x = torch.full([5,4],3)
y = x.view(20)
z = x.view(2,10)
print(x,"\n",y,"\n",z)
print(x.size(),y.size(),z.size())
#output
tensor([[3., 3., 3., 3.],
        [3., 3., 3., 3.],
        [3., 3., 3., 3.],
        [3., 3., 3., 3.],
        [3., 3., 3., 3.]])
 tensor([3., 3., 3., 3., 3., 3., 3., 3., 3., 3., 3., 3., 3., 3., 3., 3., 3., 3.,
        3., 3.])
 tensor([[3., 3., 3., 3., 3., 3., 3., 3., 3., 3.],
        [3., 3., 3., 3., 3., 3., 3., 3., 3., 3.]])
torch.Size([5, 4]) torch.Size([20]) torch.Size([2, 10])
变量(Variable)
Variable与Tensor无本质区别,不过variable会被放进一个计算图中,然后进兴向前传播,反向传播,自动求导。
from torch.autograd import Variable

x = Variable(torch.rand(2,2),requires_grad=True)
x
tensor([[0.7823, 0.8837],
        [0.5355, 0.4893]], requires_grad=True)

y = x+2
y.grad_fn
<AddBackward0 object at 0x0000028BBAE67FD0>

z = y*y*2
out=z.mean()
out
tensor(14.3410, grad_fn=<MeanBackward1>)

out.backward()

x.grad
tensor([[2.7823, 2.8837],
        [2.5355, 2.4893]])
CUDA张量
使用该.to方法可以将张量移动到任何设备上。
if torch.cuda.is_available():
    device = torch.device("cuda")          # a CUDA device object
    y = torch.ones_like(x, device=device)  # directly create a tensor on GPU
    x = x.to(device)                       # or just use strings ``.to("cuda")``
    z = x + y
    print(z)
    print(z.to("cpu", torch.double))
    #output
    tensor([1.7391], device='cuda:0')
	tensor([1.7391], dtype=torch.float64)
