1.0版本的功能:
后台方面:
1.将从接口拿到的json转为pojo。
2.使用Redis缓存提升应用的并发访问能力。
3.Quartz Schedule定时获取天气数据存入缓存进一步提升并发访问能力。
前端方面:
拿到数据传到小程序界面(直男的审美做出来的界面实在太丑了,1.0版本就先这样吧)
后台
步骤1(基础功能)
1.先实现最基本功能,将从接口拉到的数据转为实体pojo。这里使用到了Apache HttpClient,它的作用主要是第三方接口发送web请求。加入它的依赖即可使用。
		<dependency>
			<groupId>org.apache.httpcomponents</groupId>
			<artifactId>httpclient</artifactId>
			<version>4.5.3</version>
		</dependency>
2.json数据格式为下图,根据其构建处各个pojo,这样不列出各个pojo。第三方接口为"http://wthrcdn.etouch.cn/weather_mini?city=",是个完全免费的接口。
{
    "data": {
        "yesterday": {
            "date": "18日星期二",
            "high": "高温 6℃",
            "fx": "南风",
            "low": "低温 -7℃",
            "fl": "<![CDATA[<3级]]>",
            "type": "多云"
        },
        "city": "榆林",
        "forecast": [
            {
                "date": "19日星期三",
                "high": "高温 7℃",
                "fengli": "<![CDATA[<3级]]>",
                "low": "低温 -6℃",
                "fengxiang": "东南风",
                "type": "晴"
            },
            {
                "date": "20日星期四",
                "high": "高温 4℃",
                "fengli": "<![CDATA[5-6级]]>",
                "low": "低温 -7℃",
                "fengxiang": "西北风",
                "type": "多云"
            },
            {
                "date": "21日星期五",
                "high": "高温 2℃",
                "fengli": "<![CDATA[6-7级]]>",
                "low": "低温 -9℃",
                "fengxiang": "西北风",
                "type": "多云"
            },
            {
                "date": "22日星期六",
                "high": "高温 6℃",
                "fengli": "<![CDATA[3-4级]]>",
                "low": "低温 -2℃",
                "fengxiang": "东南风",
                "type": "晴"
            },
            {
                "date": "23日星期天",
                "high": "高温 11℃",
                "fengli": "<![CDATA[3-4级]]>",
                "low": "低温 -2℃",
                "fengxiang": "东南风",
                "type": "晴"
            }
        ],
        "ganmao": "天气寒冷,且昼夜温差很大,极易发生感冒。请特别注意增加衣服保暖防寒。",
        "wendu": "3"
    },
    "status": 1000,
    "desc": "OK"
}
3.关键的service层的功能实现,使用spring中一个RestTemplate,RestTemplate就相当于封装了一个Rest客户端。将json字符串转为对象需要使用jackson中的mapperObject。展示下service层的核心代码。
    private WeatherResponse doGetWeather(String uri){
        ResponseEntity<String> respString = restTemplate.getForEntity(uri,String.class);
        ObjectMapper mapper = new ObjectMapper();
        WeatherResponse resp = null;
        String strBody = null;
        if (respString.getStatusCodeValue() == 200){
            strBody = respString.getBody();
        }
        try {
            resp = mapper.readValue(strBody,WeatherResponse.class);
        } catch (IOException e) {
            e.printStackTrace();
        }
        return resp;
    }
4.编写controller层,和配置类。controller层就非常简单不做展示,关键得对Rest进行配置。配置一下RestTemplate对classpath中的HttpClient进行一个具体实现。
@Configuration
public class RestConfiguration {

    @Autowired
    private RestTemplateBuilder builder;

    @Bean
    public RestTemplate restTemplate(){
        return builder.build();
    }

}
这时就可以先进行一下测试了,如果可以访问到数据的话再进行下一步缓存的实现。
步骤2(Redis缓存)
1.添加Redis依赖
		<dependency>
			<groupId>org.springframework.boot</groupId>
			<artifactId>spring-boot-starter-data-redis</artifactId>
			<version>1.5.3.RELEASE</version>
		</dependency>
添加Redis依赖的时候,不知道到底是网络问题(老家网太差了)还是Redis版本与springboot版本有冲突,当时springboot 版本2.几导Redis2.几的包就导不进来,换成了Redis1.5.3.RELEASE有成功导入。这个问题等回到家网络好了再研究。
2.再导入个日志的依赖,同时还需要去掉web依赖中本身的日志
		<dependency>
			<groupId>org.springframework.boot</groupId>
			<artifactId>spring-boot-starter-web</artifactId>
			<exclusions>
				<exclusion>
					<groupId>org.springframework.boot</groupId>
					<artifactId>spring-boot-starter-logging</artifactId>
				</exclusion>
			</exclusions>
		</dependency>
3.配置Redis的application.properties,并且开启redis服务,打开redis可视化界面。
spring.redis.host=localhost
spring.redis.port=6379
spring.redis.timeout=120000

点击redis.server.exe开启redis。
4.先查缓存,缓存有的从缓存中取,缓存中没有的从第三方拿。
    private WeatherResponse doGetWeather(String uri){
        String key = uri;
        String strBody = null;
        ValueOperations<String, String> ops = stringRedisTemplate.opsForValue();
        ObjectMapper mapper = new ObjectMapper();
        WeatherResponse resp = null;
        //先查缓存,缓存中有的从缓存中取出
        if (stringRedisTemplate.hasKey(key))
        {
            LOGGER.info("Redis has data" + uri);
            strBody = ops.get(key);
        }else {
            LOGGER.info("Redis dose't has data" + uri);
            //缓存中没有,再调服务接口来获取
            ResponseEntity<String> respString = restTemplate.getForEntity(uri,String.class);
            if (respString.getStatusCodeValue() == 200){
                strBody = respString.getBody();
            }
            //数据写入缓存
            ops.set(key,strBody,TIME_OUT, TimeUnit.SECONDS);
        }
        try {
            resp = mapper.readValue(strBody,WeatherResponse.class);
        } catch (IOException e) {
            LOGGER.info("error" + e);
        }
        return resp;
    }
此时,redis缓存添加完毕,可以进行测试了!!!
步骤3(Quartz Schedule)
想从xml文档中定义了许多已知的许多城市名和城市ID,利用定时获取,每隔半天获取一次这些城市天气json存入缓存中,这样比上一个缓存更高效,之后还要将数据返回到微信中,所以缓存就显得尤为重要,提高了取数据的时间,使客户体验比较好。
1.获取xml,我这里只是为了演示,只用了极少数城市,根据xml格式构建相应的pojo。
<?xml version="1.0" encoding="UTF-8"?>
<c c1="0">
    <d d1="101280101" d2="咸阳" d3="guangzhou" d4="陕西"/>
    <d d1="101280102" d2="兴平" d3="panyu" d4="陕西"/>
    <d d1="101280103" d2="礼泉" d3="conghua" d4="陕西"/>
    <d d1="101280104" d2="西安" d3="zengcheng" d4="陕西"/>
    <d d1="101280105" d2="户县" d3="huadu" d4="陕西"/>
    <d d1="101280201" d2="乾县" d3="shaoguan" d4="陕西"/>
    <d d1="101280202" d2="宝鸡" d3="ruyuan" d4="陕西"/>
    <d d1="101280203" d2="渭南" d3="shixing" d4="陕西"/>
    <d d1="101280204" d2="大荔" d3="wengyuan" d4="陕西"/>
    <d d1="101280204" d2="凤翔" d3="wengyuan" d4="陕西"/>
    <d d1="101280204" d2="岐山" d3="wengyuan" d4="陕西"/>
    <d d1="101280204" d2="榆林" d3="wengyuan" d4="陕西"/>
    <d d1="101280204" d2="汉中" d3="wengyuan" d4="陕西"/>
    <d d1="101280204" d2="延安" d3="wengyuan" d4="陕西"/>
    <d d1="101280204" d2="铜川" d3="wengyuan" d4="陕西"/>
    <d d1="101280204" d2="安康" d3="wengyuan" d4="陕西"/>
    <d d1="101280204" d2="商洛" d3="wengyuan" d4="陕西"/>
    <d d1="101280204" d2="杨凌" d3="wengyuan" d4="陕西"/>
    <d d1="101280204" d2="神木" d3="wengyuan" d4="陕西"/>
    <d d1="101280204" d2="潼关" d3="wengyuan" d4="陕西"/>
    <d d1="101280204" d2="蒲城" d3="wengyuan" d4="陕西"/>
    <d d1="101280204" d2="韩城" d3="wengyuan" d4="陕西"/>
    <d d1="101280204" d2="柞水" d3="wengyuan" d4="陕西"/>
    <d d1="101280204" d2="富平" d3="wengyuan" d4="陕西"/>
    <d d1="101280204" d2="华阴" d3="wengyuan" d4="陕西"/>
    <d d1="101280204" d2="长武" d3="wengyuan" d4="陕西"/>
    <d d1="101280204" d2="旬邑" d3="wengyuan" d4="陕西"/>
    <d d1="101280204" d2="泾阳" d3="wengyuan" d4="陕西"/>
</c>
2.定义Quartz的配置类
public class QuartzConfigration {

    private static final int TIME = 1800; //更新频率

    //JobDetail   定义一个job
    @Bean
    public JobDetail weatherDataSyncJobJobDetail(){
        return JobBuilder.newJob(WeatherDataSyncJob.class).withIdentity("weatherDataSynvJob")
                .storeDurably().build();
    }
    //Trigger   触发机制, 何时去触发这个job
    @Bean
    public Trigger weatherDataSuncTrigger(){
        SimpleScheduleBuilder ScheduleBuilder = SimpleScheduleBuilder.simpleSchedule()
                .withIntervalInSeconds(TIME).repeatForever();

        return TriggerBuilder.newTrigger().forJob(weatherDataSyncJobJobDetail())
                .withIdentity("weatherDataSuncTrigger").withSchedule(ScheduleBuilder).build();
    }

}
3.定义一个真正的job去获取xml中的城市名称
public class WeatherDataSyncJob extends QuartzJobBean {
    private static final Logger LOGGER = LoggerFactory.getLogger(WeatherDataServiceImpl.class);

    @Autowired
    private CityDataService cityDataService;

    @Autowired
    private WeatherDataService weatherDataService;
    @Override
    protected void executeInternal(JobExecutionContext jobExecutionContext) throws JobExecutionException {
        LOGGER.info("Weather Data Sync Job");
        List<City> cityList = null;

        try {
            cityList = cityDataService.listCity();
        }catch (Exception e){
            LOGGER.info("Exception! " + e);
        }

        for (City city : cityList) {
            String cityId = city.getCityName();
            LOGGER.info("Weather Date Sync Job,cityId:" + cityId);

            weatherDataService.syncDateByCityId(cityId);
        }

        LOGGER.info("Weather Date Sync Job,End!");
    }
}
4.构建xmlBuilder来将xml转为指定pojo,需要用到一个工具JAXBContext来帮助我们转换。
public class XmlBuilder {

    public static Object xmlStrToObject(Class<?> clazz,String xmlStr) throws Exception{
        Object xmlObject = null;
        Reader reader = null;
        JAXBContext context = JAXBContext.newInstance(clazz);

        //xml转为对象
        Unmarshaller unmarshaller = context.createUnmarshaller();

        reader = new StringReader(xmlStr);
        xmlObject = unmarshaller.unmarshal(reader);

        if (null != reader){
            reader.close();
        }
        return xmlObject;
    }
}
5.创建定时获取对应的service层
@Service
public class CityDataServiceImpl implements CityDataService {
    @Override
    public List<City> listCity() throws Exception {
        //读取内容
        Resource resource = new ClassPathResource("citylist.xml");
        BufferedReader br = new BufferedReader(new InputStreamReader(resource.getInputStream(),"utf-8"));
        StringBuffer buffer = new StringBuffer();
        String line = "";

        while ((line = br.readLine()) != null){
            buffer.append(line);
        }

        br.close();

        //xml转为Java对象
        CityList cityList = (CityList) XmlBuilder.xmlStrToObject(CityList.class,buffer.toString());

        return cityList.getCityList();
    }
}
至此后台编程完成,xml中的信息也存入了Redis中

当我访问一次关于榆林的天气时,控制台显示redis中有这个数据。

-------------------------------------------------后台端1.0开发正式结束!!!---------------------------------------------------
前端
工具(微信开发者工具-32位) ***这里有个坑,微信开发者工具64位那个版本下载好了根本无法打开我重新安装了好几次都不行,上网搜了之后才知道这是个坑,最简单的办法就是下载32位那个版本就行了!!!
步骤
1.先去微信公众平台去注册,选择开发小程序,填写相关的资料之后,因为我们不涉及微信支付那方面,所以不需要交三四百块钱的那个支付功能的费用。------注意要记好自己的AppID,这个一会开发时会用到。

2.打开微信开发者工具,输入信息名称目录自定义,AppID填写务必要正确,后端服务选择不使用云服务,语言看你自己选择。

3.编写前端代码,我是在pages-index包下面去编写内容的,大家也可以在别的包下面编写。因为微信小程序开发使用的语言是独有的,wxml和wxss和js,其实和web前端使用的html和css和js其实同样的效果,只不过语法有差异而已。(大家可以参考微信小程序开发文档去了解)
4.先将返回前端的json格式写入index.json中,告诉前端数据的格式是什么。
{
  "data": {
    "yesterday": {
      "date": "",
      "high": "",
      "fx": "",
      "low": "",
      "fl": "",
      "type": ""
    },
    "city": "",
    "forecast": [
      {
        "date": "",
        "high": "",
        "fengli": "",
        "low": "",
        "fengxiang": "",
        "type": ""
      },
      {
        "date": "",
        "high": "",
        "fengli": "",
        "low": "",
        "fengxiang": "",
        "type": ""
      },
      {
        "date": "",
        "high": "",
        "fengli": "",
        "low": "",
        "fengxiang": "",
        "type": ""
      },
      {
        "date": "",
        "high": "",
        "fengli": "",
        "low": "",
        "fengxiang": "",
        "type": ""
      },
      {
        "date": "",
        "high": "",
        "fengli": "",
        "low": "",
        "fengxiang": "",
        "type": ""
      }
    ],
    "ganmao": "",
    "wendu": ""
  },
  "status": 1000,
  "desc": ""
}
5.跟HTML一样搭建好页面主体框架WXML。
<view class="body">
<!-- 标题 -->
<view class="title">小袁天气</view>
<!-- 搜索框view -->
<view class="search_con">
<!-- 表单 -->
<form bindsubmit="formSubmit">
<!-- 记得设置name值,这样JS才能接收name=keyword的值 -->
<input type="text" name="keyword" class="search_input" placeholder='请输入城市名?'/>
<button formType="submit" class="search_btn">搜索</button>
</form>
</view>
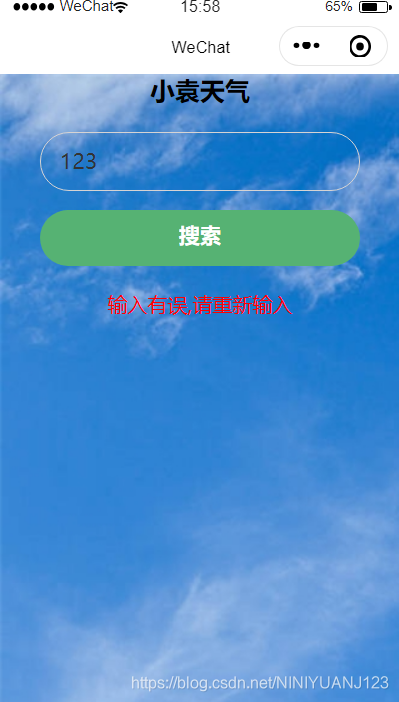
<view class="error" wx:if="{{re.status < 1}}">输入有误,请重新输入</view>
<!-- 搜索结果展示 -->
<view class="mingri" wx:if="{{re.status > 1}}">
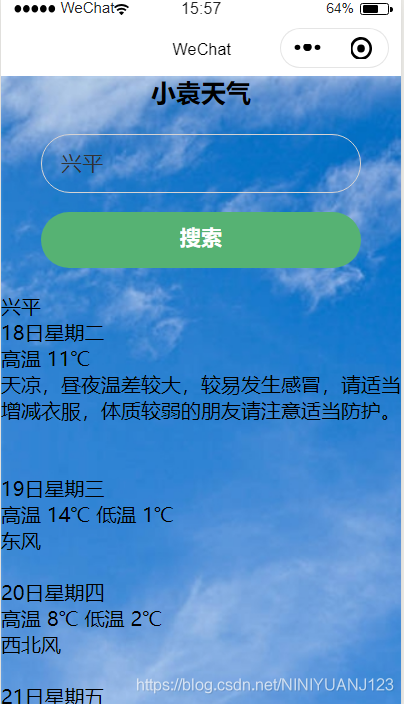
<view class="resname"><text>{{re.data.city}}</text></view>
<view class="resname"><text>{{re.data.yesterday.date}}</text></view>
<view class="resname"><text>{{re.data.yesterday.high}} {{re.yesterday.low}} {{re.yesterday.type}}</text></view>
<view class="resname"><text>{{re.data.ganmao}}</text></view>
</view>
<text>\n\n</text>
<view class='list-li mflex' wx:if="{{re.status > 1}}" wx:for="{{re.data.forecast}}" wx:key="re" >
<view class="houxu">
<view class="resname"><text>{{item.date}}</text></view>
<view class='list-tit'><text>{{item.high}} {{item.low}}</text></view>
<view class='list-con'><text>{{item.fengxiang}}</text></view>
</view>
<text>\n</text>
</view>
</view>
6.跟CSS一样设计好页面渲染WXSS
.body{
  background-attachment: fixed;
  background-image: url(http://mpic.tiankong.com/308/b0f/308b0f5807b214ec2b2d10cce6ebb738/640.jpg);
  height: 750px;
}
/* 搜索样式 */
.title{
  text-align: center;
  font-size: 20px;
  font-family: "微软雅黑";
  font-weight: bold;
}

 .error{
   text-align: center;
   color: red;
 }
.search_con{
  width: 80%;
  margin:20px auto;
}

.search_con .search_input{
  border: 1px solid rgb(214, 211, 211);
  height: 45px;
  border-radius: 100px;
  font-size: 17px;
  padding-left: 15px;/*此处要用padding-left才可以把光标往右移动15像素,不可以用text-indent*/
  color: #333;
}

.search_con .search_btn{
  margin-top: 15px;
  width: 100%;
  height: 45px;
  background: #56b273;
  color: #fff;
  border-radius: 100px;
}


.empty{
  text-align: center;
  color: #f00;
  font-size: 15px;
}

.noresult{
  text-align: center;
  color: #666;
  font-size: 15px;
}

.search_result .resname{
  text-align: left;
  color: #333;
  font-size: 15px;
}
7.最关键的就是构建js,取到后台数据并且将数据存入数组中供WXML使用。
const app = getApp()
Page({
  data: {},

  //执行点击事件
  formSubmit: function (e) {

    //声明当天执行的
    var that = this;

    //获取表单所有name=keyword的值
    var formData = e.detail.value.keyword;

    //显示搜索中的提示
    wx.showLoading({
      title: '搜索中',
      icon: 'loading'
    })

    //向搜索后端服务器发起请求
    wx.request({

      //URL
      url: 'http://localhost:8088/weather/cityName/' + formData,
      //发送的数据
      data: formData,

      //请求的数据时JSON格式
      header: {
        'Content-Type': 'application/json'
      },

      //请求成功
      success: function (res) {

        //控制台打印(开发调试用)
        console.log(res.data)

        //把所有结果存进一个名为re的数组
        that.setData({
          re: res.data,
        })


        //搜索成功后,隐藏搜索中的提示
        wx.hideLoading();
      }
    })
  },
})
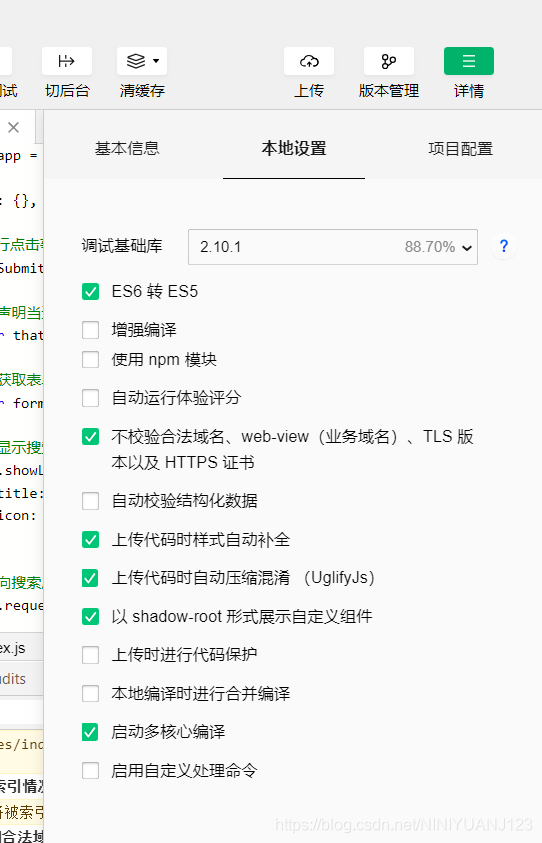
8.注意要关闭选项<不校验合法域名>选项,点击导航栏右侧详情,选择本地设置,选择不校验合法域名。否则微信不会访问你后台的接口。
前端编写完成,测试一下可否取到数据,时间是否够快。
后续上传代码和审核遵照微信公众平台步骤即可。不过我不打算上传,现在功能太简单了,等以后功能更完整页面更漂亮再上传代码。这次写项目太艰难了,老家网太卡了,动不动就断网了,好想回学校,我太难了!!!
