最近在看libra的数据结构,发现AccountState的结构在proto中的定义如下
message AccountStateWithProof {
    uint64 version = 1;
    AccountStateBlob blob = 2;
    AccountStateProof proof = 3;
}
其中的AccountStateProof的定义:
message AccountStateProof {
AccumulatorProof ledger_info_to_transaction_info_proof = 1;
TransactionInfo transaction_info = 2;
SparseMerkleProof transaction_info_to_account_proof = 3;
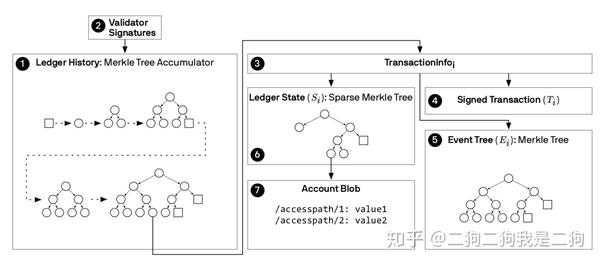
}这里出现了两种proof,分别是AccumulatorProof和SparseMerkleProof,恰好对应libra中的Accumulator和Sparse Merkle Tree。关于Accumulator 和Sparse Merkle Tree的结构会在后续文章中详细解读,这里简单介绍下。我们知道,libra中弱化了block的概念,可以看做是一个带版本的数据库,这里的版本号就是transaction的序号,那么这个数据库在逻辑中是如何存储的呢?下图简单的说明了这个问题,Ledger History是一个Merkle Tree Accumulator结构,每当有transaction被commit后,该交易以及与这个交易相关的信息(TransactionInfo)就会append到Accumulator中,这个Accumulator可以看做是一颗二叉树,如果全部展开就是一个完全二叉树,每个transaction都会被当做leaf节点append到树中。TransactionInfo包含了原始交易(Signed Transaction)以及该交易造成的账本状态(Ledger State)还有其输出信息(Event Tree),这里的Ledger State是一个Sparse Merkle Tree,这棵树我们可以暂时将他当做是Ethereum中的MPT(其实基本上差不多,逻辑结构很相似)。
OK,背景介绍完了,接下来开始正题。
首先,我们需要知道为啥要Proof。我们知道,libra中有两种角色validator和client。client会向validator查询数据,那么如何保证validator给client的数据是可信的呢,以及client如何快速验证?
对于上述问题,我们形式化的表述成,client在只存储了小量的验证数据 ,validator存储了全量数据
,现在client通过函数
请求了validator的数据,那么validator返回哪些数据可以让client进行验证其可信?
假设client请求的数据为 ,显然validator只返回结果
是无法自证真伪的,需要增加些验证数据
,那么如何设计这个
就比较关键了。我们结合白皮书的图来分析下。
显然此时的validator的全量数据包括了 ,若client请求的数据为
,那么validator返回的
只要包含
即可。当client接受到上述数据后,只需要计算验证是否相等即可
。
为什么这样就能验证?因为validator如果作假 返回值 ,那么意味着需要构造
来满足上述的验证计算,显然这个难度是非常大的。

理论上分析完了,接下来看libra是如何实现的。
我们看下AccumulatorProof的定义
message AccumulatorProof {
    // The bitmap indicating which siblings are default. 1 means non-default and
    // 0 means default. The LSB corresponds to the sibling at the bottom of the
    // accumulator. The leftmost 1-bit corresponds to the sibling at the level
    // just below root level in the accumulator, since this one is always
    // non-default.
    uint64 bitmap = 1;

    // The non-default siblings. The ones near the root are at the beginning of
    // the list.
    repeated bytes non_default_siblings = 2;
}
意思大致就是,通过bitmap来表示是否为default,这里的non default其实就是上面的验证集 ,因为Accumulator 完全展开其实是一个完全二叉树,显然会有一些是空节点,libra将这些空节点当做是default了,因为值是可以确定的。
下面手画的这个图,是一个简单的Accumulator,假设当前Transaction序号为12,,那么leaf节点就是小圆圈,方框表示空节点,这个是逻辑上的,实际存储中是不会存在的。假设我们要取12这个数据,那么proof就是外面有方框的那几个节点的hash。因为13是空节点,所以是default值,因此不需要了,接着从root开始往下每一层都贡献一个hash。左节点表示0,右节点表示1,这两个hash的位置就是:0,10.
那么,如果此时Transaction的序号是13,那么proof就是:0,10,1100。
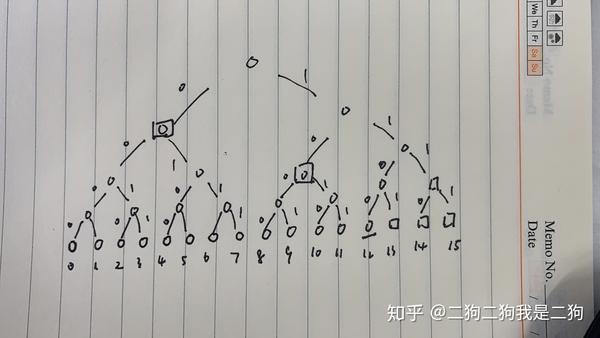
那么这里的规律是啥,因为最终是按照完全二叉树来展开的,所以non default 和default其实都是确定的。最终non default数量就是序号的二进制表示的1的数量。
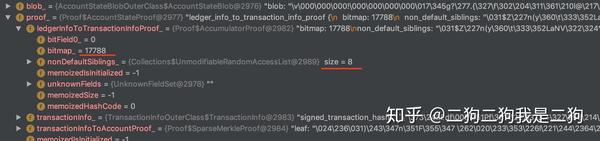
我们实际获取下libra测试网的数据进行下验证,此时序号是17788,二进制表示100010101111100,1的数量是8,符合的。
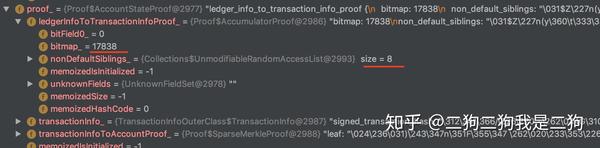
再来一个,序号是17838,二进制是100010110101110,8个,符合的。
嗯,libra的Accumulator设计的还是蛮不错的,后续会分析下Accumulator和sparse Merkle tree的CURD操作啥的。
