(本文是LearnOpenGL的学习笔记,教程中文翻译地址https://learnopengl-cn.github.io/)
0.前言
上一篇笔记记录了OpenGL在QtWidgets中的使用:https://blog.csdn.net/gongjianbo1992/article/details/104113006 ,本文将学习纹理(Texture)的使用。
1.知识点
根据教程所述,OpenGL中我们可以使用纹理(Texture)来展现细节,纹理是一个2D图片(甚至也有1D和3D的纹理)。
要把纹理映射到绘制区域,如三角形,我们需要指定三角形的每个顶点各自对应纹理的哪个部分。这样每个顶点就会关联着一个纹理坐标(Texture Coordinate),用来标明该从纹理图像的哪个部分采样(采集片段颜色)。之后在图形的其它片段上进行片段插值(Fragment Interpolation),插值方式我们可以设置(即纹理过滤设置,可以根据临近值,或是线性插值)。
纹理坐标在x和y轴上,范围为0到1之间(注意我们使用的是2D纹理图像)。使用纹理坐标获取纹理颜色叫做采样(Sampling)。纹理坐标起始于(0, 0),也就是纹理图片的左下角,终始于(1, 1),即纹理图片的右上角。下面的图片展示了我们是如何把纹理坐标映射到三角形上的。

纹理坐标的范围通常是从(0, 0)到(1, 1),如果我们把纹理坐标设置在范围之外(如小于0,或者大于1),OpenGL默认的行为是重复这个纹理图像,这也是可以设置的(即纹理环绕设置)。
此外,教程还提到了多级渐远纹理和纹理单元。
假设我们有一个包含着上千物体的大房间,每个物体上都有纹理。有些物体会很远,但其纹理会拥有与近处物体同样高的分辨率。由于远处的物体可能只产生很少的片段,OpenGL从高分辨率纹理中为这些片段获取正确的颜色值就很困难,因为它需要对一个跨过纹理很大部分的片段只拾取一个纹理颜色。OpenGL使用一种叫做多级渐远纹理(Mipmap)的概念来解决这个问题,它简单来说就是一系列的纹理图像,后一个纹理图像是前一个的二分之一。多级渐远纹理背后的理念很简单:距观察者的距离超过一定的阈值,OpenGL会使用不同的多级渐远纹理,即最适合物体的距离的那个。由于距离远,解析度不高也不会被用户注意到。同时,多级渐远纹理另一加分之处是它的性能非常好。OpenGL有一个glGenerateMipmaps函数,在创建完一个纹理后调用它OpenGL就会承担接下来的所有工作了。

使用glUniform1i,我们可以给纹理采样器分配一个位置值,这样的话我们能够在一个片段着色器中设置多个纹理。一个纹理的位置值通常称为一个纹理单元(Texture Unit)。一个纹理的默认纹理单元是0,它是默认的激活纹理单元。纹理单元的主要目的是让我们在着色器中可以使用多于一个的纹理。通过把纹理单元赋值给采样器,我们可以一次绑定多个纹理,只要我们首先激活对应的纹理单元。就像glBindTexture一样,我们可以使用glActiveTexture激活纹理单元,传入我们需要使用的纹理单元:

glActiveTexture(GL_TEXTURE0); // 在绑定纹理之前先激活纹理单元
glBindTexture(GL_TEXTURE_2D, texture);
激活纹理单元之后,接下来的glBindTexture函数调用会绑定这个纹理到当前激活的纹理单元。OpenGL至少保证有16个纹理单元供你使用。
2.如何实现
使用OpenGL先继承QOpenGLWidget类并实现对应接口,我写了两个Demo:
第一个Demo(GLTexture 单个纹理贴图),我把教程的着色器程序类替换为了Qt封装的QOpenGLShaderProgram,剩下的直接复制粘贴教程代码改动很小。在图片加载上,我也使用了Qt的QImage类。有三点要注意,
一是因为OpenGL要求纹理坐标原点在图片下方,所以默认加载的图片是上下颠倒的,我在顶点着色器里把纹理顶点反了一下(即1-xx);
二是设置纹理的时候,记得根据图片格式来修改glTexImage2D对应的参数,参数枚举可以查OpenGL API:https://www.khronos.org/opengl/wiki/GLAPI/glTexImage2D ;
三是如果图片是半透明的,需要进行设置,不然没效果:
    //当我们需要绘制透明图片时,就需要关闭GL_DEPTH_TEST并且打开混合glEnable(GL_BLEND);
    glDisable(GL_DEPTH_TEST);
    glEnable(GL_BLEND);
    //基于源像素Alpha通道值的半透明混合函数
    glBlendFunc(GL_SRC_ALPHA, GL_ONE);
第二个Demo(GLTextureUnit 使用纹理单元多个纹理贴图),我把大部分操作都替换为了Qt提供的封装类。相较于直接使用OpenGL的函数,Qt提供的类操作更简洁,比如纹理图片数据的加载,直接构造函数里填上路径就可以加载了。一些对象的创建有create()函数,绑定有bind()函数,释放有destroy()函数,等等。
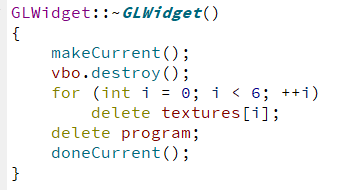
在析构函数中,因为要释放VAO、VBO等,Qt示例里是把释放操作放在了makeCurrent();和doneCurrent();两句代码之间。makecurrent()通过使相应的上下文成为当前上下文并在该上下文中绑定framebuffer对象,为渲染此小部件的OpenGL内容做准备。在大多数情况下,不必调用此函数,因为在调用paintGL()之前会自动调用该函数。doneCurrent()释放上下文。(为什么Qt没有做一个析构时自动释放的封装)
3.实现代码
(项目git链接:https://github.com/gongjianbo/OpenGLwithQtWidgets.git)
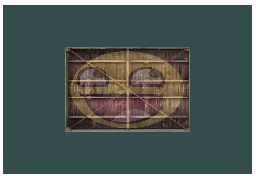
我的GLTexture类和GLTextureUnit类效果图:

GLTexture类代码:
#ifndef GLTEXTURE_H
#define GLTEXTURE_H

#include <QOpenGLWidget>
#include <QOpenGLFunctions_3_3_Core>
#include <QOpenGLShaderProgram>

//纹理贴图
class GLTexture : public QOpenGLWidget, protected QOpenGLFunctions_3_3_Core
{
    Q_OBJECT
public:
    explicit GLTexture(QWidget *parent = nullptr);
    ~GLTexture();

protected:
    //设置OpenGL资源和状态。在第一次调用resizeGL或paintGL之前被调用一次
    void initializeGL() override;
    //渲染OpenGL场景,每当需要更新小部件时使用
    void paintGL() override;
    //设置OpenGL视口、投影等,每当尺寸大小改变时调用
    void resizeGL(int width, int height) override;

private:
    QOpenGLShaderProgram _shaderProgram;
    GLuint _VAO;
    GLuint _VBO;
    GLuint _EBO;
    GLuint _Texture;
};

#endif // GLTEXTURE_H
#include "GLTexture.h"
GLTexture::GLTexture(QWidget *parent)
: QOpenGLWidget(parent)
{
}
GLTexture::~GLTexture()
{
glDeleteVertexArrays(1, &_VAO);
glDeleteBuffers(1, &_VBO);
glDeleteBuffers(1, &_EBO);
glDeleteTextures(1,&_Texture);
}
void GLTexture::initializeGL()
{
//为当前上下文初始化OpenGL函数解析
initializeOpenGLFunctions();
//着色器代码
//in输入,out输出,uniform从cpu向gpu发送
//因为OpenGL纹理颠倒过来的,所以取反vec2(aTexCoord.x, 1-aTexCoord.y);
const char *vertex_str=R"(#version 330 core
layout (location = 0) in vec3 aPos;
layout (location = 1) in vec3 aColor;
layout (location = 2) in vec2 aTexCoord;
out vec3 ourColor;
out vec2 TexCoord;
void main()
{
gl_Position = vec4(aPos, 1.0);
ourColor = aColor;
TexCoord = vec2(aTexCoord.x, 1-aTexCoord.y);
})";
const char *fragment_str=R"(#version 330 core
in vec3 ourColor;
in vec2 TexCoord;
uniform sampler2D ourTexture;
void main()
{
gl_FragColor = texture(ourTexture, TexCoord) * vec4(ourColor, 1.0);
})";
//将source编译为指定类型的着色器,并添加到此着色器程序
if(!_shaderProgram.addCacheableShaderFromSourceCode(
QOpenGLShader::Vertex,vertex_str)){
qDebug()<<"compiler vertex error"<<_shaderProgram.log();
}
if(!_shaderProgram.addCacheableShaderFromSourceCode(
QOpenGLShader::Fragment,fragment_str)){
qDebug()<<"compiler fragment error"<<_shaderProgram.log();
}
//使用addShader()将添加到该程序的着色器链接在一起。
if(!_shaderProgram.link()){
qDebug()<<"link shaderprogram error"<<_shaderProgram.log();
}
//从LearnOpenGL移植过来
//纹理坐标x范围增大了,使它看起来像正方形
float vertices[] = {
// positions // colors // texture coords
0.5f, 0.5f, 0.0f, 1.0f, 0.0f, 0.0f, 1.0f, 1.0f, // top right
0.5f, -0.5f, 0.0f, 0.0f, 1.0f, 0.0f, 1.0f, 0.0f, // bottom right
-0.5f, -0.5f, 0.0f, 0.0f, 0.0f, 1.0f, 0.0f, 0.0f, // bottom left
-0.5f, 0.5f, 0.0f, 1.0f, 1.0f, 0.0f, 0.0f, 1.0f // top left
};
unsigned int indices[] = {
0, 1, 3, // first triangle
1, 2, 3 // second triangle
};
glGenVertexArrays(1, &_VAO);
glGenBuffers(1, &_VBO);
glGenBuffers(1, &_EBO);
glBindVertexArray(_VAO);
glBindBuffer(GL_ARRAY_BUFFER, _VBO);
glBufferData(GL_ARRAY_BUFFER, sizeof(vertices), vertices, GL_STATIC_DRAW);
glBindBuffer(GL_ELEMENT_ARRAY_BUFFER, _EBO);
glBufferData(GL_ELEMENT_ARRAY_BUFFER, sizeof(indices), indices, GL_STATIC_DRAW);
// position attribute
glVertexAttribPointer(0, 3, GL_FLOAT, GL_FALSE, 8 * sizeof(float), (void*)0);
glEnableVertexAttribArray(0);
// color attribute
glVertexAttribPointer(1, 3, GL_FLOAT, GL_FALSE, 8 * sizeof(float), (void*)(3 * sizeof(float)));
glEnableVertexAttribArray(1);
// texture coord attribute
glVertexAttribPointer(2, 2, GL_FLOAT, GL_FALSE, 8 * sizeof(float), (void*)(6 * sizeof(float)));
glEnableVertexAttribArray(2);
// load and create a texture
glGenTextures(1, &_Texture);
glBindTexture(GL_TEXTURE_2D, _Texture);
// set the texture wrapping parameters
//GL_REPEAT重复,GL_MIRRORED_REPEAT镜像重复,GL_CLAMP_TO_EDGE拉伸,GL_CLAMP_TO_BORDER无重复
glTexParameteri(GL_TEXTURE_2D, GL_TEXTURE_WRAP_S, GL_CLAMP_TO_BORDER);
glTexParameteri(GL_TEXTURE_2D, GL_TEXTURE_WRAP_T, GL_CLAMP_TO_BORDER);
// set texture filtering parameters
//GL_NEAREST临近值,GL_LINEAR线性插值
glTexParameteri(GL_TEXTURE_2D, GL_TEXTURE_MIN_FILTER, GL_LINEAR);
glTexParameteri(GL_TEXTURE_2D, GL_TEXTURE_MAG_FILTER, GL_LINEAR);
// load image, create texture and generate mipmaps
//参照博客 https://www.jianshu.com/p/273b7f960f3d
QImage img1 = QImage(":/face.png").convertToFormat(QImage::Format_RGBA8888);
if (!img1.isNull()) {
// void glTexImage2D(GLenum target, GLint level, GLint internalFormat, GLsizei width, GLsizei height, GLint border, GLenum format, GLenum type, const GLvoid * data);
glTexImage2D(GL_TEXTURE_2D, 0, GL_RGBA8, img1.width(), img1.height(), 0, GL_RGBA, GL_UNSIGNED_BYTE, img1.bits());
glGenerateMipmap(GL_TEXTURE_2D);
}
// don't forget to activate/use the shader before setting uniforms!
//只有一个纹理贴图可以不用,默认就是0
//_shaderProgram.bind();
//glUniform1i(_shaderProgram.uniformLocation("texture1"), 0);
//_shaderProgram.release();
}
void GLTexture::paintGL()
{
glClearColor(0.2f, 0.3f, 0.3f, 1.0f);
glClear(GL_COLOR_BUFFER_BIT | GL_DEPTH_BUFFER_BIT);
//当我们需要绘制透明图片时,就需要关闭GL_DEPTH_TEST并且打开混合glEnable(GL_BLEND);
glDisable(GL_DEPTH_TEST);
glEnable(GL_BLEND);
//基于源像素Alpha通道值的半透明混合函数
glBlendFunc(GL_SRC_ALPHA, GL_ONE);
glActiveTexture(GL_TEXTURE0);
glBindTexture(GL_TEXTURE_2D, _Texture);
_shaderProgram.bind();
//绘制
glBindVertexArray(_VAO);
glDrawElements(GL_TRIANGLES, 6, GL_UNSIGNED_INT, 0);
_shaderProgram.release();
}
void GLTexture::resizeGL(int width, int height)
{
glViewport(0,0,width,height);
}
GLTextureUnit类代码:
#ifndef GLTEXTUREUNIT_H
#define GLTEXTUREUNIT_H

#include <QOpenGLWidget>
#include <QOpenGLFunctions_3_3_Core>
#include <QOpenGLShaderProgram>
#include <QOpenGLVertexArrayObject>
#include <QOpenGLBuffer>
#include <QOpenGLTexture>

//纹理单元,本类尝试使用Qt封装得OpenGL相关类
class GLTextureUnit : public QOpenGLWidget, protected QOpenGLFunctions_3_3_Core
{
public:
    explicit GLTextureUnit(QWidget *parent = nullptr);
    ~GLTextureUnit();

protected:
    //设置OpenGL资源和状态。在第一次调用resizeGL或paintGL之前被调用一次
    void initializeGL() override;
    //渲染OpenGL场景,每当需要更新小部件时使用
    void paintGL() override;
    //设置OpenGL视口、投影等,每当尺寸大小改变时调用
    void resizeGL(int width, int height) override;

private:
    //着色器程序
    QOpenGLShaderProgram _shaderProgram;
    //顶点数组对象
    QOpenGLVertexArrayObject _vao;
    //顶点缓冲
    QOpenGLBuffer _vbo;
    //索引缓冲
    QOpenGLBuffer _ebo;
    //纹理(因为不能赋值,所以只能声明为指针)
    QOpenGLTexture *_texture1 = nullptr;
    QOpenGLTexture *_texture2 = nullptr;
};

#endif // GLTEXTUREUNIT_H
#include "GLTextureUnit.h"
GLTextureUnit::GLTextureUnit(QWidget *parent)
: QOpenGLWidget(parent)
{
}
GLTextureUnit::~GLTextureUnit()
{
makeCurrent();
_vbo.destroy();
_ebo.destroy();
_vao.destroy();
delete _texture1;
delete _texture2;
doneCurrent();
}
void GLTextureUnit::initializeGL()
{
//为当前上下文初始化OpenGL函数解析
initializeOpenGLFunctions();
//着色器代码
//in输入,out输出,uniform从cpu向gpu发送
//因为OpenGL纹理颠倒过来的,所以取反vec2(aTexCoord.x, 1-aTexCoord.y);
const char *vertex_str=R"(#version 330 core
layout (location = 0) in vec3 aPos;
layout (location = 1) in vec3 aColor;
layout (location = 2) in vec2 aTexCoord;
out vec3 ourColor;
out vec2 TexCoord;
void main()
{
gl_Position = vec4(aPos, 1.0);
ourColor = aColor;
TexCoord = vec2(aTexCoord.x, 1-aTexCoord.y);
})";
const char *fragment_str=R"(#version 330 core
in vec3 ourColor;
in vec2 TexCoord;
uniform sampler2D texture1;
uniform sampler2D texture2;
void main()
{
gl_FragColor = mix(texture(texture1, TexCoord), texture(texture2, TexCoord), 0.2);
})";
//将source编译为指定类型的着色器,并添加到此着色器程序
if(!_shaderProgram.addCacheableShaderFromSourceCode(
QOpenGLShader::Vertex,vertex_str)){
qDebug()<<"compiler vertex error"<<_shaderProgram.log();
}
if(!_shaderProgram.addCacheableShaderFromSourceCode(
QOpenGLShader::Fragment,fragment_str)){
qDebug()<<"compiler fragment error"<<_shaderProgram.log();
}
//使用addShader()将添加到该程序的着色器链接在一起。
if(!_shaderProgram.link()){
qDebug()<<"link shaderprogram error"<<_shaderProgram.log();
}
//VAO,VBO
float vertices[] = {
// positions // colors // texture coords
0.5f, 0.5f, 0.0f, 1.0f, 0.0f, 0.0f, 1.0f, 1.0f, // top right
0.5f, -0.5f, 0.0f, 0.0f, 1.0f, 0.0f, 1.0f, 0.0f, // bottom right
-0.5f, -0.5f, 0.0f, 0.0f, 0.0f, 1.0f, 0.0f, 0.0f, // bottom left
-0.5f, 0.5f, 0.0f, 1.0f, 1.0f, 0.0f, 0.0f, 1.0f // top left
};
//EBO
unsigned int indices[] = {
0, 1, 3, // first Triangle
1, 2, 3 // second Triangle
};
_vao.create();
_vao.bind();
//QOpenGLVertexArrayObject::Binder vaoBind(&_vao);
_vbo=QOpenGLBuffer(QOpenGLBuffer::VertexBuffer);
_vbo.create();
_vbo.bind();
_vbo.allocate(vertices,sizeof(vertices));
_ebo=QOpenGLBuffer(QOpenGLBuffer::IndexBuffer);
_ebo.create();
_ebo.bind();
_ebo.allocate(indices,sizeof(indices));
// position attribute
int attr = -1;
attr = _shaderProgram.attributeLocation("aPos");
_shaderProgram.setAttributeBuffer(attr, GL_FLOAT, 0, 3, sizeof(GLfloat) * 8);
_shaderProgram.enableAttributeArray(attr);
// color attribute
attr = _shaderProgram.attributeLocation("aColor");
_shaderProgram.setAttributeBuffer(attr, GL_FLOAT, sizeof(GLfloat) * 3, 3, sizeof(GLfloat) * 8);
_shaderProgram.enableAttributeArray(attr);
// texture coord attribute
attr = _shaderProgram.attributeLocation("aTexCoord");
_shaderProgram.setAttributeBuffer(attr, GL_FLOAT, sizeof(GLfloat) * 6, 2, sizeof(GLfloat) * 8);
_shaderProgram.enableAttributeArray(attr);
// texture 1
//直接生成绑定一个2d纹理, 并生成多级纹理MipMaps
_texture1 = new QOpenGLTexture(QImage(":/box.jpg"), QOpenGLTexture::GenerateMipMaps);
if(!_texture1->isCreated()){
qDebug() << "Failed to load texture";
}
// set the texture wrapping parameters
// 等于glTexParameteri(GL_TEXTURE_2D, GL_TEXTURE_WRAP_S, GL_REPEAT);
_texture1->setWrapMode(QOpenGLTexture::DirectionS, QOpenGLTexture::Repeat);
_texture1->setWrapMode(QOpenGLTexture::DirectionT, QOpenGLTexture::Repeat);
// set texture filtering parameters
//等价于glTexParameteri(GL_TEXTURE_2D, GL_TEXTURE_MIN_FILTER, GL_LINEAR);
_texture1->setMinificationFilter(QOpenGLTexture::Linear);
_texture1->setMagnificationFilter(QOpenGLTexture::Linear);
// texture 2
//直接生成绑定一个2d纹理, 并生成多级纹理MipMaps
_texture2 = new QOpenGLTexture(QImage(":/face.png"), QOpenGLTexture::GenerateMipMaps);
if(!_texture2->isCreated()){
qDebug() << "Failed to load texture";
}
// set the texture wrapping parameters
// 等于glTexParameteri(GL_TEXTURE_2D, GL_TEXTURE_WRAP_S, GL_REPEAT);
_texture2->setWrapMode(QOpenGLTexture::DirectionS, QOpenGLTexture::Repeat);
_texture2->setWrapMode(QOpenGLTexture::DirectionT, QOpenGLTexture::Repeat);//
// set texture filtering parameters
//等价于glTexParameteri(GL_TEXTURE_2D, GL_TEXTURE_MIN_FILTER, GL_LINEAR);
_texture2->setMinificationFilter(QOpenGLTexture::Linear);
_texture2->setMagnificationFilter(QOpenGLTexture::Linear);
_shaderProgram.bind();
_shaderProgram.setUniformValue("texture1", 0);
_shaderProgram.setUniformValue("texture2", 1);
_shaderProgram.release();
}
void GLTextureUnit::paintGL()
{
glClearColor(0.2f, 0.3f, 0.3f, 1.0f);
glClear(GL_COLOR_BUFFER_BIT | GL_DEPTH_BUFFER_BIT);
//当我们需要绘制透明图片时,就需要关闭GL_DEPTH_TEST并且打开混合glEnable(GL_BLEND);
//glDisable(GL_DEPTH_TEST);
//glEnable(GL_BLEND);
//基于源像素Alpha通道值的半透明混合函数
//glBlendFunc(GL_SRC_ALPHA, GL_ONE);
//纹理单元的应用
glActiveTexture(GL_TEXTURE0);
_texture1->bind();
glActiveTexture(GL_TEXTURE1);
_texture2->bind();
_shaderProgram.bind();
//绘制
//QOpenGLVertexArrayObject::Binder vaoBind(&_vao);
_vao.bind();
glDrawElements(GL_TRIANGLES, 6, GL_UNSIGNED_INT, 0);
_shaderProgram.release();
}
void GLTextureUnit::resizeGL(int width, int height)
{
glViewport(0, 0, width, height);
}4.参考
教程:https://learnopengl-cn.github.io/01%20Getting%20started/06%20Textures/
博客(Qt+OpenGL):https://www.jianshu.com/p/273b7f960f3d
博客(纹理颠倒):https://blog.csdn.net/narutojzm1/article/details/51940817
