mipmap纹理适用于创建地形,墙壁等需要使用GL_REPEAT重复纹理拉伸的地方;还有就是应用于需要同一幅纹理,但是呈现的大小不同。
使用mipmap纹理可以使得近处的景物清晰,远处的景物模糊,符合现实生活情况。先看看示例效果
小窗口效果如下:
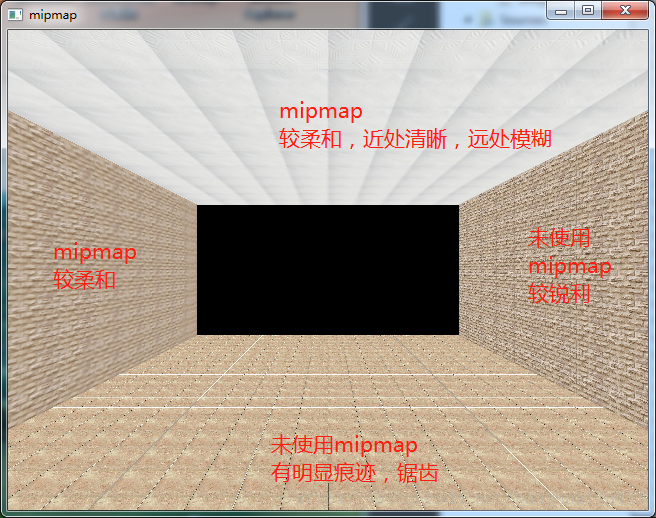
大窗口效果如下:

将地板也设置为mipmap的效果如下:
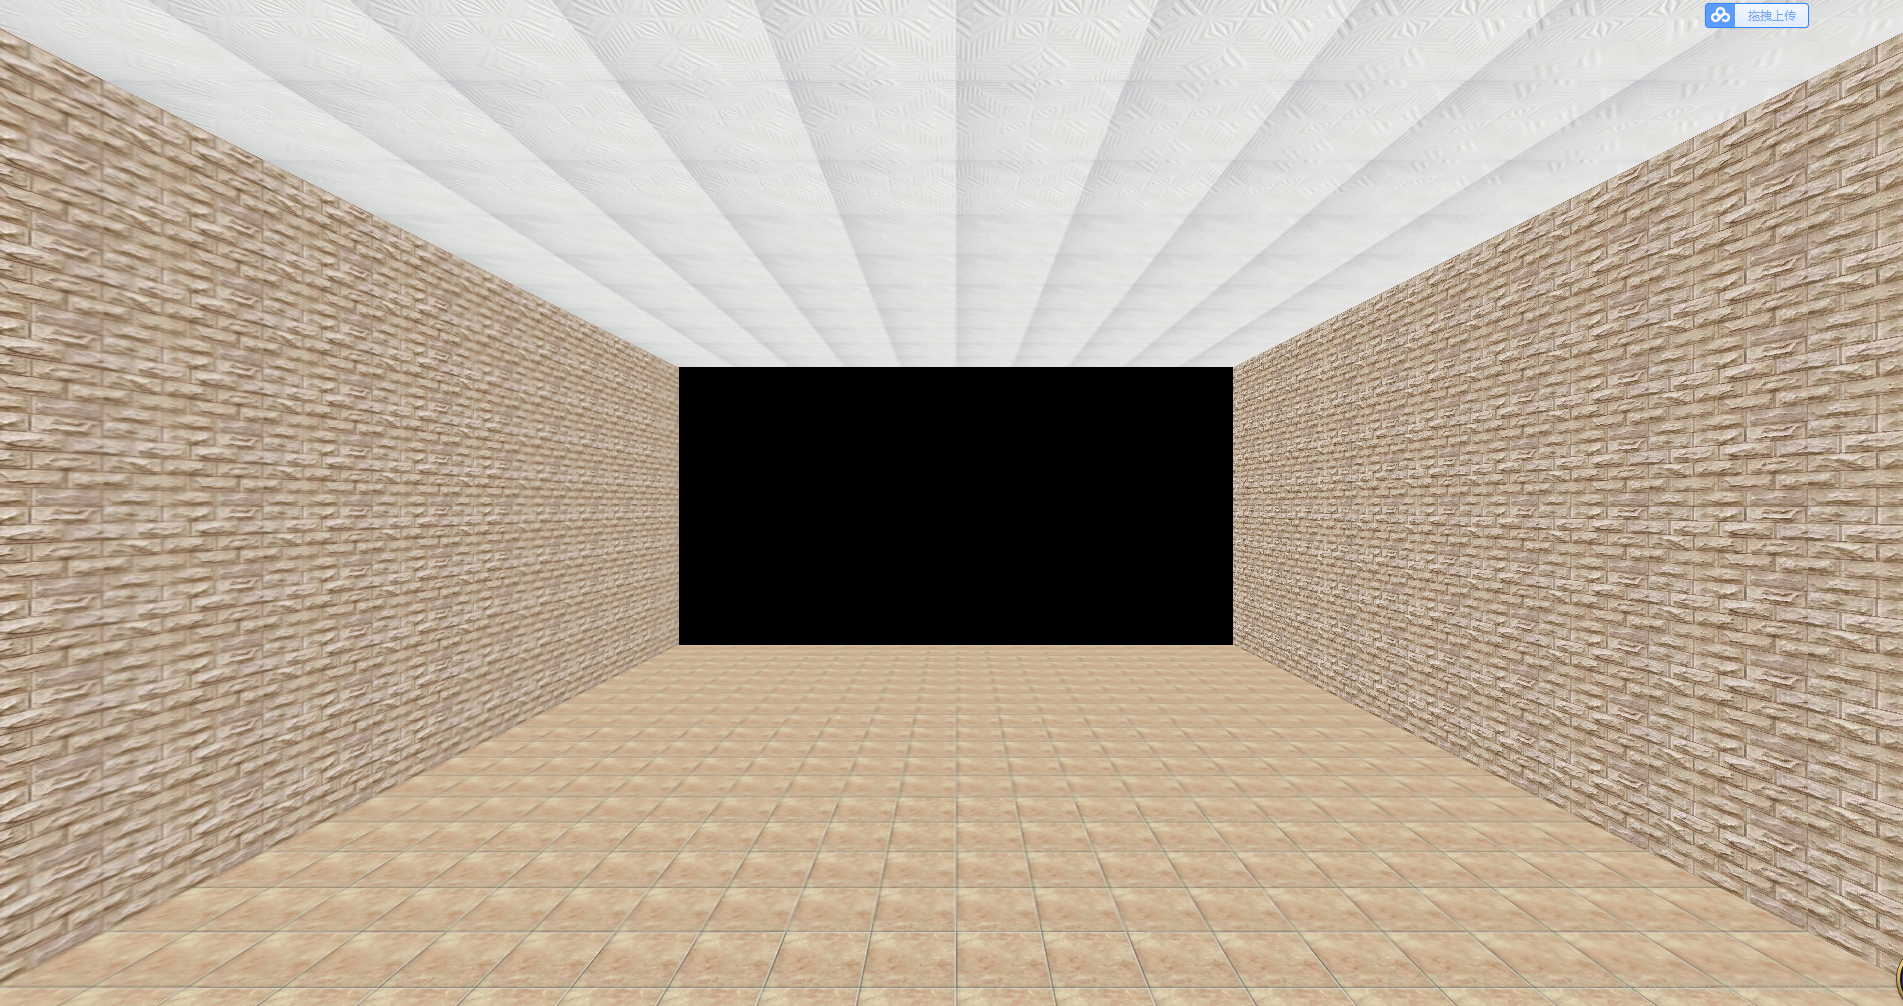
由此,我们可以看出,使用mipmap纹理方式,可以使得过度平滑,近处清晰,远处模糊的真实效果。
其实现方式为一个简单的纹理贴图,只不过将过滤方式设置为mipmap的过滤方式 ;QOpenGLTexture的构造函数(const QImage &image, MipMapGeneration genMipMaps = GenerateMipMaps)默认是会生成mipmap纹理的。
其渲染器实现如下
#ifndef MIPMAPRENDER_H
#define MIPMAPRENDER_H

#include <QOpenGLExtraFunctions>
#include <QOpenGLShaderProgram>
#include <QOpenGLBuffer>
#include <QOpenGLTexture>
class MipMapRender
{
public:
    MipMapRender() = default;
    ~MipMapRender();
    void initsize();
    void render(QOpenGLExtraFunctions *f,QMatrix4x4 &pMatrix,QMatrix4x4 &vMatrix,QMatrix4x4 &mMatrix,QImage &img,bool miped);

private:
    QOpenGLShaderProgram program_;
    QOpenGLBuffer vbo_;
    QOpenGLTexture *texture_{nullptr};
};

#endif // MIPMAPRENDER_H
#include "mipmaprender.h"
#include <QDebug>

MipMapRender::~MipMapRender()
{
    texture_->destroy();
    delete texture_;
}

void MipMapRender::initsize()
{
    program_.addCacheableShaderFromSourceFile(QOpenGLShader::Vertex,"vsrc.vert");
    program_.addCacheableShaderFromSourceFile(QOpenGLShader::Fragment,"fsrc.frag");
    program_.link();

    texture_ = new QOpenGLTexture(QOpenGLTexture::Target2D);
    GLfloat points[4 * 3 + 8]{
        -1.0,-1.0,0.0, //顶点坐标
        +1.0,-1.0,0.0,
        +1.0,+1.0,0.0,
        -1.0,+1.0,0.0,

        0.0,10.0, //纹理坐标,大于1的小数部分会只取小数部分的纹理。GL_REPEAT
        10.0,10.0,
        10.0,0.0,
        0.0,0.0
    };
    vbo_.create();
    vbo_.bind();
    vbo_.allocate(points, sizeof points);
}

void MipMapRender::render(QOpenGLExtraFunctions *f, QMatrix4x4 &pMatrix, QMatrix4x4 &vMatrix, QMatrix4x4 &mMatrix, QImage &img, bool miped)
{
    f->glEnable(GL_DEPTH_TEST);
    f->glEnable(GL_CULL_FACE);

    program_.bind();
    vbo_.bind();
    f->glActiveTexture(GL_TEXTURE0 + 0); //激活0号纹理
    program_.setUniformValue("sTexture",0);
    program_.setUniformValue("uPMatrix",pMatrix);
    program_.setUniformValue("uVMatrix",vMatrix);
    program_.setUniformValue("uMMatrix",mMatrix);
    program_.enableAttributeArray(0);
    program_.enableAttributeArray(1);

    program_.setAttributeBuffer(0,GL_FLOAT,0,3,3 * sizeof GLfloat);
    program_.setAttributeBuffer(1,GL_FLOAT,4 * 3 * sizeof GLfloat, 2, 2 * sizeof GLfloat);

    texture_->destroy(); //释放前一个纹理
    if(miped){ //如果使用mipmap方式
        texture_->setData(img);
        texture_->setMinificationFilter(QOpenGLTexture::LinearMipMapNearest); //缩小时的过滤方式为就近选择mip层,mip层内部线性插值
        texture_->setMagnificationFilter(QOpenGLTexture::LinearMipMapLinear);//在mip层之间线性插值,mip层内部线性插值
        texture_->setWrapMode(QOpenGLTexture::DirectionS,QOpenGLTexture::Repeat);//横向重复拉伸
        texture_->setWrapMode(QOpenGLTexture::DirectionT,QOpenGLTexture::Repeat);//纵向重复拉伸
    }else{ //不使用mipmap方式
        texture_->setData(img,QOpenGLTexture::DontGenerateMipMaps);
        texture_->setMinificationFilter(QOpenGLTexture::Nearest);
        texture_->setMagnificationFilter(QOpenGLTexture::Linear);
        texture_->setWrapMode(QOpenGLTexture::DirectionS,QOpenGLTexture::Repeat);
        texture_->setWrapMode(QOpenGLTexture::DirectionT,QOpenGLTexture::Repeat);
    }
    qDebug() << texture_->mipLevels() << texture_->mipBaseLevel() << texture_->maximumMipLevels();
    texture_->bind(0); //编写纹理数据
    f->glDrawArrays(GL_TRIANGLE_FAN,0,4); //绘制

    program_.disableAttributeArray(0);
    program_.disableAttributeArray(1);
    texture_->release();
    vbo_.release();
    program_.release();

    f->glDisable(GL_DEPTH_TEST);
    f->glDisable(GL_CULL_FACE);
}
其shader如下,比较简单
#version 330
uniform mat4 uPMatrix,uVMatrix,uMMatrix;
layout (location = 0) in vec3 aPosition;
layout (location = 1) in vec2 aTexture;
smooth out vec2 vTextureCood;

void main(void)
{
    gl_Position = uPMatrix * uVMatrix * uMMatrix * vec4(aPosition,1);
    vTextureCood = aTexture;
}
#version 330
uniform sampler2D sTexture;
in vec2 vTextureCood;
out vec4 fragColor;

void main(void)
{
    fragColor = texture2D(sTexture,vTextureCood);
}
在widget部件中的使用如下
#ifndef WIDGET_H
#define WIDGET_H

#include <QOpenGLWidget>
#include "mipmaprender.h"

class Widget : public QOpenGLWidget
{
    Q_OBJECT

public:
    Widget(QWidget *parent = 0);
    ~Widget();

protected:
    void initializeGL() override;
    void resizeGL(int w, int h) override;
    void paintGL() override;

private:
    MipMapRender render_; //渲染器
    QMatrix4x4 pMatrix; //投影矩阵
    QVector3D camera_; //摄像机位置
};

#endif // WIDGET_H
#include "widget.h"

Widget::Widget(QWidget *parent)
    : QOpenGLWidget(parent)
{
}

Widget::~Widget()
{
    makeCurrent();
}

void Widget::initializeGL()
{
    render_.initsize(); //初始化渲染器,生成顶点、纹理数据
    //设置摄像机位置
    camera_.setX(0.0);
    camera_.setY(3.5);
    camera_.setZ(30.0);
}

void Widget::resizeGL(int w, int h)
{   //窗口变化时,重置投影矩阵,使得缩放比例一致
    pMatrix.setToIdentity();
    pMatrix.perspective(30,float(w) / h,0.01f,100.0f);
}

void Widget::paintGL()
{
    QOpenGLExtraFunctions *f = QOpenGLContext::currentContext()->extraFunctions();
    f->glClearColor(0.0f,0.0f,0.0f,1.0f);
    f->glClear(GL_COLOR_BUFFER_BIT | GL_DEPTH_BUFFER_BIT);

    QMatrix4x4 vMatrix;
    vMatrix.lookAt(camera_,QVector3D{0.0f,3.5f,0.0f},QVector3D{0.0f,1.0f,0.0f});
    //绘制地板
    QMatrix4x4 mMatrix;
    mMatrix.scale(7,3.5,18);
    mMatrix.rotate(-90,1,0,0);
    render_.render(f,pMatrix,vMatrix,mMatrix,QImage("floor.jpg"),true);
    //绘制左边墙壁
    mMatrix.setToIdentity();
    mMatrix.translate(-7.0,3.5,0.0);
    mMatrix.scale(7,3.5,18);
    mMatrix.rotate(90,0,1,0);
    render_.render(f,pMatrix,vMatrix,mMatrix,QImage("wall.jpg"),true);
    //绘制右边墙壁
    mMatrix.setToIdentity();
    mMatrix.translate(7.0,3.5,0.0);
    mMatrix.scale(7,3.5,18);
    mMatrix.rotate(-90,0,1,0);
    render_.render(f,pMatrix,vMatrix,mMatrix,QImage("wall.jpg"),false);
    //绘制天花板
    mMatrix.setToIdentity();
    mMatrix.translate(0.0,7.0,0.0);
    mMatrix.scale(7,3.5,18);
    mMatrix.rotate(90,1,0,0);
    render_.render(f,pMatrix,vMatrix,mMatrix,QImage("sky.jpg"),true);
}
工程到此下载https://download.csdn.net/download/wanghualin033/10703851
gitlab地址为https://gitlab.com/gitHubwhl562916378/mipmap
工作愉快