1.1 keepalived高可用软件介绍
参考:
haproxy:
    https://blog.csdn.net/l835311324/article/details/83031084
    https://blog.csdn.net/qq_41772936/article/details/80718014
    https://blog.51cto.com/3381847248/1977073
keepalive:
    https://blog.csdn.net/celeste7777/article/details/49096167
    https://v3u.cn/a_id_117
1、keepalived--监控检查
注:keepalive软件有两种功能:监控检查、VRRP冗余协议
1. keepalive的作用是检测web服务器的状态,如果一台web服务器宕机,会将故障机器从集群中剔除
2. keepalieve会从以下三层来检查集群中的服务是否正常:
1)layer3:通过ICMP协议ping测试
2)layer4:比如web服务,keepalived检查80端口是否启动
3)layer7:根据用户的设定检查服务器程序运行是否正常
2、keepalived--VRRP冗余协议原理
注:vrrp是虚拟路由冗余协议,就是当出现单点故障问题通过竞选方式决定vip走向的一种机制
1. Keepalived高可用是通过vrrp协议通信的,vrrp是通过竞选机制决定主备
2. Keepalived 主的服务器会一直发送 VRRP广播包,告诉备它还活着
3. 当备机监听不到主发送的广播包时,就人为主机不可用,所有备机通过配置文件中的优先级选举新的主机
4. 新的主机就会启动相关服务接管资源,保证业务的连续性
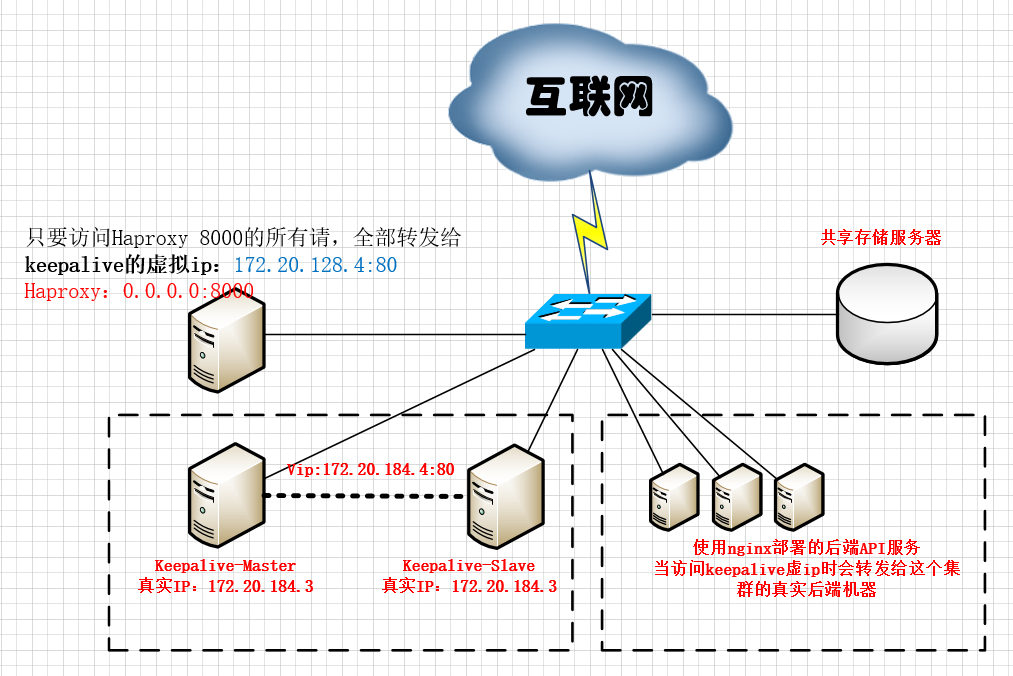
1.2 keepalive+haproxy高可用集群
1、真实keepalive集群部署架构图
1)haproxy中的配置
1. haproxy的 frontend模块配置负责给用户请求一个接口,backend定义可以定义后端一组服务器(其实就是keepalive主机组)
2. 一个frontend可以拥有多个backend,一个backend也可以让多个不同的frontend调用(后端api接口可以被多个前端调用)
3. 具体流程就是当frontend接受到用户请求,根据我们的配置交给指定的backend处理请求。
4. backend再将请求分发到真正的后端服务器
2)keepalive中的配置
1. 两台keepalive服务器同时监听一个虚拟IP,同一时间只有keepalive-master集群能够进行服务代理
2. 当keepalive-master宕机,keepalive-slave会立刻顶替master执行集群代理服务
1.3 使用docker-compose配置keepalive
1、环境说明(这里借用compose测试)
'''环境中只需要一台虚拟机,然后使用docker-compose来启动三个docker容器模拟 haproxy、keepalive-master、keepalive-slave '''
# haproxy: 0.0.0.0:8000 (在docker-compose网络中映射宿主机的8000端口到haproxy)
# keepalive-master: 172.20.128.2(VIP:172.20.128.4:80)
# keepalive-slave: 172.20.128.3 (VIP:172.20.128.4:80)
2、部署keepalive项目代码


version: "3"
services:
  nginx_master:
    build:
      context: ./
      dockerfile: ./Dockerfile
    volumes:
      - ./index-master.html:/usr/share/nginx/html/index.html
      - ./favicon.ico:/usr/share/nginx/html/favicon.ico
      - ./keepalived-master.conf:/etc/keepalived/keepalived.conf
    networks:
      static-network:
        ipv4_address: 172.20.128.2
    cap_add:
      - NET_ADMIN
  nginx_slave:
    build:
      context: ./
      dockerfile: ./Dockerfile
    volumes:
      - ./index-slave.html:/usr/share/nginx/html/index.html
      - ./favicon.ico:/usr/share/nginx/html/favicon.ico
      - ./keepalived-slave.conf:/etc/keepalived/keepalived.conf
    networks:
      static-network:
        ipv4_address: 172.20.128.3
    cap_add:
        - NET_ADMIN
  proxy:
    image: haproxy:1.7-alpine
    ports:
      - 8000:6301
    volumes:
      - ./haproxy.cfg:/usr/local/etc/haproxy/haproxy.cfg
    networks:
      - static-network

networks:
  static-network:
    ipam:
      config:
        - subnet: 172.20.0.0/16
# 使用的基础镜像源(alpine是精简的Linux内核)
FROM nginx:1.13.5-alpine
# 更新最新本地镜像源  && 升级软件
RUN apk update && apk upgrade
# 安装keepalived等相关软件
RUN apk add --no-cache bash curl ipvsadm iproute2 openrc keepalived && \
    rm -f /var/cache/apk/* /tmp/*
# 将nginx和keepalive启动脚本从宿主机拷贝到docker容器中
COPY entrypoint.sh /entrypoint.sh
# 给启动脚本添加权限
RUN chmod +x /entrypoint.sh
# 启动服务
CMD ["/entrypoint.sh"]
# vrrp_script区域主要用来做健康检查的,当时检查失败时会将vrrp_instance的priority减少相应的值
vrrp_script chk_nginx {
    script "pidof nginx"
    interval 2
}

# 设置外网的VIP(虚拟ip)
vrrp_instance VI_1 {
    # 可以是MASTER或BACKUP,不过当其他节点keepalived启动时会将priority比较大的节点选举为MASTER
    state MASTER
    # 对外提供服务的网络接口,用来发VRRP包
    interface eth0
    # 取值在0-255之间,用来区分多个instance的VRRP组播, 同一网段中该值不能重复,并且同一个vrrp实例使用唯一的标识
    virtual_router_id 33
    # 用来选举master的,要成为master,那么这个选项的值最好高于其他机器50个点,该项取值范围是1-255(在此范围之外会被识别成默认值100)
    priority 200
    # 发VRRP包的时间间隔,即多久进行一次master选举,可以认为是健康查检时间间隔,单位为秒
    advert_int 1
    # 表示发送VRRP单播报文使用的源IP地址,当前keepalive真实ip
    unicast_src_ip 172.20.128.2
    # 表示对端接收VRRP单播报文的IP地址(防止上游交换机禁用广播)
    unicast_peer {
        172.20.128.3
    }

    authentication {
        # 定义认证类型
        auth_type PASS
        # 认证密码  这些相当于暗号
        auth_pass letmein
    }
    # keepalive对外的虚拟地址,访问虚拟地址会访问keepalive的master地址
    virtual_ipaddress {
        172.20.128.4/24 dev eth0
    }
    # track_script用于追踪脚本,用以实现某个检测功能
    track_script {
        chk_nginx
    }
}

# 配置keepalive
virtual_server 172.20.128.2 80 {
    delay_loop 15
    lb_algo rr
    lb_kind DR
    nat_mask 255.255.255.0
    persistence_timeout 50
    protocol TCP

    # keepalive代理的真实服务ip
    real_server 172.16.16.177 80 {
         weight 1
        TCP_CHECK {
            connect_port 80
            connect_timeout 3
            nb_get_retry 3
            delay_before_retry 4
        }
    }
    # keepalive代理的真实服务ip
    real_server 172.16.16.178 80 {
        weight 1
        TCP_CHECK {
            connect_port 80
            connect_timeout 3
            nb_get_retry 3
            delay_before_retry 4

        }
    }
}
vrrp_script chk_nginx {
    script "pidof nginx"
    interval 2
}

vrrp_instance VI_1 {
    state BACKUP
    interface eth0
    virtual_router_id 33
    priority 100
    advert_int 1
    unicast_src_ip 172.20.128.3
    unicast_peer {
        172.20.128.2
    }

    authentication {
        auth_type PASS
        auth_pass letmein
    }

    virtual_ipaddress {
        172.20.128.4/24 dev eth0
    }

    track_script {
        chk_nginx
    }
}
# global常用配置项
global
    # haproxy默认没有记录日志的文件,需要依赖rsyslog收集,具体方法,首先在配置文件的global段添加一条配置项
    log 127.0.0.1 local0
    # 最大并发连接数;默认为2000
    maxconn 4096
    daemon
    # 要启动的haproxy的进程数量;默认为1个,推荐为1个
    nbproc 4

defaults
    log 127.0.0.1 local3
    mode http
    option dontlognull
    option redispatch
    retries 2
    maxconn 2000
    balance roundrobin
    timeout connect 5000ms
    timeout client 5000ms
    timeout server 5000ms

# frontend部署前端服务,负责给用户请求一个接口
frontend main
    # 监听本docker容器中所有访问6301端口的请求
    # 监听端口,即haproxy提供web服务的端口,和lvs的vip端口类似
    bind *:6301
    # 定义一个服务器组 http_back
    default_backend webserver

# backend可以定义后端一组服务器
backend webserver
    server ngxin_master 172.20.128.4:80 check inter 2000 rise 2 fall 5
# 具体流程就是当frontend接受到用户请求,根据我们的配置交给指定的backend处理请求,backend再将请求分发到真正的后端服务器
#!/bin/sh

/usr/sbin/keepalived -n -l -D -f /etc/keepalived/keepalived.conf --dont-fork --log-console &

nginx -g "daemon off;"
<!DOCTYPE html>
<html lang="en">
<head>
    <meta charset="UTF-8">
    <meta name="viewport" content="width=device-width, initial-scale=1.0">
    <meta http-equiv="X-UA-Compatible" content="ie=edge">
    <title>主机</title>
<style>

#box{
    margin: 0px auto;
    font-family: 'Times New Roman', Times, serif;
    font-size: 30px;
    font-style: initial;
    color: aliceblue;
    }

body{
    background-color: black
}

</style>
</head>
<body>

    <div id="box">

        主机

    </div>

</body>
</html>
<!DOCTYPE html>
<html lang="en">
<head>
    <meta charset="UTF-8">
    <meta name="viewport" content="width=device-width, initial-scale=1.0">
    <meta http-equiv="X-UA-Compatible" content="ie=edge">
    <title>从机</title>
<style>

#box{
    margin: 0px auto;
    font-family: 'Times New Roman', Times, serif;
    font-size: 30px;
    font-style: initial;
    color: aliceblue;
    }

body{
    background-color: black
}

</style>
</head>
<body>

    <div id="box">

        从机

    </div>

</body>
</html>
3、测试keepalive
1)使用docker-compose开启keepalive集群
[root@linux-node4 nginx_keepalive]# docker-compose up       # 使用docker-compose部署keepalive(是在交互窗口运行的)
[root@linux-node4 nginx_keepalive]# docker ps               # 部署完成后新打开一个终端查看运行状态
CONTAINER ID        IMAGE                         PORTS                    NAMES
8fc6f148f02d        nginx_keepalive_nginx_master  80/tcp                   nginx_keepalive_nginx_master_1
5c94af00a93e        nginx_keepalive_nginx_slave   80/tcp                   nginx_keepalive_nginx_slave_1
93afe48d9b86        haproxy:1.7-alpine            0.0.0.0:8000->6301/tcp   nginx_keepalive_proxy_1

2)关闭keepalive-master模拟机器故障测试自动切换
[root@linux-node4 compose_lnmp]# docker stop nginx_keepalive_nginx_master_1     # 关闭keepalive-master模拟机器故障
[root@linux-node4 compose_lnmp]# docker ps                                      # 取到keepalive-master已经关闭
CONTAINER ID        IMAGE                        PORTS                    NAMES
c21d0edda6d3        nginx_keepalive_nginx_slave  80/tcp                   nginx_keepalive_nginx_slave_1
ab283ebcfaf1        haproxy:1.7-alpine           0.0.0.0:8000->6301/tcp   nginx_keepalive_proxy_1
[root@linux-node4 nginx_keepalive]# docker rm -f $( docker ps -a | grep keepalive |awk '{print $1}')   # 如果要停用最好删除创建的docker镜像

3)项目地址
https://gitee.com/xiaonq110/nginx_keepalive.git