一、 背景
本文主要介绍使用 keepalive 实现 nginx 的主备高可用
实验环境:CentOS 7 64 位
二、 实验步骤
2.1 安装 Nginx 和 Keepalive 软件 (两台机器都装)
# sudo rpm -Uvh http://nginx.org/packages/centos/7/noarch/RPMS/nginx-release-centos-7-0.el7.ngx.noarch.rpm
# sudo yum install -y nginx
# sudo systemctl start nginx.service
# sudo systemctl enable nginx.service
# sudo yum install keepalived -y
# sudo systemctl start keepalived.service
# sudo systemctl enable keepalived.service
2.2 编写 nginx 服务存活检测脚本(两台机器都装)
# vim /usr/bin/check_nginx_alive.sh
#!/bin/sh

PATH=/bin:/sbin:/usr/bin:/usr/sbin

A=`ps -C nginx --no-header |wc -l`

if [ $A -eq 0 ]
   then
     echo 'nginx server is died'
     killall keepalived
fi
# chmod +x /usr/bin/check_nginx_alive.sh
2.3 配置 keepalive (两台机器略有差异)
# vim /etc/keepalived/keepalived.conf
机器 A
vrrp_script check_nginx_alive {
    script "/usr/bin/check_nginx_alive.sh"
    interval 3
    weight -10
}
global_defs {
    ## 设置lvs的id,在一个网络内唯一
    router_id LVS_DEVEL
}

vrrp_instance VI_1 {
    ## 主机配置,从机为BACKUP
    state MASTER
    ## 网卡名称
    interface ens37
    virtual_router_id 51
    ## 权重值,值越大,优先级越高,backup设置比master小,这样就能在master宕机后讲backup变为master,而master回复后就可以恢复.
    priority 100
    advert_int 1
    authentication {
        auth_type PASS
        auth_pass 1111
    }
    virtual_ipaddress {
        ## 同一网段虚拟IP
        192.168.1.100
    }
    track_script {
        check_nginx_alive
    }

}

virtual_server 192.168.1.100 80 {
    delay_loop 6
    lb_algo rr
    lb_kind NAT
    persistence_timeout 50
    protocol TCP

    real_server 192.168.1.9 80 {
        weight 1
        TCP_CHECK{
            connect_timeout 3
            nb_get_retry 3
            delay_before_retry 3
            connect_port 80
        }
    }
}
机器 B
vrrp_script check_nginx_alive {
    script "/usr/bin/check_nginx_alive.sh"
    interval 3
    weight -10
}
global_defs {
    ## 设置lvs的id,在一个网络内唯一
    router_id LVS_DEVEL
}

vrrp_instance VI_1 {
    ## 主机配置,从机为BACKUP
    state BACKUP
    ## 网卡名称
    interface ens37
    virtual_router_id 51
    ## 权重值,值越大,优先级越高,backup设置比master小,这样就能在master宕机后讲backup变为master,而master回复后就可以恢复.
    priority 90
    advert_int 1
    authentication {
        auth_type PASS
        auth_pass 1111
    }
    virtual_ipaddress {
        ## 同一网段虚拟IP
        192.168.1.100
    }
    track_script {
        check_nginx_alive
    }

}

virtual_server 192.168.1.100 80 {
    delay_loop 6
    lb_algo rr
    lb_kind NAT
    persistence_timeout 50
    protocol TCP

    real_server 192.168.1.8 80 {
        weight 1
        TCP_CHECK{
            connect_timeout 3
            nb_get_retry 3
            delay_before_retry 3
            connect_port 80
        }
    }
}
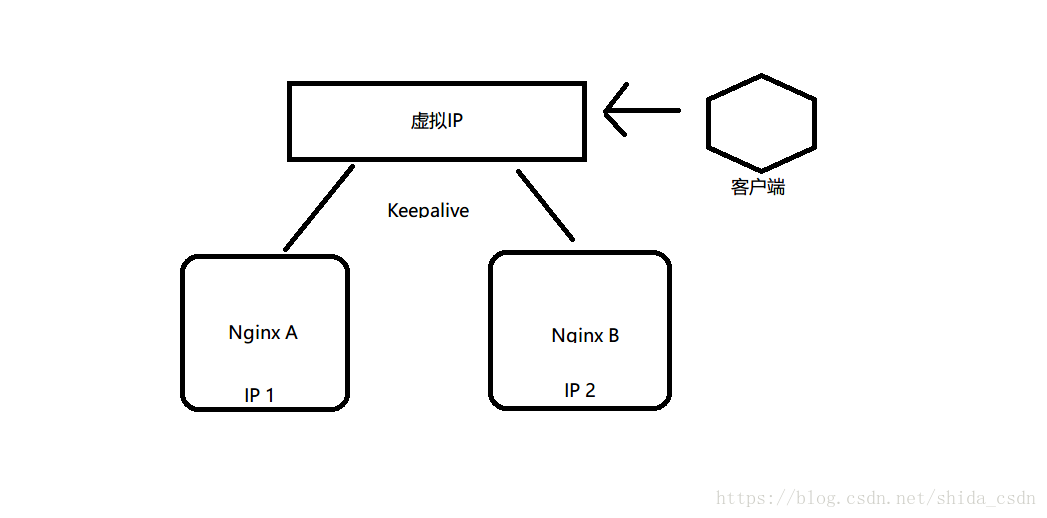
注解: 虚拟 IP 为 192.168.1.100,A 机器 IP 为 192.168.1.9,B 机器 IP 为 192.168.1.8
扫描二维码关注公众号,回复:
1757731 查看本文章

A 为 Master,B 为 Slave,A 优先级(100)高于 B 优先级(90),
2.4 修改 Nginx 主页,便于追溯主机(非必需,两台主机不同)
# vim /usr/share/nginx/html/index.html
机器 A
<!DOCTYPE html>
<html>
<head>
<title>Welcome to nginx!</title>
<style>
    body {
        width: 35em;
        margin: 0 auto;
        font-family: Tahoma, Verdana, Arial, sans-serif;
    }
</style>
</head>
<body>
<h1>Welcome to nginx! @Node A </h1>
<p>If you see this page, the nginx web server is successfully installed and
working. Further configuration is required.</p>

<p>For online documentation and support please refer to
<a href="http://nginx.org/">nginx.org</a>.<br/>
Commercial support is available at
<a href="http://nginx.com/">nginx.com</a>.</p>

<p><em>Thank you for using nginx.</em></p>
</body>
</html>
机器 B
<!DOCTYPE html>
<html>
<head>
<title>Welcome to nginx!</title>
<style>
    body {
        width: 35em;
        margin: 0 auto;
        font-family: Tahoma, Verdana, Arial, sans-serif;
    }
</style>
</head>
<body>
<h1>Welcome to nginx! @Node B </h1>
<p>If you see this page, the nginx web server is successfully installed and
working. Further configuration is required.</p>

<p>For online documentation and support please refer to
<a href="http://nginx.org/">nginx.org</a>.<br/>
Commercial support is available at
<a href="http://nginx.com/">nginx.com</a>.</p>

<p><em>Thank you for using nginx.</em></p>
</body>
</html>
2.5 重启 keepalive 生效(两台机器都执行)
# systemctl restart keepalived
2.6 结果检查
客户端访问虚拟 IP

A 机器 停止 nginx 服务
# systemctl stop nginx
再次访问虚拟地址

A 机器 重新启动 nginx ,同时重新启动 keepalived
# systemctl start nginx
# systemctl restart keepalived
再次访问虚拟 IP

本实验验证了 VIP 的自动漂移,基本实现了nginx 的主备自动切换
值得注意的是,修复失败的服务后,
必须重启所在机器的keepalive服务,否则keepalive是无法感知到服务恢复的!!!