子曰:温故而知新,可以为师矣。 《论语》-- 孔子
一、 简介
Android 四大组件之一,特点是无需界面,用于在后台处理耗时的操作或长期任务。甚至在程序退出的情况下,我们也可以让 Service 在后台继续保持运行状态。
二、 生命周期
先来一张经典的图:
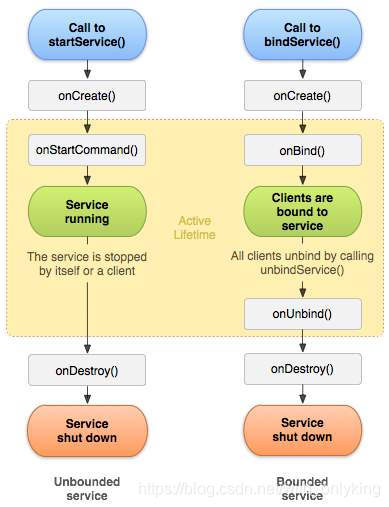
从图上分析:
Service的生命周期会根据启动方式的不同有不同的生命周期回调。startService和bindService的区别就是该service是否可以和启动它的组件(比如Activity)通信。
2.1 startService 方式开启服务
1)新键一个 MyService 类继承 Service,并重写父类的 onCreate()、onStartCommand()、onDestroy()方法。
public class MyService extends Service {

    public static final String TAG = "TAG";

    @Override
    public void onCreate() {
        super.onCreate();
        Log.d(TAG,"=======onCreate=======");
    }

    @Override
    public int onStartCommand(Intent intent, int flags, int startId) {
        Log.d(TAG,"=======onStartCommand=======");
        return super.onStartCommand(intent, flags, startId);
    }

    @Override
    public void onDestroy() {
        super.onDestroy();
        Log.d(TAG,"=======onDestroy=======");
    }

    @Nullable
    @Override
    public IBinder onBind(Intent intent) {
        return null;
    }
}
2)项目中的每一个 Service 都必须在 AndroidMainfest.xml 中注册才行。
<application

        // .....
        // 在 application 节点下注册
        <service android:name=".MyService"/>
        // .....

</application>
3)在 MainActivity 的布局文件添加一个启动服务按钮和一个停止服务按钮,同时在 MainActivity 中添加点击事件,分别做启动和停止服务操作。
public class MainActivity extends AppCompatActivity {

    @Override
    protected void onCreate(Bundle savedInstanceState) {
        super.onCreate(savedInstanceState);
        setContentView(R.layout.activity_main);

        Button btnStartService = findViewById(R.id.btn_start);
        Button btnStopService = findViewById(R.id.btn_stop);

        //开启服务
        btnStartService.setOnClickListener(new View.OnClickListener() {
            @Override
            public void onClick(View v) {
               startService(new Intent(MainActivity.this, MyService.class));
            }
        });

        //停止服务
        btnStopService.setOnClickListener(new View.OnClickListener() {
            @Override
            public void onClick(View v) {
               stopService(new Intent(MainActivity.this,MyService.class));
            }
        });
    }
}
4)运行程序,点击开启服务按钮,查看 log 日志。
com.example.servicedemo D/TAG: =======onCreate=======
com.example.servicedemo D/TAG: =======onStartCommand=======
从日志中可以分析出:
当启动一个服务时,会回调 onCreate() --> onStartCommand()
如果此时再次点击一下开启服务按钮,那么生命周期如何?,操作后查看日志。
com.example.servicedemo D/TAG: =======onCreate=======
com.example.servicedemo D/TAG: =======onStartCommand=======
com.example.servicedemo D/TAG: =======onStartCommand=======
提出疑问:此时并没有走 onCreate 方法,为什么 ???
说明 onCreate 方法只会在 Service 第一次创建的时候调用,如果 Service 已经被创建了,那么 startService 方法不管被调用多少次,onCreate 方法都不会被调用。
对比 Activity ,Activity 可以根据启动模式的不同可以有一个或者多个实例,虽然 Service 有两种启动方式,但是在整个系统中只会有一个 Service 实例。好比 PC 端的 C/S 模式,使用一个服务端去处理多个客户端的请求,这里就对应一个 Service 去处理来自多个 Activity 的请求。
对于 onStartCommand 方法的返回值,再次有必要说明一下: onStartCommand 方法必须返回一个整数,用于告知系统在服务被杀死后应该如何运行。
START_NOT_STICKY: 不会重建服务,除非还存在未发送的intent。当服务不再是必须的,并且应用程序能够简单地重启那些还未完成的工作时,这是避免服务运行的最安全的选项。START_TICKY:重建服务并且调用onStartCommand(),但是不会再次送入上一个intent,而是用空的intent来调用onStartCommand()。除非还有启动服务的intent未发送完,那么这些剩下的intent会继续发送 (适用于媒体播放器的类似服务,它们不执行命令,但需要一直运行并随时待命)。START_REDELIVER_INTENT:重建服务且用上一个已发送过的intent调用onStartCommand,任何未发送完成的intent也会依次进入。(使用与那些需要立即恢复工作的活跃服务,比如下载文件)
5.点击停止服务按钮,查看 log 日志。
com.example.servicedemo D/TAG: =======onDestroy=======
此时服务停止,回调 onDestroy 方法。
特别说明一下: 一旦服务开启,就和调用者 (开启者) 没有任何关系了,开启者退出,销毁(例如 Activity 的销毁),服务都在后台长期运行,开启者不能调用服务里面的方法。
好了,关于 startService 方式开启的 service 的生命周期的讲解结束啦,下面总结一下:
- 第一次启动服务,手动调用
startService()方法,生命周期回调:onCreate()-->onStartCommand(),之后无论多少次启动服务,只会走onStartCommand()方法。 - 停止服务,手动调用
unbindService()方法,生命周期回调:onDestory()。 - 此启动模式下的生命周期,只有
onStartCommand()方法会多次调用,其余方法只会调用一次。
2.2 bind 方式开启服务
1)在 MyService 中 创建 MyBinder 实例,继承 Binder,同时 onBind() 方法返回 MyBinder 实例。
public class MyService extends Service {

    public static final String TAG = "TAG";
    private MyBinder mMyBinder = new MyBinder();

    @Override
    public void onCreate() {
        super.onCreate();
        Log.d(TAG,"=======onCreate=======");
    }

    @Override
    public int onStartCommand(Intent intent, int flags, int startId) {
        Log.d(TAG,"=======onStartCommand=======");
        return super.onStartCommand(intent, flags, startId);
    }

    @Override
    public void onDestroy() {
        super.onDestroy();
        Log.d(TAG,"=======onDestroy=======");
    }

    @Nullable
    @Override
    public IBinder onBind(Intent intent) {
        Log.i(TAG,"=======onBind=======");
        return mMyBinder;
    }

    @Override
    public boolean onUnbind(Intent intent) {
        Log.i(TAG,"=======onUnbind=======");
        return super.onUnbind(intent);
    }

    class MyBinder extends Binder {

        public void startDownload(){
            Log.d(TAG,"=======startDownload=======");
            // 假设执行具体的下载任务
        }
    }
}
2. MainActivity 中 创建 MyServiceConnection 的实例,实现 ServiceConnection 接口,重写 onServiceConnected 和 onServiceDisconnected 方法,在 onServiceConnected 方法中,可以拿到 MyService 中的 MyBinder 实例,可以调用 MyBinder 实例中的任何 public 方法。同时添加绑定服务操作和解绑服务操作,分别调用 bindService 和 unbindService 方法。
public class MainActivity extends AppCompatActivity {

    private MyService.MyBinder mMyBinder;

    private ServiceConnection mServiceConnection;

    @Override
    protected void onCreate(Bundle savedInstanceState) {
        super.onCreate(savedInstanceState);
        setContentView(R.layout.activity_main);

        Button btnStartService = findViewById(R.id.btn_start);
        Button btnStopService = findViewById(R.id.btn_stop);
        Button btnBindService = findViewById(R.id.btn_bind);
        Button btnUnBindService = findViewById(R.id.btn_unbind);

        mServiceConnection = new MyServiceConnection();

        //开启服务
        btnStartService.setOnClickListener(new View.OnClickListener() {
            @Override
            public void onClick(View v) {
               startService(new Intent(MainActivity.this, MyService.class));
            }
        });

        //停止服务
        btnStopService.setOnClickListener(new View.OnClickListener() {
            @Override
            public void onClick(View v) {
               stopService(new Intent(MainActivity.this,MyService.class));
            }
        });

        //绑定服务
        btnBindService.setOnClickListener(new View.OnClickListener() {
            @Override
            public void onClick(View v) {
                Intent bindIntent = new Intent(MainActivity.this,MyService.class);
                //Context.BIND_AUTO_CREATE : Activity和Service建立关联后自动创建Service
                bindService(bindIntent,mServiceConnection, Context.BIND_AUTO_CREATE);
            }
        });

        //解绑服务
        btnUnBindService.setOnClickListener(new View.OnClickListener() {
            @Override
            public void onClick(View v) {
                unbindService(mServiceConnection);
            }
        });
    }


    class MyServiceConnection implements ServiceConnection{

        /**
         *
         * @param name
         * @param service Service中的onBind方法返回的
         */
        @Override
        public void onServiceConnected(ComponentName name, IBinder service) {
            Log.d("TAG", "onServiceConnected");
            mMyBinder = (MyService.MyBinder) service;
            mMyBinder.startDownload();
        }

        @Override
        public void onServiceDisconnected(ComponentName name) {
            Log.i("TAG", "onServiceDisconnected");
        }
    }
}
3.点击绑定服务,查看日志
com.example.servicedemo D/TAG: =======onCreate=======
com.example.servicedemo I/TAG: =======onBind=======
注意:
- 绑定服务不会调用
onStartCommand方法。 - bind 方式开启的服务,绑定服务后,调用者挂了,服务也会挂了,调用者可以使用服务里面的方法。
- 任何一个
Service在整个应用程序范围内都是通用的,即MyService不仅可以和MainActivity建立关联,还可以和任何一个Activity建立关联,而且建立关联时,都可以获得相同的MyBinder实例。
4.点击解绑服务,查看日志。
com.example.servicedemo I/TAG: =======onUnbind=======
com.example.servicedemo D/TAG: =======onDestroy=======
思考: 如果点击了开启服务,同时又点击了绑定服务,那么如何销毁服务呢???
5. 点击开启服务按钮,接着点击绑定服务按钮,然后点击停止服务按钮,最后点击解绑服务按钮,查看日志。
com.example.servicedemo D/TAG: =======onCreate=======
com.example.servicedemo D/TAG: =======onStartCommand=======

com.example.servicedemo I/TAG: =======onBind=======
com.example.servicedemo D/TAG: onServiceConnected
com.example.servicedemo D/TAG: =======startDownload=======

com.example.servicedemo D/TAG: click Stop Service button

com.example.servicedemo D/TAG: click Unbind Service button
com.example.servicedemo I/TAG: =======onUnbind=======
com.example.servicedemo D/TAG: =======onDestroy=======
从日志中可以得出结论:一个 Service 必须要在既没有和任何 Activity 关联又处理停止状态的时候才会被销毁。
好了,关于 bindService 的讲解就结束啦,下面总结一下:
- 绑定服务:手动调用
bindService()方法,生命周期回调onCreate()-->onBind()。 - 解绑服务:手动调用
unbindServide方法,生命周期回调onUnbind()-->onDestroy()。 - 先启动服务,在绑定服务,然后解绑服务,最后停止服务,生命周期回调
onCreate()-->onStartCommand()-->onBind()-->onUnBind()-->onDestroy()。
再强调几点说明:
startService方式启动的service是无法与Activity通信的,而bindService方式启动的servcice是可以与Activity通信的。startService方式启动的service,Activity销毁了,此service依然可以在后台运行,除非调用stopService方法停止服务;而bindService方式启动的servcice,一旦与之关联的所有Activity都销毁了,service自动销毁。
2.3 前台服务
- 前台
Service优先级较高,不会由于系统内存不足而被回收;后台Service优先级较低,当系统出现内存不足情况时,很有可能会被回收。
前台服务与后台服务最大的区别在于,前台服务在下拉通知栏有显示通知,但后台服务没有,只需要在原有的 Service 类对 onCreate() 方法进行稍微修改即可,代码如下:
@Override
    public void onCreate() {
        super.onCreate();
        System.out.println("执行了onCreat()");

        //添加下列代码将后台Service变成前台Service
        //构建"点击通知后打开MainActivity"的Intent对象
        Intent notificationIntent = new Intent(this,MainActivity.class);
        PendingIntent pendingIntent = PendingIntent.getActivity(this,0,notificationIntent,0);

        //新建Builer对象
        Notification.Builder builer = new Notification.Builder(this);
        builer.setContentTitle("前台服务通知的标题");//设置通知的标题
        builer.setContentText("前台服务通知的内容");//设置通知的内容
        builer.setSmallIcon(R.mipmap.ic_launcher);//设置通知的图标
        builer.setContentIntent(pendingIntent);//设置点击通知后的操作

        Notification notification = builer.getNotification();//将Builder对象转变成普通的notification
        startForeground(1, notification);//让Service变成前台Service,并在系统的状态栏显示出来

    }
三、Service 和 Thread 之间的关系
Service和Thread之间没有任何关系。- 调用者和
service在同一个进程里,所以运行在主进程的main线程中,所以不能在Service里编写耗时代码。
其实就是要搞清楚后台与子线程是两个完全不同的概念。
Android 的后台就是指,它的运行是完全不依赖 UI 的。即使 Activity 被销毁,或者程序被关闭,只要进程还在,Service 就可以继续运行。
正确的做法是在 Service 中再创建子线程,然后在这里去处理耗时逻辑就不会阻塞主线程的运行。
start 启动服务的 Service 可以这样写:
@Override
public int onStartCommand(Intent intent, int flags, int startId) {
	new Thread(new Runnable() {
		@Override
		public void run() {
			// 开始执行后台任务
		}
	}).start();
	return super.onStartCommand(intent, flags, startId);
}
bind 启动服务的 Service 可以这样写:
// 参考 MyService
class MyBinder extends Binder {

	public void startDownload() {
		new Thread(new Runnable() {
			@Override
			public void run() {
				// 执行具体的下载任务
			}
		}).start();
	}
}
四、远程 Service(AIDL)
先来做一个小改动,在 MyService 的 onCreate() 方法中让线程睡眠 60 秒。
public class MyService extends Service {

	......

	@Override
	public void onCreate() {
		super.onCreate();
		Log.d(TAG, "onCreate() executed");
		try {
			Thread.sleep(60000);
		} catch (InterruptedException e) {
			e.printStackTrace();
		}
	}

	......
}
重新运行后,点击一下 Start Service 按钮或 Bind Service 按钮,程序就会阻塞住并无法进行任何其它操作,过一段时间后就会弹出 ANR 的提示框。
原因想必你已经知道原因了,Service 是运行在主线程中的,不能执行耗时操作,那么如何避免这 ANR 呢???
这时候可以使用远程 Service。将一个普通的 Service 变成 远程 Service 其实很简单,只需要在注册 Service 时,将它的 process 属性变成 remote 就行。
 <service android:name=".MyService"
            android:process=":remote"/>
现在重新运行,并没有 ANR,原因是 MyService 已经在另外一个进程当中了,所以只会阻塞该进程中的主线程,并不会影响到当前应用程序。
为了验证说法,在 MyService 和 MainActivity 的 onCreate 方法中加入一行日志,打印出各自所在的进程 id。
com.example.servicedemo D/TAG: process id is 8928
com.example.servicedemo:remote D/TAG: =======onCreate=======
com.example.servicedemo:remote D/TAG: process id is 8958
可以明显的看到,不仅仅是进程id不同了,就连应用程序包名也不一样了,MyService 中打印的那条日志,包名后面还跟上了:remote标识。
这种方式有一个弊端,就是不能使用 bindService 方式了,点击 start Service 程序不会崩溃,但是点击 bind Service 会崩溃,why ???
原因是 bindService 方式启动的 Service 服务,会把 MainActivity 和 MyService 建立关联,但是它们运行在两个不同的进程中,不能再用传统的方式了,此时就需要 AIDL 了。
AIDL 是 Android 接口定义语言的意思,它可以用于让某个 Service 与
多个应用程序组件之间进行跨进程通信(IPC),从而实现多个应用程序共享一个 Service 的功能。
AIDL 用法
1) 新建 AIDL 文件
interface MyAIDLService {
    int plus(int a,int b);
    String toUpperCase(String str);
}
2)在 Service 子类中实现定义的接口方法。
public class MyServiceByAIDL extends Service {
    public static final String TAG = "TAG";

    @Override
    public void onCreate() {
        super.onCreate();
        Log.d(TAG,"=======onCreate=======");
    }

    @Override
    public int onStartCommand(Intent intent, int flags, int startId) {
        Log.d(TAG,"=======onStartCommand=======");
        return super.onStartCommand(intent, flags, startId);
    }

    @Override
    public boolean onUnbind(Intent intent) {
        Log.i(TAG,"=======onBind=======");
        return super.onUnbind(intent);
    }

    @Override
    public void onDestroy() {
        super.onDestroy();
        Log.d(TAG,"=======onDestroy=======");
    }

    @Nullable
    @Override
    public IBinder onBind(Intent intent) {
        return mBinder;
    }

    MyAIDLService.Stub mBinder = new MyAIDLService.Stub() {
        @Override
        public void invokeMethodInMyService()  {
            Log.d(TAG,"客户端通过AIDL与远程后台成功通信");
        }
    };
}
3) 在 AndroidMainfest.xml 中 注册服务 和 声明为远程服务。
 // process=":remote" : 将本地服务设置成远程服务
 // exported="true"  : 设置可被其他进程调用
        <service android:name=".MyServiceByAIDL"
            android:process=":remote"
            android:exported="true" >
            // 此处Intent的action必须写成“服务器端包名.aidl文件名”
            <intent-filter>
                <action android:name="com.example.servicedemo.MyAIDLService"/>
            </intent-filter>
        </service>
4)新建一个工程,同时把之前写好的 AIDL 文件所在的包(也就是aidl的文件夹)一起复制到新建工程的 main 包下。
5) 在 MainActivity里,作如下代码修改,相关注释都写在代码里了:
public class MainActivity extends AppCompatActivity {
    //定义aidl接口变量
    private MyAIDLService mMyAIDLService;

    //创建ServiceConnection的匿名类
    private ServiceConnection mServiceConnection = new ServiceConnection() {


        //在Activity与Service建立关联时调用
        @Override
        public void onServiceConnected(ComponentName name, IBinder service) {
            //使用AIDLService1.Stub.asInterface()方法获取服务器端返回的IBinder对象
            //将IBinder对象传换成了mAIDL_Service接口对象

            mMyAIDLService = MyAIDLService.Stub.asInterface(service);
            try {
                //通过该对象调用在MyAIDLService.aidl文件中定义的接口方法,从而实现跨进程通信
                mMyAIDLService.invokeMethodInMyService();

            } catch (RemoteException e) {
                e.printStackTrace();
            }
        }

        //重写onServiceConnected()方法和onServiceDisconnected()方法
        //在Activity与Service建立关联和解除关联的时候调用
        @Override
        public void onServiceDisconnected(ComponentName name) {

        }
    };
    @Override
    protected void onCreate(Bundle savedInstanceState) {
        super.onCreate(savedInstanceState);
        setContentView(R.layout.activity_main);

        Button button = findViewById(R.id.btn_bind);

        button.setOnClickListener(new View.OnClickListener() {
            @Override
            public void onClick(View v) {

                //通过Intent指定服务端的服务名称和所在包,与远程Service进行绑定
                //参数与服务器端的action要一致,即"服务器包名.aidl接口文件名"
                Intent intent = new Intent("com.example.servicedemo.MyAIDLService");

                //Android5.0后无法只通过隐式Intent绑定远程Service
                //需要通过setPackage()方法指定包名
                intent.setPackage("com.example.servicedemo");

                //绑定服务,传入intent和ServiceConnection对象
                bindService(intent,mServiceConnection, Context.BIND_AUTO_CREATE);
            }
        });

    }
}
6)点击绑定服务按钮,查看日志:
D/TAG: =======onCreate=======
D/TAG: =======onBind=========
D/TAG: 客户端通过AIDL与远程后台成功通信
到此,就简单地实现类跨进程通信。
五、IntentService
- 作为任何一个
Android开发,不能不知道InterService,下面那就具体讲解一下关于IntentService的方方面面。
5.1 什么是 IntentService?
IntentService 是继承自 Service, 所以本质还是一个 Service。在 IntentService 内部维护了一个 WorkerThread 来专门处理耗时的操作,实际上他会将所有 IntentService 的业务操作都放在 WorkThread 中执行。
如果 start 了多次使用的 IntentService ,那么每一次 start 任务,都会在 WorkThread 中依次执行。IntentService 在执行完这些任务之后,会调用 stopSelf() 结束自己。
5.2 IntentService 的特点
- 创建独立的
WorkThread来处理所有的Intent请求。 - 创建独立的
WorkThread来处理onHandleIntent()的实现代码,无需担心多线程问题。 - 所有请求完成后,
IntentService会自动停止。 onBind()默认返回null,不要去实现它,不要用bindService()绑定一个IntentService。onStartCommand提供了默认的实现,会将请求的Intent添加到队列中。
5.3 IntentService 的使用
1)创建 MyIntentService 继承 IntentService。提供一个空参的构造方法,同时在 onHandleIntent 中执行耗时操作,也能在此方法中接收 intent 传来的参数。
public class MyIntentService extends IntentService {

    private static final String TAG = "TAG";

    /**
     * // 这里必须有一个空参数的构造实现父类的构造,否则会报异常
     * // java.lang.InstantiationException: java.lang.Class<com.example.intentservicedemo.MyIntentService> has no zero argument constructor
     */
    public MyIntentService() {
        super("");
    }

    @Override
    public void onCreate() {
        super.onCreate();
        Log.d(TAG,"=====onCreate======");
    }

    @Override
    protected void onHandleIntent(@Nullable Intent intent) {
        Log.d(TAG,"工作线程是:"+ Thread.currentThread().getName());
        String task = intent.getStringExtra("task");
        Log.d(TAG,"任务是:"+task);
        for (int i =0;i<3;i++){
            try {
                Thread.sleep(2000);
            } catch (InterruptedException e) {
                e.printStackTrace();
            }
        }
    }

    @Override
    public int onStartCommand(@Nullable Intent intent, int flags, int startId) {
        Log.d(TAG,"onStartCommand,startId:  "+startId);
        return super.onStartCommand(intent, flags, startId);
    }

    @Override
    public void onDestroy() {
        super.onDestroy();
        Log.d(TAG,"onDestroy");
    }
}
2)在 MainActivity 中 点击开启服务。同时不要忘记,在 AndroidMinfest.xml 文件中给 MyIntentService 注册。
 button.setOnClickListener(new View.OnClickListener() {
            @Override
            public void onClick(View v) {
                Intent intent = new Intent(MainActivity.this,MyIntentService.class);
                intent.putExtra("task","播放音乐");
                startService(intent);
                intent.putExtra("task","播放视频");
                startService(intent);
                intent.putExtra("task","播放图片");
                startService(intent);
            }
        });
3)查看日志:
com.example.intentservicedemo D/TAG: =====onCreate======
com.example.intentservicedemo D/TAG: onStartCommand,startId:  1
com.example.intentservicedemo D/TAG: 工作线程是:IntentService[]
com.example.intentservicedemo D/TAG: 任务是:播放音乐
com.example.intentservicedemo D/TAG: onStartCommand,startId:  2
com.example.intentservicedemo D/TAG: onStartCommand,startId:  3
com.example.intentservicedemo D/TAG: 工作线程是:IntentService[]
com.example.intentservicedemo D/TAG: 任务是:播放视频
com.example.intentservicedemo D/TAG: 工作线程是:IntentService[]
com.example.intentservicedemo D/TAG: 任务是:播放图片
com.example.intentservicedemo D/TAG: onDestroy
从上面的日志分析:
onCreate只执行了一次,onStartCommand执行了三次,说明只有一个实例。- 播放音乐,播放视频,播放图片是顺次执行的,最后一个任务执行完,回调了
onDestroy方法。符合所有请求完成后,IntentService会自动停止的特点。
通过上面的简单示例,是不是发现 IntentService 蛮简单地嘛,下面我们从源码来分析一波,一探究竟。
问题一:IntentService 如何单独开启一个新的工作线程?
IntentService 源码中的 onCreate 方法:
 @Override
    public void onCreate() {
        // TODO: It would be nice to have an option to hold a partial wakelock
        // during processing, and to have a static startService(Context, Intent)
        // method that would launch the service & hand off a wakelock.

        super.onCreate();
        /**
         * 1. 通过实例化 HandlerThread 新建线程。
         * 2. HandlerThread 就是一个带有 handler 的 Thread。
         * 3. 在自定义的MyService里面,构造方法写的是super(""),如果写的不是空串,日志打印就应该是"工作线程是: IntentService[我们定义的名称]"。
         **/
        HandlerThread thread = new HandlerThread("IntentService[" + mName + "]");
        thread.start();
        // 获取这个线程的looper,赋给内部维护的 Looper
        mServiceLooper = thread.getLooper();
        // 新建 mServiceHandler ,绑定上述获得 Looper
        mServiceHandler = new ServiceHandler(mServiceLooper);
    }
ServiceHandler源码分析:
private final class ServiceHandler extends Handler {
     // 构造函数
     public ServiceHandler(Looper looper) {
     super(looper);
     }

     // IntentService的handleMessage()把接收的消息交给onHandleIntent()处理
     @Override
     public void handleMessage(Message msg) {

     // onHandleIntent 方法在工作线程中执行
     // onHandleIntent() = 抽象方法,使用时需重写
     onHandleIntent((Intent)msg.obj);
     // 执行完调用 stopSelf() 结束服务
     stopSelf(msg.arg1);
    }
}

    /**
     * onHandleIntent()源码分析
     * onHandleIntent() = 抽象方法,使用时需重写
     **/
      @WorkerThread
      protected abstract void onHandleIntent(Intent intent);
问题二:IntentService 如何通过 onStartCommand() 将 Intent 传递给服务并且一次插入到工作队列中?
/**
  * onStartCommand()源码分析
  * onHandleIntent() = 抽象方法,使用时需重写
  **/
  public int onStartCommand(Intent intent, int flags, int startId) {

    // 调用onStart()->>分析1
    onStart(intent, startId);
    return mRedelivery ? START_REDELIVER_INTENT : START_NOT_STICKY;
}

 /**
  * 分析1:onStart(intent, startId)
  **/
  public void onStart(Intent intent, int startId) {

    // 1. 获得ServiceHandler消息的引用
    Message msg = mServiceHandler.obtainMessage();
    msg.arg1 = startId;

    // 2. 把 Intent参数 包装到 message 的 obj 发送消息中,
    //这里的Intent  = 启动服务时startService(Intent) 里传入的 Intent
    msg.obj = intent;

    // 3. 发送消息,即 添加到消息队列里
    mServiceHandler.sendMessage(msg);
}
好了,关于 IntentService 的源码解读就差不多了,下面有两点注意事项:
- 若一个任务正在
IntentService中执行,此时再发送一个新的任务,此任务会等到前一个任务结束后才开始执行。理由是onCreate()方法只执行一次,即只会创建一个工作线程,多次调用只是把消息加入消息队列中等待执行而已。 - 不建议通过
bindService启动IntentService。理由是此模式不会调用onStartcommand方法,消息不会发送到消息队列中,那么onHandleIntent不会回调,无法实现多线程操作。
写在文末
纸上得来终觉浅,绝知此事要躬行。 《冬夜读书示子聿》-- 陆游
至此,Service 的基础知识点算是梳理了一遍,各位看官食用愉快。
