目录
1 简介
在本节中,我们将学习如何使用卷积神经网络,并使用更大的数据集,这有助于避免过度拟合的问题!
2 使用更大的数据集进行训练-猫和狗
在之前的实验中,训练了一个马与人类数据的分类器。尽管在训练集上获得了很好的训练结果,但是当我们尝试用真实图像进行分类时,存在许多错误,主要是由于过度拟合–CNN在见过的数据方面表现非常好。
3 导入库
import os
import zipfile
import random
import tensorflow as tf
from tensorflow.keras.optimizers import RMSprop
from tensorflow.keras.preprocessing.image import ImageDataGenerator
from shutil import copyfile
4 获取数据
local_zip = "./cats-and-dogs.zip"
zip_ref = zipfile.ZipFile(local_zip,"r")
zip_ref.extractall("cats-and-dogs")
zip_ref.close()
print(len(os.listdir("./cats-and-dogs/PetImages/Cat/")))
print(len(os.listdir("./cats-and-dogs/PetImages/Dog/")))
12501
12501
5 准备数据
def split_data(SOURCE,TRAINING,TESTING,SPLIT_SIZE):
    files = []
    for filename in os.listdir(SOURCE):
        file = SOURCE + filename
        if os.path.getsize(file) > 0:
            files.append(filename)
        else:
            print(filename+" is zero length,so ignoring.")

    training_length = int(len(files)*SPLIT_SIZE)
    testing_length = int(len(files)-training_length)
    shuffled_set = random.sample(files,len(files))
    training_set = shuffled_set[0:training_length]
    testing_set = shuffled_set[:testing_length]

    for filename in training_set:
        this_file = SOURCE + filename
        destination = TRAINING + filename
        copyfile(this_file, destination)

    for filename in testing_set:
        this_file = SOURCE + filename
        destination = TESTING + filename
        copyfile(this_file, destination)


CAT_SOURCE_DIR = "./cats-and-dogs/PetImages/Cat/"
TRAINING_CATS_DIR = "./cats-v-dogs/training/cats/"
TESTING_CATS_DIR = "./cats-v-dogs/testing/cats/"
DOG_SOURCE_DIR = "./cats-and-dogs/PetImages/Dog/"
TRAINING_DOGS_DIR = "./cats-v-dogs/training/dogs/"
TESTING_DOGS_DIR = "./cats-v-dogs/testing/dogs/"

split_size = .9
split_data(CAT_SOURCE_DIR, TRAINING_CATS_DIR, TESTING_CATS_DIR, split_size)
split_data(DOG_SOURCE_DIR, TRAINING_DOGS_DIR, TESTING_DOGS_DIR, split_size)
666.jpgis zero length,so ignoring.
11702.jpgis zero length,so ignoring.
print(len(os.listdir('./cats-v-dogs/training/cats/')))
print(len(os.listdir('./cats-v-dogs/training/dogs/')))
print(len(os.listdir('./cats-v-dogs/testing/cats/')))
print(len(os.listdir('./cats-v-dogs/testing/dogs/')))
11250
11250
1250
1250
6 定义模型
model = tf.keras.models.Sequential([
    tf.keras.layers.Conv2D(16,(3,3),activation="relu",input_shape=(150,150,3)),
    tf.keras.layers.MaxPooling2D(2,2),
    tf.keras.layers.Conv2D(32,(3,3),activation="relu"),
    tf.keras.layers.MaxPooling2D(2,2),
    tf.keras.layers.Conv2D(64,(3,3),activation="relu"),
    tf.keras.layers.MaxPooling2D(2,2),
    tf.keras.layers.Flatten(),
    tf.keras.layers.Dense(512,activation="relu"),
    tf.keras.layers.Dense(1,activation="sigmoid")
])
WARNING:tensorflow:From D:\software\Anaconda\anaconda\lib\site-packages\tensorflow\python\ops\resource_variable_ops.py:435: colocate_with (from tensorflow.python.framework.ops) is deprecated and will be removed in a future version.
Instructions for updating:
Colocations handled automatically by placer.
model.compile(optimizer=RMSprop(lr=0.0001),
              loss="binary_crossentropy",
              metrics=["acc"])
7 训练模型
TRAINING_DIR = "./cats-v-dogs/training/"
train_datagen = ImageDataGenerator(rescale=1.0/255.)
train_generator = train_datagen.flow_from_directory(TRAINING_DIR,
                                                    batch_size=100,
                                                    class_mode="binary",
                                                    target_size=(150,150))
VALIDATION_DIR = "./cats-v-dogs/testing/"
validation_datagen = ImageDataGenerator(rescale=1.0/255.)
validation_generator = validation_datagen.flow_from_directory(VALIDATION_DIR,
                                                              batch_size=100,
                                                              class_mode='binary',
                                                              target_size=(150, 150))
Found 22498 images belonging to 2 classes.
Found 2500 images belonging to 2 classes.
history = model.fit_generator(train_generator,
                              epochs=15,
                              verbose=1,
                              validation_data=validation_generator)
Epoch 1/15
 37/225 [===>..........................] - ETA: 5:53 - loss: 0.6875 - acc: 0.5338
Epoch 13/15
25/25 [==============================] - 16s 643ms/step - loss: 0.2902 - acc: 0.8780
225/225 [==============================] - 390s 2s/step - loss: 0.3139 - acc: 0.8636 - val_loss: 0.2902 - val_acc: 0.8780
Epoch 14/15
25/25 [==============================] - 16s 640ms/step - loss: 0.2689 - acc: 0.8864
225/225 [==============================] - 390s 2s/step - loss: 0.2978 - acc: 0.8698 - val_loss: 0.2689 - val_acc: 0.8864
Epoch 15/15
25/25 [==============================] - 16s 641ms/step - loss: 0.2471 - acc: 0.8952
225/225 [==============================] - 390s 2s/step - loss: 0.2840 - acc: 0.8797 - val_loss: 0.2471 - val_acc: 0.8952
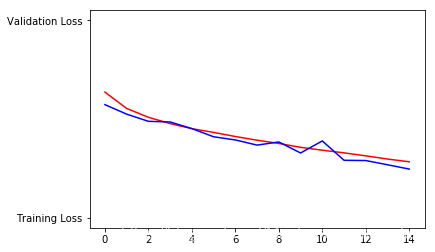
8 探索数据集
%matplotlib inline
import matplotlib.image  as mpimg
import matplotlib.pyplot as plt
#-----------------------------------------------------------
# Retrieve a list of list results on training and test data
# sets for each training epoch
#-----------------------------------------------------------
acc=history.history['acc']
val_acc=history.history['val_acc']
loss=history.history['loss']
val_loss=history.history['val_loss']

epochs=range(len(acc)) # Get number of epochs

#------------------------------------------------
# Plot training and validation accuracy per epoch
#------------------------------------------------
plt.plot(epochs, acc, 'r', "Training Accuracy")
plt.plot(epochs, val_acc, 'b', "Validation Accuracy")
plt.title('Training and validation accuracy')
plt.figure()

#------------------------------------------------
# Plot training and validation loss per epoch
#------------------------------------------------
plt.plot(epochs, loss, 'r', "Training Loss")
plt.plot(epochs, val_loss, 'b', "Validation Loss")
plt.figure()
<Figure size 432x288 with 0 Axes>

<Figure size 432x288 with 0 Axes>
