flask
概念:flask ‘微’框架
django –> 完善完整高集成的框架
flask –> Flask 不包含数据库抽象层微框架,database,templetes需要自己去组装
flask 布置项目:
1.创建虚拟环境
    virtualenv --no-site-packages flaskenv
    # 把虚拟环境创建在flaskenv目录下

2.进入虚拟环境
    cd Scripts
    activate
3.虚拟环境下安装flask
    pip install flask
4.打开pycharm,创建工程
    解释器选择flaskenv/Scripts/python.exe
上午讲:
1.项目下右键新建python文件,名字为hello.py

from flask import Flask

# 初始化, __name__代表主模块名或者包
app = Flask(__name__)

# 定义路由(/)
@app.route('/')
# 视图函数
def hello_world():
    return 'hello World'


# 定义路由,url中参数为字符串
@app.route('/name/hello/')
def hello_man(name):
    print(name)
    print(type(name))
    return 'hello name:%s' %(name, type(name))

# 定义路由,url参数为整数
@app.route('/helloint/<int:id>/')
def hello_int(id):
    print(id)
    print(type(id))
    return 'hello int:%s' %id

# 定义路由,返回一个页面
@app.route('/index/')
def index():
return render_template('hello.html')
if __name__ == '__main__':
    # 启动项目
    app.run(debug=True,port='8000',host='0.0.0.0')
    运行方式,启动debug模式,指定端口为8000,IP地址为 127.0.0.1,如果不指定默认为(127.0.0.1:5000)
配置debug如下:
run --> debug --> + -->
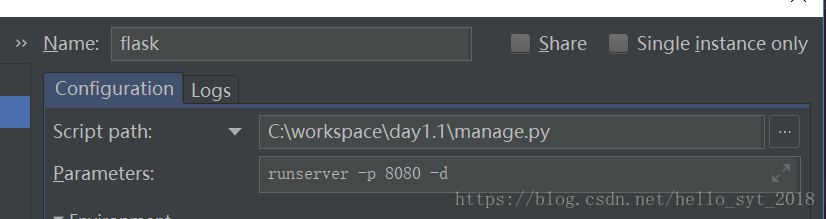
名字自定义
Script path:选择项目下要调试的py文件,这和django不同,
django是选择项目下的manage.py文件
Parameters: runserver -p 端口 -h IP -d debug
不用全写
下午:上面的项目页面什么的都写在了一起显得太low,把hello.py文件拆开写,把hello.py文件重命名为manage.py
# 修改启动方式
pip install flask-script
pip install flask-blueprint

项目下新建目录App,static,templates,css是新建的目录后缀.css
目录结构如下图:
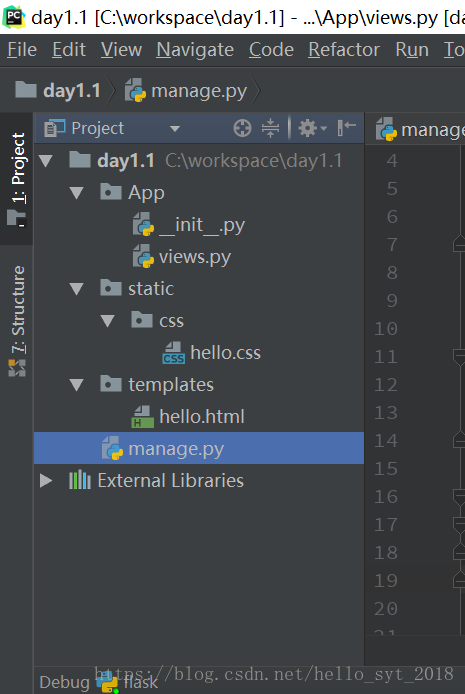
__init__.py 写代替app装饰器的方法,app装饰器是定义路由并且勇于启动项目的方法:

from flask import Flask
from App.views import blue

# blue 改变装饰器定义路由的方式,并且改变项目启动方式


def create_app():
    # 初始化路由,__name__代表主模块名或者包
    app = Flask(__name__)
    # 注册路由
    app.register_blueprint(blueprint=blue)
    return app

views.py 中主要用来处理业务逻辑

import uuid  # 生成一串随机的字母
# 返回页面的一种方式
from flask import render_template
# 返回页面的一种方式
from flask import sender_file
# 用来改变启动方式的
from flask import Blueprint

# 代替app,装饰器路由,first是自己定义的,可以随便写
blue = Blueprint('first',__name__)

# 使用blue定义路由,指定请求方式为post和get
@blue.route('/',methods=['POST','GET'])
def hello_word():
    return 'hello world'


@blue.route('/hello/<name>/')
def hello_man(name):
    print(name)
    print(type(name))
    return 'hello name:%s type:%s' % (name, type(name))

@blue.route('/helloint/<int:id>')
def hello_int(id):
    print(id)
    print(type(id))
    return 'hello int:%s' % id

@blue.route('/index/')
def index():
    # 返回页面方式1
    return render_template('hello.html')
    # 返回页面方式2
    return send_flie('../templates/hello.html')

# 定义url传入的第二个参数为浮点型
@blue.route('/getfloat/<float:price>')
def hello_float(price):
    return 'float:%s' %price

# 定义url中传入的参数为字符串
@blue.route('/getstr/<string:name>/')
def hello_name(name):
    return 'string:%s' %name
# 定义url中传入的参数为路径地址,会把getpath/后面的所有内容都当做参数,包括/
@blue.route('/getpath/<path:url_path>/')
def hello_path(url_path):
    return 'path:%s' %url_path

# 定义查看uuid是什么
@blue.route('/getuuid/')
def get_hello_uuid():
    a = uuid.uuid4()
    return str(uu)

# 定义uuid的参数,自动生成的,这个一般没用
@blue.route('getbyuuid/<uuid:uu>')
def get_uuid(uu):
    return 'uuid:%s' %uu

static 目录下存放js、css等渲染页面的文件
该目录下新建css目录,目录下新建hello.css文件,内容如下:
    h3 {
        color:red;
       }
templates目录下放前端页面:
hello.html
<!DOCTYPE html>
<html lang="en">
<head>
    <meta charset="UTF-8">
    <title>欢迎你</title>
    <link  rel="stylesheet" href="/static/css/hello.css">
</head>
<body>
<h3 id="new">欢迎来到千锋学习</h3>
</body>
</html>

项目下的manage.py文件,写启动方式:

from flask_script import Manage.py
from App import create_app

# 定义启动方式
app = create_app()
manager = Manager(app=app)

if __name__=='__main__':

    manager.run()
运行flask项目:
python hello.py runserver -p 端口 -h IP -d


python xxx.py ---> 启动默认127.0.0.1:5000端口

运行参数:
debug = True  调试
port = '8000'  端口
host = '0.0.0.0'  IP