1.创建data目录(data名称不能改)
mkdir -p /data
2.添加阿里yum源
yum list
3. 备份原有repo文件
mv /etc/yum.repos.d/CentOS-Base.repo /etc/yum.repos.d/CentOS-Base.repo.backup
4.下载阿里repo文件
wget -O /etc/yum.repos.d/CentOS-Base.repo http://mirrors.aliyun.com/repo/Centos-7.repo
5.um源更新(期间要按提示输入y):
yum clean all
yum makecache
yum update
6.用Xftp-6.0.0183p.exe工具将cloudpivot_v.1.5.0-alpha.28.11_20200206170625.zip上次到服务器/data目录,解压
#查看是否安装有 unzip 命令
unzip
#如果出现 -bash: unzip: command not found,则使用yum进行安装
yum install -y unzip zip
#继续完成解压
cd /data
unzip cloudpivot_v.1.5.0-alpha.28.11_20200206170625.zip
7.验证jdk,没有参照java\工具\1.安装jdk\linux下JDK安装教程.docx
java -version    #出现java version "1.8.0_144"字样,表示已安装jdk
echo $JAVA_HOME  #出现/data/jdk1.8.0_144字样,表示已配置JAVA_HOME
8.输入yum install docker安装docker,安装完成后,输入docker version验证
启动并设置开机自启:
service docker start
chkconfig docker on
9.安装redis
docker run --name bpm3.0-redis -p6379:6379 --restart=always -d redis:4-alpine3.8 --requirepass "H3yuncom"
10.安装Zookeeper
docker run -d --name bpm3.0-zk -p 2181:2181 --restart=always zookeeper
11.安装Nginx
docker run --name bpm3.0-nginx -p 80:80 -p 443:443 -v /data/cloudpivot/program/frontEnd/:/usr/share/nginx/html -v /data/cloudpivot/middleware/nginx/conf/nginx.conf:/etc/nginx/nginx.conf --privileged=true -v /data/cloudpivot/middleware/nginx/log:/var/log/nginx -v /etc/localtime:/etc/localtime:ro -v /data/cloudpivot/middleware/nginx/ssl/:/etc/nginx/ssl/:rw --restart=always -d nginx:latest
12.修改/data/cloudpivot/middleware/nginx/conf/nginx.conf


# For more information on configuration, see:
#   * Official English Documentation: http://nginx.org/en/docs/
#   * Official Russian Documentation: http://nginx.org/ru/docs/

user nginx;
worker_processes auto;
error_log /var/log/nginx/error.log;
pid /run/nginx.pid;

# Load dynamic modules. See /usr/share/nginx/README.dynamic.
include /usr/share/nginx/modules/*.conf;

events {
    worker_connections 1024;
}

http {
    log_format  main  '$remote_addr - $remote_user [$time_local] "$request" '
                      '$status $body_bytes_sent "$http_referer" '
                      '"$http_user_agent" "$http_x_forwarded_for" "$upstream_addr" "$upstream_status"';

    access_log  /var/log/nginx/access.log  main;

    sendfile            on;
    tcp_nopush          on;
    tcp_nodelay         on;
    keepalive_timeout   65;
    types_hash_max_size 2048;

    include             /etc/nginx/mime.types;
    default_type        application/octet-stream;

    # Load modular configuration files from the /etc/nginx/conf.d directory.
    # See http://nginx.org/en/docs/ngx_core_module.html#include
    # for more information.
    include /etc/nginx/conf.d/*.conf;

    gzip on;
    gzip_min_length 1k;
    gzip_buffers 4 16k;
    #gzip_http_version 1.0;
    gzip_comp_level 2;
    gzip_types text/plain application/javascript application/x-javascript text/css application/xml text/javascript image/jpeg image/gif image/png;
    gzip_vary off;


    server {
        listen       80 default_server;
        listen       [::]:80 default_server;
        server_name  _;
        root         /usr/share/nginx/html/portal/;


        # Load configuration files for the default server block.
        include /etc/nginx/default.d/*.conf;

        location / {
              try_files $uri $uri/ /index.html;

              add_header Last-Modified $date_gmt;
          # 避免入口html缓存
              add_header Cache-Control 'no-store, no-cache, must-revalidate, proxy-revalidate, max-age=0';
              if_modified_since off;
              expires off;
              etag off;
        }

    location ~* ^.+\.(jpg|jpeg|gif|png|ico|css|js|woff|svg)$ {
              access_log off;
              # expires 30d;
        }


    ###############添加内容###############
        location ^~ /api/ {
          # 8080为webapi服务端口,配置参考下文webapi配置
          proxy_pass http://192.168.31.134:8080;

          proxy_set_header   Host              $host;
          proxy_set_header   X-Real-IP         $remote_addr;
          proxy_set_header   X-Forwarded-For   $proxy_add_x_forwarded_for;
          proxy_set_header   X-Forwarded-Proto $scheme;
          proxy_set_header   X-Forwarded-Port  $server_port;

          #文件上传的请求体大小的配置
          # TODO: 可以针对单独的location进行配置
          client_max_body_size 200M;
          proxy_read_timeout   300;
        }
        #####################################

       # location /api/ {
       #     proxy_pass http://127.0.0.1:8080;
       #     proxy_set_header   Host             $host;
       #     proxy_set_header   X-Real-IP        $remote_addr;
       #     proxy_set_header   X-Forwarded-For  $proxy_add_x_forwarded_for;
       #     proxy_set_header X-Forwarded-Proto $scheme;

       #     client_max_body_size 200m;
       #     proxy_read_timeout  300;
       # }

        error_page 404 /404.html;
            location = /40x.html {
        }

        error_page 500 502 503 504 /50x.html;
            location = /50x.html {
        }
    }


}
重启nginx:docker restart bpm3.0-nginx
13.配置My SQL数据库链接,
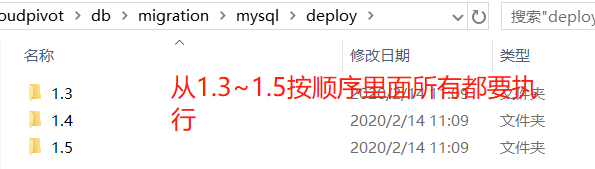
a.新建cloudpivot数据库,执行/data/cloudpivot/db/migration/mysql/deploy语句(init最先执行)
b.执行以下语句(192.168.31.134为linux服务器ip)
UPDATE base_security_client SET registeredRedirectUris='http://192.168.31.134/admin,http://192.168.31.134/admin#/oauth,http://192.168.31.134/oauth' WHERE id='8a5da52ed126447d359e70c05721a8aa';
14.修改Portal以下文件
/data/cloudpivot/program/frontEnd/portal/config.js
var host = window.location.protocol + '//' + window.location.hostname;

window.config = {
  oauthHost: host + '/api',
  redirectHost: host,
  client_id: 'api',
  scope: 'read',
  secret: 'c31b32364ce19ca8fcd150a417ecce58',
  apiHost: host + '/api',
  portalHost: host,
};
/data/cloudpivot/program/frontEnd/portal/admin/config.js
var host = window.location.protocol + '//' + window.location.hostname;

window.config = {
  oauthHost: host + '/api',
  redirectHost: host + '/admin',
  client_id: 'api',
  scope: 'read',
  secret: 'c31b32364ce19ca8fcd150a417ecce58',
  apiHost: host + '/api',
  portalHost: host,
};
/data/cloudpivot/program/frontEnd/portal/mobile/config.js
var host = window.location.protocol + '//' + window.location.hostname;

window.config = {
  oauthHost: host + ':8080',
  redirectHost: host + '/mobile',
  client_id: 'api',
  scope: 'read',
  secret: 'c31b32364ce19ca8fcd150a417ecce58',
  apiHost: host + ':8080',
  portalHost: host,
  isMobile: true
};
15.修改/engine/application-prod.yml
server:
  port: 8099
  address: 0.0.0.0
  compression:
    enabled: true

#Spring相关配置
spring:


#  boot:
#    admin:
#      client:
#        url: http://localhost:9999      #配置SpringBoot Admin Server 地址
  application:
    name: cloudpivot-engine-service
  main:
    allow-bean-definition-overriding: true
  #数据源
  datasource:
    type: com.zaxxer.hikari.HikariDataSource
    #数据库驱动:
    #ORACLE  oracle.jdbc.OracleDriver,
    #MYSQL   com.mysql.jdbc.Driver, org.mariadb.jdbc.Driver
    driver-class-name: com.mysql.jdbc.Driver
    #数据库连接:
    #ORACLE   jdbc:oracle:thin:@127.0.0.1:1521:orcl,
    #MYSQL    jdbc:mysql://127.0.0.1:3306/cloudpivot, jdbc:mariadb://127.0.0.1:3306/cloudpivot
    url: jdbc:mysql://192.168.31.1:3306/cloudpivot?serverTimezone=Asia/Shanghai&useUnicode=true&characterEncoding=utf-8&useSSL=false
    username: root
    password: wssoft@1201
    hikari:
      maximum-pool-size: 30                #根据系统并发用户数
      data-source-properties:
        cachePrepStmts: true
        prepStmtCacheSize: 1024
        prepStmtCacheSqlLimit: 4096
        useServerPrepStmts: true
  #jpa
  jpa:
    hibernate:
      ddl-auto: none
      naming:
        physical-strategy: org.hibernate.boot.model.naming.PhysicalNamingStrategyStandardImpl
    #database-platform: org.hibernate.dialect.Oracle12cDialect       # MYSQL
    #database-platform: org.hibernate.dialect.MySQL5InnoDBDialect    # ORACLE
    database-platform: org.hibernate.dialect.MySQL5InnoDBDialect
    database: MYSQL    # 支持 MYSQL  ORACLE
    show-sql: false
    properties:
      hibernate.id.new_generator_mappings: true
      hibernate.cache.use_second_level_cache: false
      hibernate.cache.use_query_cache: false
      hibernate.generate_statistics: false
      hibernate.enable_lazy_load_no_trans: false
      javax.persistence.sharedCache.mode: NONE
  #kafka消息
  kafka:
    enabled: false
    bootstrapServers: 127.0.0.1:9092
    consumer:
      keyDeserializer: org.apache.kafka.common.serialization.StringDeserializer
      value-deserializer: org.apache.kafka.common.serialization.StringDeserializer
      auto-offset-reset: latest
      enable-auto-commit: true
      auto-commit-interval: 100
      group-id: cloudpivot-group
    producer:
      retries: 0
      key-serializer: org.apache.kafka.common.serialization.StringSerializer
      value-serializer: org.apache.kafka.common.serialization.StringSerializer
      batch-size: 16384
      buffer-memory: 33554432
  # redis
  redis:
    host: 127.0.0.1
    port: 6379
    database: 1
    password: H3yuncom
  #flyway版本管理
  flyway:
    clean-disabled: false        #禁用清理
    enabled: false               #正式环境不开启
    locations: classpath:db/migration/{vendor}/dev
    baseline-on-migrate: true
    out-of-order: true
  http:
    encoding:
      charset: UTF-8
      enabled: true
      force: true

#日志
logging:
  level:
    com.authine.cloudpivot.engine: info  #云枢产品日志级别

#zookeeper
zookeeper:
  server: 127.0.0.1:2181     #zk IP:端口号
  namespace: cloudpivot-engine
  sessionTimeoutMs: 6000     #会话超时时间
  connectionTimeoutMs: 6000  #连接超时时间
  maxRetries: 3              #最大重试次数
  baseSleepTimeMs: 1000      #重试之间等待的初始时间

#dubbo服务配置
dubbo:
  application:
    name: cloudpivot-engine-service-provider
    qos-enable: false
    parameters:
      token: h3bpmtoken
    logger: slf4j
  protocols:
    dubbo:
      name: dubbo
      host: 127.0.0.1  #dubbo服务地址
      port: 20880      #dubbo服务端口号
      threads: 1000          #服务线程池大小
      queues: 2000           #线程池队列大小
      threadpool: fixed      #线程池类型  fixed 固定  cached 缓存  limited 可伸缩
      dispatcher: execution  #消息派发方式
      status: server
      serialization: kryo    #序列化类型
      accepts: 10000         #最大可接受连接数
      timeout: 5000          #超时时间
    rest:
      server: servlet
      name: rest
      host: 127.0.0.1  #engine ip
      port: 8099       #engine服务端口号
      token: false
      extension: com.authine.cloudpivot.engine.rest.RestContextFilter
  registry:
    protocol: zookeeper
    address: 127.0.0.1  #zk地址
    port: 2181          #zk端口号
    timeout: 3000  #超时时间
  scan:
    basePackages: com.authine.cloudpivot.engine.api.facade.dubbo
  provider:
    retries: 0     #超时重试次数
    serialization: kryo
    protocol:
      optimizer: com.authine.cloudpivot.engine.dubbo.SerializationOptimizerImpl
    accesslog: true

cloudpivot:
  isv:
    host: https://isv.cloudpivot.cn
    secret_key: 919c2591-f47a-4300-9191-163da079e8e2


  bizobject:
    bizmethod-invoke-timeout-seconds: 10  #业务集成默认超时时间,单位:秒
    db:
      type: mysql                   #数据库类型名称,支持 mysql oracle
  publicKeyStoreFile: public.key    #许可证解密的公钥文件
  license:
    licenseFile: cloudpivot.license #许可证文件
    verifyMode: offline # license授权验证方式,offline:本地授权文件方式;online:线上验证方式
    instanceId:  #当使用online验证方式时,需要配置客户实例ID,变量:${custInstanceId}
    host: https://license.cloudpivot.cn
    perm-manage:
      enabled: false #授权管理开关, 默认关闭
  #ehcache缓存
  cache:
    heapEntries: 1000               #ehcache 在缓存存放的数据记录数
    offheapSizeMB: 10               #ehcache 在堆外存放的数据大小,单位:MB
    cluster:
      enabled: false                #ehcache是否是集群部署,true:集群部署,false:非集群部署
      uri:                          #ehcache集群服务器地址  默认:terracotta://localhost:9410/default-server
      dedicatedSizeMB: 15           #ehcache 集群环境专用缓存大小,单位:MB
      defaultResourceName:          #ehcache 集群方式堆外空间默认名称  默认:main
  #钉钉同步
  dingtalk:
    client:
      aes_key: e6e18d0a42dd027cade89c213c75f477e6e18d0a42d   #数据加密密钥
      aes_token: 2cc69a199b644f9ca0d21360f242d98d
      #订阅的钉钉组织机构同步事件
      callback_tag:
        user_add_org,
        user_modify_org,
        user_leave_org,
        org_admin_add,
        org_admin_remove,
        org_dept_create,
        org_dept_modify,
        org_dept_remove,
        org_remove,
        org_change,
        label_user_change,
        label_conf_add,
        label_conf_del,
        label_conf_modify
      callback_url: /public/dingtalk/notify  #钉钉组织机构增量同步回调地址
  task:
    enabled: true                            #是否开启定时任务,在集群部署环境下只开启一个节点的定时任务
  workItem:
    participant_number: 1000                 #待办 传阅 加签 等参与者数量限制
  message:
    profile:
      active: simple                         #消息类型,simple:进程内消息,kafka:kafka中间件,默认simple
  bizlog:
    storagetype: db                          #业务日志存储类型, sls 阿里云SLS日志服务,db 内置数据库
    project: k8s-bizlog                      #SLS项目名称
    endpoint: cn-shenzhen.log.aliyuncs.com   #地域节点 如:oss-cn-shenzhen.aliyuncs.com
    accessKeyId:                             #
    accessKeySecret:                         #
    loginStore: biz_login_log                #登录日志库
    integrationStore: biz_service_log        #业务服务日志库
    exceptionStore: biz_exeception_log       #异常日志库
    engineLogStore: engine_log               #引擎日志库
  swagger:
    enable: false                            #是否开启swagger-ui
  event_push:
    enable: false                            #是否开启事件订阅推送
    consumer_number: 4                       #正常consumer线程数
16.修改webapi/application-prod.yml
server:
  port: 8080
  address: 0.0.0.0
  compression:
    enabled: true
  tomcat:
    max-swallow-size: -1
    remote-ip-header: x-forwarded-for
    protocol-header: x-forwarded-proto
  servlet:
    context-path: /api    #应用的上下文路径,详细参考 云枢帮助中心-开发者手册-解决跨域安全问题

#info:
#  blog-url: https://www.cloudpivot.cn/
#  author: Authine
#  version: @project.version@

spring:
  application:
    name: cloudpivot-web-api
#  boot:
#    admin:
#      client:
#        url: http://127.0.0.1:9999
  main:
    allow-bean-definition-overriding: true


  jackson:
    date-format: yyyy-MM-dd HH:mm:ss
    time-zone: Asia/Shanghai

  cache:
    type: redis

  #redis
  redis:
    host: 127.0.0.1     #地址
    database: 1         #
    password: H3yuncom  #密码
    port: 6379          #端口

  #spring session
  session:
    store-type: redis   #存储类型

  mvc:
    locale: zh_CN
    date-format: yyyy-MM-dd HH:mm:ss

  thymeleaf:
    cache: false
    check-template: false

  security:
    oauth:
      sso_uri: http://127.0.0.1:8080

  servlet:
    multipart:
      enabled: true                #默认支持文件上传
      max-file-size: 200MB         #上传单个文件大小限制
      max-request-size: 200MB      #多个同时上传总大小限制

logging:
  config: classpath:logback-spring.xml  #logback日志配置文件
  level:
    org.springframework.boot: error
    org.springframework.security.oauth2: error
    com.alibaba.dubbo: error
    com.authine.cloudpivot: info   # 云枢产品日志输出级别

# 日志输出路径
log:
  path: logs

dubbo:
  application:
    name: cloudpivot-web-api-consumer
    qos-enable: false
    parameters:
      protocol: dubbo
  registry:
    protocol: zookeeper
    address: 127.0.0.1  #服务注册地址
    port: 2181          #端口
    timeout: 3000       #超时时间
    check: true
  consumer:
    check: false
    retries: 0          #重试次数
  provider:
    token: h3bpmtoken

cloudpivot:
  system:
    update:
      log:
        url: http://help.cloudpivot.cn/channels/7.html  #产品更新日志地址
  login:
    dingtalk: false #钉钉方式登录
    accountpassword: true #账号密码登录
    dingtalk&accountpassword: false #钉钉扫码和账号密码方式登录
  switch:
    multi_language_toggle_switch: false  #多语言开关 默认关
  attachment:   # 文件存储方式
    oss:
      enabled: true     #是否启用
      accesskeyid: LTAI4Fh3diWR16fLtDJaYi9i      #用户AccessKey
      accesskeysecret: EpzJKPgm7lRaA1EILjAt3vuEoh7QsU #Access Key Secret
      endpoint: oss-cn-hangzhou.aliyuncs.com
      bucket: yunshu2020.oss-cn-hangzhou.aliyuncs.com
      #expirtime: 600000 #默认十分钟
    sftp:
      enabled: false      #是否启用
      #ftpserver:    #IP 如:120.66.88.11
      #ftpport: 22   #端口 如:22
      #ftpaccount:   #账号 如:root
      #ftppassword:  #密码 如:123456
      #ftppath:      #ftp存放地址 如./ftp  .表示当前路径,不配置表示默认当前路径
  convert:
      html2pdf: flyingsaucer #HTML转PDF,两种方式phantomjs 和 flyingsaucer
  api:
    oauth:
      enabled: true   # 是否开启权限校验
      test:
        userid:       # 模拟测试用户ID,不能用于生产环境
  webmvc:
    corsmappings: false          #配置是否允许跨域,详细参考 云枢帮助中心-开发者手册-解决跨域安全问题
    corsAllowedOrigins: '*'      #跨域请求白名单,多个地址以逗号分割
  dingtalk:
    client:
      aes_key: e6e18d0a42dd027cade89c213c75f477e6e18d0a42d
      aes_token: 2cc69a199b644f9ca0d21360f242d98d
      #钉钉组织机构同步事件
      callback_tag:
        user_add_org,
        user_modify_org,
        user_leave_org,
        org_admin_add,
        org_admin_remove,
        org_dept_create,
        org_dept_modify,
        org_dept_remove,
        org_remove,
        org_change,
        label_user_change,
        label_conf_add,
        label_conf_del,
        label_conf_modify
      callback_url: /public/dingtalk/notify #增量同步回到地址
  bizlog:
    endpoint:          #地域节点 如:oss-cn-shenzhen.aliyuncs.com
    accessKeyId:       #用户AccessKey
    accessKeySecret:   #Access Key Secret
    project:                #SLS项目名称
    logStore: webapi_log    #web-sso日志库
17.启动引擎
cd /data/cloudpivot/program/backEnd
./deploy.sh engine
tail -300f engine/engine-logs/log_total.log
18.启动webapi
cd /data/cloudpivot/program/backEnd
./deploy.sh webapi
tail -300f webapi/logs/log_total.log
19.访问入口:http://192.168.31.134/
预到的问题排查:
1.docker ps -a指令,发现engix
查看运行中服务(正常有3个且状态为up)docker ps -a
关闭指定服务:docker stop id
开启指定服务:docker start id
关机:shutdown -h now
锁屏:Ctrl+c 回显:Ctrl+s