##文件归档##文件归档,就是把多个文件变成一个归档文件
tar c ##创建
f ##指定归档文件名称
t ##显示归档文件中的内容
r ##向归档文件中添加文件
--get ##取出单个文件
--delete ##删除单个文件
x ##取出归档文件中的所有内容
-C ##指定解档目录
-z ##gz格式压缩
-j ##bz2格式压缩
-J ##xz格式压缩
##操作步骤##
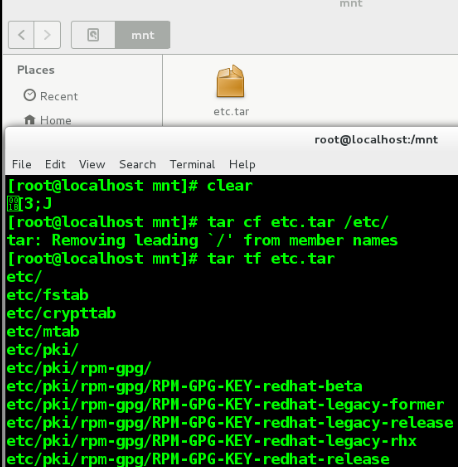
tar cf etc.tar /etc ##指定归档文件名称并建立
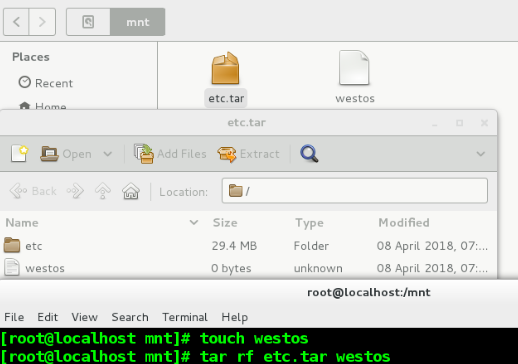
131 tar tf etc.tar ##显示归档文件中的内容
132 touch westos
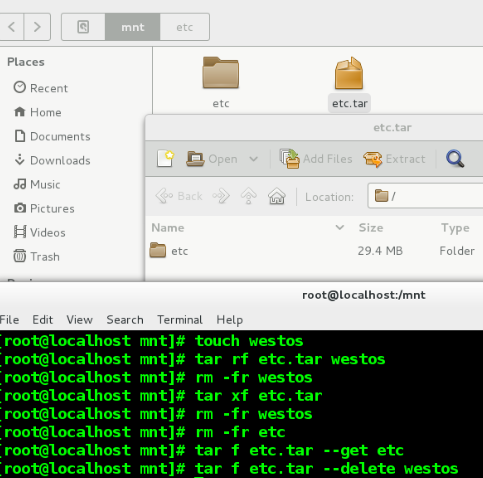
133 tar rf etc.tar westos ##向归档文件中添加文件
134 tar xf etc.tar ##取出etc.tar中所有内容
135 tar f etc.tar --get westos##指定取出文件
136 tar f etc.tar --get etc
137 tar f etc.tar --delete westos删除指定文件
139 tar f etc.tar --delete etc
140 rm -fr *
141 tar cf etc.tar /etc
142 touch westos
143 tar rf etc.tar westos
144 tar f etc.tar --delete westos
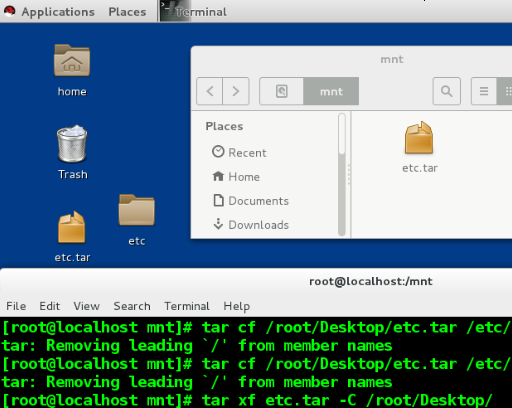
145 tar cf etc.tar -C /root/Desktop/##
146 tar xf etc.tar -C /root/Desktop/##指定位置取出文件
147 tar cf /root/Desktop/etc.tar /etc/##指定位置创建文件

####2.压缩
gz
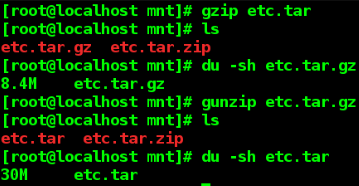
gzip etc.tar ##压缩成gz格式
gunzip etc.tar.gz ##解压gz格式压缩包
tar zcf etc.tar.gz /etc ##把文件归档为tar并压缩成gz
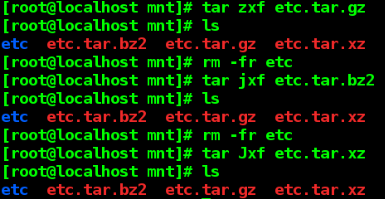
tar zxf etc.tar.gz ##解压并解档gz格式压缩包
bz2
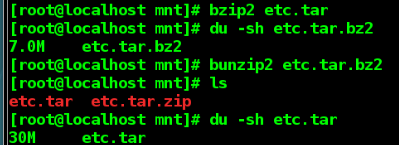
bzip2 etc.tar ##压缩成bz2格式
bunzip2 etc.tar.bz2 ##解压bz2格式压缩包
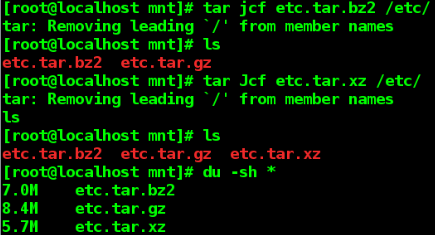
tar jcf etc.tar.bz2 /etc ##把文件归档为tar并压缩成bz2
tar jxf etc.tar.bz2 ##解压并解档bz2格式压缩包
xz
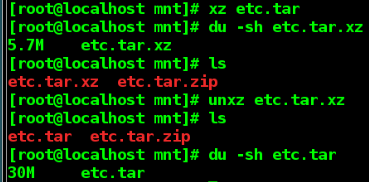
xz etc.tar ##压缩成xz格式
unxz etc.tar.xz ##解压xz格式压缩包
tar Jcf etc.tar.xz /etc ##把文件归档为tar并压缩成zx
tar Jxf etc.tar.xz ##解压并解档xz格式压缩包
zip
zip -r etc.tar.zip etc.tar ##压缩成zip格式
unzip etc.tar.zip ##解压zip格式压缩包

压缩并建立归档文件和删除压缩的归档文件
##### 1.openssh ####
当主机中开启openssh服务,那么就对外开放了远程连接的接口
#openssh服务的服务端 sshd
#openssh服务的客户端 ssh
### 2.在客户端连接sshd的方式
ssh 服务端用户@服务端ip地址
例如
ssh [email protected] ##在客户端用ssh命令连接172.25.0.10主机的root用户
[root@localhost ~]# ssh [email protected]
The authenticity of host '172.25.254.200 (172.25.254.200)' can't be established.
ECDSA key fingerprint is eb:24:0e:07:96:26:b1:04:c2:37:0c:78:2d:bc:b0:08.
Are you sure you want to continue connecting (yes/no)? ##当当前主机第一次连接陌生主机时
##会自动建立.ssh/know_hosts
##这个文中记录的是连接过的主机信息
[email protected]'s password: #输入密码连接成功
Last login: Fri Mar 30 02:05:52 2018 from 172.25.254.100
[root@localhost ~]# exit #表示退出当前连接
logout
Connection to 172.25.254.200 closed.
"注意:以上连接方式是不能打开远程主机的图形功能的如果需要打开远程主机图形功能需要输入 -X"
ssh -X [email protected]
## 3.给ssh服务添加新的认证方式 KEY认证
1.生成锁和钥匙
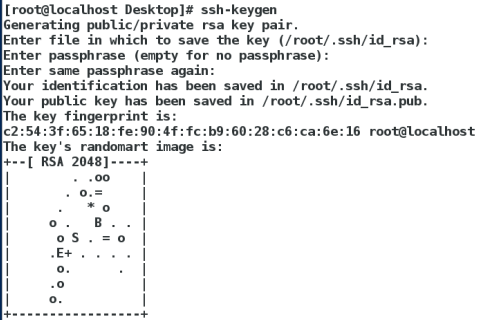
[root@localhost ~]# ssh-keygen ##生成密钥的命令
Generating public/private rsa key pair.
Enter file in which to save the key (/root/.ssh/id_rsa): #保存加密字符的文件用默认
Created directory '/root/.ssh'.
Enter passphrase (empty for no passphrase): #可以为空,如果想为空必须大于4位
Enter same passphrase again:
Your identification has been saved in /root/.ssh/id_rsa. ##私钥
Your public key has been saved in /root/.ssh/id_rsa.pub. ##公钥
The key fingerprint is:
00:4f:b0:72:40:9f:a6:fb:91:86:d2:69:bc:7c:75:5f root@localhost
The key's randomart image is:
+--[ RSA 2048]----+
| .o o.. |
| o * |
| . * o |
| = . |
| . S |
| o + .. . E |
|. B +. . . . |
| + +.. . |
| o.. |
+-----------------+

2.加密ssh用户的认证
#在服务端
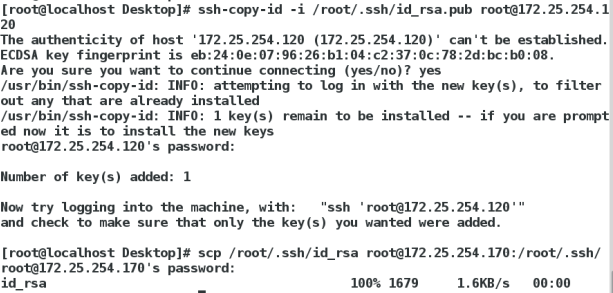
ssh-copy-id -i /root/.ssh/id_rsa.pub [email protected]
ssh-copy-id ##加密命令
-i ##指定密钥
/root/.ssh/id_rsa.pub ##密钥
root ##加密用户
172.25.254.200 ##主机ip

3.验证
#解密文件传输到客户端
scp /root/.ssh/id_rsa [email protected]:/root/.ssh/
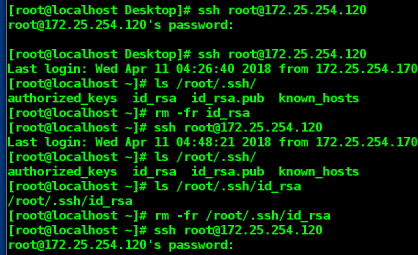
#在客户端 ssh [email protected] #连接不需要密码
#在服务端 rm -fr /root/.ssh/authorized_keys ##当此文件被删除,客户端解密文件失效
#在服务端 cp /root/.ssh/id_rsa.pub /root/.ssh/authorized_keys ##从新生成锁文件,解密文件功能恢复
## 4.sshd的安全配置
1.禁止原始认证方式
PasswordAuthentication no|yes ##开启或关闭ssh的默认认证方式(78行)
PermitRootLogin no|yes ##开启或关闭root用户的登陆权限(48行)
AllowUsers westos ##用户白名单,当前设定是只允许westos登陆(配置文件中没有,需要时自己加上)
DenyUsers linux ##用户黑名单,当前设定是只不允许linux登陆(配置文件中没有,需要时自己加上)


##5.虚拟机ip设置命令
##系统中的文件传输
scp file username@ip:/dir ##上传
scp username@ip:/dir/file /dir ##下载
rsync [参数] file username@ip:/dir
rsync -r ##同步目录
-l ##不忽略链接
-p ##不忽略文件权限
-t ##不忽文件时间戳
-g ##不忽文件所有组
-o ##不忽文件所有人
-D ##不忽略设备文件

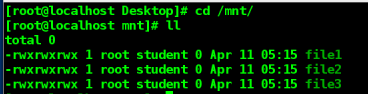
操作步骤(其中绿色为测试端)
ll
chmod 777 *
ll
chown student.student *
ll
rsync -r /mnt/ [email protected]:/mnt/ ##只把文件传过去
rsync -r /mnt [email protected]:/mnt/ ##连同目录和文件传过去
rsync -r /mnt/ [email protected]:/mnt/
rsync -p /mnt/ [email protected]:/mnt/
rsync -p /mnt/ [email protected]:/mnt
ls /mnt/
rsync -pr /mnt/ [email protected]:/mnt
ll
rsync -ptr /mnt/ [email protected]:/mnt
rsync -ptgr /mnt/ [email protected]:/mnt
ll
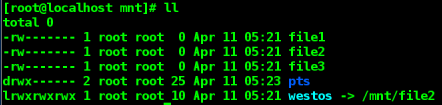
rm -fr *
ln -s /mnt/file2 /mnt/westos
ll
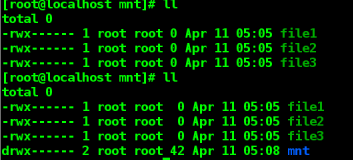
touch file{1..3}
ll
rsync -r /mnt [email protected]:/mnt
ll
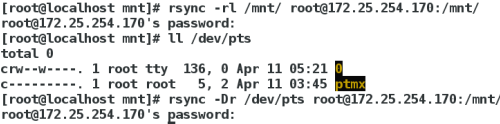
rsync -rl /mnt [email protected]:/mnt
rsync -rl /mnt/ [email protected]:/mnt
ll /dev/pts/
host mnt]# rsync -rl /mnt [email protected]:/mnt
rsync -r /dev/pts [email protected]:/mnt
rsync -Dr /dev/pts [email protected]:/mnt