几种图像二值化方式
import cv2
import numpy as np
import matplotlib.pylab  as plt

Original = cv2.imread('cat.png')
ret,thresh1 = cv2.threshold(Original,127,255,cv2.THRESH_BINARY)
ret,thresh2 = cv2.threshold(Original,127,255,cv2.THRESH_BINARY_INV)
ret,thresh3 = cv2.threshold(Original,127,255,cv2.THRESH_TRUNC)
ret,thresh4 = cv2.threshold(Original,127,255,cv2.THRESH_TOZERO)
ret,thresh5 = cv2.threshold(Original,127,255,cv2.THRESH_TOZERO_INV)

titles = ['Original','BINARY','BINARY_INV','TRUNC','TOZERO','TOZERO_INV']
images = [Original, thresh1, thresh2, thresh3, thresh4, thresh5]

for i in range(6):
    plt.subplot(2,3,i+1),plt.imshow(images[i],'gray')
    plt.title(titles[i])
    plt.xticks([]),plt.yticks([])


#===============================黑白图可视化=====================================
w,h = Original.shape[:2]
result0 = np.hstack((Original,thresh1,thresh2))
result1 = np.hstack((thresh3,thresh4,thresh5))
result = np.vstack((result0,result1))
font = cv2.FONT_HERSHEY_TRIPLEX
for i in range(len(titles)):
    if i < 3:
        result = cv2.putText(result, titles[i], (5+i*200, 180), font, 0.8, (0, 0, 0), 1)
    else:
        result = cv2.putText(result, titles[i], (5+(i-3)*200, 360), font, 0.8, (255, 255, 255), 1)

cv2.imshow('result',result)
cv2.waitKey(0)
cv2.destroyAllWindows()
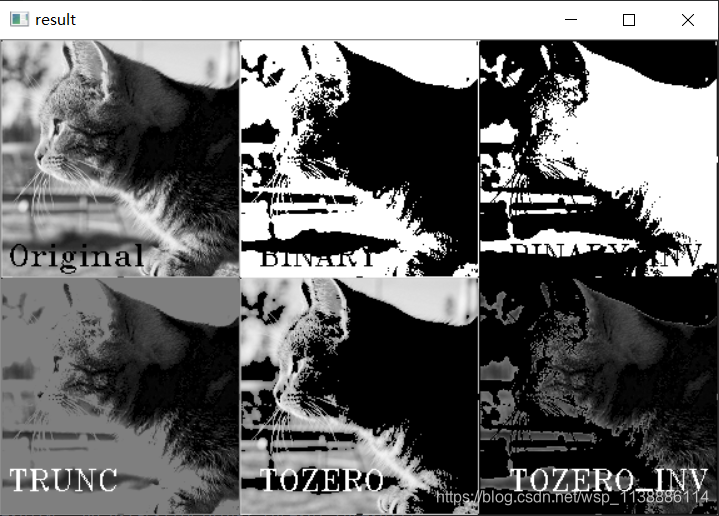
直接使用灰度图如下:依次是:原灰度图,二值化,二值化并反相,
cv2.THRESH_TRUNC: 像素点的灰度值小于阈值不改变,大于阈值的灰度值的像素点就设定为该阈值。
cv2.THRESH_TOZERO: 像素点的灰度值小于该阈值的不进行任何改变,而大于该阈值的部分,其灰度值全部变为0。
cv2.THRESH_TOZERO_INV: 像素点的灰度值大于该阈值的不进行任何改变,像素点的灰度值小于该阈值的,其灰度值全部变为0。

计算 HOG 前我们使用图片的二阶矩对其进行抗扭斜(deskew)处理。
def deskew(img):
    m = cv2.moments(img)
    if abs(m['mu02']) < 1e-2:
        return img.copy()
    skew = m['mu11']/m['mu02']
    M = np.float32([[1, skew, -0.5*SZ*skew], [0, 1, 0]])
    img = cv2.warpAffine(img,M,(SZ, SZ),flags=affine_flags)
    return img
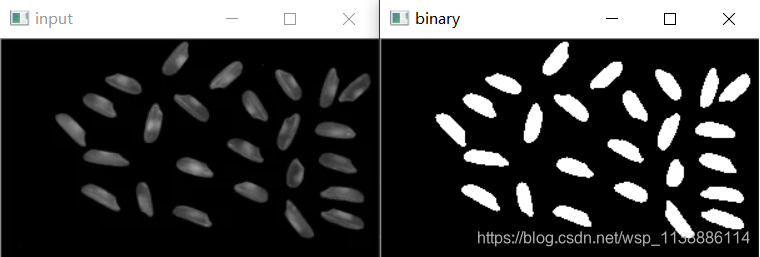
OpenCV之图像二值寻找算法 – OTSU
import cv2
import numpy as np


src = cv2.imread("./cat.png")

cv2.imshow("input", src)
h, w = src.shape[:2]

# 自动阈值分割 OTSU
gray = cv2.cvtColor(src, cv2.COLOR_BGR2GRAY)
ret, binary = cv2.threshold(gray, 0, 255, cv2.THRESH_BINARY | cv2.THRESH_OTSU)
cv2.imshow("binary", binary)
cv2.waitKey(0)
cv2.destroyAllWindows()
Riddler-Calvard算法
Riddler-Calvard阈值法是基于直方图的二值化算法,OTSU与Triangle一样都是基于直方图计算得到阈值的二值化分割算法。
首先假设初始阈值T比如T=127,然后得到分割后的两个像素cluster。计算它们的均值分别如下:
其中g表示图像像素灰度值,灰度值范围
,其中L=256表示256个灰度级别。P(g)表示图像直方图统计概率百分比。下标:f表示前景,b表示背景。计算得到新的阈值:
计算两个阈值之间的差值:
参考与鸣谢:
https://blog.csdn.net/qq_30490125/article/details/80458500
https://www.cnblogs.com/Undo-self-blog/p/8449393.html
