文章目录
前言
在前一篇文章中(Ozone作为Hadoop FileSystem的配置使用),笔者介绍了Ozone作为Hadoop兼容性文件系统来使用的配置说明,也给出了简单的使用例子。不过在上篇文章中没有过多介绍里面的原理实现,本文笔者就来补充介绍这块的内容。这部分的内容总体而言并不复杂,尽管Ozone的K-V存储设计模式相较于传统文件系统API操作而言差距较大,但是我们还是可以做个简单的规则映射,使得外部应用能够以文件系统的方式来访问Ozone的数据的。
Ozone FileSystem的简单架构
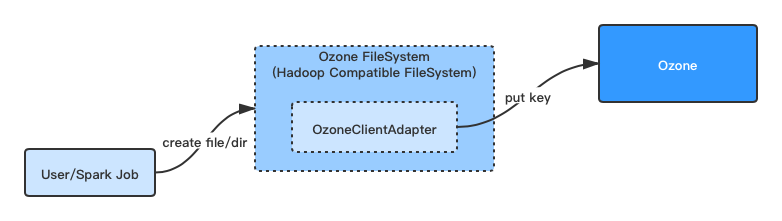
Ozone FileSystem是Ozone内部实现的一套Hadoop Compatible的FileSystem,目前它实现了主要与数据读写相关的API方法,例如mkdir,createFile,delete操作等等。
笔者在上文中介绍过Ozone FileSystem的工作原理,如下引用所述:
Ozone在这里实现了OzoneFileSystem类,它的一个主要原理是将所有的namespace操作都限定在了一个bucket内。简单地来说,OzoneFileSystem用一个现有的bucket,作为这个文件系统的root目录。后续的创建文件,目录行为如下:
FileSystem的创建文件行为,在bucket下创建Key,Value为写入文件的建Key操作。
FileSystem的创建目录行为,在bucket下创建Key,Value为空的建Key操作。
FileSystem的在子目录中再进行文件目录操作行为,类似前两步操作,同样是建Key操作,不过在Key名称上将会带上父目录路径名称。假设一个目录key的名称为testdir/,则这个目录下新建的文件将会如testdir/testfile。
此过程的展示图效果如下所示:
Hadoop FileSystem到Ozone的命名空间的转化
Hadoop FileSystem和Ozone内部的对于命名空间的格式是不同的,前者是文件系统,多级树型组织,存在目录,文件。后者则是Volume,Bucket,Key的形式。在这其中,必然存在命名空间上的转化。
刚刚上文也已经提到过,这个文件系统的根是取了其中的一个Ozone Bucket来做的。因此上面的文件命名空间的转化其实就变成了文件命名空间到Ozone Key的转化了。换句话来说,Ozone FileSystem中的目录也是以Key不带Value(Value置为0)的形式存储于Bucket下的,转化形式如下图所示:
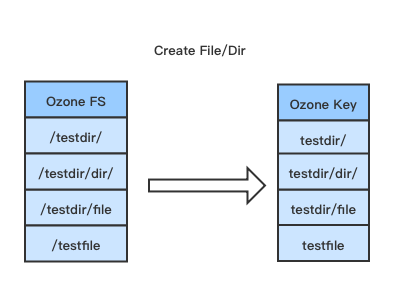
从上面的存储方式我们可以看到,Ozone Bucket下的key存储只是线性存储方式,没有树型或父子这样的存储关系。因此在做FS的list file这类的操作时需要进行整个key表的prefix前者查询。与这类操作密切相关的操作方法包括Rename,List和Delete操作。对于这三类操作,Ozone FileSystem内部使用了Key的Iterator帮助做迭代处理。
Ozone FileSystem的“虚假”目录的处理
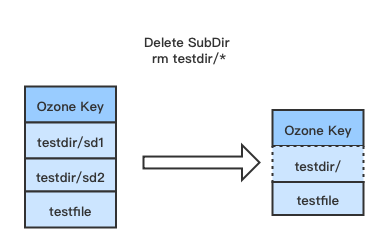
在Ozone FileSystem的操作中,有个特殊的地方,当我们以递归方式建立目录的时候,它存储到Ozone中的只有1项,前面的目录只是“虚假”的存在和展示。
一个简单的例子如下:
[hdfs@lyq yiqlin]$ /apache/releases/hadoop-2.7/bin/hadoop fs -mkdir -p o3fs://buckettest.volumetest.lyq-m2-xx.xx.xx.xx/dir/subdir/dir

[hdfs@lyq yiqlin]$ /home/hdfs/ozone/bin/ozone sh key list o3://om-service-test/volumetest/buckettest/
{
  "volumeName" : "volumetest",
  "bucketName" : "buckettest",
  "name" : "dir/subdir/dir/",
  "dataSize" : 0,
  "creationTime" : "2020-01-31T08:39:10.890Z",
  "modificationTime" : "2020-01-31T08:39:10.890Z",
  "replicationType" : "RATIS",
  "replicationFactor" : 1
}
当这种情况假设我们只是删除最下层的dir目录后,会连带上面的2级父目录也会被删除。这个时候Ozone FileSystem的做法是删除完毕后,会额外新建一个代表父目录的Key。
[hdfs@lyq yiqlin]$ /apache/releases/hadoop-2.7/bin/hadoop fs -rm -r o3fs://buckettest.volumetest.lyq-m2-xx.xx.xx.xx/dir/subdir
Deleted o3fs://buckettest.volumetest.lyq-m2-xx.xx.xx.xx/dir/subdir

[hdfs@lyq yiqlin]$ /home/hdfs/ozone/bin/ozone sh key list o3://om-service-test/volumetest/buckettest/
{
  "volumeName" : "volumetest",
  "bucketName" : "buckettest",
  "name" : "dir/",
  "dataSize" : 0,
  "creationTime" : "2020-01-31T08:41:48.814Z",
  "modificationTime" : "2020-01-31T08:41:48.814Z",
  "replicationType" : "RATIS",
  "replicationFactor" : 1
}
上面的例子中,当我们执行删除子目录操作后,key从’dir/subdir/dir/‘变为了新的key‘dir/’,这不是key名称的更新,而是完全新建了key。
此例子的图示过程如下:
Ozone FileSystem相关代码实现分析
下面来简单分析Ozone FileSystem内部的代码实现,首先是URL传入过程的初始化部分的操作。
BasicOzoneFileSystem的initialize方法,
  public void initialize(URI name, Configuration conf) throws IOException {
    super.initialize(name, conf);
    setConf(conf);
    Objects.requireNonNull(name.getScheme(), "No scheme provided in " + name);
    Preconditions.checkArgument(getScheme().equals(name.getScheme()),
        "Invalid scheme provided in " + name);

    String authority = name.getAuthority();
    if (authority == null) {
      // authority is null when fs.defaultFS is not a qualified o3fs URI and
      // o3fs:/// is passed to the client. matcher will NPE if authority is null
      throw new IllegalArgumentException(URI_EXCEPTION_TEXT);
    }

    Matcher matcher = URL_SCHEMA_PATTERN.matcher(authority);

    if (!matcher.matches()) {
      throw new IllegalArgumentException(URI_EXCEPTION_TEXT);
    }
    // 1)解析传入URL得到bucket名称
    String bucketStr = matcher.group(1);
    // 2)解析传入URL得到volume名称
    String volumeStr = matcher.group(2);
    // 3)得到URL剩余字符串,
    String remaining = matcher.groupCount() == 3 ? matcher.group(3) : null;

    String omHost = null;
    int omPort = -1;
    if (!isEmpty(remaining)) {
      // 4)从剩余字符串中得到host,端口号,假设用户有传入的情况下
      String[] parts = remaining.split(":");
      // Array length should be either 1(hostname or service id) or 2(host:port)
      if (parts.length > 2) {
        throw new IllegalArgumentException(URI_EXCEPTION_TEXT);
      }
      omHost = parts[0];
      if (parts.length == 2) {
        try {
          omPort = Integer.parseInt(parts[1]);
        } catch (NumberFormatException e) {
          throw new IllegalArgumentException(URI_EXCEPTION_TEXT);
        }
      }
    }

    try {

      ...
      // 5) 根据前面解析得到的参数值,初始化Ozone Client适配器
      this.adapter = createAdapter(conf, bucketStr, volumeStr, omHost, omPort,
          isolatedClassloader);

      ...

    } catch (URISyntaxException ue) {
      final String msg = "Invalid Ozone endpoint " + name;
      LOG.error(msg, ue);
      throw new IOException(msg, ue);
    }
  }
上面的adapter变量是起到主要作用的变量。Adapter的初始化构造方法如下:
  public BasicOzoneClientAdapterImpl(String omHost, int omPort,
      Configuration hadoopConf, String volumeStr, String bucketStr)
      throws IOException {

      ...
      // 从配置中得到默认的Ozone Replication值
      String replicationTypeConf =
          conf.get(OzoneConfigKeys.OZONE_REPLICATION_TYPE,
              OzoneConfigKeys.OZONE_REPLICATION_TYPE_DEFAULT);

      int replicationCountConf = conf.getInt(OzoneConfigKeys.OZONE_REPLICATION,
          OzoneConfigKeys.OZONE_REPLICATION_DEFAULT);

      // 根据用户传入的host,port进行Ozone Client的初始化,如果host,
      // port没有指定则将会取默认值
      if (OmUtils.isOmHAServiceId(conf, omHost)) {
        // omHost is listed as one of the service ids in the config,
        // thus we should treat omHost as omServiceId
        this.ozoneClient =
            OzoneClientFactory.getRpcClient(omHost, conf);
      } else if (StringUtils.isNotEmpty(omHost) && omPort != -1) {
        this.ozoneClient =
            OzoneClientFactory.getRpcClient(omHost, omPort, conf);
      } else {
        this.ozoneClient =
            OzoneClientFactory.getRpcClient(conf);
      }
      objectStore = ozoneClient.getObjectStore();

      // 得到将要写入的Bucket所属的Volume
      this.volume = objectStore.getVolume(volumeStr);
      // 得到将要操作的Bucket对象
      this.bucket = volume.getBucket(bucketStr);
      this.replicationType = ReplicationType.valueOf(replicationTypeConf);
      this.replicationFactor = ReplicationFactor.valueOf(replicationCountConf);
      this.configuredDnPort = conf.getInt(
          OzoneConfigKeys.DFS_CONTAINER_IPC_PORT,
          OzoneConfigKeys.DFS_CONTAINER_IPC_PORT_DEFAULT);
    } finally {
      Thread.currentThread().setContextClassLoader(contextClassLoader);
    }
  }
随后就是Ozone FileSystem的方法执行调用adapter的bucket key创建的过程了,
例如下面的creatFile操作,
BasicOzoneFileSystem的create方法,
  @Override
  public FSDataOutputStream create(Path f, FsPermission permission,
      boolean overwrite, int bufferSize,
      short replication, long blockSize,
      Progressable progress) throws IOException {
    LOG.trace("create() path:{}", f);
    incrementCounter(Statistic.INVOCATION_CREATE);
    statistics.incrementWriteOps(1);
    final String key = pathToKey(f);
    return createOutputStream(key, overwrite, true);
  }

  private FSDataOutputStream createOutputStream(String key, boolean overwrite,
      boolean recursive) throws IOException {
    // 调用adapter的操作方法
    return new FSDataOutputStream(adapter.createFile(key, overwrite, recursive),
        statistics);
  }
最终调用的操作,BasicOzoneClientAdapterImpl类的createFile方法,
    public OzoneFSOutputStream createFile(String key, boolean overWrite,
        boolean recursive) throws IOException {
      incrementCounter(Statistic.OBJECTS_CREATED);
      try {
        // 本质调用的ozone bucket的接口方法
        OzoneOutputStream ozoneOutputStream = bucket
            .createFile(key, 0, replicationType, replicationFactor, overWrite,
                recursive);
        return new OzoneFSOutputStream(ozoneOutputStream.getOutputStream());
      } catch (OMException ex) {
        if (ex.getResult() == OMException.ResultCodes.FILE_ALREADY_EXISTS
            || ex.getResult() == OMException.ResultCodes.NOT_A_FILE) {
          throw new FileAlreadyExistsException(
              ex.getResult().name() + ": " + ex.getMessage());
        } else {
          throw ex;
        }
      }
    }
另外我们来看其中的目录创建的操作,
BasicOzoneClientAdapterImpl的createDirectory操作,
  public boolean createDirectory(String keyName) throws IOException {
    LOG.trace("creating dir for key:{}", keyName);
    incrementCounter(Statistic.OBJECTS_CREATED);
    try {
      bucket.createDirectory(keyName);
    } catch (OMException e) {
      if (e.getResult() == OMException.ResultCodes.FILE_ALREADY_EXISTS) {
        throw new FileAlreadyExistsException(e.getMessage());
      }
      throw e;
    }
    return true;
  }
然后最终是OzoneManager内部的KeyManagerImpl进行server端的处理,
KeyManagerImpl的createDirectory方法,
  public void createDirectory(OmKeyArgs args) throws IOException {
    Preconditions.checkNotNull(args, "Key args can not be null");
      ...

      Path keyPath = Paths.get(keyName);
      OzoneFileStatus status =
          verifyNoFilesInPath(volumeName, bucketName, keyPath, false);
      if (status != null && OzoneFSUtils.pathToKey(status.getPath())
          .equals(keyName)) {
        // if directory already exists
        return;
      }
      // 1)构造Key Info
      OmKeyInfo dirDbKeyInfo =
          createDirectoryKey(volumeName, bucketName, keyName, args.getAcls());
      String dirDbKey = metadataManager
          .getOzoneKey(volumeName, bucketName, dirDbKeyInfo.getKeyName());
      // 2)存入Key表
      metadataManager.getKeyTable().put(dirDbKey, dirDbKeyInfo);
    } finally {
      metadataManager.getLock().releaseLock(BUCKET_LOCK, volumeName,
          bucketName);
    }
  }

  // 专门为目录建的Key
  private OmKeyInfo createDirectoryKey(String volumeName, String bucketName,
      String keyName, List<OzoneAcl> acls) throws IOException {
    // verify bucket exists
    OmBucketInfo bucketInfo = getBucketInfo(volumeName, bucketName);

    String dir = OzoneFSUtils.addTrailingSlashIfNeeded(keyName);
    FileEncryptionInfo encInfo = getFileEncryptionInfo(bucketInfo);
    return new OmKeyInfo.Builder()
        .setVolumeName(volumeName)
        .setBucketName(bucketName)
        .setKeyName(dir)
        .setOmKeyLocationInfos(Collections.singletonList(
            new OmKeyLocationInfoGroup(0, new ArrayList<>())))
        .setCreationTime(Time.now())
        .setModificationTime(Time.now())
        .setDataSize(0) // Data size 为0
        .setReplicationType(ReplicationType.RATIS)
        .setReplicationFactor(ReplicationFactor.ONE)
        .setFileEncryptionInfo(encInfo)
        .setAcls(acls)
        .build();
  }
