众所周知,在Java高级开发里面,多线程会经常被使用。通常有2种方式去启动一个新线程:
- 定义一个Thread的子类,在子类中重写run方法。
- 定义一个类实现Runnable接口,重写run方法;然后通过新建Thread线程去执行。
前者是完全独立的线程,可以直接运行;后者不可以直接运行,必须通过Thread线程去运行。当需要多个线程去完成同一个任务时,一般建议使用第二种方法,具体的方法网上到处都有介绍,在此就不多说了。本文主要针对主要的几个方法的源码进行分析和实例讲解,读完本篇文章后,Java的线程创建你就能完全理解了。
Runnable接口的实现
@FunctionalInterface
public interface Runnable {
    /**
     * When an object implementing interface <code>Runnable</code> is used
     * to create a thread, starting the thread causes the object's
     * <code>run</code> method to be called in that separately executing
     * thread.
     * <p>
     * The general contract of the method <code>run</code> is that it may
     * take any action whatsoever.
     *
     * @see     java.lang.Thread#run()
     */
    public abstract void run();
}
从注解@FunctionalInterface可以看出,这是一个函数式接口,即:有且只有一个抽象方法的接口。这个接口非常简单,里面只定义了一个抽象方法run(),使用时必须定义一个实现类重写run()方法。
Thread类的定义
public class Thread implements Runnable {
  .....
}
我们常用的线程类Thead,居然是Runnable的实现类,这说明2个问题:
1.Thread重写了run()方法;
2.Runnable可以引用Thread实例
当需要使用线程时,我们经常定义一个Thread类的子类,重写run()方法,然后调用start()方法即可运行线程,那这个过程中发生了哪些事情呢?我们通过源码分析来讲解一下。
我们先跳过run()方法,先看看start()方法:
    public synchronized void start() {
        /**
         * This method is not invoked for the main method thread or "system"
         * group threads created/set up by the VM. Any new functionality added
         * to this method in the future may have to also be added to the VM.
         *
         * A zero status value corresponds to state "NEW".
         */
        if (threadStatus != 0)
            throw new IllegalThreadStateException();

        /* Notify the group that this thread is about to be started
         * so that it can be added to the group's list of threads
         * and the group's unstarted count can be decremented. */
        group.add(this);

        boolean started = false;
        try {
            start0();
            started = true;
        } finally {
            try {
                if (!started) {
                    group.threadStartFailed(this);
                }
            } catch (Throwable ignore) {
                /* do nothing. If start0 threw a Throwable then
                  it will be passed up the call stack */
            }
        }
    }

    private native void start0();
可以看出,start()方法的核心是调用了start0(),而这是一个native的方法,属于Java虚拟机的底层实现,我们看不到源码。Java虚拟机底层实质是调用了操作系统的系统调用去启动这个线程,比如在Linux下面,肯定就是调用了pthread_create,这个细节我们不用管,反正就是启动了一个线程。这个线程做了什么,我们可以通过start()的注释了解一下:
/**
     * Causes this thread to begin execution; the Java Virtual Machine
     * calls the <code>run</code> method of this thread.
     * <p>
     * The result is that two threads are running concurrently: the
     * current thread (which returns from the call to the
     * <code>start</code> method) and the other thread (which executes its
     * <code>run</code> method).
     * <p>
     * It is never legal to start a thread more than once.
     * In particular, a thread may not be restarted once it has completed
     * execution.
     *
     * @exception  IllegalThreadStateException  if the thread was already
     *               started.
     * @see        #run()
     * @see        #stop()
*/第一句话很明显:Causes this thread to begin execution; the Java Virtual Machine calls the <code>run</code> method of this thread.意思是:导致这个线程开始执行,Java虚拟机调用这个线程 的run方法。也就是说:你执行了start()方法时,一个新线程被创建,执行的是run()方法。
我们再看一下Thread类中的默认run方法:
 @Override
    public void run() {
        if (target != null) {
            target.run();
        }
    }
非常简单的一个方法,target对象我们暂时先忽视,一会再讲。正常情况target为null,这时run()里面其实什么也没做。也就是说,你可以直接创建一个Thread的对象,并直接调用start()运行,这个线程会被创建、执行和消亡,但是啥事也没干!
public class Main {
    public static void main(String[] args) {
        Thread thread = new Thread();
        thread.start();
    }
}

Process finished with exit code 0
Thread常规使用方式
想让新线程执行你想要做的任务,那只有定义一个Thread的子类并重写run()方法,这时新线程就会去执行你写的run()方法中的代码。这也是最传统的Java线程实现方式。
//自定义子类
public class MyThread  extends Thread{

    //必须重写run()方法,这里面完成自己线程要做的事情
    @Override
    public void run() {
        System.out.println("This is a child thread");
    }
}

//测试代码
public class Main {
    public static void main(String[] args) {
        Thread thread = new MyThread();
        thread.start();
    }
}

//输出结果
This is a child thread

Process finished with exit code 0
这就是Thread的常规用法,创建多个线程和上面也是类似,定义多个对象即可。改写一下刚才的例子如下:
//自定义子类
public class MyThread  extends Thread{
    private int num = 5;

    @Override
    public void run() {
       while(num>0) {
           System.out.println("resume number:" + num--);
       }
    }
}

//测试代码
public class Main {
    public static void main(String[] args) {
        Thread thread1 = new MyThread();
        thread1.start();

        Thread thread2 = new MyThread();
        thread2.start();

        Thread thread3 = new MyThread();
        thread3.start();
    }
}

//执行结果
resume number:5
resume number:4
resume number:3
resume number:2
resume number:1
resume number:5
resume number:4
resume number:3
resume number:2
resume number:1
resume number:5
resume number:4
resume number:3
resume number:2
resume number:1
可以看出,3个线程各自独立,可以从Java虚拟机的角度分析一下。
堆是由所有线程共享的数据区,我们new了3个MyThread对象,实质是在堆里面创建了3个对象:
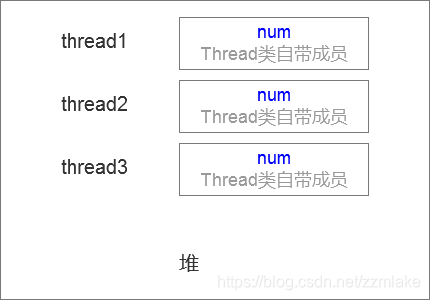
3个线程分别访问自己的num成员,互相不干扰,所以每个线程都会输出5到1这几个数字。
Runnable和Thread混合使用
上面我们看过Runnable的定义,知道里面只有一个抽象的run()方法。如果我们直接定义一个Runnable的实现类,把run()方法重写一下,这个实现类可以直接运行吗???
结果肯定是否定的,我们来看看。首先改写MyThread,改成直接实现Runnable接口。
public class MyThread  implements Runnable{
    private int num = 5;

    @Override
    public void run() {
       while(num>0) {
           System.out.println("resume number:" + num--);
       }
    }
}
试图直接启动线程试试:
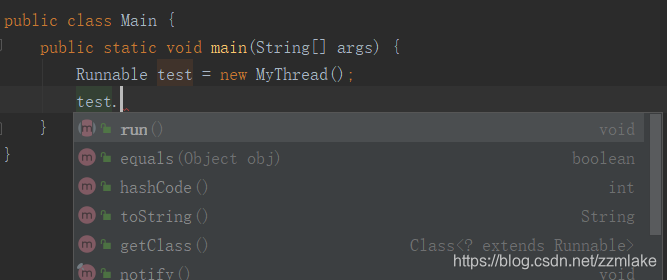
你会发现,只有run能调用,根本没有start()方法!!!因为Runnable里面根本没有这个方法,你定义的类里面也没有,通过上面学习你已经知道:启动线程必须使用start()方法,它是一个底层虚拟机实现,它是Thread类的方法。因此,你的类虽然实现了Runnable接口,重写了run()方法,但是是无法运行的;想要运行起来,还是得借助Thread类!这时,我们就得看看Thread类的其他初始化方法。
Thread类有一个构造方法:
 public Thread(Runnable target) {
        init(null, target, "Thread-" + nextThreadNum(), 0);
    }
还记得上面的run()方法里面也有一个target吗?就是这个了!如果在创建Thread对象时,你是用一个Runable实现类进行初始化的,那么target将不为null,我们继续看看源码,这里调用了init方法:
  private void init(ThreadGroup g, Runnable target, String name,
                      long stackSize) {
        init(g, target, name, stackSize, null, true);
    }
继续追踪,这个被调用方法比较长,删除无关代码,得到结论如下:
 private void init(ThreadGroup g, Runnable target, String name,
                      long stackSize, AccessControlContext acc,
                      boolean inheritThreadLocals) {
        if (name == null) {
            throw new NullPointerException("name cannot be null");
        }
        ......
        this.name = name;
        ......
        this.target = target;
        ......
    }
其实就是用传入的target参数来初始化当前Thread类中的target,此时target已经不为null,那么再看一次run()方法:
  @Override
    public void run() {
        if (target != null) {
            target.run();
        }
    }
这时,线程start()启动一个新线程时,target已经不为null,run()方法将调用target中定义的run()。因此,Runnable的正确用法是:
1.定义Runnable的实现类MyThread,重写run()方法;
2.创建MyThread对象myThread;
3.用myThread去初始化一个Thread的对象thread;
4.thread对象执行start()方法。
此时,线程将被创建,执行Runnable实现类中定义的run()方法。
//测试代码
public class Main {
    public static void main(String[] args) {
        Runnable myThread = new MyThread();
        Thread   thread = new Thread(myThread);
        thread.start();
    }
}

//执行结果
resume number:5
resume number:4
resume number:3
resume number:2
resume number:1
这个执行顺序是不固定的,哪个线程先执行并不确定,这取决于哪个线程先获得CPU的时间片。
到此,Thread和Runnable的基本使用方法已经介绍完毕。
Runnable特别之处
那么很多人可能会说:那Runnable有什么用?不如简单点,全部用Thread子类,1个对象即可;使用Runnable还得去定义2个对象呢!我们接下来再把代码改改看看。
//测试代码
public class Main {
    public static void main(String[] args) {
        Runnable myThread = new MyThread();

        Thread   thread1 = new Thread(myThread);
        thread1.start();

        Thread   thread2 = new Thread(myThread);
        thread2.start();

        Thread   thread3 = new Thread(myThread);
        thread3.start();
    }
}

//执行结果
resume number:5
resume number:2
resume number:1
resume number:3
resume number:4
Amazing! 我们这次创建了3个线程,发现这个3个线程居然访问到同一个num了!这和上面纯粹用Thread实现的线程完全不一样!这里好像是把一个任务分给3个线程去一起做,完全不重复!当然,涉及到共享数据,就必须考虑同步互斥的问题,但是我们今天主题不是这个,就不多加讨论了。
我们再来看看这个过程:
1.创建了一个MyThread对象myThread;
2.用myThread去初始化了3个Thread对象,此时这3个对象中,target都指向了myThread;
3.3个Thread对象都执行了start()方法,那么就是创建了3个新线程,都执行了myThread.run()方法。
此时堆的情况如下:
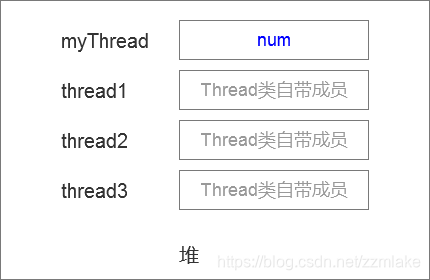
很明显,堆内存中,num只有一个,3个线程访问的都是这个num,所以5到1每个只打印了一次。
Runnable接口和Thread配合使用,可以实现对共享资源的访问,当然需要配上同步互斥机制。
是不是只有通过Runnable接口才可以做到这种共享访问呢?其实也不是的,只不过用Runnable是最佳答案而已。我们可以再观察一下Thread的2个点 :
//Thread是Runnable的实现类
public class Thread implements Runnable {
  ......


    //构造方法的参数是Runnable的target
    public Thread(Runnable target) {
        init(null, target, "Thread-" + nextThreadNum(), 0);
    }
}
明白了吗?哈哈哈!这个方法不好,但是可以做到。如有需要使用Runnable更佳。
扩展说明
另外,配合Java8的新特征Lambda表达式,使用Runnable来实现简单的线程更直观简洁。
public class Main {
    public static void main(String[] args) {
        new Thread(()->System.out.println("hello world")).start();
    }
}

//输出结果
hello world

Process finished with exit code 0
如有任何建议和疑问,欢迎和我继续讨论,谢谢。QQ:1446125822。
