接触Android一段时间之后发现自定义控件是一个很好玩的东西,可以绘制出各种绚丽的UI,成就感十足呀,同时自定义控件也是应用开发必备技能,以前总想着写一些常用的控件可以提供给别人使用,后来发现,大千世界,根本写不尽开发者所需要的各式各样的控件,授人以鱼不如授人以渔。
所以将自定义控件的方法记录下来,希望能给后来的开发者一些启示,学好这些基础知识,你就会发现自定义控件真的很简单,从此不再急头急脑的找控件,而是自己上手就写
这会是一个系列文章,这是第一篇,我们先了解一下 Paint 和 Canvas
在Android系统上画图跟我们美术画图原理上是一样的,Paint 表示画笔 Canvas 表示画布,画板
所以,跟画笔相关的设置都是通过 Paint 来设置,比如:画笔大小,颜色值,透明度,填充样式等等;要画出来的成品都通过 Canvas 绘制,比如:圆形,矩形,文字,图片 等等
Paint 基础函数使用
void setColor(int color)
设置画笔颜色
void setARGB(int a, int r, int g, int b)
设置画笔颜色
a:透明度 0-255 值越小越透明
r:红色值 0-255
g:绿色值 0-255
b:蓝色值 0-255
void setAlpha(int a)
设置画笔透明度 0-255 例如: 30%透明度 = 255 * 0.3
void setAntiAlias(boolean aa)
设置画笔是否抗锯齿。 锯齿:边缘看起来像被齿锯过一样,不圆滑
void setStyle(Paint.Style style)
设置画笔样式
Paint.Style.FILL:填充内部
Paint.Style.FILL_AND_STROKE:填充内部和描边
Paint.Style.STROKE:仅描边
void setStrokeWidth(float width)
设置描边宽度

上图表示三种Style的效果,很多人说 Paint.Style.FILL 和 Style.FILL_AND_STROKE 没有区别,那是因为没有设置 setStrokeWidth ,在设置描边宽度的情况下区别如上图。
void setShadowLayer(float radius, float dx, float dy, int shadowColor)
设置阴影
radius:阴影的倾斜度
dx:水平位移
dy:垂直位移
shadowColor:阴影颜色值
mPaint.setShadowLayer(10,10,10,Color.GREEN);

以上就是 Paint 基础函数介绍,完全掌握基础的绘制已经够用了,还有几个进阶函数后期再讲,下面看看Canvas 绘制图形的基本函数
Canvas 基础函数使用
知道如何设置画笔之后我们就要自定义一个控件来绘制自己想要的图形了
这里我们创建一个最简单的自定义的控件 MyView 继承 View ,重写 onDraw 方法在空白的界面上绘制新的内容。 给新手提示一下,这些区别于系统基础控件的View被称为自定义控件,其实简单的一逼,不要被名字吓到。
public class RView extends View {

    private Paint mPaint;
    public RView(Context context) {
        this(context, null);
    }

    public RView(Context context, AttributeSet attrs) {
        super(context, attrs);
        init();
    }

    private void init() {
        mPaint = new Paint();
        mPaint.setColor(Color.RED);
        mPaint.setStyle(Paint.Style.FILL);
        mPaint.setStrokeWidth(15);
    }

    @Override
    protected void onDraw(Canvas canvas) {
        super.onDraw(canvas);
        canvas.drawPoint(100, 100, mPaint);
    }
}
xml 使用
<widget.customwidget.RView
        android:layout_width="match_parent"
        android:layout_height="match_parent" />
好了废话不多说,从基础的几何图形开始学习绘制。 点 , 线 ,面 ,圆 ,各种几何图形
canvas 绘制 单个点
void drawPoint(float x, float y, Paint paint)
参数
float x: 点 X 坐标
float y: 点 Y 坐标
Paint paint: 画笔 前面说过如何设置画笔
    Paint mPaint = new Paint();
    mPaint.setColor(Color.RED);
    mPaint.setStyle(Paint.Style.FILL);
    mPaint.setStrokeWidth(15);

    canvas.drawPoint(100, 100, mPaint);
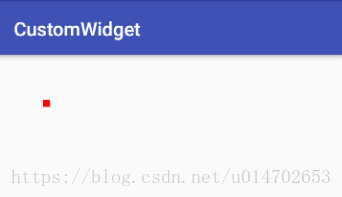
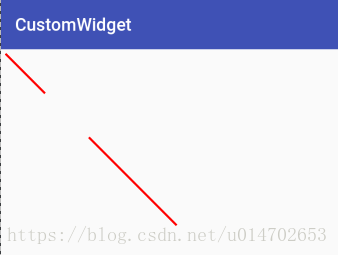
canvas 绘制 多个点
void drawPoints (float[] pts, Paint paint)
void drawPoints (float[] pts, int offset, int count, Paint paint)
参数
float[] pts: 点的集合。 样式为{x0,y0,x1,y1,x2,y2…} 一个点2个值
int offset: 跳过集合中的数值个数 不是点的个数
int count: 参与绘制的数值的个数 不是点的个数
float[] pts = {10, 10, 100, 100, 200, 200, 400, 400};
offset = 2
count = 4
意义: 在 pts 集合中跳过前面 2 个,紧接着连续获取 4 个数值参与绘制
效果: 跳过第一个点,画出后面两个点,第四个点不画 ,注意一个点是两个数值!
    Paint mPaint = new Paint();
    mPaint.setColor(Color.RED);
    mPaint.setStyle(Paint.Style.FILL);
    mPaint.setStrokeWidth(15);

    float[] pts = {10, 10, 100, 100, 200, 200, 400, 400};
    //全部绘制
    canvas.drawPoints(pts, mPaint);

    //跳过前面2个 紧接着4个值绘制
    mPaint.setColor(Color.GREEN);
    canvas.drawPoints(pts, 2, 4, mPaint);
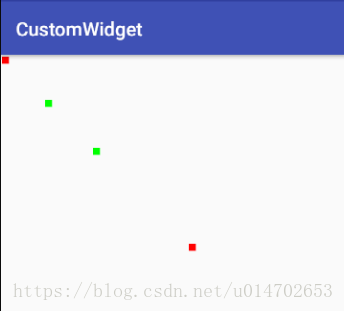
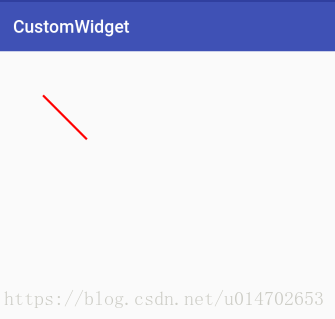
canvas 绘制 一条线
void drawLine (float startX, float startY, float stopX, float stopY, Paint paint)
参数
float startX: 起始点X坐标
float startY: 起始点Y坐标
float stopX: 结束点X坐标
float stopY: 结束点Y坐标
    Paint mPaint = new Paint();
    mPaint.setColor(Color.RED);
    mPaint.setStyle(Paint.Style.FILL);
    mPaint.setStrokeWidth(5);

    canvas.drawLine(100, 100, 300, 300, mPaint);
canvas 绘制 多条线
void drawLines (float[] pts, Paint paint)
void drawLines (float[] pts, int offset, int count, Paint paint)
参数
两点决定一条直线,所以意义跟前面讲的多个点类似
float[] pts: 线段的集合。 样式为{x0,y0,x1,y1,x2,y2…} 一个点2个值,2个点一条直线
int offset: 跳过集合中的数值个数 不是线段的个数
int count: 参与绘制的数值的个数 不是线段的个数
    Paint mPaint = new Paint();
    mPaint.setColor(Color.RED);
    mPaint.setStyle(Paint.Style.FILL);
    mPaint.setStrokeWidth(5);

    float[] pts = {10, 10, 100, 100, 200, 200, 400, 400};
    canvas.drawLines(pts, mPaint);
代码中 pts 有 8 个数值,表示 4 个点 ,2 条直线
    Paint mPaint = new Paint();
    mPaint.setColor(Color.RED);
    mPaint.setStyle(Paint.Style.FILL);
    mPaint.setStrokeWidth(5);

    float[] pts = {10, 10, 100, 100, 200, 200, 400, 400};
    canvas.drawLines(pts, 2, 4, mPaint);
矩形工具类RectF与Rect
这两个都是矩形辅助类,都是通过4个点确定一个矩形,Rect的参数为int类型,而RectF的参数类型为float类型,没什么大的区别
RectF 常用构造函数
RectF(float left, float top, float right, float bottom)
Rect 常用构造函数
Rect(int left, int top, int right, int bottom)
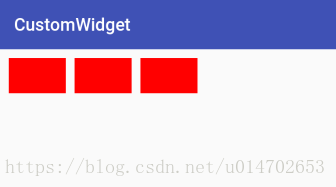
canvas 绘制 矩形
void drawRect (float left, float top, float right, float bottom, Paint paint)
void drawRect (RectF rect, Paint paint)
void drawRect (Rect r, Paint paint)
第一个函数直接传入4个点 绘制一个矩形
第2,3 个函数传入 RectF 或者 Rect 绘制一个矩形
    Paint mPaint = new Paint();
    mPaint.setColor(Color.RED);
    mPaint.setStyle(Paint.Style.FILL);
    mPaint.setStrokeWidth(5);

    canvas.drawRect(20, 20, 150, 100, mPaint);

    RectF rectF = new RectF(170, 20, 300, 100);
    canvas.drawRect(rectF, mPaint);

    Rect rect = new Rect(320, 20, 450, 100);
    canvas.drawRect(rect, mPaint);
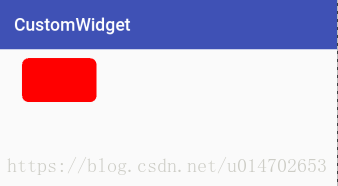
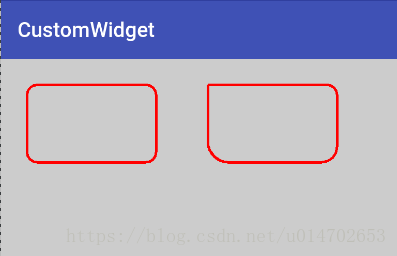
canvas绘制 圆角矩形
void drawRoundRect(RectF rect, float rx, float ry, Paint paint)
void drawRoundRect(float left, float top, float right, float bottom, float rx, float ry, Paint paint)
参数
float rx:生成圆角的椭圆的X轴半径
float ry:生成圆角的椭圆的Y轴半径
    Paint mPaint = new Paint();
    mPaint.setColor(Color.RED);
    mPaint.setStyle(Paint.Style.FILL);
    mPaint.setStrokeWidth(5);

    RectF rectF = new RectF(50, 20, 220, 120);
    canvas.drawRoundRect(rectF, 15, 15, mPaint);
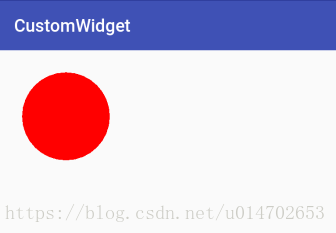
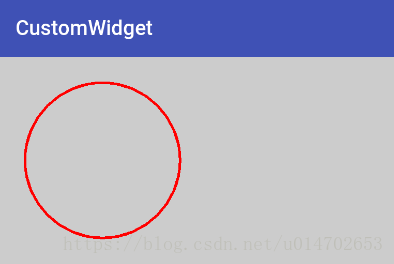
canvas绘制 圆形
void drawCircle (float cx, float cy, float radius, Paint paint)
参数
float cx:圆心X坐标
float cy:圆心Y坐标
float radius:圆的半径
    Paint mPaint = new Paint();
    mPaint.setColor(Color.RED);
    mPaint.setStyle(Paint.Style.FILL);
    mPaint.setStrokeWidth(5);

    canvas.drawCircle(150, 150, 100, mPaint);
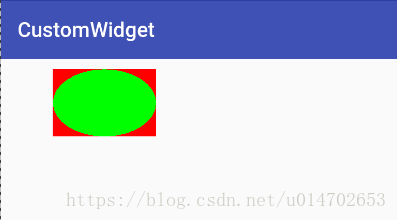
canvas绘制 椭圆
我们知道椭圆是根据一个矩形绘制的,以矩形的长为椭圆的X轴,矩形的宽为椭圆的Y轴,绘制椭圆图形
void drawOval (RectF oval, Paint paint)
void drawOval(float left, float top, float right, float bottom, Paint paint)
参数
RectF oval:用来生成椭圆的矩形
    Paint mPaint = new Paint();
    mPaint.setColor(Color.RED);
    mPaint.setStyle(Paint.Style.FILL);
    mPaint.setStrokeWidth(5);

    RectF rect = new RectF(100, 20, 300, 150);
    canvas.drawRect(rect, mPaint);//绘制矩形辅助理解

    mPaint.setColor(Color.GREEN);
    canvas.drawOval(rect, mPaint);
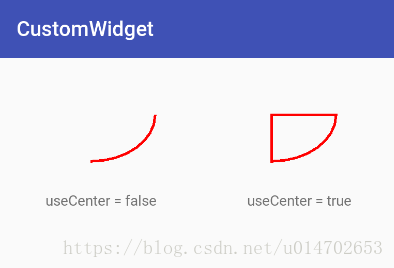
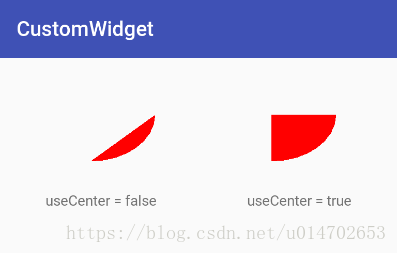
canvas绘制 圆弧,扇形
void drawArc(RectF oval, float startAngle, float sweepAngle, boolean useCenter, Paint paint)
参数
RectF oval:生成椭圆的矩形
float startAngle:圆弧开始的角度,以X轴正方向为0度
float sweepAngle:圆弧扫过的角度
boolean useCenter:是否连接中心点
    Paint mPaint = new Paint();
    mPaint.setColor(Color.RED);
    mPaint.setStyle(Paint.Style.STROKE);
    mPaint.setStrokeWidth(5);

    RectF rect = new RectF(50, 20, 300, 200);
    canvas.drawArc(rect, 0, 90, false, mPaint);

    RectF rect2 = new RectF(400, 20, 650, 200);
    canvas.drawArc(rect2, 0, 90, true, mPaint);
设置画笔为描边,起始角度 0 ,扫过 90 度角 效果如下
改变画笔为填充 mPaint.setStyle(Paint.Style.FILL) ,useCenter = true 可以实现扇形效果
canvas 绘制 Path
绘制路径,可以通过Path构建出任何图形,没错是任何图形!是不是很吊?也就是说学会绘制Path,基本上任何图形都能绘制出来,再配合上其他基础知识,绘制优美控件简直易如反掌
canvas.drawPath(path, mPaint);
方法超简单直接传入一个path即可,那么重点就落在在了如何构建path
Path 直线路径
void moveTo(float x, float y)//移动到坐标值为(x,y)的某个点
void lineTo(float x, float y)//连接到坐标值为(x,y)的某个点
void close ()//如果连续画了几条直线,但没有形成闭环,调用Close()会将路径首尾点连接起来,形成闭环;
这几个函数很有用处,那么我们现在用这几个函数绘制一个三角形
    Paint mPaint = new Paint();
    mPaint.setColor(Color.RED);
    mPaint.setStyle(Paint.Style.STROKE);
    mPaint.setStrokeWidth(5);
    //根据路径绘制
    Path path = new Path();
    path.moveTo(50, 100);//设置为起点
    path.lineTo(150, 100);//连接到第2个点(也是下一条直线起点)
    path.lineTo(100, 50);//连接到第3个点
    path.close();//闭环
    canvas.drawPath(path, mPaint);

Path 矩形路径
void addRect(RectF rect, Path.Direction dir)
void addRect(float left, float top, float right, float bottom, Path.Direction dir)
参数
这里跟绘制一个矩形思路一样,第一个函数是直接使用一个矩形;第二个函数是传入4个参数构建一个矩形
Path.Direction 路径的方向
Path.Direction.CCW: 逆时针方向
Path.Direction.CW: 顺时针方向
    Paint mPaint = new Paint();
    mPaint.setColor(Color.RED);
    mPaint.setStyle(Paint.Style.STROKE);
    mPaint.setStrokeWidth(5);
    //逆时针方向生成路径
    Path pathCCW = new Path();
    pathCCW.addRect(new RectF(50, 50, 300, 200), Path.Direction.CCW);
    canvas.drawPath(pathCCW, mPaint);

    //顺时针方向生成路径
    Path pathCW = new Path();
    pathCW.addRect(new RectF(400, 50, 650, 200), Path.Direction.CW);
    canvas.drawPath(pathCW, mPaint);
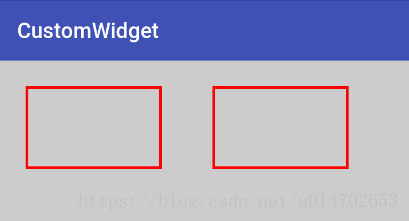
咦?根据上图看来好像 Path.Direction.CCW 和 Path.Direction.CW 两种当时生成的矩形并没有什么区别呀,那这个参数是不是没什么卵用?
当然有用,在图形上看来是没有区别,如果说需要根据路径方向排版的时候就很有用处啦,比如说文字排版
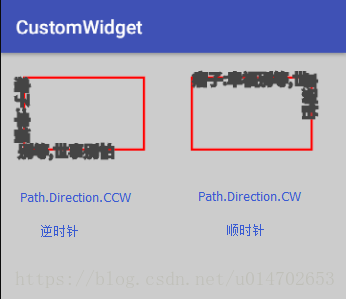
    Paint mPaint = new Paint();
    mPaint.setColor(Color.RED);
    mPaint.setStyle(Paint.Style.STROKE);
    mPaint.setStrokeWidth(5);
    //逆时针方向生成路径
    Path pathCCW = new Path();
    pathCCW.addRect(new RectF(50, 50, 300, 200), Path.Direction.CCW);
    canvas.drawPath(pathCCW, mPaint);

    //顺时针方向生成路径
    Path pathCW = new Path();
    pathCW.addRect(new RectF(400, 50, 650, 200), Path.Direction.CW);
    canvas.drawPath(pathCW, mPaint);

    //根据路径绘制文字
    mPaint.setColor(Color.DKGRAY);
    mPaint.setTextSize(32);
    String text = "痞子:幸福别等,世事别怕";
    canvas.drawTextOnPath(text, pathCCW, 0, 16, mPaint);
    canvas.drawTextOnPath(text, pathCW, 0, 16, mPaint);
Path 圆角矩形路径
void addRoundRect(RectF rect, float rx, float ry, Path.Direction dir)
void addRoundRect(float left, float top, float right, float bottom, float rx, float ry, Path.Direction dir)
void addRoundRect(RectF rect, float[] radii, Path.Direction dir)
void addRoundRect(float left, float top, float right, float bottom, float[] radii, Path.Direction dir)
参数
RectF 以及通过4个点构建一个RectF这些参数就不说了,都要写吐了。
float rx:生成圆角的椭圆的X轴半径 (跟前面绘制圆角矩形一样的)
float ry:生成圆角的椭圆的Y轴半径
Path.Direction dir:生成圆角矩形路径的方向 前面刚说
float[] radii: 这个参数是一个数组,需要传入8个值,共4组,分别对应每个角所使用的椭圆的X轴半径 rx 和Y轴半径 ry 例如:{x0,y0,x1,y1,x2,y2,x3,y3}
radii[0]/[1] = 左上角 (rx,ry)
radii[2]/[3] = 右上角 (rx,ry)
radii[4]/[5] = 右下角 (rx,ry)
radii[6]/[7] = 左下角 (rx,ry)
这个非常有实用价值,当初实现指定方向圆角图片的时候多亏了这个参数 安利一波:RWidgetHelper
    Paint mPaint = new Paint();
    mPaint.setColor(Color.RED);
    mPaint.setStyle(Paint.Style.STROKE);
    mPaint.setStrokeWidth(5);

    Path path = new Path();
    path.addRoundRect(new RectF(50, 50, 300, 200), 20, 20, Path.Direction.CCW);
    canvas.drawPath(path, mPaint);

    //指定某个方向圆角度数
    float[] radii = {0, 0, 20, 20, 30, 30, 40, 40};
    Path path1 = new Path();
    path1.addRoundRect(new RectF(400, 50, 650, 200), radii, Path.Direction.CCW);
    canvas.drawPath(path1, mPaint);
Path 圆形路径
void addCircle(float x, float y, float radius, Path.Direction dir)
参数
float x:圆心X轴坐标
float y:圆心Y轴坐标
float radius:圆半径
Path.Direction dir:圆形路径方向
    Paint mPaint = new Paint();
    mPaint.setColor(Color.RED);
    mPaint.setStyle(Paint.Style.STROKE);
    mPaint.setStrokeWidth(5);

    Path path = new Path();
    path.addCircle(200, 200, 150, Path.Direction.CCW);
    canvas.drawPath(path, mPaint);
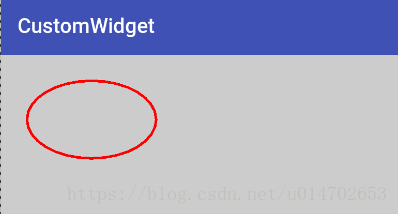
Path 椭圆形路径
void addOval(RectF oval, Path.Direction dir)
void addOval(float left, float top, float right, float bottom, Path.Direction dir)
参数
RectF oval:构建椭圆的矩形
Path.Direction dir:椭圆形路径方向
    Paint mPaint = new Paint();
    mPaint.setColor(Color.RED);
    mPaint.setStyle(Paint.Style.STROKE);
    mPaint.setStrokeWidth(5);

    Path path = new Path();
    path.addOval(new RectF(50, 50, 300, 200), Path.Direction.CCW);
    canvas.drawPath(path, mPaint);
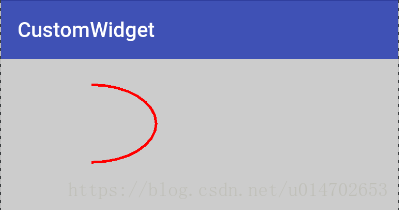
Path 圆弧路径
void addArc(RectF oval, float startAngle, float sweepAngle)
void addArc(float left, float top, float right, float bottom, float startAngle, float sweepAngle)
参数
RectF oval:构建圆弧的矩形
float startAngle:圆弧开始的角度,以X轴正方向为0度
float sweepAngle:圆弧扫过的角度
    Paint mPaint = new Paint();
    mPaint.setColor(Color.RED);
    mPaint.setStyle(Paint.Style.STROKE);
    mPaint.setStrokeWidth(5);

    Path path = new Path();
    path.addArc(new RectF(50, 50, 300, 200), -90, 180);
    canvas.drawPath(path, mPaint);
恩恩,由于篇幅的原因,本篇就先写到这里,转篇继续学习关于 绘制文本 和 绘制图片
文章地址:自定义控件(二)Paint,Canvas 基础用法 - drawBitmap(),drawText() 详解