项目中各种自定义控件,用到paint和canvas的地方非常多,所以就总结了下paint和canvas的用法,如有错误欢迎大家批评指正
一.paint类讲解
首先paint类是在graphics类下面的 它的继承关系如下

paint类是android提供的绘图的一个工具类即画笔工具,它在绘图中有极其重要的作用,画笔工具主要指定如何绘制我们所需要的图形,如图形的颜色、样式等。画笔对象有很多设置方法,大体上可以分为两类
(1)与图形绘制相关
(2)与文本绘制相关
1.图形绘制
setARGB(int a ,int r,int g,int b);//参数含义:a代表透明度,r,g,b代表颜色值
setAlpha(int a);//参数含义:a代表绘制图形的透明度
setColor(int color);//参数含义:color:设置绘制的颜色,使用颜色值来表示,该颜色值包括透明度和RGB颜色
setAntiAlias(boolean b)//设置是否使用抗锯齿功能,会消耗较大资源,绘制图形速度会变慢。
setDither(boolean dither)//设置是否使用图像抖动处理,会使绘制出来的图片颜色更加平滑和饱满,图像更加清晰
setFilterBitmap(boolean filter)//如果该项设置为true,则图像在动画进行中,会滤掉对Bitmap图像的优化操作,加快显示速度,本设置项依赖于dither和xfermode的设置
setMaskFilter(MaskFilter maskfilter)//设置MaskFilter,可以用不同的MaskFilter实现滤镜的效果,如滤化,立体等
setColorFilter(ColorFilter colorfilter)//设置颜色过滤器,可以在绘制颜色时实现不同颜色的变化效果
setPathEffect(PathEffect effect)//设置绘制路径的效果,如点画线等
setShader(Shader shader)//设置图像效果,使用Shader可以绘制出各种渐变效果
setShadowLayer(float radius , float dx,float dy,int color)//在图形下面设置阴影层,产生阴影效果,radius为阴影的角度,dx 和 dy为阴影在x轴和y轴上的距离,color为阴影的颜色
setStyle(Paint.Style style)//设置画笔的样式,为FILT , FILT_OR_STROKE 或 STROKE Style.FILL: 填充 STORKE:描边 FILL_OR_STORE:描边并填充
setStrokeCap(Paint.Cap cap)//当画笔样式为STROKE或FILL_OR_STROKE时,设置笔刷的图形样式,如Cap.ROUND圆形样式,或Cap.SQUARE方形样式
该方法用来设置我们画笔的
笔触风格
,比如:ROUND,表示是圆角的笔触。那么什么叫笔触呢,其实很简单,就像我们现实世界中的笔,如果你用圆珠笔在纸上戳一点,那么这个点一定是个 圆,即便很小,它代表了笔的笔触形状,如果我们把一支铅笔笔尖削成方形的,那么画出来的线条会是一条弯曲的“矩形”,这就是笔触的意思。除了ROUND,Paint.Cap还提供了另外两种类型: SQUARE和BUTT
元
setStrokeJoin(Paint.Join join)//设置绘制时个图形的结合方式,如平滑效果等,MITER为锐角,
ROU
ND为圆弧,BEVEL结合处为直线
setStrokeWidth(float width)//当画笔样式为STROKE或FILL_OR_STROKE时,设置笔刷的粗细度
setXfermode(Xfermode xfermode)//设置图形重叠时的处理方式,如合并,取交集或并集,经常用来制作橡皮擦出效果
2.文本绘制
setFakeBoldText(boolean fakeBoldText)//模拟实现粗体文字,设置在小字体上效果非常差
setSubpixelText(boolean subpixelText)//设置该项为true,将有助于文本在LCD屏幕上的显示效果
setTextAlign(Paint.Align align)//设置绘制文字的对齐方向
setTextScaleX(float scaleX)//设置绘制文字x轴的缩放比例,可以实现文字的拉伸效果
setTextSize(float textSize)//设置绘制文字的字号大小
setTextSkewX(float skewX)//设置斜体文字,skewX为倾斜弧度
setTypeface(Typeface typeface)//设置Typeface对象,即字体风格,包括粗体,斜体以及衬线体,非衬线体等
setUnderlineText(boolean underlineText)//设置带有下划线的文字效果
setStrikeThruText(boolean strikeThruText)//设置带有删除线的效果
// //设置结合处的样式,MITER为锐角,ROUND为圆弧,BEVEL为直线
// paint.setStrokeJoin(Join.ROUND);
/**ROUND
* The stroke projects out as a square, with the center at the end
* of the path.
*/
//它的英文解释如上我们要明白他是在path的终点进行设置
paint
.setStrokeCap(Cap.
ROUND
);
3.几个不容易理解的方法的讲解
(1).setStrokeCap//它是在路径的末尾进行处理的
示例代码如下:
package com.example.paintpractice;

import android.content.Context;
import android.graphics.Canvas;
import android.graphics.Color;
import android.graphics.Paint;
import android.graphics.Paint.Cap;
import android.graphics.Paint.Join;
import android.graphics.Paint.Style;
import android.graphics.Path;
import android.util.AttributeSet;
import android.view.View;
import android.widget.RelativeLayout;

public class DefineView extends View{

     Paint paint;
     public DefineView(Context context, AttributeSet attrs) {
            super(context, attrs);
            paint= new Paint();
            //设置画笔的颜色
            paint.setColor(Color. RED);
            //设置画笔的宽度
            paint.setStrokeWidth(5);
            //设置画笔的样式, Style.FILL: 实心  STORKE: 空心 FILL_OR_STORE:同时实心与空心
            paint.setStyle(Style. STROKE);
            //设置抗锯齿功能
            paint.setAntiAlias( true);
            //设置笔触样式

        /**ROUND
         * The stroke projects out as a square, with the center at the end
         * of the path.
         */
            //它的英文解释如上我们要明白他是在path的终点进行设置(个人的理解)
            paint.setStrokeCap(Cap. ROUND);

     }

     @Override
     protected void onDraw(Canvas canvas) {
            super.onDraw(canvas);

           Path path= new Path();
           path.moveTo(50,50);
           path.lineTo(100,100);
           path.lineTo(30,180);
           path.lineTo(50,50);

           canvas.drawPath(path, paint);
     }
}

从图中可以看出只有在路径的末尾(50,50)处是经过圆形处理的,其他两个结合点并没有处理
(2) setStrokeJoin(Paint.Join join)
(2) setStrokeJoin(Paint.Join join)
此方法是设置绘制时的结合方式
源码如下:
package com.example.paintpractice;

import android.content.Context;
import android.graphics.Canvas;
import android.graphics.Color;
import android.graphics.Paint;
import android.graphics.Paint.Cap;
import android.graphics.Paint.Join;
import android.graphics.Paint.Style;
import android.graphics.Path;
import android.util.AttributeSet;
import android.view.View;
import android.widget.RelativeLayout;

public class DefineView extends View{

     Paint paint;
     public DefineView(Context context, AttributeSet attrs) {
            super(context, attrs);
            paint= new Paint();
            //设置画笔的颜色
            paint.setColor(Color. RED);
            //设置画笔的宽度
            paint.setStrokeWidth(5);
            //设置画笔的样式, Style.FILL: 实心  STORKE: 空心 FILL_OR_STORE:同时实心与空心
            paint.setStyle(Style. STROKE);
            //设置抗锯齿功能
            paint.setAntiAlias( true);

      //设置结合处的样式,MITER为锐角,ROUND为圆弧,BEVEL为直线
      paint.setStrokeJoin(Join. ROUND);
     }

     @Override
     protected void onDraw(Canvas canvas) {
            super.onDraw(canvas);

           Path path= new Path();
           path.moveTo(50,50);
           path.lineTo(100,100);
           path.lineTo(30,180);
           path.lineTo(50,50);

           canvas.drawPath(path, paint);
     }


}
效果图:

从效果图中可以看到在路径的末尾没有进行圆形处理,只要我们加上 paint.setStrokeCap(Cap. ROUND);这句话就会达到想要的效果如下图

其他的方法,看到名字就知道是干什么的了,paint就先说这么多吧,以后研究其他的在接着写。
有关setXfermode和
AvoidXfermode以及混合模式的讲解参考下面的链接
二、canvas类讲解
1、继承关系

2、canvas是画布的意思,有一点必须记清楚不管我们怎么移动和旋转画布我们所绘制的内容,一定是在画布上的
提到canvas我们必须首先要讲解它的一难以理解的方法(对我来说)rotate(degree)方法这个方法是花费我最长时间理解的方法,网上有好多说的都不对
这个方法是旋转,大家一定要记住它旋转的是坐标系,并不是画布我们可以通过一个小的例子进行验证
如下部分代码
canvas.drawRect(100, 100, 150, 150,
paint1
);
// paint1是红色的画笔
canvas.rotate(30);
canvas.drawRect(200, 200, 250, 250, paint2);
// paint2是黑色的画笔
效果图:
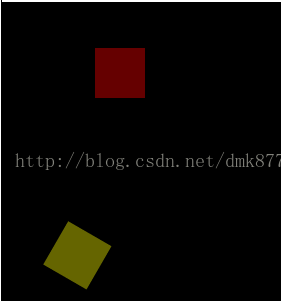
分析:从代码中我们可以看到我们先画的红色的正方形,然后旋转30度然后绘制黄色的正方形。可能大家有所迷惑为什么红色正方形没有旋转呢,那是因为我们进行旋转操作时旋转的是画布
有一句话
画图的canvas和显示没关系,而这个canvas又只影响你画图,
意思就是,画图,实际上是画在这个canvas定义的范围和规则下,但是其实图是画在显示在屏幕上的。我们进行的旋转只是旋转了坐标系而对之前所绘制的图形是没有影响的,影响的是旋转后我们所绘制的图形
3.canvas的另一对重要的方法restore()和save()
save:用来保存Canvas的状态。save之后可以调用Canvas的平移、缩放、旋转、错切、裁剪等操作
restore:用来恢复Canvas之前保存的状态。防止save后对Canvas执行的操作后续的绘制有影响。
save和restore要配对使用(restore可以比save少,但是不能多),如果restore调用的次数比save多会引发Error。save和restore之间,往往夹杂的是对Canvas的特殊操作
对上面的代码作如下更改
canvas.drawRect(100, 100, 150, 150,
paint1
);
// paint1是红色的画笔
canvas.save();
canvas .rotate(30);
canvas .restore();
//restore回刚才没有旋转的状态
canvas .drawRect(200, 200, 250, 250, paint2);
// paint2是黄色的画笔
效果图如下:
4.canvas常用的绘制图形的方法的介绍
(1)绘制圆形
canvas.drawCircle(0,0,200,
paint
);
源码:
<span style="font-size:18px;">    /**
     * Draw the specified circle using the specified paint. If radius is <= 0,
     * then nothing will be drawn. The circle will be filled or framed based
     * on the Style in the paint.
     *
     * @param cx     The x -coordinate of the center of the cirle to be drawn
     * @param cy     The y -coordinate of the center of the cirle to be drawn
     * @param radius The radius of the cirle to be drawn
     * @param paint  The paint used to draw the circle
     */
    public void drawCircle (float cx, float cy, float radius, Paint paint)
        cx:圆心的X坐标
        cy:圆心的Y坐标
        radius:半径
</span> //绘制弧线区域
RectF rect= new RectF(10,10,100,100);
canvas.drawArc(rect,10,90, true, paint);
canvas.translate(50, 50);
canvas.drawArc(rect, //弧线所使用的矩形区域大小
10, //开始角度
90, //扫过的角度
false, //是否使用中心
paint//采用的哪个画笔
);
使用中心和不使用中心的区别如下图

(3)绘制矩形
canvas.drawColor(Color.
RED
);
canvas.drawRect(150 , 10 , 200 , 60 ,
paint
);
源码:
 /**
     * Draw the specified Rect using the specified paint. The rectangle will
     * be filled or framed based on the Style in the paint.
     *
     * @param left   The left side of the rectangle to be drawn
     * @param top    The top side of the rectangle to be drawn
     * @param right  The right side of the rectangle to be drawn
     * @param bottom The bottom side of the rectangle to be drawn
     * @param paint  The paint used to draw the rect
     */
    public void drawRect( float left, float top, float right, float bottom, Paint paint) {
        native_drawRect(mNativeCanvas , left, top, right, bottom, paint.mNativePaint);
    }
其实它是定义了两个坐标一个是矩形的左上角的坐标(left,top)一个是右下角(right,bottom)
(4)绘制直线
canvas.drawLine(10,10,500,500,
paint
);
源码:
/**
     * Draw a line segment with the specified start and stop x,y coordinates,
     * using the specified paint.
     *
     * <p>Note that since a line is always "framed", the Style is ignored in the paint.</p>
     *
     * <p>Degenerate lines (length is 0) will not be drawn. </p>
     *
     * @param startX The x -coordinate of the start point of the line
     * @param startY The y -coordinate of the start point of the line
     * @param paint  The paint used to draw the line
     */
    public void drawLine (float startX, float startY, float stopX, float stopY, Paint paint) {
        native_drawLine(mNativeCanvas , startX, startY, stopX, stopY, paint.mNativePaint);
    }
定义了直线的起点和终点的坐标
(5)绘制椭圆
RectF oval=
new
RectF(0, 0, 200, 300);
canvas.drawOval(oval,
paint
);
源码:
 /**
     * Draw the specified oval using the specified paint. The oval will be
     * filled or framed based on the Style in the paint.
     *
     * @param oval The rectangle bounds of the oval to be drawn
     */
    public void drawOval (RectF oval, Paint paint) {
        if (oval == null) {
            throw new NullPointerException();
        }
        native_drawOval(mNativeCanvas , oval, paint.mNativePaint);
    }
(6)绘制路径在上面已经说到
Path path=
new
Path();
path.moveTo(10,10);
path.lineTo(300,100);
path.lineTo(500,500);
canvas.drawPath(path,
paint
);
源码:
 /**
     * Draw the specified path using the specified paint. The path will be
     * filled or framed based on the Style in the paint.
     *
     * @param path  The path to be drawn
     * @param paint The paint used to draw the path
     */
    public void drawPath (Path path, Paint paint) {
        native_drawPath(mNativeCanvas , path.ni(), paint.mNativePaint);
    }

如果我们想绘制封闭的应该加上一句
path.lineTo(10,10);
假如我们的
paint
.setStyle(Style.
FILL
);为填充那么不管我们有没有
path.lineTo(10,10);
这句话它都是填充的效果如下:

(7)使文字按照指定坐标排列
canvas.drawColor(Color.
BLACK
);
canvas. drawPosText(
"Android_清大世纪"
,
new
float
[]{
10,10,
//第一个字母的坐标
20,20,
//第二个字母的坐标
30,30,
40,40,
50,50,
60,60,
70,70,
80,80,
90,90,
100,100,
110,110,
120,120
},
paint
);
源码:
 /**
     * Draw the text in the array, with each character's origin specified by
     * the pos array.
     *
     * This method does not support glyph composition and decomposition and
     * should therefore not be used to render complex scripts.
     *
     * @param text  The text to be drawn
     * @param pos   Array of [x,y] positions, used to position each character
     * @param paint The paint used for the text (e.g. color, size, style)
     */
    @Deprecated
    public void drawPosText(String text, float[] pos, Paint paint) {
        if (text.length()*2 > pos. length) {
            throw new ArrayIndexOutOfBoundsException();
        }
        native_drawPosText(mNativeCanvas , text, pos, paint.mNativePaint);
    }
效果图:

(8)沿着指定路径绘制文字
Path path=
new
Path();
path.moveTo(10,10);
path.lineTo(300,100);
path.lineTo(500,500);
canvas.drawTextOnPath(
"清大世纪教育集团"
,
path,
10,
//hOffset参数指定水平偏移
10,
//vOffset指定垂直偏移
paint
);
源码:
/**
     * Draw the text, with origin at (x,y), using the specified paint, along
     * the specified path. The paint's Align setting determins where along the
     * path to start the text.
     *
     * @param text     The text to be drawn
     * @param path     The path the text should follow for its baseline
     * @param hOffset  The distance along the path to add to the text's
     *                 starting position
     * @param vOffset  The distance above( -) or below(+) the path to position
     *                 the text
     * @param paint    The paint used for the text (e.g. color, size, style)
     */
    public void drawTextOnPath (String text, Path path, float hOffset, float vOffset, Paint paint) {
        if (text.length() > 0) {
            native_drawTextOnPath(mNativeCanvas, text, path.ni(), hOffset, vOffset,
                    paint.mBidiFlags, paint.mNativePaint);
        }
    }
(9)绘制圆角矩形
RectF rect =
new
RectF(0,0,100,100);
canvas.drawRoundRect( rect,
30,
//X轴半径
30,
//Y轴半径
paint
);
源码:
 /**
     * Draw the specified round -rect using the specified paint. The roundrect
     * will be filled or framed based on the Style in the paint.
     *
     * @param rect  The rectangular bounds of the roundRect to be drawn
     * @param rx    The x -radius of the oval used to round the corners
     * @param ry    The y -radius of the oval used to round the corners
     * @param paint The paint used to draw the roundRect
     */
    public void drawRoundRect (RectF rect, float rx, float ry, Paint paint) {
        if (rect == null) {
            throw new NullPointerException();
        }
        native_drawRoundRect(mNativeCanvas , rect, rx, ry,
                             paint.mNativePaint);
    }
接下来上一个有那么一点技术含量的代码,绘制一个会走的时钟,在网上查了好多资料他们都是把指针或者时钟的框架弄成一个图片调用canvas.drawBitmap方法
画进去

像这种图片,但是我想把整个时钟给绘制出来于是研究了下
做成了一个小时钟挺有收获这个是会走的哦,,,效果图如下
