Hexo + GitHub Pages 搭建个人博客及 NexT 主题配置
最近,自己根据网上的一些教程,基于 Hexo 搭建了自己的博客,并把搭建过程整理了出来,以供参考。
源码仓库:https://github.com/yifanzheng/yifanzheng.github.io/tree/hexo-blog-backup
框架驱动:Hexo
博客主题:NexT ^6.x
博客搭建与配置
环境准备
Hexo 搭建
安装 Hexo,打开 Git Bash 命令窗口,输入命令:
npm install -g hexo-cli
安装好 Hexo 后,在任意目录新建一个空文件夹,名字可以为 blogs,然后进入这个文件夹,在命令行输入命令:
hexo init
执行完成后(如果命令窗口出现橙色的 WARN 不用管),生成文件结构:
├── node_modules       //依赖安装目录
├── scaffolds          //模板文件夹,新建的文章将会从此目录下的文件中继承格式
|   ├── draft.md         //草稿模板
|   ├── page.md          //页面模板
|   └── post.md          //文章模板
├── source             //资源文件夹,用于放置图片、数据、文章等资源
|   └── _posts           //文章目录
├── themes             //主题文件夹
|   └── landscape        //默认主题
├── .gitignore         //指定不纳入git版本控制的文件
├── _config.yml        //站点配置文件
├── db.json
├── package.json
└── package-lock.json
下载依赖包,输入命令:
npm install
依赖包下载完成后,输入如下命令启动 hexo 的内置 Web 服务器:
hexo g // 打包文件

hexo s // 启动服务器
然后可以在在浏览器中通过地址 http://localhost:4000/ 访问博客了。
更换 NexT 主题
Hexo 更换主题的方式很简单,只需要将主题文件拷贝至根目录下的 themes 目录中, 然后修改根目录下 _config.yml 文件中的 theme 字段,便可完成更换。
在博客项目的根目录下,输入命令:
git clone https://github.com/theme-next/hexo-theme-next.git themes/next
打开根目录下 _config.yml 文件,将 theme 字段的值修改为 next。
# Extensions
## Plugins: https://hexo.io/plugins/
## Themes: https://hexo.io/themes/
theme: next
这个时候需要重启服务器 hexo g && hexo s 并刷新才能使主题生效。
重要定义
在项目文件中存在两个 _config.yml 文件,为了方便区分。
-
项目根目录下的
_config.yml文件叫作站点配置文件。 -
主题文件夹根目录下的
themes/next/_config.yml文件叫作主题配置文件。
部署到 GitHub Pages
GitHub 配置
-
创建 GitHub 账号
-
创建仓库,仓库名必须是:<GitHub 账号名称>.github.io,这是GitHub pages 的特殊命名规范
修改站点配置文件 _config.yml
# Deployment
## Docs: https://hexo.io/docs/deployment.html
deploy:
  type: 'git'
  repo:
    github: https://github.com/yifanzheng/yifanzheng.github.io.git
  branch: master
注意:GitHub pages 仅在 master 分支下实现。
部署
- 在项目根目录下,安装 Git 部署插件:
npm install hexo-deployer-git --save
- 部署到 Github Pages
hexo g

hexo d
部署完成后,在浏览器访问网址:https://<Github账号名称>.github.io 即可查看博客。
详细过程可以参考:借助 GitHub pages 搭建静态个人网站并绑定域名
站点配置
站点配置可以查看 Hexo 官方文档。
Hexo 官方文档:https://hexo.io/zh-cn/docs/configuration.html 。
注意:所有的 : 都为英文字符,后面必须有一个空格。
主题配置
NexT 的主题配置可以先查看官方文档,写得很不错,很完善。
NexT 官方文档:http://theme-next.iissnan.com/getting-started 。
NexT (最新)官方文档:https://theme-next.org/docs/getting-started/ 。
第三方配置
鼠标点击特效
从各个站点里收集了以下四个比较常用的鼠标点击特效:
- 礼花特效
下载:礼花特效
- 爆炸特效
下载:爆炸特效
- 浮出爱心
下载:浮出爱心
- 浮出文字
下载:浮出文字
将脚本文件放置于 themes/next/source/js/cursor 目录下(如果没有相应的目录,需要自行创建,可以根据自己习惯命名)。
在主题自定义布局文件 themes/next/layout/_custom/custom.swig (如果没有 custom.swig 文件,需自行创建)中添加如下代码:
{# 鼠标点击特效 #}
{% if theme.cursor_effect == "fireworks" %}
  <script async src="/js/cursor/fireworks.js"></script>
{% elseif theme.cursor_effect == "explosion" %}
  <canvas class="fireworks" style="position: fixed;left: 0;top: 0;z-index: 1; pointer-events: none;" ></canvas>
  <script src="//cdn.bootcss.com/animejs/2.2.0/anime.min.js"></script>
  <script async src="/js/cursor/explosion.min.js"></script>
{% elseif theme.cursor_effect == "love" %}
  <script async src="/js/cursor/love.min.js"></script>
{% elseif theme.cursor_effect == "text" %}
  <script async src="/js/cursor/text.js"></script>
{% endif %}
在 themes/next/layout/_layout.swig 文件 body 标签中添加如下代码:
    ...
    {% include '_custom/custom.swig' %}
  </body>
</html>
在主题配置文件 themes/next/_config.yml 中添加如下代码:
# mouse click effect: fireworks | explosion | love | text
  cursor_effect: love
打字特性
- 打字礼花
下载:打字礼花
将脚本文件放置到 themes/next/source/js 目录下。
在主题自定义配置 themes/next/layout/_custom/custom.swig 文件中添加如下代码:
{% if theme.typing_effect %}
  <script async src="/js/activate-power-mode.min.js"></script>
  <script>
    POWERMODE.colorful = {{ theme.typing_effect.colorful }};
    POWERMODE.shake = {{ theme.typing_effect.shake }};
    document.body.addEventListener('input', POWERMODE);
  </script>
{% endif %}
在主题配置文件 themes/next/_config.yml 中添加如下代码:
# typing effect
typing_effect:
  colorful: true  # 礼花特效
  shake: false  # 震动特效
在 themes/next/layout/_layout.swig 文件 body 标签中添加如下代码:
    ...
    {% include '_custom/custom.swig' %}
  </body>
</html>
网站运行时间
在主题自定义配置 themes/next/layout/_custom/custom.swig 文件中添加如下代码:
{# 页脚站点运行时间统计 #}
{% if theme.footer.site_runtime.enable %}
  <script src="https://cdn.jsdelivr.net/npm/[email protected]/moment.min.js"></script>
  <script src="https://cdn.jsdelivr.net/npm/[email protected]/moment-precise-range.min.js"></script>
  <script>
    function timer() {
      var ages = moment.preciseDiff(moment(),moment({{ theme.footer.site_runtime.since }},"YYYYMMDD"));
      ages = ages.replace(/years?/, "年");
      ages = ages.replace(/months?/, "月");
      ages = ages.replace(/days?/, "天");
      ages = ages.replace(/hours?/, "小时");
      ages = ages.replace(/minutes?/, "分");
      ages = ages.replace(/seconds?/, "秒");
      ages = ages.replace(/\d+/g, '<span style="color:{{ theme.footer.site_runtime.color }}">$&</span>');
      div.innerHTML = `{{ __('footer.site_runtime')}} ${ages}`;
    }
    var div = document.createElement("div");
    //插入到copyright之后
    var copyright = document.querySelector(".copyright");
    document.querySelector(".footer-inner").insertBefore(div, copyright.nextSibling);
    timer();
    setInterval("timer()",1000)
  </script>
{% endif %}
在 themes/next/layout/_layout.swig 文件 body 标签中添加如下代码:
    ...
    {% include '_custom/custom.swig' %}
  </body>
</html>
在主题主题配置文件 themes/next/_config.yml 中添加如下内容:
  footer:
    ...
+  # Web Site runtime
+  site_runtime:
+  enable: true
+  # Specify the date when the site was setup
+  since: 20191124
+  # color of number
+  color: "#1890ff"
然后在文件 themes\next\languages\zh-CN.yml 中补全对应文案:
  footer:
    powered: "由 %s 强力驱动"
    theme: 主题
    # total_views: 总访问量
    # total_visitors: 总访客量
    total_views: "历经 %s 次回眸才与你相遇"
    total_visitors: "我的第 %s 位朋友"
+   site_runtime: "我已在此等候你"
文章阅读量 - LeanCloud
LeanCloud 能够给每篇博客统计访问量的工具。首先注册并登录 LeanCloud。
LeanCloud 官网:https://www.leancloud.cn/ 。
- LeanCloud 应用配置
参考:https://github.com/theme-next/hexo-theme-next/blob/master/docs/zh-CN/LEANCLOUD-COUNTER-SECURITY.md
- hexo-leancloud-counter-security 插件安装与配置
参考:https://github.com/theme-next/hexo-leancloud-counter-security
评论系统 - Valine
Valine 是一款基于 Leancloud 的快速,简单和高效的无后端评论系统。
Valine 官网:https://valine.js.org/ 。
配置参考:https://theme-next.org/docs/third-party-services/comments#Valine
百度统计
登录百度统计, 定位到站点的代码获取页面。
复制 hm.js? 后面那串统计脚本 id,如图:
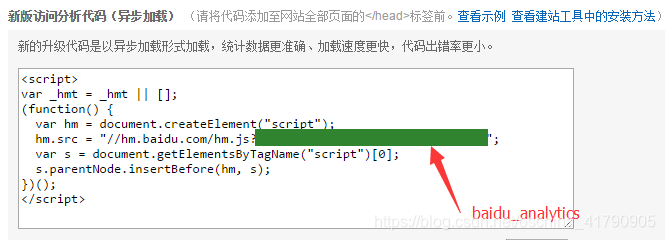
编辑主题配置文件,修改字段 baidu_analytics, 字段值设置成你的百度统计脚本 id。
# Baidu Analytics
baidu_analytics: # <app_id>
收录
百度收录
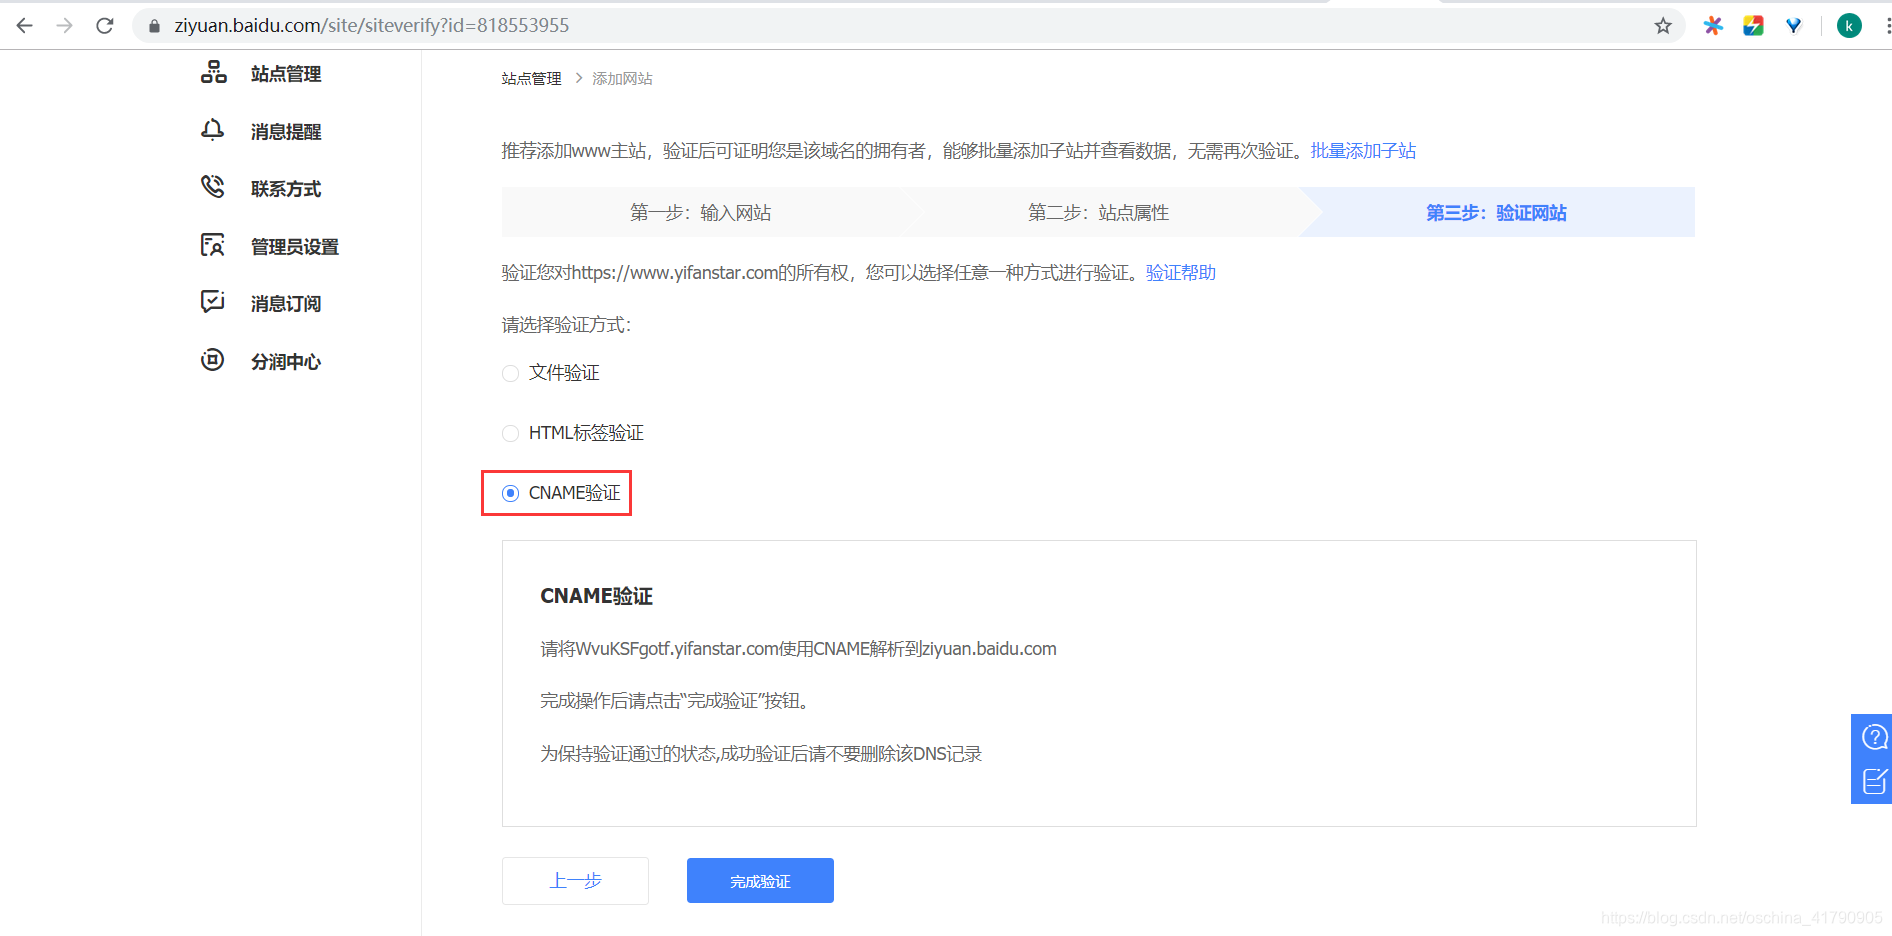
- 添加站点
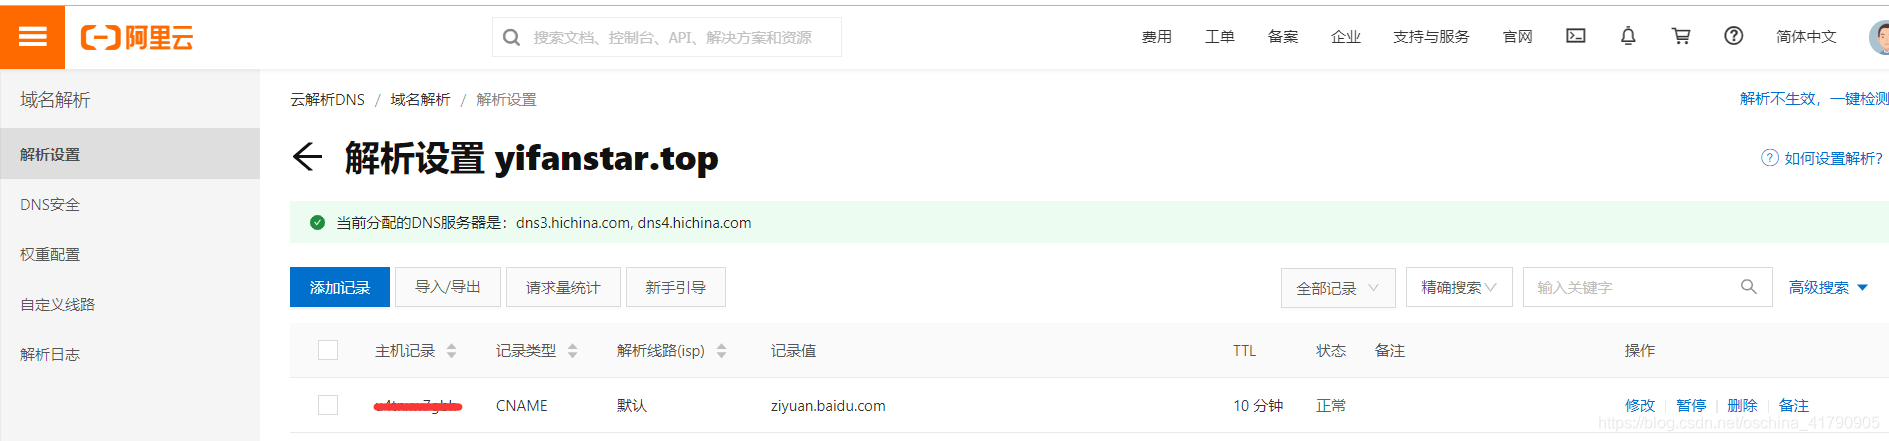
在 百度搜索资源平台 中提交站点域名,勾选站点属性,最后一步中同样会要求验证网站的所有权身份,选择 CNAME 验证,然后将给出的 ID 信息使用 CNAME 解析到 ziyuan.baidu.com。

到 阿里云 进行域名解析。
- 生成网站地图
使用 npm 自动生成网站的 sitemap,然后将生成的 sitemap 提交到百度搜索引擎,输入如下命令安装 sitemap 插件。
npm install hexo-generator-sitemap --save
npm install hexo-generator-baidu-sitemap --save
在 站点配置文件 添加如下代码:
# hexo sitemap
sitemap:
  path: sitemap.xml

baidusitemap:
  path: baidusitemap.xml
配置成功后,会生成 sitemap.xml 和 baidusitemap.xml,sitemap.xml 一般提交给谷歌搜素引擎,baidusitemap.xml 一般适合提交百度搜索引擎。
提交百度 sitemap:
除了 sitemap 之外还提供了多种推送站点内容的方案:
- 主动推送:通过 API 接口推送站点内容,实时性较高。
- 自动推送:在网页内添加 JS 脚本,每当页面被访问的时候会将页面 url 推送给百度,比较被动。
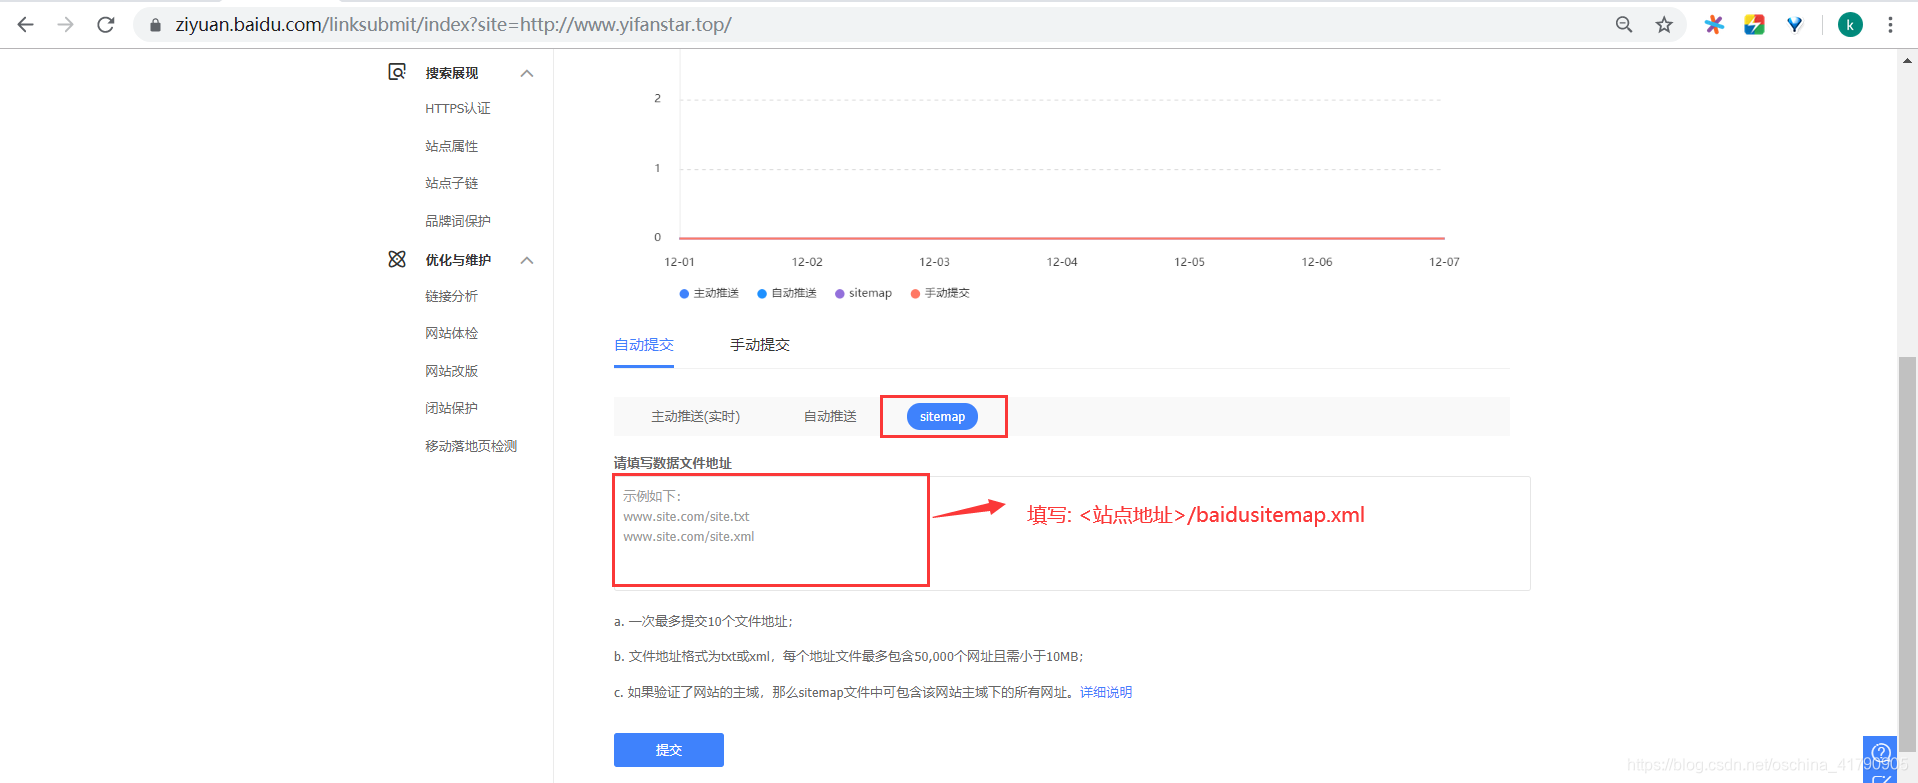
- sitemap:填写站点地图文件地址,百度会周期性的抓取其中的内容进行分析收录,收录效率比较低。
- 手动提交:手动填写链接地址进行收录。
- 开启主动推送
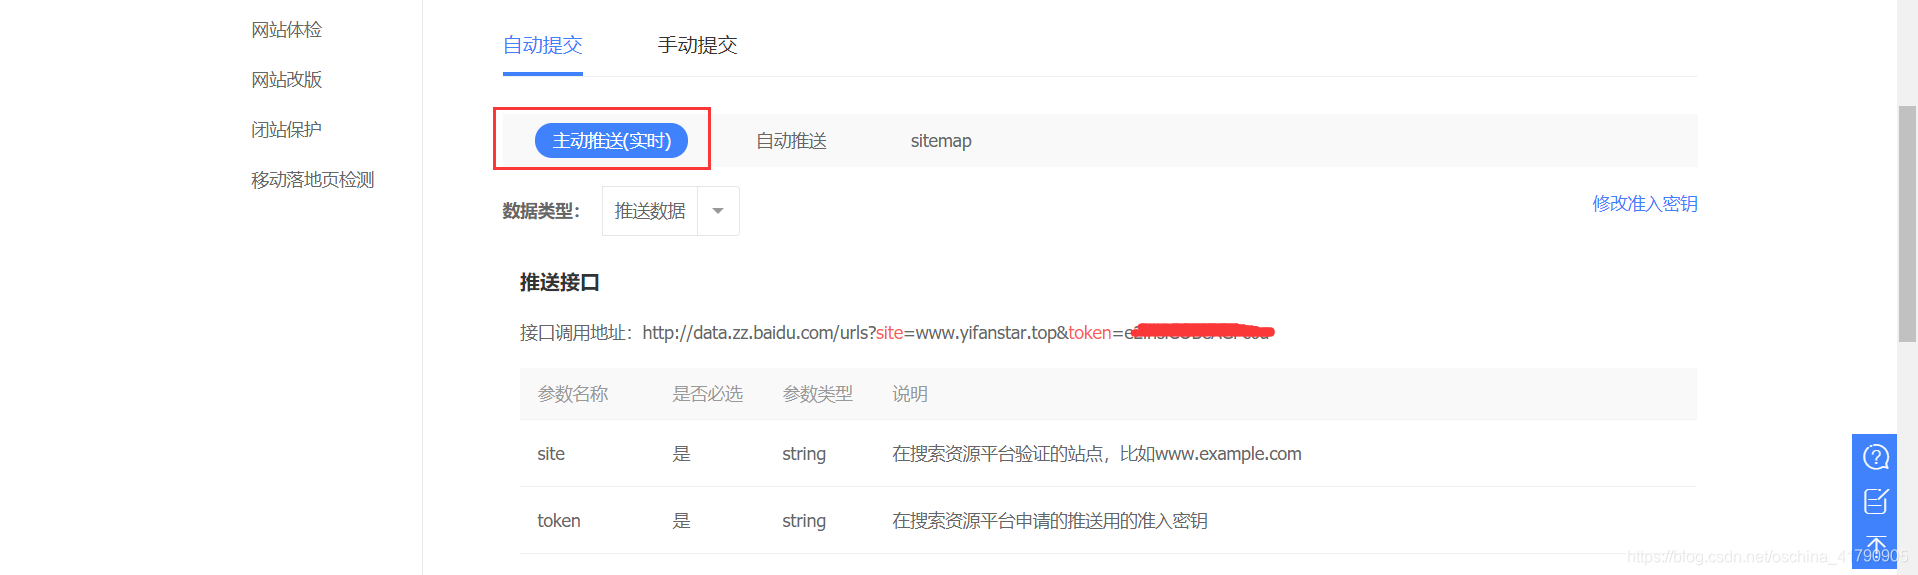
Hexo 中可以利用 hexo-baidu-url-submit 插件实现主动推送,在项目根目录下输入以下命令安装依赖:
npm install hexo-baidu-url-submit --save
在 站点配置文件 中添加以下代码:
# baidu SEO
baidu_url_submit:
  count: 80 # 提交最新的一个链接
  host: www.yifanstar.top # 在百度站长平台中注册的域名
  token: <your token> # 请注意这是您的秘钥, 所以请不要把博客源代码发布在公众仓库里!
  path: baidu_urls.txt # 文本文档的地址, 新链接会保存在此文本文档里
在 站点配置文件 中修改部署策略:
# Deployment
## Docs: https://hexo.io/docs/deployment.html
deploy:
 -
  type: 'git'
  repo:
    github: https://github.com/yifanzheng/yifanzheng.github.io.git
    coding: https://git.dev.tencent.com/yifanzheng/blogs.git
  branch: master
+ -
+  type: baidu_url_submitter
- 开启自动推送
Next 主题中内置了开启百度自动推送的选项,只需将其设置成 true 即可:
# Enable baidu push so that the blog will push the url to baidu automatically which is very helpful for SEO
baidu_push: true
谷歌收录
在 Google Search Console 中提交站点域名,此时会提供几种验证网站所有权的方法,展开其他验证方法中的 HTML 标记,然后将 meta 标签的 content 属性值复制到主题配置文件中:
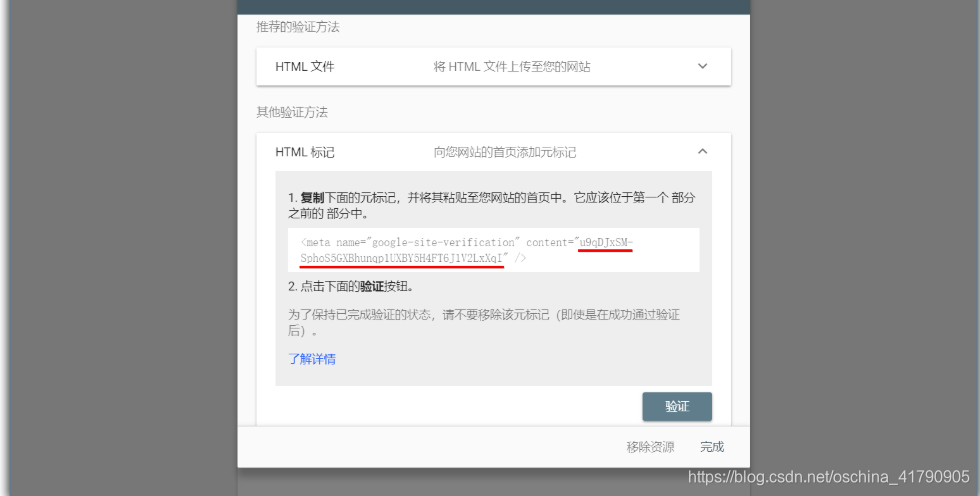
# Google Webmaster tools verification setting
# See: https://www.google.com/webmasters/
google_site_verification: <content>
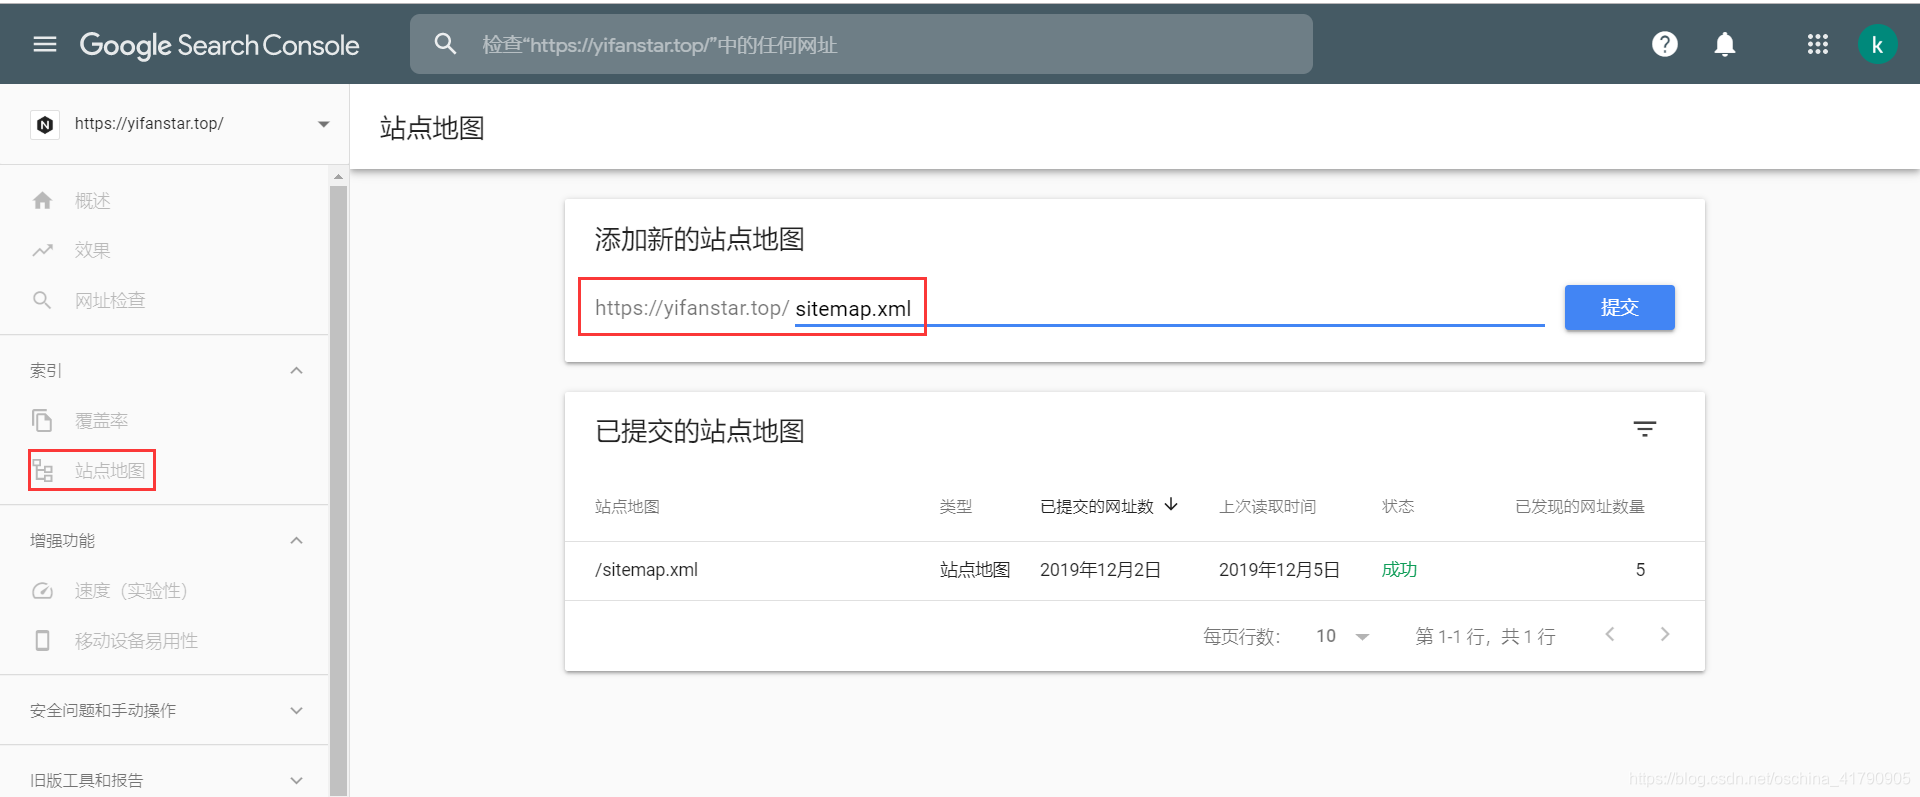
回到 Search Console 页面点击验证按钮,验证成功后将进入控制台,点击左侧 站点地图 菜单,在域名后输入 sitemap.xml 并提交,完成站点地图的添加。
使用 Gulp 压缩静态资源
Gulp 是前端开发过程中对代码进行构建的工具,是自动化项目的构建利器。不仅能对网站的资源进行优化,并且能在开发过程中能够对很多重复的任务使其自动完成。
- 安装 Gulp
npm install gulp -g
- 安装 Gulp 的插件
# 安装功能模块
npm install gulp-htmlclean gulp-htmlmin gulp-minify-css gulp-uglify gulp-imagemin --save

# 额外的功能模块
npm install gulp-debug gulp-clean-css gulp-changed gulp-if gulp-plumber gulp-babel babel-preset-es2015 del --save
接下来在博客项目的根目录下新建 gulpfile.js 文件,并复制下面的内容到文件中:
var gulp = require("gulp");
var debug = require("gulp-debug");
var cleancss = require("gulp-clean-css"); //css压缩组件
var uglify = require("gulp-uglify"); //js压缩组件
var htmlmin = require("gulp-htmlmin"); //html压缩组件
var htmlclean = require("gulp-htmlclean"); //html清理组件
var imagemin = require("gulp-imagemin"); //图片压缩组件
var changed = require("gulp-changed"); //文件更改校验组件
var gulpif = require("gulp-if"); //任务 帮助调用组件
var plumber = require("gulp-plumber"); //容错组件(发生错误不跳出任务,并报出错误内容)
var isScriptAll = true; //是否处理所有文件,(true|处理所有文件)(false|只处理有更改的文件)
var isDebug = true; //是否调试显示 编译通过的文件
var gulpBabel = require("gulp-babel");
var es2015Preset = require("babel-preset-es2015");
var del = require("del");
var Hexo = require("hexo");
var hexo = new Hexo(process.cwd(), {}); // 初始化一个hexo对象

// 清除public文件夹
gulp.task("clean", function() {
  return del(["public/**/*"]);
});

// 下面几个跟hexo有关的操作,主要通过hexo.call()去执行,注意return
// 创建静态页面 (等同 hexo generate)
gulp.task("generate", function() {
  return hexo.init().then(function() {
    return hexo
      .call("generate", {
        watch: false
      })
      .then(function() {
        return hexo.exit();
      })
      .catch(function(err) {
        return hexo.exit(err);
      });
  });
});

// 启动Hexo服务器
gulp.task("server", function() {
  return hexo
    .init()
    .then(function() {
      return hexo.call("server", {});
    })
    .catch(function(err) {
      console.log(err);
    });
});

// 部署到服务器
gulp.task("deploy", function() {
  return hexo.init().then(function() {
    return hexo
      .call("deploy", {
        watch: false
      })
      .then(function() {
        return hexo.exit();
      })
      .catch(function(err) {
        return hexo.exit(err);
      });
  });
});

// 压缩public目录下的js文件
gulp.task("compressJs", function() {
  return gulp
    .src(["./public/**/*.js", "!./public/libs/**"]) //排除的js
    .pipe(gulpif(!isScriptAll, changed("./public")))
    .pipe(gulpif(isDebug, debug({ title: "Compress JS:" })))
    .pipe(plumber())
    .pipe(
      gulpBabel({
        presets: [es2015Preset] // es5检查机制
      })
    )
    .pipe(uglify()) //调用压缩组件方法uglify(),对合并的文件进行压缩
    .pipe(gulp.dest("./public")); //输出到目标目录
});

// 压缩public目录下的css文件
gulp.task("compressCss", function() {
  var option = {
    rebase: false,
    //advanced: true,               //类型:Boolean 默认:true [是否开启高级优化(合并选择器等)]
    compatibility: "ie7" //保留ie7及以下兼容写法 类型:String 默认:''or'*' [启用兼容模式; 'ie7':IE7兼容模式,'ie8':IE8兼容模式,'*':IE9+兼容模式]
    //keepBreaks: true,             //类型:Boolean 默认:false [是否保留换行]
    //keepSpecialComments: '*'      //保留所有特殊前缀 当你用autoprefixer生成的浏览器前缀,如果不加这个参数,有可能将会删除你的部分前缀
  };
  return gulp
    .src(["./public/**/*.css", "!./public/**/*.min.css"]) //排除的css
    .pipe(gulpif(!isScriptAll, changed("./public")))
    .pipe(gulpif(isDebug, debug({ title: "Compress CSS:" })))
    .pipe(plumber())
    .pipe(cleancss(option))
    .pipe(gulp.dest("./public"));
});

// 压缩public目录下的html文件
gulp.task("compressHtml", function() {
  var cleanOptions = {
    protect: /<\!--%fooTemplate\b.*?%-->/g, //忽略处理
    unprotect: /<script [^>]*\btype="text\/x-handlebars-template"[\s\S]+?<\/script>/gi //特殊处理
  };
  var minOption = {
    collapseWhitespace: true, //压缩HTML
    collapseBooleanAttributes: true, //省略布尔属性的值  <input checked="true"/> ==> <input />
    removeEmptyAttributes: true, //删除所有空格作属性值    <input id="" /> ==> <input />
    removeScriptTypeAttributes: true, //删除<script>的type="text/javascript"
    removeStyleLinkTypeAttributes: true, //删除<style>和<link>的type="text/css"
    removeComments: true, //清除HTML注释
    minifyJS: true, //压缩页面JS
    minifyCSS: true, //压缩页面CSS
    minifyURLs: true //替换页面URL
  };
  return gulp
    .src("./public/**/*.html")
    .pipe(gulpif(isDebug, debug({ title: "Compress HTML:" })))
    .pipe(plumber())
    .pipe(htmlclean(cleanOptions))
    .pipe(htmlmin(minOption))
    .pipe(gulp.dest("./public"));
});

// 压缩 public/uploads 目录内图片
gulp.task("compressImage", function() {
  var option = {
    optimizationLevel: 5, //类型:Number  默认:3  取值范围:0-7(优化等级)
    progressive: true, //类型:Boolean 默认:false 无损压缩jpg图片
    interlaced: false, //类型:Boolean 默认:false 隔行扫描gif进行渲染
    multipass: false //类型:Boolean 默认:false 多次优化svg直到完全优化
  };
  return gulp
    .src("./public/medias/**/*.*")
    .pipe(gulpif(!isScriptAll, changed("./public/medias")))
    .pipe(gulpif(isDebug, debug({ title: "Compress Images:" })))
    .pipe(plumber())
    .pipe(imagemin(option))
    .pipe(gulp.dest("./public"));
});
// 执行顺序: 清除public目录 -> 产生原始博客内容 -> 执行压缩混淆 -> 部署到服务器
gulp.task(
  "build",
  gulp.series(
    "clean",
    "generate",
    "compressHtml",
    "compressCss",
    "compressJs",
    "compressImage",
    gulp.parallel("deploy")
  )
);

// 默认任务
gulp.task(
  "default",
  gulp.series(
    "clean",
    "generate",
    gulp.parallel("compressHtml", "compressCss", "compressImage", "compressJs")
  )
);
//Gulp4最大的一个改变就是gulp.task函数现在只支持两个参数,分别是任务名和运行任务的函数
以后在部署时,只需要每次在执行 generate 命令后执行 gulp 就可以实现对静态资源的压缩,压缩完成后执行 deploy 命令同步到服务器:
hexo g

gulp

hexo d
参考
https://juejin.im/post/5dd2e898e51d45400206a466#heading-0
https://juejin.im/post/5bebfe51e51d45332a456de0#heading-0
