开发前的准备
1 硬件需求
- 电脑
- J-Link v9
- L-Stick
2 软件准备
- Linux系统(Ubunt16.04 64位)
- nRF52832开发包
- gcc-arm-none-eabi-6-2017-q2-update-linux 编译工具链
- J-Link驱动
- nRF5x-Command-Line-Tools-Linux64
2.1 安装nRF52832开发包
nRF52832开发包不需要安装,只需要下载解压到你的某个文件夹中就可以了。
进入nordic官网nRF52832的首页选择DOWNLOADS向下找到Software Development Kit
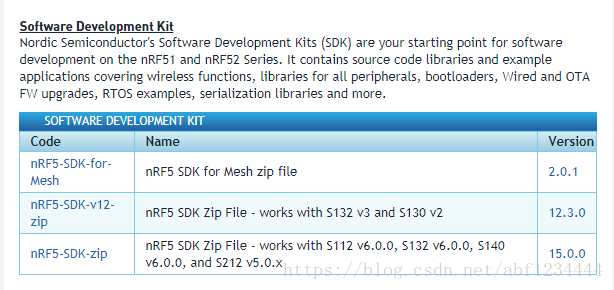
可以看到有三个可供下载
- nRF5-SDK-for-Mesh:低功耗蓝牙mesh组网的开发包
- nRF5-SDK-v12-zip:12.3.0版本的低功耗蓝牙开发包
- nRF5-SDK-zip:15.0.0版本的低功耗蓝牙开发包
我们目前用不到开发蓝牙MESH,所以直接选择最新版本的 nRF5-SDK-zip 进行下载
下载完成后解压开发包可以看到开发包内的结构如下
SDK/
 ├── components      # 一些基本代码库,外设驱动库,工具等
 ├── config          # 存放了不同芯片的配置模板文件
 ├── documentation   # 存放一些基本的文档信息
 ├── examples        # 各种例子的工程源码
 ├── external        # 存放一些第三方的代码库
 ├── external_tools  # 提供了一个CMSIS配置工具软件
 ├── integration     # 提供了一些兼容性代码
 ├── modules         # 关于nrfx的实现,nrfx是对外设驱动库接口的统一抽象,方便用户调用
 ├── license.txt     # 许可声明文件(没什么用)
 ├── nRF5x_MDK_8_16_0_IAR_NordicLicense.msi    # 针对IAR的芯片支持包
└── nRF5x_MDK_8_16_0_Keil4_NordicLicense.msi # 针对Keil4的芯片支持包对于开发包各个文件夹内的东西具体有什么意义现在不用深究,当我们用到的时候在这里找到它时会有更好的认识,但是一定要先看一下 SDK/documentation/release_notes.txt
nRF5 SDK v15.0.0
------------------------
Release Date: Week 12, 2018

Highlights:
- Full support for nRF52840 and production quality of libraries and examples for this device.
- Support for the new SoftDevices S140, S132, and S112 v6.0.0.
- Peripheral drivers now use nrfx.
- Extensive rework of the DFU functionality.
- Extensive rework of the cryptography library (nrf_crypto).
- USB firmware is now in production quality.
- Serialization of SoftDevices S140, S132, and S112 v6.0.0.
- IEEE 802.15.4 protocol in production quality.
- Included nrf_oberon crypto library with standard Nordic 5-clause license.

The following toolchains/devices have been used for testing and
verification:
- ARM: MDK-ARM version 5.18a
- GCC: GCC ARM Embedded 6.3 2017-q2-update
- IAR: IAR Workbench 7.80.4 (IAR 8 - see note below)
- SES: SES 3.34
- Linux: Ubuntu 17.04, Kernel 4.10.0.
- Jlink: 6.22g
可以看到官方的开发包使用开发环境说明,这也就是我们为什么选择 gcc-arm-none-eabi-6-2017-q2-update-linux 编译工具链,这样可以避免很多开发中由于编译工具链版本不同带来的各种问题。
2.2 安装gcc-arm-none-eabi
从https://developer.arm.com/open-source/gnu-toolchain/gnu-rm/downloads下载gcc-arm-none-eabi-6-2017-q2-update Linux 64-bit版本,将压缩包解压到 /usr/local/目录下即完成了安装,至于为什么解压到这个路径这也是因为nRF52832开发包的各种例子中的Makefile指定编译工具链的位置就是这里,可以在SDK/components/toolchain/gcc/Makefile.posix文件中看到
GNU_INSTALL_ROOT ?= /usr/local/gcc-arm-none-eabi-6-2017-q2-update/bin/
GNU_VERSION ?= 6.3.1
GNU_PREFIX ?= arm-none-eabi当然你也可以解压到其它位置,只需要将这个文件中的GNU_INSTALL_ROOT重新指定一下即可。
2.3 安装J-Link驱动
驱动版本和J-Link硬件本身有一定的兼容性,如果烧录出现问题就换一个版本的J-Link驱动再次尝试,最终我自己的J-Link V9选择了jlink_5.12.6_x86_64.deb下载地址这个版本。
下载完成后打开Linux终端cd到下载的文件目录下执行 sudo dpkg -i jlink_5.12.6_x86_64.deb即可。
2.4 安装nRF5x-Command-Line-Tools-Linux64
Nordic提供的nRF5x-Command-Line-Tools-Linux64 是一个工具软件,里边包含nrfjprog 和 mergehex两部分,nrfjprog和程序烧录相关,mergehex和HEX文件合并处理有关,下载压缩包后只需要将文件解压到/usr/local/目录下,然后将nrfjprog和mergehex这两个文件夹添加到环境变量即可。
3 编译一个官方的例子并烧录到芯片
现在就可以通过编译一个nRF52832开发包中提供的随便一个例子并烧录到nRF52832芯片中来检查我们的准备工作是否正确无误。
打开一个终端cd到 SDK/examples/peripheral/blinky/pca10040/blank/armgcc/ 目录下执行
makeubuntu:~/Desktop/nRF5_SDK_15.0.0_a53641a/examples/peripheral/blinky/pca10040/blank/armgcc$ make mkdir _build cd _build && mkdir nrf52832_xxaa Assembling file: gcc_startup_nrf52.S Compiling file: main.c Compiling file: boards.c Compiling file: app_error.c Compiling file: app_error_handler_gcc.c Compiling file: app_error_weak.c Compiling file: app_util_platform.c Compiling file: nrf_assert.c Compiling file: nrf_strerror.c Compiling file: system_nrf52.c Linking target: _build/nrf52832_xxaa.out text data bss dec hex filename 2140 112 28 2280 8e8 _build/nrf52832_xxaa.out Preparing: _build/nrf52832_xxaa.hex Preparing: _build/nrf52832_xxaa.bin DONE nrf52832_xxaa把J-Link通过SW模式接线连接L-Stick和电脑
在终端中执行
make erase对芯片进行全片擦除操作(非必需操作)
  ubuntu:~/Desktop/nRF5_SDK_15.0.0_a53641a/examples/peripheral/blinky/pca10040/blank/armgcc$ make erase
  nrfjprog -f nrf52 --eraseall
  Erasing user available code and UICR flash areas.
  Applying system reset.
在终端中执行
make flash进行程序烧录,执行完毕后芯片会被复位然后开始运行烧录的新程序ubuntu:~/Desktop/nRF5_SDK_15.0.0_a53641a/examples/peripheral/blinky/pca10040/blank/armgcc$ make flash Flashing: _build/nrf52832_xxaa.hex nrfjprog -f nrf52 --program _build/nrf52832_xxaa.hex --sectorerase Parsing hex file. Erasing page at address 0x0. Applying system reset. Checking that the area to write is not protected. Programing device. nrfjprog -f nrf52 --reset Applying system reset. Run.
如果以上步骤都可以得到正确的执行则表明我们的准备工作完美的完成了,可以开始我们的正式开发了。
