项目结构如下:

package com.enjoy.cap2.MainConfiguer;


import com.enjoy.cap1.Person;
import org.springframework.context.annotation.Bean;
import org.springframework.context.annotation.ComponentScan;
import org.springframework.context.annotation.Configuration;

@Configuration
@ComponentScan(value = "com.enjoy.cap2")//扫描组件
public class MainConfig {
    @Bean
    public Person person1(){
        return new Person("张三",22);
    }
}
如果把@ComponentScan注释掉测试用例打印出的结果如下:
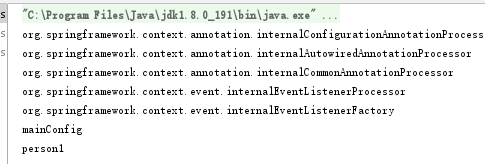
如果@ComponentScan不被注释掉测试用例打印出的结果如下:

可以发现@ComponentScan用在扫描@Repository,@Service,@Controller被注解标识的MVC并放入容器中(默认名称为类名首字母小写)
我们可以看到@bean注解的对象和@ComponentScan扫描的对象都被打印出来了,这说明@Bean的方式和扫描的方式是一样的。
其余代码如下:
package com.enjoy.cap2.controller;

import org.springframework.stereotype.Controller;

@Controller
public class OderController {
}
package com.enjoy.cap2.dao;

import org.springframework.stereotype.Repository;

@Repository
public class OrderDAO {
}
package com.enjoy.cap2.service;

import org.springframework.stereotype.Service;

@Service
public class OrderService {
}
package test;

import com.enjoy.cap2.MainConfiguer.MainConfig;
import org.junit.jupiter.api.Test;
import org.springframework.context.annotation.AnnotationConfigApplicationContext;

public class MainTEwst {

    @Test
    public void sss(){
        AnnotationConfigApplicationContext annotationConfigApplicationContext = new AnnotationConfigApplicationContext(MainConfig.class);
        String[] beanDefinitionNames = annotationConfigApplicationContext.getBeanDefinitionNames();
        for(String name:beanDefinitionNames){
            System.out.println(name);
        }
    }
}
annotationConfigApplicationContext.getBeanDefinitionNames();获取容器中所有对对象名称
