一、用@Configuration加载spring
1.1、@Configuration配置spring并启动spring容器
1.2、@Configuration启动容器+@Bean注册Bean
1.3、@Configuration启动容器+@Component注册Bean
1.4.0 @Scope
1.4.1 @Lazy
1.5、@Conditional
1.6.0 给容器中注册组件
1.6.1 @import导入组件
1.6.2 使用ImportSelector接口
1.6.3 ImportBeanDefinitionRegistrar手动注册bean到容器中
1.6.4使用Spring提供的 FactoryBean(工厂Bean)
1.6.5@ImportResource和Import引入配置文件
二.生命周期
2.1 @Bean指定初始化和销毁方法
2.2 InitializingBean 与 DisposableBean
2.3. @PostConstruct 与 @PreDestroy注解
2.4 BeanPostProcessor后置处理器
三.属性赋值
3.0 @value注解
3.1 @Propertysource注解
四. 自动装配
4.1 @Autowired注解
4.2 @Qualifier注解
4.3 @@Resource注解
4.4@Resource注解与@Autowired区别
4.5 spring之Aware接口的相关实现
4.6@Profile注解
一 @Configuation加载Spring方法
1.0 @Configuration注解
@ Configuration用于定义配置类,
可替换xml配置文件,被注解的类内部包含有一个或多个被@Bean注解的方法,
这些方法将会被AnnotationConfigApplicationContext
或AnnotationConfigWebApplicationContext类进行扫描,并用于构建bean定义,初始化Spring容器
    AnnotationConfigApplicationContext applicationContext =
    new AnnotationConfigApplicationContext(MainConfig2.class);
注意:@Configuration注解的配置类有如下要求:
@Configuration不可以是final类型;
@Configuration不可以是匿名类;
嵌套的configuration必须是静态类。
1.1、@Configuration配置spring并启动spring容器
@Configuration标注在类上,相当于把该类作为spring的xml配置文件中的,作用为:配置spring容器(应用上下文)
不用@Configuration注解的spring容器加载方式,用xml配置文件加载:
ApplicationContext Context=new ClassPathXmlApplicationContext("beans.xml");
@Configuration注解的spring容器加载方式:
    AnnotationConfigApplicationContext applicationContext =
    new AnnotationConfigApplicationContext(MainConfig2.class);
// @Configuration注解的spring容器加载方式,用AnnotationConfigApplicationContext替换ClassPathXmlApplicationContext />
1.2@Bean注解
@Bean标注在方法上(返回某个实例的方法),等价于spring的xml配置文件中的,作用为:注册bean对象
使用配置文件
    < bean id="person" class="com.atguigu.bean.Person"  scope="prototype" >
    		< property name="age" value="${}"></property>
    		< property name="name" value="zhangsan"></property>
    	< /bean>
使用@Bean注解
	//配置类==配置文件
    @Configuration  //告诉Spring这是一个配置类
    public class MainConfig {

    	//给容器中注册一个Bean;类型为返回值的类型,id默认是用方法名作为id
    	@Bean("person")
    	public Person person01(){
    		return new Person("lisi", 20);
    	}

    }
注:
(1)、@Bean注解在返回实例的方法上,如果未通过@Bean指定bean的名称,则默认与标注的方法名相同;
(2)、@Bean注解默认作用域为单例singleton作用域,可通过@Scope(“prototype”)设置为原型作用域;
(3)、既然@Bean的作用是注册bean对象,那么完全可以使用@Component、@Controller、@Service、@Ripository等注解注册bean,当然需要配置@ComponentScan注解进行自动扫描。
1.3 @ComponentScan注解
1、@Service用于标注业务层组件
2、@Controller用于标注控制层组件(如struts中的action)
3、@Repository用于标注数据访问组件,即DAO组件.
4、@Component泛指组件,当组件不好归类的时候,我们可以使用这个注解进行标注。
在xml文件中配置
    	<context:component-scan base-package="com.atguigu" use-default-filters="false" >
    </context:component-scan>
使用注解@Configuration启动容器+@Component注册Bean
   //配置类==配置文件
    @Configuration  //告诉Spring这是一个配置类

    @ComponentScans(
    		value = {
    				@ComponentScan(value="com.atguigu",includeFilters = {
    /*						@Filter(type=FilterType.ANNOTATION,classes={Controller.class}),
    						@Filter(type=FilterType.ASSIGNABLE_TYPE,classes={BookService.class}),*/
    						@Filter(type=FilterType.CUSTOM,classes={MyTypeFilter.class})
    				},useDefaultFilters = false)
    		}
    		)
    //@ComponentScan  value:指定要扫描的包
    //excludeFilters = Filter[] :指定扫描的时候按照什么规则排除那些组件
    //includeFilters = Filter[] :指定扫描的时候只需要包含哪些组件
    //FilterType.ANNOTATION:按照注解
    //FilterType.ASSIGNABLE_TYPE:按照给定的类型;
    //FilterType.ASPECTJ:使用ASPECTJ表达式
    //FilterType.REGEX:使用正则指定
    //FilterType.CUSTOM:使用自定义规则
    public class MainConfig {

    	//给容器中注册一个Bean;类型为返回值的类型,id默认是用方法名作为id
    	@Bean("person")
    	public Person person01(){
    		return new Person("lisi", 20);
    	}

    }
使用@Filter(type=FilterType.CUSTOM,classes={MyTypeFilter.class})自定义规则
public class MyTypeFilter implements TypeFilter {

	/**
	 * metadataReader:读取到的当前正在扫描的类的信息
	 * metadataReaderFactory:可以获取到其他任何类信息的
	 */
	@Override
	public boolean match(MetadataReader metadataReader, MetadataReaderFactory metadataReaderFactory)
			throws IOException {
		// TODO Auto-generated method stub
		//获取当前类注解的信息
		AnnotationMetadata annotationMetadata = metadataReader.getAnnotationMetadata();
		//获取当前正在扫描的类的类信息
		ClassMetadata classMetadata = metadataReader.getClassMetadata();
		//获取当前类资源(类的路径)
		Resource resource = metadataReader.getResource();

		String className = classMetadata.getClassName();
		System.out.println("--->"+className);
		if(className.contains("er")){
			return true;
		}
		return false;
	}

}
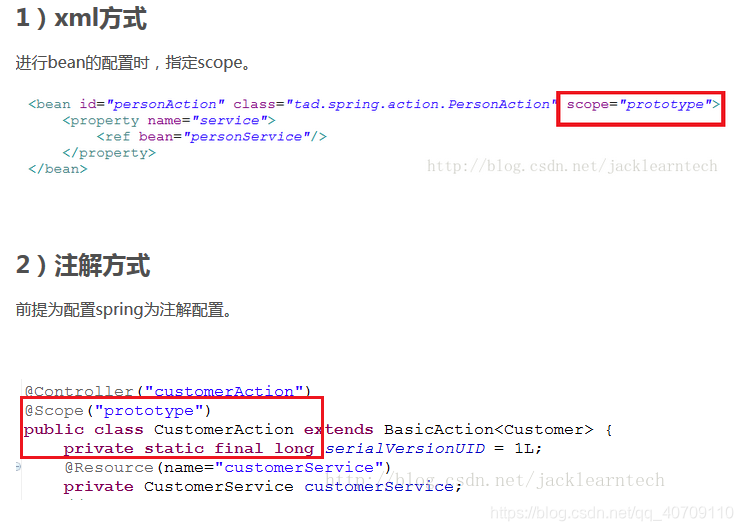
1.4.0@Scope
//默认是单实例的
ConfigurableBeanFactory#SCOPE_PROTOTYPE * @see
ConfigurableBeanFactory#SCOPE_SINGLETON * @see
org.springframework.web.context.WebApplicationContext#SCOPE_REQUEST
request * @see
org.springframework.web.context.WebApplicationContext#SCOPE_SESSION
sesssion * @return\ * @Scope:调整作用域 *
prototype:多实例的:ioc容器启动并不会去调用方法创建对象放在容器中。 * 每次获取的时候才会调用方法创建对象; 每一次请求(将其注入到另一个bean中,或者以程序的方式调用容器的 getBean()方法)都会产生一个新的bean实例,相当与一个new的操作,
singleton:单实例的(默认值):ioc容器启动会调用方法创建对象放到ioc容器中。 * 以后每次获取就是直接从容器(map.get())中拿, 当把 一个bean定义设置为singleton作用域时,Spring IOC容器只会创建该bean定义的唯一实例。这个单一实例会被存储到单例缓存(singleton cache)中,并且所有针对该bean的后续请求和引用都 将返回被缓存的对象实例
request:同一次请求创建一个实例 *
session:同一个session创建一个实例
1.4.1@Lazy懒加载:
@Lazy注解用于标识bean是否需要延迟加载
 * 		单实例bean:默认在容器启动的时候创建对象;
 * 		懒加载:容器启动不创建对象。第一次使用(获取)Bean创建对象,并初始化;
 *
没加注解之前主要容器启动就会实例化bean,而加上@Lazy注解则必须在第一次调用的时候才会加载
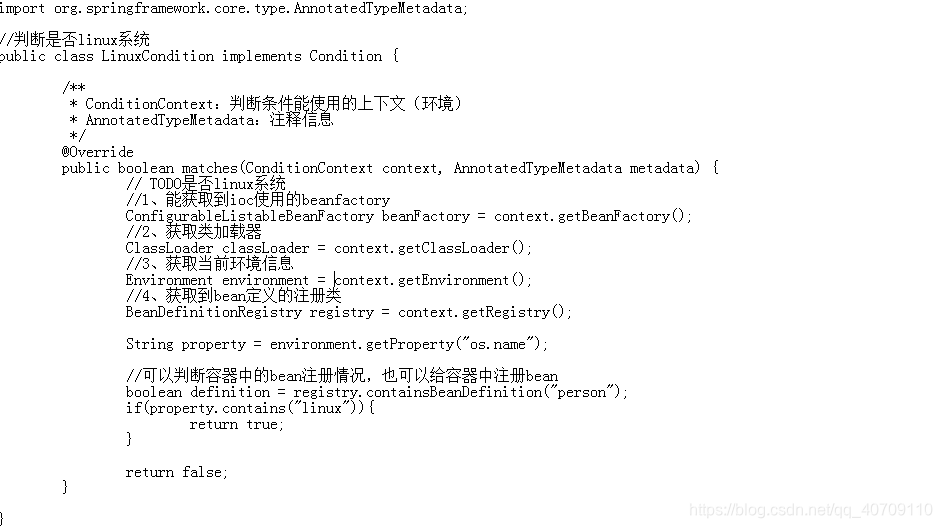
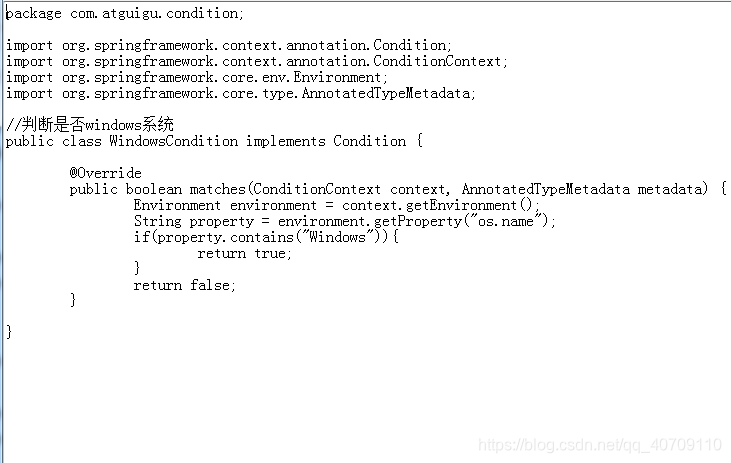
1.5@Conditional注解
SpringBoot底层大量使用,它的作用是按照一定的条件进行判断,满足条件给容器注册bean,注解可以标注在类和方法上
	/**
	 * @Conditional({Condition}) : 按照一定的条件进行判断,满足条件给容器中注册bean
	 *
	 * 如果系统是windows,给容器中注册("bill")
	 * 如果是linux系统,给容器中注册("linus")
	 */
	@Conditional(LinuxCondition.class)
	@Bean("bill")
	public Person person01(){
		return new Person("Bill Gates",62);
	}

	@Conditional(LinuxCondition.class)
	@Bean("linus")
	public Person person02(){
		return new Person("linus", 48);
	}
需要实现Condition接口,并重写方法来自定义match规则,conditionContext提供了多种方法,方便获取各种信息,也是SpringBoot中 @ConditonalOnXX注解多样扩展的基础。
1.6.0给容器中注册组件;
 * 1)、包扫描+组件标注注解(@Controller/@Service/@Repository/@Component)[自己写的类]
 * 2)、@Bean[导入的第三方包里面的组件]
 * 3)、@Import[快速给容器中导入一个组件]
 * 		1)、@Import(要导入到容器中的组件);容器中就会自动注册这个组件,id默认是全类名
 * 		2)、ImportSelector:返回需要导入的组件的全类名数组;
 * 		3)、ImportBeanDefinitionRegistrar:手动注册bean到容器中
 * 4)、使用Spring提供的 FactoryBean(工厂Bean);
 * 		1)、默认获取到的是工厂bean调用getObject创建的对象
 * 		2)、要获取工厂Bean本身,我们需要给id前面加一个&
 * 			&colorFactoryBean
 */
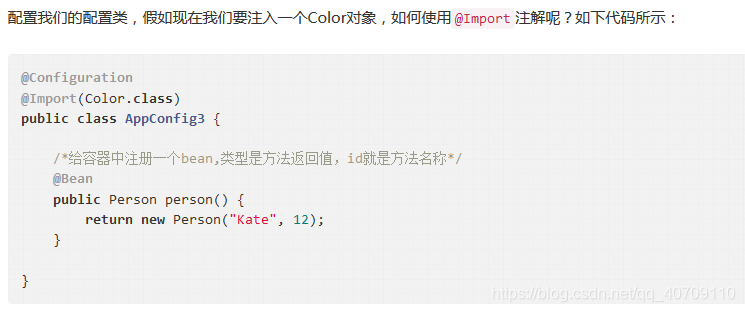
1.6.1@Import导入组件
@Import注解是:通过导入的方式实现把实例加入springIOC容器中
1)@Import(要导入到容器中的组件);容器中就会自动注册这个组件,id默认是全类
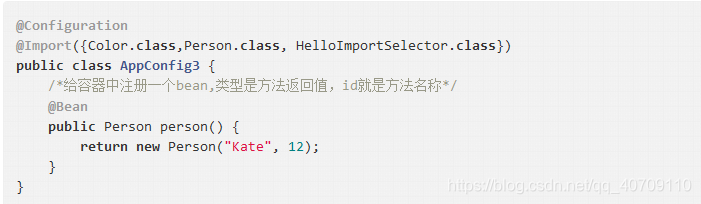
1.6.2使用ImportSelector接口
ImportSelector:返回需要导入的组件的全类名数组
假如现在要给容器注册Red对象,则进行如下操作:
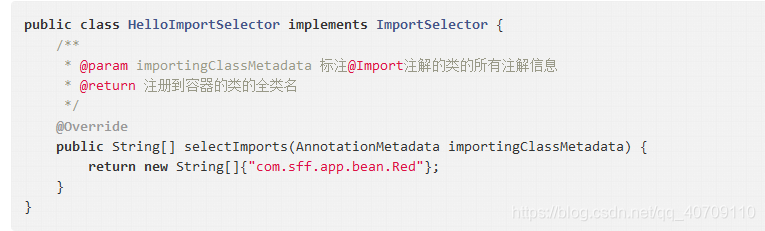
修改配置类
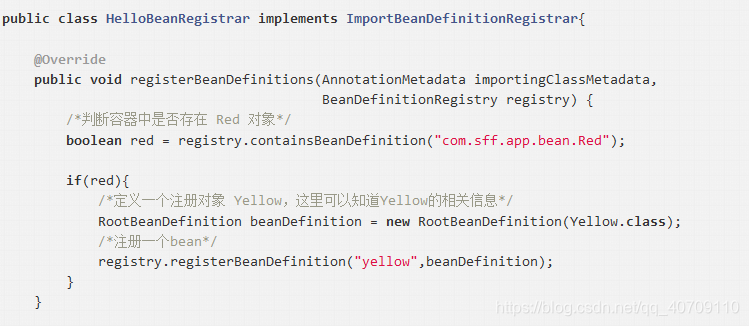
1.6.3 ImportBeanDefinitionRegistrar手动注册bean到容器中
1.6.4使用Spring提供的 FactoryBean(工厂Bean)
Spring中有两种类型的Bean,一种是普通Bean,另一种是工厂Bean,即FactoryBean。工厂Bean跟普通Bean不同,其返回的对象不是指定类的一个实例,其返回的是该工厂Bean的getObject方法所返回的对象。
1、实现工厂bean接口
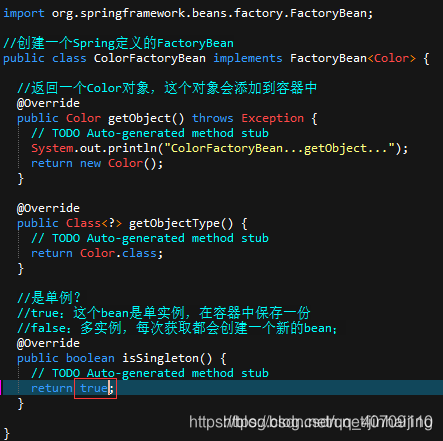
2、配置类配置工厂bean

3、测试
获取bean时,调用的工厂类中的getObject方法。

注:如何拿到工厂bean的本身?
测试类,工厂类id前添加&符号,&在工厂类接口中是定义好的,是一个常亮。

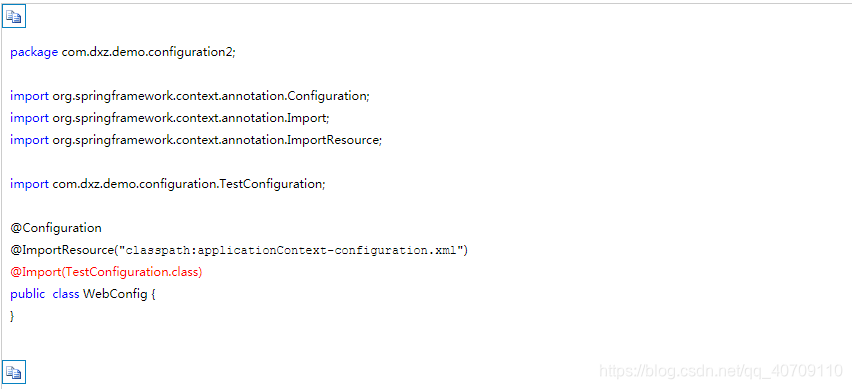
1.6.5@ImportResource和Import引入配置文件
1.在@configuration中引入spring的xml配置文件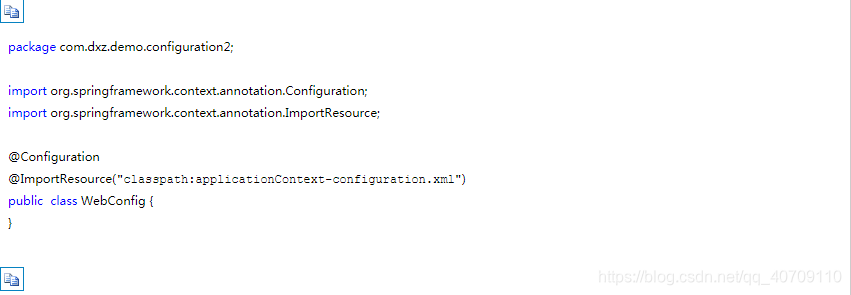
2.在@configuration中引入其他配置文件
二.生命周期
2.1@Bean指定初始化和销毁方法
使用XML方式配置Bean的时候,通过 元素的 init-method/destroy-method属性可以指定初始化之后 、销毁之前调用的操作方法。`
   <bean id="car" class="com.baiding.model.Car" init-method="init" destroy-method="destory">
            <property name="name" value="audi"/>
    </bean>
不过在使用@Bean注解声明bean的时候,也可以做出上述XML配置相同的功能,基本实例如下:
声明一个Java配置类,在配置类中使用@Bean注解声明一个组件
@Configuration
public class LifecycleConfig {

    @Bean(initMethod = "init",destroyMethod = "destory")
    public Car car(){
        return new Car("audi");
    }
只有单例的bean,在容器创建时才会实例化,并执行初始化方法,在容器关闭时执行销毁方法。对于多实例bean,只有在创建bean的时候才会实例化并初始化方法,如果要执行多实例bean的销毁方法,需要我们自己手动去调用。(只需将bean的@Scope设置为prototype,可以看出容器关闭的时候并没有调用销毁方法)。
2.2 InitializingBean 与 DisposableBean
可以让bean实现InitializingBean 接口 定义自身初始化逻辑,实现DisposableBean接口定义销毁逻辑。
    public class Car implements InitializingBean,DisposableBean{
    private String name;

        public Car(String name) {
            this.name = name;
            System.out.println("Car...Constructor ");
        }

        public void destroy() throws Exception {
            System.out.println("car ...DisposableBean... destory");
        }

        public void afterPropertiesSet() throws Exception {
            System.out.println("car...InitializingBean...afterPropertiesSet");
        }
2.3. @PostConstruct 与 @PreDestroy注解
SpringBean 的初始化流程
flowchat
st=>start: 开始
op1=>operation: Spring容器加载1
op2=>operation: 调用构造函数
op3=>operation: @PostConstruct方法调用
op4=>operation: init()调用
op5=>operation: 其他代码
op6=>operation: destroy()调用
op7=>operation: @PreDestroy方法调用
e=>end: 结束
默认情况下,Spring不会意识到@PostConstruct和@PreDestroy注解。要启用它,要么注册“CommonAnnotationBeanPostProcessor”,要么在bean配置文件的<context:annotation-config
/>‘ 指定
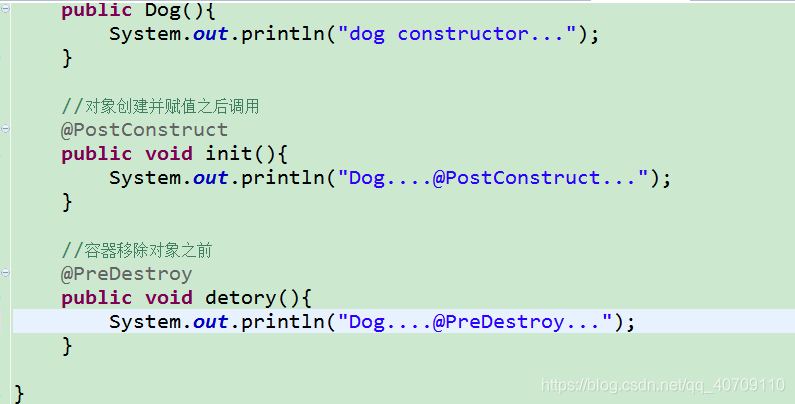
可以看出,@PostConstruct 与 @PreDestroy 这两个注解与上述两种方法功能基本相似,只是在他们同时起作用的时候,执行顺序还是有些规律的。
初始化之后执行: @PostConstruct > InitializingBean > init-method
销毁之前执行:@preDestroy > DisposableBean > destoryMethod
2.4 BeanPostProcessor后置处理器
初始化前调用这个方法:
* BeanPostProcessor.postProcessBeforeInitialization
初始化方法有:
- 1) 通过@Bean指定init-method和destroy-method;
- 2)、通过让Bean实现InitializingBean(定义初始化逻辑),
DisposableBean(定义销毁逻辑); - 3)、可以使用JSR250;
@PostConstruct:在bean创建完成并且属性赋值完成;来执行初始化方法
@PreDestroy:在容器销毁bean之前通知我们进行清理工作
对象创建完成,并赋值好,调用初始化方法。。。
在初始化之后工作BeanPostProcessor.postProcessAfterInitialization - 销毁:
-
单实例:容器关闭的时候 -
多实例:容器不会管理这个bean;容器不会调用销毁方法 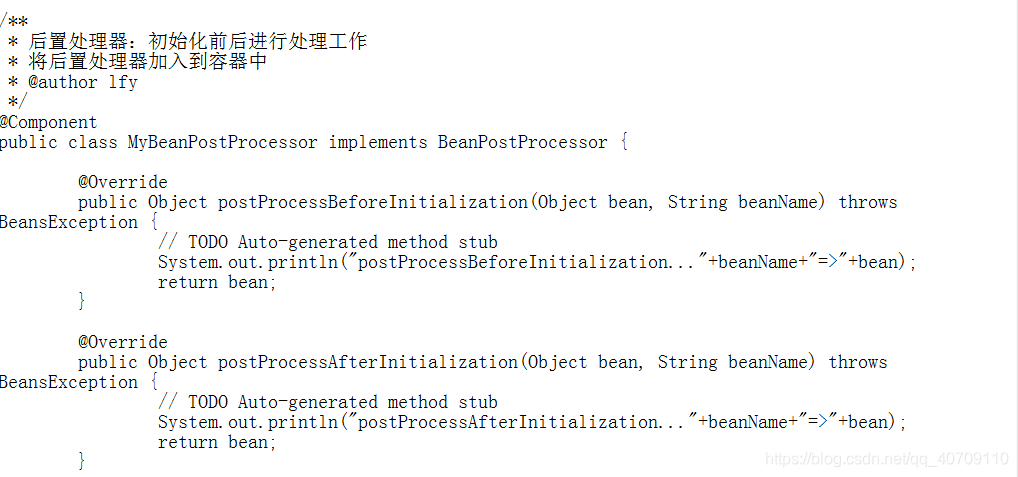
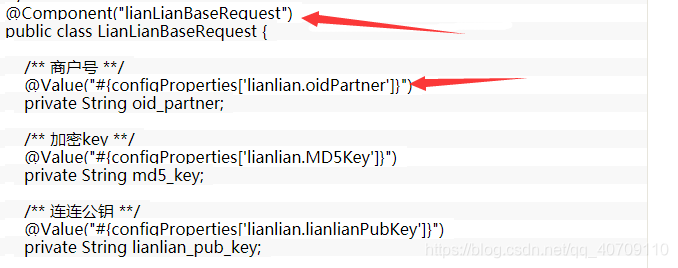
3.0 @Value注解
- @Value("#{configProperties[‘t1.msgname’]}")
或者 - @Value("${t1.msgname}");
Spring 通过注解获取*.porperties文件的内容,除了xml配置外,还可以通过@value方式来获取。
使用方式必须在当前类使用@Component,xml文件内配置的是通过pakage扫描方式,
例如:<context:component-scan base-package=“pakage_name” />加粗样式
属性赋值
3.1 @Propertysource注解
通过@PropertySource注解将properties配置文件中的值存储到Spring的 Environment中,Environment接口提供方法去读取配置文件中的值,参数是properties文件中定义的key值。
用法1- @PropertySource和@Value
@Configuration
@PropertySource("classpath:jdbc.properties")
public class PropertiesWithJavaConfig {

   @Value(${jdbc.driver})
   private String driver;

   @Value(${jdbc.url})
   private String url;

   @Value(${jdbc.username})
   private String username;

   @Value(${jdbc.password})
   private String password;

   //要想使用@Value 用${}占位符注入属性,这个bean是必须的,这个就是占位bean,另一种方式是不用value直接用Envirment变量直接getProperty('key')
   @Bean
   public static PropertySourcesPlaceholderConfigurer propertySourcesPlaceholderConfigurer() {
      return new PropertySourcesPlaceholderConfigurer();
   }
}
用法2- 等同于在xml中配置properties文件
?xml version="1.0" encoding="UTF-8"?>
<beans xmlns="http://www.springframework.org/schema/beans"
   xmlns:xsi="http://www.w3.org/2001/XMLSchema-instance"
   xmlns:context="http://www.springframework.org/schema/context"
   xsi:schemaLocation="
      http://www.springframework.org/schema/beans
      http://www.springframework.org/schema/beans/spring-beans-4.2.xsd
      http://www.springframework.org/schema/context
      http://www.springframework.org/schema/context/spring-context-4.2.xsd">

      <context:property-placeholder location="classpath:jdbc.properties" />

</beans>
用法3- 通过Environment设置
示例1:@PropertySource + Environment
package com.dxz.config;

import org.springframework.beans.factory.annotation.Autowired;
import org.springframework.context.annotation.ComponentScan;
import org.springframework.context.annotation.Configuration;
import org.springframework.context.annotation.PropertySource;
import org.springframework.core.env.Environment;

@Configuration
@ComponentScan(basePackages = "com.dxz.config")
@PropertySource(value = "classpath:spring/config.properties")
public class ServiceConfiguration {

    @Autowired
    Environment environment;

    public ServiceConfiguration() {
        System.out.println("ServiceConfiguration zheli");
    }

    //@Bean
    public javax.sql.DataSource dataSource(){
        String user = this.environment.getProperty("ds.user");
        System.out.println(user);
        return null;
    }
}

@Configuration
@PropertySource("classpath:jdbc.properties")
public class PropertiesWithJavaConfig {

   @Autowired
    private Environment env;

}
在Spring 4中,Spring提供了一个新的注解——@PropertySources,从名字就可以猜测到它是为多配置文件而准备的。
    @PropertySources({

    @PropertySource("classpath:config.properties"),

    @PropertySource("classpath:db.properties")

    })

    public class AppConfig {

        //something

    }
四.自动装配
4.1、@Autowired:自动注入:
     * 		1)、默认优先按照类型去容器中找对应的组件:applicationContext.getBean(BookDao.class);找到就赋值
     * 		2)、如果找到多个相同类型的组件,再将属性的名称作为组件的id去容器中查找
     * 							applicationContext.getBean("bookDao")
     * 		3)、@Qualifier("bookDao"):使用@Qualifier指定需要装配的组件的id,而不是使用属性名
     * 		4)、自动装配默认一定要将属性赋值好,没有就会报错;
     * 			可以使用@Autowired(required=false);
     * 		5)、@Primary:让Spring进行自动装配的时候,默认使用首选的bean;
     * 				也可以继续使用@Qualifier指定需要装配的bean的名字
     * 		BookService{
     * 			@Autowired
     * 			BookDao  bookDao;
     * 		}
@Autowired注解是按照类型(byType)装配依赖对象,默认情况下它要求依赖对象必须存在,如果允许null值,可以设置它的required属性为false。如果我们想使用按照名称(byName)来装配,可以结合@Qualifier注解一起使用。如下:
4.2@Qualifier注解
@Qualifier限定描述符除了能根据名字进行注入,更能进行更细粒度的控制如何选择候选者,具体使用方式如下: 解释得不够通俗易懂哈。
这个作用是:当一个接口有多个实现的时候,为了指名具体调用哪个类的实现。
@Autowired是根据类型进行自动装配的。如果当Spring上下文中存在不止一个UserDao类型的bean时,就会抛出BeanCreationException异常;如果Spring上下文中不存在UserDao类型的bean,也会抛出BeanCreationException异常。我们可以使用@Qualifier配合@Autowired来解决这些问题。如下:
①可能存在多个UserDao实例
   @Autowired
    @Qualifier("userServiceImpl")
    public IUserService userService;
或者
@Autowired
public void setUserDao(@Qualifier("userDao") UserDao userDao) {
    this.userDao = userDao;
}
这样Spring会找到id为userServiceImpl和userDao的bean进行装配。
②可能不存在UserDao实例
@Autowired(required = false)
public IUserService userService
个人总结:
@Autowired//默认按type注入
@Qualifier(“cusInfoService”)//一般作为@Autowired()的修饰用
4.3@Resource注解
@Resource的作用相当于@Autowired,只不过@Autowired按byType自动注入,而@Resource默认按 byName自动注入罢了。@Resource有两个属性是比较重要的,分是name和type,Spring将@Resource注解的name属性解析为bean的名字,而type属性则解析为bean的类型。所以如果使用name属性,则使用byName的自动注入策略,而使用type属性时则使用byType自动注入策略。如果既不指定name也不指定type属性,这时将通过反射机制使用byName自动注入策略。
4.4@Resource注解与@Autowired区别:
使用区别
    @Resource(name="loginService")
    private LoginService loginService;

    @Autowired(required=false)@Qualifier("loginService")
    private LoginService loginService;
(1).@Autowired 与@Resource都可以用来装配bean. 都可以写在字段上,或写在setter方法上;
(2).@Autowired 默认按类型装配,默认情况下必须要求依赖对象必须存在,如果要允许null值,可以设
置它的required属性为false,如:@Autowired(required=false) .
如果我们想使用名称装配可以结合 @Qualifier注解进行使用;
(3).@Resource(这个注解属于J2EE的),默认安装名称进行装配,名称可以通过name属性进行指定,如果没
有指定name属性,当注解写在字段上时,默认取字段名进行安装名称查找,如果注解写在setter方法上默认取属
性名进行装配。当找不到与名称匹配的bean时才按照类型进行装 配。但是需要注意的是,如果name属性一旦指
定,就只会按照名称进行装配。
推荐使用@Resource注解在字段上,这样就不用写setter方法了.并且这个注解是属于J2EE的,减少了与Spring
的耦合,这样代码看起就比较优雅 。
另外,通过实践,还总结出一条规律:
如果将@requied或者@autowired写了set方法之上,则程序会走到set方法内部。
但如果写在了field之上,则不会进入set方法当中。
4.5 spring之Aware接口的相关实现
详细链接:https://blog.csdn.net/boling_cavalry/article/details/81611426
Spring Aware
作用:你的bean将会和spring框架耦合
目的:是为了让bean获取spring容器的服务:
了解spring容器的IOC(依赖注入)的同学应该知道,我们的所有的bean对于spring容器是无意识的,啥叫无意识呢,就是你完全可以把spring容器替换成其他的容器而不需要改变你的代码,并且bean之间也是没有耦合的,既然这样,那问题就来,假如现在我们需要对spring有意识,换句话说就是现在我们的业务可能需要用到spring底层的一些功能那么我们该怎么实现?这个其实优秀的spring框架早就帮我们想到了,那就是spring提供了一系列的xxxAware接口供我们自己来实现使用
public class MyAware implements BeanNameAware,ResourceLoaderAware,ApplicationContextAware,BeanFactoryAware{
    private String beanName;
    private ResourceLoader loader;
    private ApplicationContext applicationContext;
    private BeanFactory beanFactory;
    // BeanFactoryAware中的方法
    public void setBeanFactory(BeanFactory beanFactory) throws BeansException {
        this.beanFactory = beanFactory;
    }
    // ApplicationContextAware中的方法
    public void setApplicationContext(ApplicationContext applicationContext)
            throws BeansException {
        this.applicationContext = applicationContext;
    }
    // ResourceLoaderAware中的方法
    public void setResourceLoader(ResourceLoader resourceLoader) {
        this.loader = resourceLoader;
    }
    public void printResult() throws IOException {
        System.out.println("BeanNameAware Bean的名称是:" + beanName);
        Resource resource = loader.getResource("classpath:test.txt");
        System.out.println("----------------------------------------" );
        System.out.print("ResourceLoaderAware ResourceLoader加载的内容是:");
        String line = null;
        BufferedReader reader = new BufferedReader(new InputStreamReader(
                resource.getInputStream()));
        while ((line = reader.readLine()) != null) {
            System.out.println(line);
        }
        reader.close();
        Environment environment = applicationContext.getEnvironment();
        System.out.println("----------------------------------------" );
        System.out.println("ApplicationContextAware 系统是:" + environment.getProperty("os.name"));
        boolean flow = beanFactory.isSingleton(beanName);
        System.out.println("----------------------------------------" );
        System.out.println("BeanFactoryAware bean【" + beanName+" 】是单例嘛:"+flow);
    }
    // BeanNameAware中的方法
    public void setBeanName(String name) {
        this.beanName = name;
    }
}
4.6@@Profile注解
@profile注解是spring提供的一个用来标明当前运行环境的注解。我们正常开发的过程中经常遇到的问题是,开发环境是一套环境,qa测试是一套环境,线上部署又是一套环境。这样从开发到测试再到部署,会对程序中的配置修改多次,尤其是从qa到上线这个环节,让qa的也不敢保证改了哪个配置之后能不能在线上运行。
为了解决上面的问题,我们一般会使用一种方法,就是配置文件,然后通过不同的环境读取不同的配置文件,从而在不同的场景中跑我们的程序。
那么,spring中的@profile注解的作用就体现在这里。
@Profile注解用于实现通过修改运行时参数,切换不同的开发环境
@Profile注解可以加在类上,也可以加载注入bean的方法上
使用方法:
/**
 * Profile:
 * 		Spring为我们提供的可以根据当前环境,动态的激活和切换一系列组件的功能;
 *
 * 开发环境、测试环境、生产环境;
 * 数据源:(/A)(/B)(/C);
 *
 *
 * @Profile:指定组件在哪个环境的情况下才能被注册到容器中,不指定,任何环境下都能注册这个组件
 *
 * 1)、加了环境标识的bean,只有这个环境被激活的时候才能注册到容器中。默认是default环境
 * 2)、写在配置类上,只有是指定的环境的时候,整个配置类里面的所有配置才能开始生效
 * 3)、没有标注环境标识的bean在,任何环境下都是加载的;
 */

@PropertySource("classpath:/dbconfig.properties")
@Configuration
public class MainConfigOfProfile implements EmbeddedValueResolverAware{

	@Value("${db.user}")
	private String user;

	private StringValueResolver valueResolver;

	private String  driverClass;


	@Bean
	public Yellow yellow(){
		return new Yellow();
	}

	@Profile("test")
	@Bean("testDataSource")
	public DataSource dataSourceTest(@Value("${db.password}")String pwd) throws Exception{
		ComboPooledDataSource dataSource = new ComboPooledDataSource();
		dataSource.setUser(user);
		dataSource.setPassword(pwd);
		dataSource.setJdbcUrl("jdbc:mysql://localhost:3306/test");
		dataSource.setDriverClass(driverClass);
		return dataSource;
	}


	@Profile("dev")
	@Bean("devDataSource")
	public DataSource dataSourceDev(@Value("${db.password}")String pwd) throws Exception{
		ComboPooledDataSource dataSource = new ComboPooledDataSource();
		dataSource.setUser(user);
		dataSource.setPassword(pwd);
		dataSource.setJdbcUrl("jdbc:mysql://localhost:3306/ssm_crud");
		dataSource.setDriverClass(driverClass);
		return dataSource;
	}

	@Profile("prod")
	@Bean("prodDataSource")
	public DataSource dataSourceProd(@Value("${db.password}")String pwd) throws Exception{
		ComboPooledDataSource dataSource = new ComboPooledDataSource();
		dataSource.setUser(user);
		dataSource.setPassword(pwd);
		dataSource.setJdbcUrl("jdbc:mysql://localhost:3306/scw_0515");

		dataSource.setDriverClass(driverClass);
		return dataSource;
	}

	@Override
	public void setEmbeddedValueResolver(StringValueResolver resolver) {
		// TODO Auto-generated method stub
		this.valueResolver = resolver;
		driverClass = valueResolver.resolveStringValue("${db.driverClass}");
	}
public class IOCTest_Profile {

	 //1、使用命令行动态参数: 在虚拟机参数位置加载 **-Dspring.profiles.active=test**
	//2、代码的方式激活某种环境;
	@Test
	public void test01(){
		AnnotationConfigApplicationContext applicationContext =
				new AnnotationConfigApplicationContext();
		//1、创建一个applicationContext
		//2、设置需要激活的环境
		applicationContext.getEnvironment().setActiveProfiles("dev");
		//3、注册主配置类
		applicationContext.register(MainConfigOfProfile.class);
		//4、启动刷新容器
		applicationContext.refresh();


		String[] namesForType = applicationContext.getBeanNamesForType(DataSource.class);
		for (String string : namesForType) {
			System.out.println(string);
		}

		Yellow bean = applicationContext.getBean(Yellow.class);
		System.out.println(bean);
		applicationContext.close();
	}
