概念简述:
Redux = Reducer+Flux
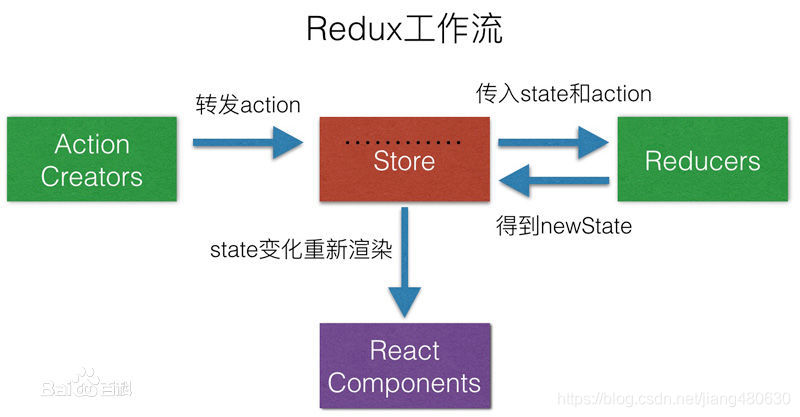
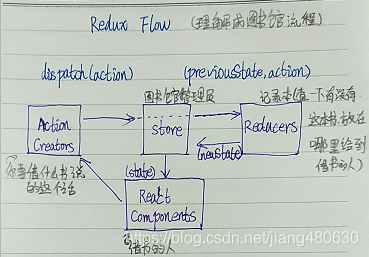
Redux工作流程:
简单demo演示:
1、安装:
yarn add redux
2、创建store
store/index.js
import { createStore } from 'redux';//引入方法
import reducers from './reducers';//引入reducers作为createStore的第一个参数,传给store
const store = createStore(
    reducers,
    window.__REDUX_DEVTOOLS_EXTENSION__ && window.__REDUX_DEVTOOLS_EXTENSION__()//第二个参数用来调试redux
)
export default store;
store/reducers.js
//reducers首先返回的是一个函数,这个函数接收两个参数,state是存放整个store仓库存储的数据,state = defalutState这里设置了默认的值
const defalutState = {
    inputValue: '123',
    list: [1, 2]
}

export default (state = defalutState, action) => {
    // input内容发生改变显示改变后的内容
    if(action.type === 'change_input_value'){
        const newState = JSON.parse(JSON.stringify(state))
        newState.inputValue = action.value;
        return newState
    }
    //点击提交添加list
    if(action.type === 'add_list_value'){
       const newState = JSON.parse(JSON.stringify(state));
       newState.list.push(newState.inputValue);
       newState.inputValue = '';
       return newState
    }
    console.log(state, action);
    return state;
}
演示组件
item.jsx
import React, { Component } from 'react';
import { Input, Button, List } from 'antd';
import store from '../store'

class Item extends Component {
    constructor(props) {
        super(props);
        this.state = store.getState();
        console.log(store.getState())
        store.subscribe(this.handleStoreChange)//改变input页面上显示的内容		订阅store
    }

    // 监听input
    handleInputChange = (e) => {
        console.log(e.target.value);
        const action = {
            type: 'change_input_value',
            value: e.target.value
        }
        store.dispatch(action)//调用dispatch并传入action
    }

    // 监听store改变,改变input框内的内容
    handleStoreChange = () => {
        console.log('store改变了')
        this.setState(store.getState())
    }
    // 点击提交
    handleBtnClick = () => {
        const action = {
            type: 'add_list_value'
        }
        store.dispatch(action)
    }

    // 删除选中
    handleListDele = (index) => {
        console.log(index);
        const list = this.state.list;
        list.splice(index, 1)
        this.setState({
            list: list
        })
    }

    render() {
        return (
            <div>
                <Input
                    style={{ width: '300px' }}
                    value={this.state.inputValue}
                    onChange={this.handleInputChange}
                />
                <Button
                    type="primary"
                    style={{ marginTop: '10px' }}
                    onClick={this.handleBtnClick}
                >提交</Button>
                <List
                    style={{ width: '360px', marginTop: '10px' }}
                    bordered
                    dataSource={this.state.list}
                    renderItem={(item, index) => (
                        <List.Item
                            key={item}
                            onClick={this.handleListDele.bind(this, index)}
                        >
                            {item}
                        </List.Item>
                    )}
                />
            </div>
        )
    }
}
export default Item;
index.jsx根组件
import React from 'react';
import ReactDOM from 'react-dom';
import './index.css';
import Item from './components/item'
import * as serviceWorker from './serviceWorker';
import 'antd/dist/antd.css';

ReactDOM.render(
    <Item />,
    document.getElementById('root'));

serviceWorker.unregister();
这就实现了一个简单redux的demo。
巴拉巴拉主页传送门~~
