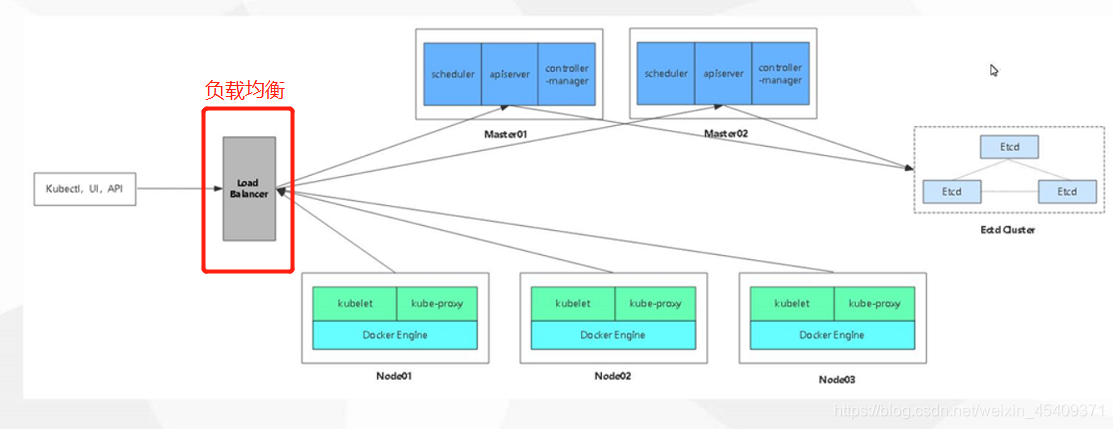
基于之前部署好的多 Master 集群架构的基础上,部署两台调度器服务器(这边我用的是 nginx),实现负载均衡:
再次重申一下环境:
| 角色 | IP地址 |
|---|---|
| master01 | 192.168.100.110 |
| master02 | 192.168.100.109 |
| 调度器1(nginx01) | 192.168.100.113 |
| 调度器2(nginx02) | 192.168. 100.233 |
| node01节点 | 192.168.100.111 |
| node02节点 | 192.168.100.112 |
| 虚拟 ip | 192.168.100.100 |
准备好两个以下脚本:
第一个:keepalived.conf

! Configuration File for keepalived

global_defs {
   # 接收邮件地址
   notification_email {
     acassen@firewall.loc
     failover@firewall.loc
     sysadmin@firewall.loc
   }
   # 邮件发送地址
   notification_email_from Alexandre.Cassen@firewall.loc
   smtp_server 127.0.0.1
   smtp_connect_timeout 30
   router_id NGINX_MASTER
}

vrrp_script check_nginx {
    script "/usr/local/nginx/sbin/check_nginx.sh"
}

vrrp_instance VI_1 {
    state MASTER
    interface eth0
    virtual_router_id 51 # VRRP 路由 ID实例,每个实例是唯一的
    priority 100    # 优先级,备服务器设置 90
    advert_int 1    # 指定VRRP 心跳包通告间隔时间,默认1秒
    authentication {
        auth_type PASS
        auth_pass 1111
    }
    virtual_ipaddress {
        10.0.0.188/24
    }
    track_script {
        check_nginx
    }
}


mkdir /usr/local/nginx/sbin/ -p
vim /usr/local/nginx/sbin/check_nginx.sh

count=$(ps -ef |grep nginx |egrep -cv "grep|$$")

if [ "$count" -eq 0 ];then
    /etc/init.d/keepalived stop
fi


chmod +x /usr/local/nginx/sbin/check_nginx.sh


第二个:nginx

cat > /etc/yum.repos.d/nginx.repo << EOF
[nginx]
name=nginx repo
baseurl=http://nginx.org/packages/centos/7/$basearch/
gpgcheck=0
EOF


stream {

   log_format  main  '$remote_addr $upstream_addr - [$time_local] $status $upstream_bytes_sent';
    access_log  /var/log/nginx/k8s-access.log  main;

    upstream k8s-apiserver {
        server 10.0.0.3:6443;
        server 10.0.0.8:6443;
    }
    server {
                listen 6443;
                proxy_pass k8s-apiserver;
    }
    }
————配置开始:
//首先关闭防火墙:
[root@localhost ~]# systemctl stop firewalld.service
[root@localhost ~]# setenforce 0

//将这个脚本文件放进家目录中:
[root@localhost ~]# ls
anaconda-ks.cfg  initial-setup-ks.cfg  keepalived.conf  nginx.sh  公共  模板  视频  图片  文档  下载  音乐  桌面


//建立本地yum仓库:
[root@localhost ~]# vim /etc/yum.repos.d/nginx.repo
[nginx]
name=nginx repo
baseurl=http://nginx.org/packages/centos/7/$basearch/
gpgcheck=0

[root@localhost ~]# yum list
[root@localhost ~]# yum install nginx -y   //下载nginx

//接下来是添加四层转发:
[root@localhost ~]# vim /etc/nginx/nginx.conf
添加以下模块:
stream {

   log_format  main  '$remote_addr $upstream_addr - [$time_local] $status $upstream_bytes_sent';
    access_log  /var/log/nginx/k8s-access.log  main;

    upstream k8s-apiserver {
        server 192.168.100.110:6443;    //master01的IP地址
        server 192.168.100.109:6443;    //master02的IP地址
    }
    server {
                listen 6443;
                proxy_pass k8s-apiserver;
    }
    }


[root@localhost ~]# systemctl start nginx     //开启服务

//接下来是部署 keepalived服务:
[root@localhost ~]# yum install keepalived -y

//修改配置文件(nginx01是master):
[root@localhost ~]# cp keepalived.conf /etc/keepalived/keepalived.conf
cp:是否覆盖"/etc/keepalived/keepalived.conf"? yes
[root@localhost ~]# vim /etc/keepalived/keepalived.conf
//做如下删改:
! Configuration File for keepalived

global_defs {
   # 接收邮件地址
   notification_email {
     acassen@firewall.loc
     failover@firewall.loc
     sysadmin@firewall.loc
   }
   # 邮件发送地址
   notification_email_from Alexandre.Cassen@firewall.loc
   smtp_server 127.0.0.1
   smtp_connect_timeout 30
   router_id NGINX_MASTER
}

vrrp_script check_nginx {
    script "/etc/nginx/check_nginx.sh"   ##检测脚本的路径,稍后会创建
}

vrrp_instance VI_1 {
    state MASTER
    interface ens33
    virtual_router_id 51
    priority 100     ##优先级
    advert_int 1
    authentication {
        auth_type PASS
        auth_pass 1111
    }
    virtual_ipaddress {
        192.168.100.100/24      ##虚拟IP地址
    }
    track_script {
        check_nginx
    }
}

//nginx02(是backup),配置如下:

! Configuration File for keepalived

global_defs {
   # 接收邮件地址
   notification_email {
     acassen@firewall.loc
     failover@firewall.loc
     sysadmin@firewall.loc
   }
   # 邮件发送地址
   notification_email_from Alexandre.Cassen@firewall.loc
   smtp_server 127.0.0.1
   smtp_connect_timeout 30
   router_id NGINX_MASTER
}

vrrp_script check_nginx {
    script "/etc/nginx/check_nginx.sh"   ##检测脚本的路径,稍后会创建
}

vrrp_instance VI_1 {
    state BACKUP
    interface ens33
    virtual_router_id 51
    priority 90     ##优先级低于master
    advert_int 1
    authentication {
        auth_type PASS
        auth_pass 1111
    }
    virtual_ipaddress {
        192.168.100.100/24      ##虚拟IP地址
    }
    track_script {
        check_nginx
    }
}

//创建检测脚本
[root@localhost ~]# vim /etc/nginx/check_nginx.sh
count=$(ps -ef |grep nginx |egrep -cv "grep|$$")

if [ "$count" -eq 0 ];then
    systemctl stop keepalived
fi


[root@localhost ~]# chmod +x /etc/nginx/check_nginx.sh   //授权
[root@localhost ~]# systemctl start keepalived.service   //开启服务
[root@localhost ~]# ip a   //查看ip地址
1、此时 虚拟ip在 nginx01 上,验证地址漂移,可以在 lb01 中使用 pkill nginx 停止nginx服务,再在 lb02 上使用 ip a 命令查看地址是否进行了漂移。
2、恢复,此时,在 nginx02上,我们先启动 nginx服务,再启动 keepalived服务,再用 ip a命令查看,地址又漂移回来了,而 nginx02上没有虚拟ip。
验证二:验证负载均衡是否实现
1、修改nginx01(master)的首页内容:
[root@localhost ~]# vim /usr/share/nginx/html/index.html
<h1>Welcome to master nginx!</h1>
2、修改nginx02(backup)的首页内容:
[root@localhost ~]# vim /usr/share/nginx/html/index.html
<h1>Welcome to backup nginx!</h1>
3、用浏览器访问:http://192.168.100.100/
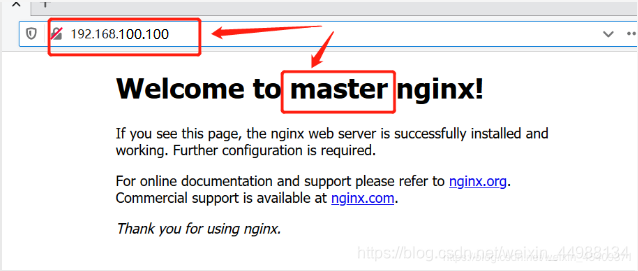
此时,负载均衡和高可用功能都已经完全实现了!!!
———— 接下来开始部署 node节点:
//开始修改 node节点配置文件统一的 VIP(bootstrap.kubeconfig,kubelet.kubeconfig)
修改内容:server: https://192.168.195.100:6443(都改成vip)
[root@localhost cfg]# vim /opt/kubernetes/cfg/bootstrap.kubeconfig
[root@localhost cfg]# vim /opt/kubernetes/cfg/kubelet.kubeconfig
[root@localhost cfg]# vim /opt/kubernetes/cfg/kube-proxy.kubeconfig
//重启服务:
[root@localhost cfg]# systemctl restart kubelet.service
[root@localhost cfg]# systemctl restart kube-proxy.service
//检查修改内容:
[root@localhost cfg]# grep 100 *
bootstrap.kubeconfig: server: https://192.168.100.100:6443
kubelet.kubeconfig: server: https://192.168.100.100:6443
kube-proxy.kubeconfig: server: https://192.168.100.100:6443
//接下来在 调度器1 上查看 nginx的k8s日志:
[root@localhost ~]# tail /var/log/nginx/k8s-access.log
192.168.220.140 192.168.100.110:6443 - [09/Feb/2020:13:14:45 +0800] 200 1122
192.168.220.140 192.168.100.109:6443 - [09/Feb/2020:13:14:45 +0800] 200 1121
192.168.220.136 192.168.100.110:6443 - [09/Feb/2020:13:18:14 +0800] 200 1120
192.168.220.136 192.168.100.109:6443 - [09/Feb/2020:13:18:14 +0800] 200 1121
可以看出是以轮询调度的算法,将请求流量分发给两台master
———— 接下来是测试创建 Pod:
在 master01 上操作:
[root@localhost kubeconfig]# kubectl run nginx --image=nginx
//查看状态:
[root@localhost kubeconfig]# kubectl get pods
NAME READY STATUS RESTARTS AGE
nginx-dbddb74b8-zbhhr 1/1 Running 0 47s
此时已经创建完成,正在运行中
*** 注意日志问题 ***:
[root@localhost kubeconfig]# kubectl logs nginx-dbddb74b8-zbhhr
Error from server (Forbidden): Forbidden (user=system:anonymous, verb=get, resource=nodes, subresource=proxy) ( pods/log nginx-dbddb74b8-zbhhr)
此时,由于权限问题查看日志,会出现报错
解决办法(提升权限):
[root@localhost kubeconfig]# kubectl create clusterrolebinding cluster-system-anonymous --clusterrole=cluster-admin --user=system:anonymous
clusterrolebinding.rbac.authorization.k8s.io/cluster-system-anonymous created
此时,再次查看日志,就不会出现报错:
//查看 Pod网络:
[root@localhost kubeconfig]# kubectl get pods -o wide
NAME READY STATUS RESTARTS AGE IP NODE NOMINATED NODE
nginx-dbddb74b8-zbhhr 1/1 Running 0 7m11s 172.17.25.2 192.168.220.140 <none>
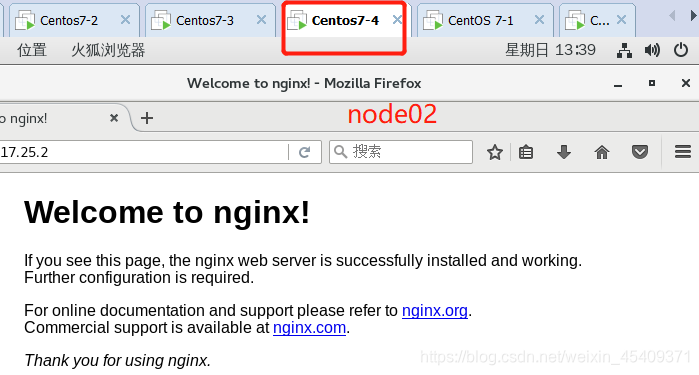
可以看出,这个在master01上创建的pod被分配到了node01上了。
我们可以在对应网络的 node节点上操作就可以直接访问:
在node01上操作:
[root@localhost cfg]# curl 172.17.25.2
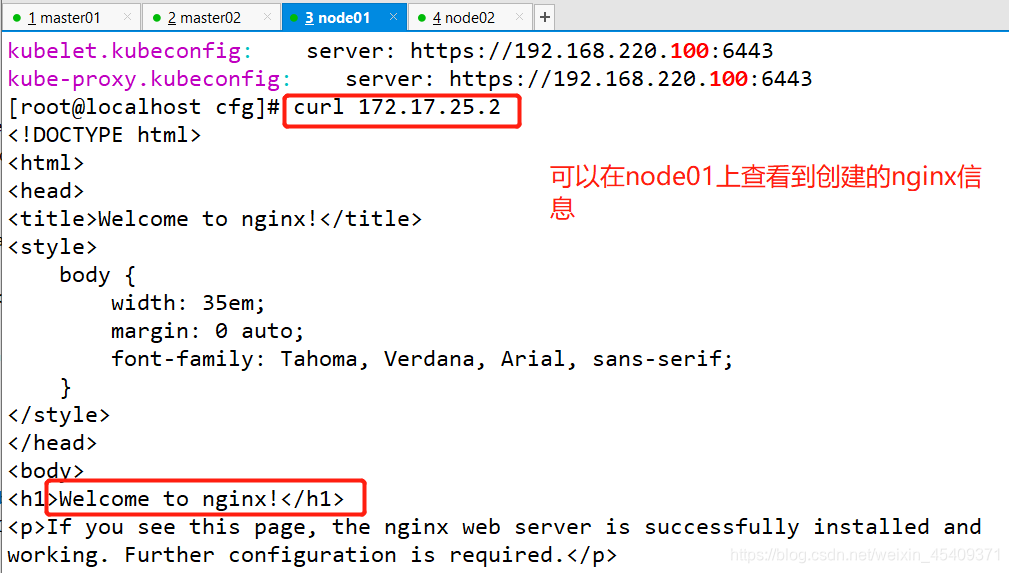
此时,由于 flannel网络组件的作用下,都可以在node01和node02的浏览器上访问这个地址:172.17.25.2

由于刚刚访问了网页,我们也可以在 master01上查看到日志信息:

