原项目资源地址: https://www.html5tricks.com/js-passwd-generator.html
codepen地址: https://codepen.io/deuscx/pen/YzPoEPp
演示:
要点
复制图标跟随鼠标移动,并且复制进剪贴板。
    <div class="result">
        <div class="result__title field-title">生成的密码</div>
        <div class="result__info right">点击复制</div>
        <div class="result__info left">复制</div>
        <div class="result__viewbox" id="result">点击生成</div>
        <button id="copy-btn" style="--x: 0; --y: 0"><i class="far fa-copy"></i></button>
    </div>
// Button to copy the text 复制按钮
const copyBtn = document.getElementById("copy-btn");
// Result viewbox container 密码视图容器
const resultContainer = document.querySelector(".result");
// Update Css Props of the COPY button
// Getting the bounds of the result viewbox container
//得到密码框的大小及其相对于视口的位置
let resultContainerBound = {
left: resultContainer.getBoundingClientRect().left,
top: resultContainer.getBoundingClientRect().top,
};
// 监听mousemove事件,设置图标的 --x --y属性
resultContainer.addEventListener("mousemove", e => {
copyBtn.style.setProperty("--x", `${e.x - resultContainerBound.left}px`);
copyBtn.style.setProperty("--y", `${e.y - resultContainerBound.top}px`);
/*
设置图标相对于 resultContainer的相对距离
position: absolute;
top: var(--y);
left: var(--x);
*/
});
window.addEventListener("resize", e => {
resultContainerBound = {
left: resultContainer.getBoundingClientRect().left,
top: resultContainer.getBoundingClientRect().top,
};
});
// 复制密码到剪贴板
copyBtn.addEventListener("click", () => {
const textarea = document.createElement("textarea");
const password = resultEl.innerText;//得到密码
if (!password || password == "CLICK GENERATE") {
return;
}
textarea.value = password;
document.body.appendChild(textarea);
textarea.select();
document.execCommand("copy");
textarea.remove();
copyInfo.style.transform = "translateY(200%)";
copyInfo.style.opacity = "0";
copiedInfo.style.transform = "translateY(0%)";
copiedInfo.style.opacity = "0.75";
});getBoundingClientRect
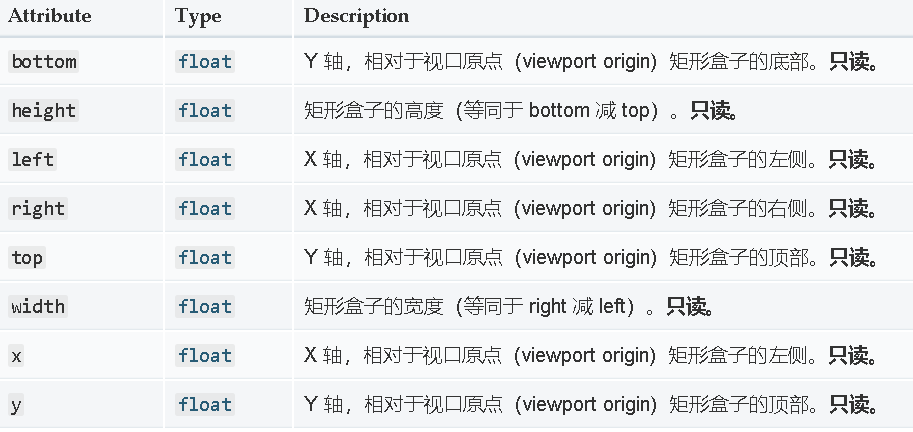
Element.getBoundingClientRect()方法返回元素的大小及其相对于视口的位置。
返回值是一个 DOMRect 对象,这个对象是由该元素的 getClientRects() 方法返回的一组矩形的集合
MouseEvent
MouseEvent 接口指用户与指针设备( 如鼠标 )交互时发生的事件。
复制到剪贴板
textarea.select(); -> 选取textarea中的文本
document.execCommand("copy");
当一个HTML文档切换到设计模式时,document暴露 execCommand 方法,该方法允许运行命令来操纵可编辑内容区域 contenteditable 的元素。
bool = document.execCommand(aCommandName, aShowDefaultUI, aValueArgument)参数:
aCommandName
一个 DOMString ,命令的名称。可用命令列表请参阅 命令 。
aShowDefaultUI
一个 Boolean, 是否展示用户界面,一般为 false。Mozilla 没有实现。
aValueArgument
一些命令(例如insertImage)需要额外的参数(insertImage需要提供插入image的url),默认为null。
slider
<div class="length range__slider" data-min="4" data-max="32">
<div class="length__title field-title" data-length='0'>长度:</div>
    <input id="slider" type="range" min="4" max="32" value="16" />
</div>input中type:
如果未指定此属性,则采用的默认类型为 text
range:HTML5 用于输入不精确值控件。如果未指定相应的属性,控件使用如下缺省值:
min:0max:100value:min+ (max-min)/2,或当max小于min 时使用minstep:1
// Range Slider Properties.
// Fill : The trailing color that you see when you drag the slider.
// background : Default Range Slider Background
const sliderProps = {
    fill: "#0B1EDF",
    background: "rgba(255, 255, 255, 0.214)",
};

// Selecting the Range Slider container which will effect the LENGTH property of the password.
const slider = document.querySelector(".range__slider");

// Text which will show the value of the range slider.
const sliderValue = document.querySelector(".length__title");

// Using Event Listener to apply the fill and also change the value of the text.
slider.querySelector("input").addEventListener("input", event => {
    sliderValue.setAttribute("data-length", event.target.value);
    applyFill(event.target);
});
// Selecting the range input and passing it in the applyFill func.
applyFill(slider.querySelector("input"));
// This function is responsible to create the trailing color and setting the fill. 更改滑动条的颜色
function applyFill(slider) {
    const percentage = (100 * (slider.value - slider.min)) / (slider.max - slider.min);
    const bg = `linear-gradient(90deg, ${sliderProps.fill} ${percentage}%, ${sliderProps.background} ${percentage +
        0.1}%)`;
    slider.style.background = bg;
    sliderValue.setAttribute("data-length", slider.value);
}
input事件和change事件
input事件:当一个 <input>, <select>, 或 <textarea> 元素的 value 被修改时,会触发 input 事件。
change事件被<input>, <select>, 和<textarea> 元素触发, 当用户提交对元素值的更改时。与 input 事件不同,change 事件不一定会对元素值的每次更改触发。
事件触发取决于表单元素的类型(type)和用户对标签的操作:
- 当元素被
:checked时(通过点击或者使用键盘):和; - 当用户完成提交动作时(例如:点击了
select中的一个选项,从标签选择了一个日期,通过标签上传了一个文件,等); - 当标签的值被修改并且失焦后,但并未进行提交(例如:对
<textarea>或者<input type="text">的值进行编辑后。)。
event.target 和event.currentTarget
Event 接口的只读属性 currentTarget 表示的,标识是当事件沿着 DOM 触发时事件的当前目标。它总是指向事件绑定的元素。而 Event.target 则是触发事件的对象 (某个DOM元素) 的引用。
target可以用于事件委托:
// Make a list
var ul = document.createElement('ul');
document.body.appendChild(ul);

var li1 = document.createElement('li');
var li2 = document.createElement('li');
ul.appendChild(li1);
ul.appendChild(li2);

function hide(e){
  // e.target 引用着 <li> 元素
  // 不像 e.currentTarget 引用着其父级的 <ul> 元素.
  /*
  // 支持 IE6-8
  var target = e.target || e.srcElement;
  */
  e.target.style.visibility = 'hidden';
}

// 添加监听事件到列表,当每个 <li> 被点击的时候都会触发。
ul.addEventListener('click', hide, false);
::-webkit-slider-thumb
这是type为range的input标签内的一种伪类样式,用于设置range的滑块的具体样式,该伪类只在内核为webkit/blink的浏览器中有效
该伪类需要配和::-webkit-slider-runnable-track使用,否则会没有效果.......

input[type=range]::-webkit-slider-thumb{
    -webkit-appearance: none; /*清除默认样式*/
    height:7vw;/*设置滑块高度*/
    width:5vw;/*设置滑块宽度*/
    background:#000;/*设置背景色*/
    border-radius:10vw 10vw;/*加个圆角边*/
    margin-top:-1vw;/*使用position的话会导致滑块不滑动,但是绑定的value是改变的,所以这里使用margin-top去做定位*/
}

/*滑块轨道样式*/
input[type=range]::-webkit-slider-runnable-track{
    border-radius: 30px;
    background:#128;
    height:15px;
}

input[type=range]{
     -webkit-appearance: none; /*清除默认样式 必须*/
    /**...样式*/
}
Setting
    <div class="settings">
        <span class="settings__title field-title">settings</span>
        <div class="setting">
            <input type="checkbox" id="uppercase" checked />
            <label for="uppercase">包含大写</label>
        </div>
        <div class="setting">
            <input type="checkbox" id="lowercase" checked />
            <label for="lowercase">包含小写</label>
        </div>
        <div class="setting">
            <input type="checkbox" id="number" checked />
            <label for="number">包括数字</label>
        </div>
        <div class="setting">
            <input type="checkbox" id="symbol" />
            <label for="symbol">包括符号</label>
        </div>
    </div>
在此按钮中利用的是label的 ::before 和 ::after 两个伪类来实现开关样式。
/*::before  是开关容器
:: after 是开关的圆形点*/
.settings .setting input + label::before, .settings .setting input + label::after {
  content: "";
  position: absolute;
  transition: 150ms cubic-bezier(0.24, 0, 0.5, 1);
  transform: translateY(-50%);
  top: 50%;
  right: 10px;
  cursor: pointer;
}
/*设置初始样式*/
.settings .setting input + label::before {
  height: 30px;
  width: 50px;
  border-radius: 30px;
  background: rgba(214, 214, 214, 0.434);
}
.settings .setting input + label::after {
  height: 24px;
  width: 24px;
  border-radius: 60px;
  right: 32px;
  background: #fff;
}

/*设置开关checked的样式
通过更改容器的background
以及开关圆点的偏移距离来达到偏移
*/
.settings .setting input:checked + label:before {
  background: #5d68e2;
  transition: all 150ms cubic-bezier(0, 0, 0, 0.1);
}
.settings .setting input:checked + label:after {
  right: 14px;
}
.settings .setting input:focus + label:before {
  box-shadow: 0 0 0 2px rgba(255, 255, 255, 0.75);
  /*box-shadow: h-shadow v-shadow blur模糊距离 spread阴影尺寸 color inset;
    */
}
生成密码
// Checkboxes representing the options that is responsible to create differnt type of password based on user 获得设置元素
const uppercaseEl = document.getElementById("uppercase");
const lowercaseEl = document.getElementById("lowercase");
const numberEl = document.getElementById("number");
const symbolEl = document.getElementById("symbol");

// Button to generate the password
const generateBtn = document.getElementById("generate");

// When Generate is clicked Password id generated.
generateBtn.addEventListener("click", () => {
    const length = +lengthEl.value; //将字符串转换为Number

    //checked为Boolean类型
    const hasLower = lowercaseEl.checked;
    const hasUpper = uppercaseEl.checked;
    const hasNumber = numberEl.checked;
    const hasSymbol = symbolEl.checked;
    resultEl.innerText = generatePassword(length, hasLower, hasUpper, hasNumber, hasSymbol);

    //显示复制提示
    copyInfo.style.transform = "translateY(0%)";
    copyInfo.style.opacity = "0.75";
    copiedInfo.style.transform = "translateY(200%)";
    copiedInfo.style.opacity = "0";
});

// Function responsible to generate password and then returning it.
function generatePassword(length, lower, upper, number, symbol) {
    let generatedPassword = "";
    //计算出一共有多少个条件 eg:  true+true = 2
    const typesCount = lower + upper + number + symbol;

    const typesArr = [{ lower }, { upper }, { number }, { symbol }].filter(item => Object.values(item)[0]);
    if (typesCount === 0) {
        return "";
    }
    for (let i = 0; i < length; i++) {
        typesArr.forEach(type => {
            const funcName = Object.keys(type)[0];
            generatedPassword += randomFunc[funcName]();
        });
    }
    return generatedPassword.slice(0, length);
}

// Object of all the function names that we will use to create random letters of password
const randomFunc = {
    lower: getRandomLower,
    upper: getRandomUpper,
    number: getRandomNumber,
    symbol: getRandomSymbol,
};
// Generator Functions
// All the functions that are responsible to return a random value taht we will use to create password.
function getRandomLower() {
    return String.fromCharCode(Math.floor(Math.random() * 26) + 97);
}
function getRandomUpper() {
    return String.fromCharCode(Math.floor(Math.random() * 26) + 65);
}
function getRandomNumber() {
    return String.fromCharCode(Math.floor(Math.random() * 10) + 48);
}
function getRandomSymbol() {
    const symbols = '~!@#$%^&*()_+{}":?><;.,';
    return symbols[Math.floor(Math.random() * symbols.length)];
}Object.values()方法返回一个给定对象自身的所有可枚举属性值的数组,值的顺序与使用for...in循环的顺序相同 ( 区别在于 for-in 循环枚举原型链中的属性 )。
Object.keys()方法会返回一个由一个给定对象的自身可枚举属性组成的数组,数组中属性名的排列顺序和使用 for...in 循环遍历该对象时返回的顺序一致 。
String.fromCharCode 静态 String.fromCharCode() 方法返回由指定的UTF-16代码单元序列创建的字符串。
大写字母: 65 ~ 90
小写字母: 97 ~ 122
数字: 48 ~ 57