1.前置增强
前置增强用@Before注解标识,例如:
@Before("execution(public int mul(int,int))")
	public void before(JoinPoint joinPoint) {
		Object target = joinPoint.getTarget();
		Object[] params = joinPoint.getArgs();
		String methodName = joinPoint.getSignature().getName();
		System.out.println(target.getClass().getName()+":The "+methodName+" method begins.");
		System.out.println(target.getClass().getName()+":Parameters of the "+methodName+" method: ["+params[0]+","+params[1]+"]");
		System.out.println("before");
	}
其结果特征就是前置增强方法先于目标方法执行结束:

“---->1”是目标函数执行的结果
2.后置增强
后置增强以@After注解标识
例如:
@After("execution(public int mul(..))")
	public void after(JoinPoint joinPoint) {

		Object target = joinPoint.getTarget();
		String name = joinPoint.getSignature().getName();
		System.out.println(target.getClass().getName()+" :the "+name+" ends");
		System.out.println("after");
	}
其结果特征是后置增强方法在目标方法后执行:

红线下面那两行是后置增强方法执行的结果
3.返回增强
返回增强以@AfterReturning注解为标识
例如:
@AfterReturning(value="execution(public int mul(int,int))",returning="re")
	public void afterReturning(JoinPoint joinPoint,int re) {
		Object target = joinPoint.getTarget();
		System.out.println(target.getClass().getName()+"返回增强"+" 结果 "+re);
	}
其中的returning="re"是规定把返回值传递给public void afterReturning(JoinPoint joinPoint,int re)中的re.
结果特征为:
结果特征为:返回增强并不一定执行,当目标函数抛出异常时它不会执行
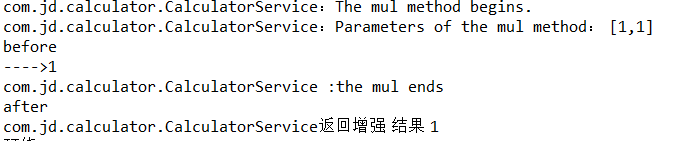
从上图可以发现,当目标函数不抛出异常时执行顺序为:前置增强—>目标函数----->后置增强------>返回增强
当目标函数抛出异常时如下:前置增强—>目标函数----->后置增强

上图最后一行是接下来要说的异常增强
4异常增强
异常增强以@AfterThrowing注解为标识
例如:
@AfterThrowing(value="execution(public int mul(int,int))",throwing="e")
	public void afterThrowing(JoinPoint joinPoint,Exception e) {
		Object target = joinPoint.getTarget();
		System.out.println(target.getClass().getName()+"出现异常:"+e.getMessage());
	}
使用这个增强时有如下注意事项:
(1.)目标函数要抛出异常,并且抛出的异常是public void afterThrowing(JoinPoint joinPoint,Exception e)中规定捕获的异常的子类,或者是同样的异常,这里可以用数学中的交集理解:
(2.)当目标函数不抛出异常时,可以执行返回增强,此时异常增强不执行;当目标函数抛出异常时,返回增强不执行,异常增强可以执行。故二者不会同时执行
总之:执行顺序为 前置增强----->目标函数------->后置增强-------->返回增强跟异常增强二选一
5.环绕增强
该增强以@Around注解为标识,在环绕增强中可以实现上述四种增强
例如:
@Around("execution(public int *(..))")
	public Object around(ProceedingJoinPoint jp) {//ProceedingJoinPoint是JoinPoint的子类
		Object target = jp.getTarget();
		Object[] params = jp.getArgs();
		String methodName = jp.getSignature().getName();
		Object result = null;
		try {
			try {
				//前置增强
				System.out.println(target.getClass().getName()+":The "+methodName+" method begins.");
				System.out.println(target.getClass().getName()+":Parameters of the "+methodName+" method: ["+params[0]+","+params[1]+"]");
				System.out.println("before");
				result = jp.proceed();
			} finally {
				//后置增强
				System.out.println(target.getClass().getName()+" :the "+methodName+" ends");
				System.out.println("after");
			}
			//返回增强
			System.out.println(target.getClass().getName()+"返回增强"+" 结果 "+result);
		} catch (Throwable e) {
			//异常增强
			System.out.println(target.getClass().getName()+"出现异常:"+e.getMessage());
			e.printStackTrace();
		}
		System.out.println("环绕+"+result);
		return result;
	}
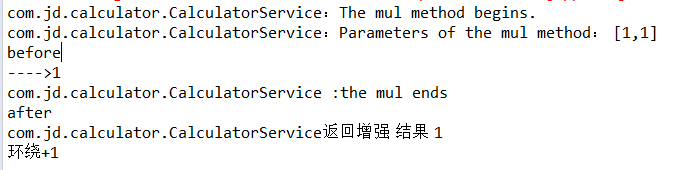
当目标函数不抛出异常时:结果如下
当目标函数抛出异常时:结果如下

打个比方:环绕增强可以看作是蛋壳,目标函数看作是蛋壳里的内容物。
